
Challenge - Import a CAD Model with PiXYZ Plugin
Tutorial
Beginner
+10XP
30 mins
(8)
Unity Technologies
Building on the previous tutorial, this tutorial walks us through the PiXYZ Plugin again. However, you will import a house model rather than the PiXYZ stock asset.
Resources
Languages available:
1. Overview
Building on the previous tutorial, this Challenge walks us through the PiXYZ Plugin again. However, you will import a house model rather than the PiXYZ stock asset.
The process reviewed in this Challenge is standard for all CAD models. Check here for a full list of supported file formats.
2. What WIll You Do?
To do so, you’ll need to:
- Create a new Unity project on your desktop.
- Import PiXYZ plugin (you should be properly licensed after completing the PiXYZ Streaming).
- Download and import the provided CAD model or one of your own.
3. Create a new Unity Project
On your desktop create a new Unity Project so that you can import a CAD model
- Open Unity Hub on your desktop (review Unity on Desktop if you have not already downloaded Unity)
- Click the New button to create a new project
- Give it a name, save location, and choose a version (Unity 2018.4 is the version used in this Challenge)
- Click Create
4. Import PiXYZ
To import a CAD model in Unity import the PiXYZ Plugin package you downloaded in the Sandbox
(Hint: Use the Import Package button (Assets > Import Package))
- Download the PiXYZ plugin if you haven’t already (see the previous tutorial for details)
- Click Asset > Import Package and select the PiXYZ Plugin Package (or drag it directly into the Project Window
- When prompted to in the Import Window, click All, then Import
Tip - Check PiXYZ Compatibility
After the installation step of the Plugin, you’ll notice that PiXYZ has a new dropdown menu at the toolbar above the Unity Editor. Within that menu, there is a tool called “Check Compatibility.” Use this tool to make sure your version of PiXYZ is compatible with your current version of Unity. We recommend using Unity version 2017.4 or newer.
5. Import a CAD Model
Use the PiXYZ drop down to import the CAD model (available from the Tutorial Materials tab above) from your computer into Unity.
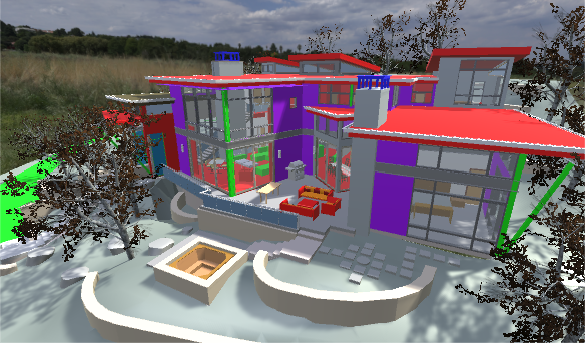
1. Download the Revit model from the folder and unzip the file so we can bring it into Unity with the PiXYZ Plugin. You will use the Residence Rosa Parks .ifc model made in Revit.
2. Use PiXYZ>Import CAD and then select the Genesis CAD model that you’ve downloaded
3. When prompted select the ResidenceRosaParks.ifc (or any other model you have) Then click Import.
4. For the best results with the PiXYZ plugin use the following settings. Each is visited in a dropdown below.
5. Explore and polish the model by adding new Materials. Download house materials, tree models, and furniture models from the Asset Store. Try using the PiXYZ Rule Engine to replace out multiple Materials and models at once
(Note: You should not have a preset file (above the cursor) in your import window. This was taken from our import settings exercise.)
6. Key Takeaways
You have now successfully imported a CAD model into Unity using the PiXYZ Plugin.
By completing this module, you’re now able bring CAD models into your Unity application, and view them using VR.
- Import and setup your Unity environment to include the PiXYZ Plugin
- Prepare and import a CAD model.
- Modify the polygonal model in Unity.