
Changing Textures and Color Tints in Substance Painter
Tutorial
intermediate
+10XP
20m
(21)
Unity Technologies
Substance Painter is a 3D texturing software that allows you to create a realistic model using procedurally based materials. Substance Painter allows you to create and modify Textures, adjust colors, and add surface roughness for Assets that can be used in the Unity Editor.
Languages available:
1. Changing Textures and Color Tints in Substance Painter
This tutorial has been verified using Unity 2019 LTS, Substance Painter v2021.1.0(7.1.0) and Live Link Substance Painter - Unity v3.
Substance Painter is a 3D texturing software that allows you to create a realistic model using procedurally-based materials. With Substance Painter, you can create and modify Textures, adjust colors, and add surface roughness for Assets that can be used in the Unity Editor.
Currently, the Substance live link package will only work with Unity’s built-in renderer. The link package is no longer included with the Substance plugin on the Asset store. It can still be downloaded at: https://share.substance3d.com/libraries/3088
The steps provided here show you how to load a model into Substance Painter and apply different techniques to create a surface Texture (Figure 01).
2. Importing a Model into Substance Painter
To import a model:
1. Open Substance Painter and have it running.
2. Using the Live Link Substance Painter - Unity plugin, send the model from Unity to Substance Painter for texturing by right-clicking on the Asset in the Hierarchy window and selecting Send to Substance Painter. Changes you make to the model in Substance Painter will show up automatically in the Unity Editor (Figure 02).
3. For more information on how to use the Live Link plugin refer to the Unity DCC Live Link with Substance Painter tutorial.
3. Using Substance Painter
Substance Painter has similar navigation controls as Autodesk Maya. This is useful if you’re familiar with the hotkeys and mouse controls in Maya’s viewport.
Tip: When you press a modifier key, you will see the shortcut keys and mouse controls in an overlay (Figure 03).
4. Texture Resolution and Baking
In Substance Painter, setting a Texture’s resolution and baking the textures only requires a couple of steps.
1. Set the Texture size in the Texture Set settings panel. While this can be changed later, it’s a good idea to set this early so you will not have to fix any texture scaling errors or issues that may occur. (Figure 04).
2. Bake the Textures before texturing, painting, or applying Materials. For more information on baking settings, see Baking Texture Maps in Substance Painter (Figure 05).
While the Texture is baking, a window displays the progress. When baking is complete, click OK.
5. Creating a Base Fill Layer
Similar to paint programs like Photoshop, Substance Painter works in layers. Layers allow you to apply Textures to a model by layering multiple elements. You can rearrange the order of the layers to match your design. The highest layer in the list is the topmost layer on the object.
Substance Painter has a default empty layer, Layer 1. This layer covers the entire model and adds basic color information to every Texture channel.
1. Open the Layers Panel by selecting the Layers tab (Figure 06).
2. To ensure that there will be no empty areas or missing information, fill Layer 1 with color:
- Select Add Effect, which is the left-most button at the top of the Layer panel.
- Select Add Fill to fill the layer with color (Figure 07). Alternatively, you can right-click on the layer in the Layers panel and select Add Fill.
6. Modifying the Fill
To change the fill settings, select Fill under Layer 1, then apply changes in the Properties panel (Figure 08).
7. Creating New Layers
To add a new layer, select Add a Layer in the Layers panel (Figure 09).
Another way to create a new layer is to drag and drop Materials or Smart Materials onto the Layers panel. This creates new Layers filled with these Materials. You can also create a new Layer by dragging and dropping Materials or smart Materials onto the model.
8. Creating Layer Groups
To create a Layer Group (a folder that can contain multiple layers for organizational purposes), select Add Group at the top of the Layer panel (Figure 10). You can place multiple fill Materials in the folder to add variations to Materials.
9. Creating Masks
You can combine masks to give an imperfect or worn-in look. To create a mask, select Mask at the top of the Layer panel (Figure 11).
The mask options are:
- Add white mask: This shows everything.
- Add black mask: This shows nothing.
- Add bitmap mask: This adds a bitmap file as a mask.
- Add mask with color selection: This allows you to pick a specific color to mask.
- Add mask with height combination: This uses a comparison operation on a channel (normally Height) to mask how layers are compared.
10. Smart Materials
Smart Materials are mainly composed of multiple layers with generated masks (Figure 12).
To see the construction of a Smart Material, add one to the Layers panel, then view each layer to see how they are combined.
You can also modify Smart Materials and save your own custom versions (Figure 13).
11. Painting
You can simply use a brush to paint with color, but if you’d prefer more artistic styles, Substance Painter has Textures you can use for painting.
To discover these different Textures, explore the options in the Shelf panel.
To adjust brush options, use the Properties panel (Figure 14).
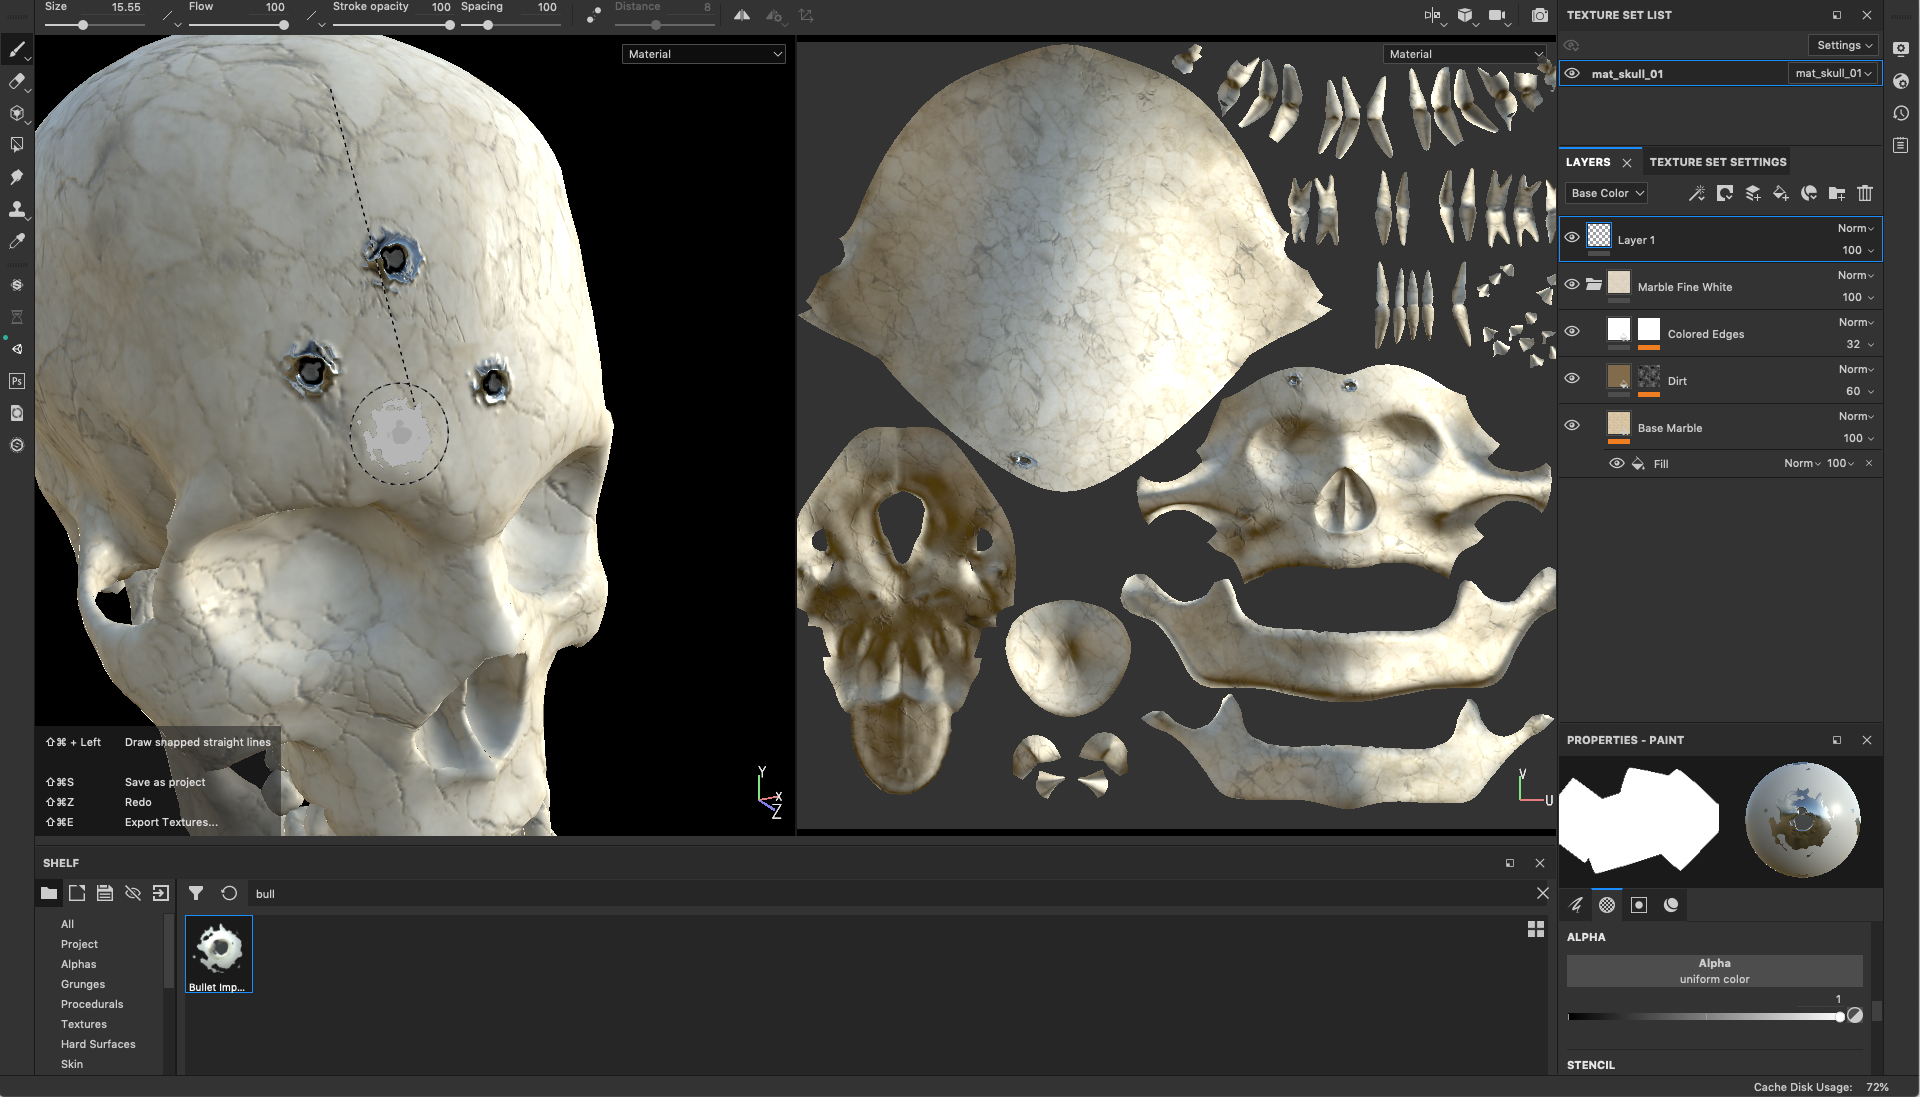
Create a unique look by painting different Textures on the Asset (Figure 15).
12. Returning to Unity
Before we can send the Textures back to Unity, we need to change some export settings for Substance Painter.
1. Go to the File drop-down and select Export Textures.
2. In the new window, go to the Output Templates tab.
3. Select the preset for Unity Universal Render Pipeline (Metallic Standard), then right-click and duplicate it (Figure 16).
4. Rename the new export setting Unity 5 (Standard Metallic). This is necessary so the live link can send the Textures back to Unity.
5. Close the Export Textures window and press the Unity button on your left toolbar (Figure 17).
You can now save your Substance scene. The next time you send this FBX from Unity, it will attempt to open this saved scene first so you can continue to refine your Textures.
In Unity, you should see a new folder in your Project view called SP_Textures. This will contain another folder with your FBX’s name. That folder will contain the new Textures (Figure 18).
The first time you return to Unity, you will have to place these Textures into the Material on your FBX. After that, the Textures will automatically refresh every time you press the Send to Unity button in Substance Painter (Figure 19).
13. Conclusion
Substance Painter provides the tools for painting and adding texture to a model. Explore these tools to create new variations that fit the style of your project.