
Configuring HDRP Settings: Recommended Practices - 2019.1
Tutorial
intermediate
+10XP
15 mins
(40)
Unity Technologies
When using HDRP for your project, there are recommended practices and settings to help you create more realistic lighting in your projects.
Languages available:
1. Configuring HDRP Settings: Recommended Practices
This tutorial has been verified using Unity 2019.4 LTS
When using HDRP for your project, there are recommended practices and settings, in addition to those included with the HDRP template’s sample Scene, to help you create more realistic lighting in your projects
2. Setting up the Scene Volume Profile
The Scene Volume component helps define an area that the Volumetric Fog, Screen Space Reflections, etc. will affect. This area can be a finite space, defined by a collider, or affect the entire Scene globally.
To create the Scene Volume:
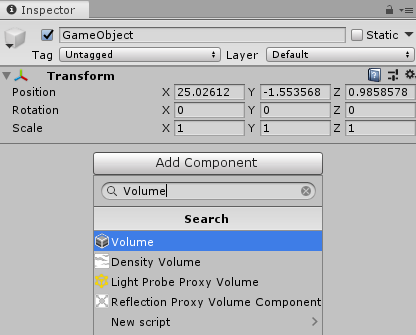
1. Add an empty GameObject to the Scene.
2. Click the GameObject and add a Volume component (Figure 01).
3. Once the Volume is added, click New next to the Profile, then click Add Override
(Figure 02).
4. Add Visual Environment. Enable and set the Sky type to HDRI Sky. (Figure 03).
5. Add Exposure and set the Fixed Exposure to 5. Post-Processing>Tonemapping and set the type to ACES (Figure 04).
3. Recommended Settings for HDRP
Along with the recommended Volume overrides for your project, there are some recommended settings for lighting. If you have a high-end GPU and lots of VRAM, it’s better to use the GPU Lightmapper. If you are on a lower-end machine, such as a laptop, it’s better to use the CPU Lightmapper.
1. Open your Lighting Window by navigating to the Window drop-down menu and clicking Rendering > Lighting Settings. This will open the Lighting window where we can adjust the settings for our back end (Figure 05).
2. Enable Baked Global Illumination in Mixed Lighting. (Figure 06)
3. Set the Lighting Mode to Shadowmask.
4. Under Lightmapping Settings, set the Light Mapper to Progressive CPU.
5. Ensure Prioritize View and Multiple Importance Sampling is enabled.
6. Set the Direct Samples to 32 and Indirect Samples and Environment Samples to 100.
7. Set Bounces to 3.
8. Set the Filtering to Advanced with the Direct, Indirect, and Ambient Denoisers to Optix and the Direct, Indirect, Ambient Occlusion Filters to None. (Activate the Ambient Occlusion option to enable all the filters and denoising options.)
9. Set the Lightmap Resolution to 20 texels per unit, Lightmap Padding to 2 texels, and the Lightmap size to 1024.
10. Ensure Compress Lightmaps is disabled.
11. Enable Ambient Occlusion and set the Max Distance to 1, with the Indirect Contribution to 1.
For recommended GPU Settings: (Figure 07)
1. Set the Lighting Mode to Baked Indirect.
2. Change the Direct Samples to 32.
3. Change the Indirect Samples to 500.
4. Set the Lightmap Resolution to 40 texels per units.
4. Conclusion
Now that you have the basic recommended settings for your HDRP project, you’re one step closer to simulating realistic lighting. Use what you’ve learned as a foundation for bringing your projects a new level of visual fidelity.