
Configuring Light Probes
Tutorial
Beginner
+10XP
10m
(32)
Unity Technologies
Light Probes are used to provide high-quality lighting on moving objects in your Scene. Light Probes allow you to have Baked lighting — such as Emissive Materials and Area lights to illuminate moving objects passing through the area. It really helps make Scenes more dynamic and cohesive. In this tutorial, you will learn to place and use light probes.
Languages available:
1. Configuring Light Probes
This tutorial has been verified using Unity 2019 LTS
Light Probes add high-quality lighting effects to moving objects. They allow you to use Baked lighting — such as Emissive Materials and Area Lights — to illuminate objects passing through your Scene.
2. Uses of Light Probes
Light Probes store information about light hitting surfaces in your Scene and provide a way to capture and use that information.
There are two primary uses of Light Probes:
- To add high-quality light, including indirect bounced light, to moving objects.
- To provide lighting information for static scenery when that scenery is using Unity’s Level of Detail (LOD) system.
Regardless of how you’re using Light Probes, most of the techniques remain the same. It’s important to understand how Light Probes work so you can choose where to place them.
Probe lighting is fairly inexpensive at run time and quick to precompute; however, to maximize performance, you have to take some care when placing the probes. Even if the dense grid arrangements are quicker to set up, many of the probes won't be sampling much variance.
It’s better and more efficient to place probes around areas where there’s a pronounced change in lighting — this might include areas where there’s a transition from light into shadow.
3. Placing Light Probes
Let’s begin placing Light Probes.
- Create a Light Probe Group by going to the GameObject drop-down and selecting
Light > Light Probe Group. - This will place a Light Probe Group within the Scene. Select it.
- In the Inspector Panel that appears when you select the Probe Group, choose Edit Light Probes (Figure 01).
The Light Probe Group has the following properties:
- Edit Light Probes: Allows you to modify the Light Probes within the Group.
- Show Wireframe: Shows the magenta wireframe of the Volume being created.
- Selected Probe Position: When selecting a probe, its transform coordinates will appear here.
- Add Probe: Adds a Light Probe to the Group.
- Delete Selected: Deletes the selected Light Probe.
- Select All: Selects all the Light Probes in the Group.
- Duplicate Selected: Creates a duplicate of the selected Light Probe.
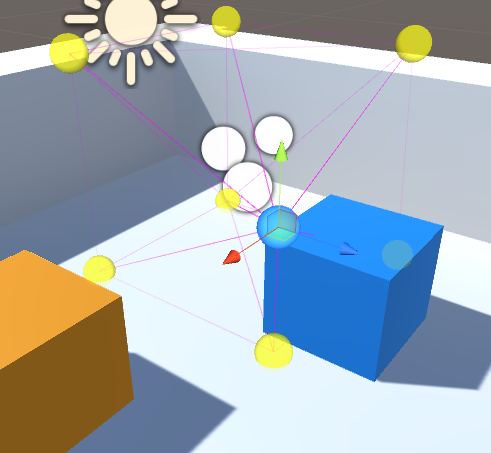
Now you can select the Light Probes themselves in the Scene view and position them in the Scene (Figure 02).
Note: A Light Probe only works on items that fall within its volume, which is indicated by the magenta lines connecting to each of the probes. Anything that falls outside the volume won’t be included in the Light Probe.
4. Determining Where to Use Light Probes
When you’re trying to figure out which objects would benefit from Light Probes, look for: areas of shadow, places where moving objects pass through Baked lighting, a strong change in the color of the terrain Material, or intense color fading. Remember that your aim is to sample indirect or bounced lighting throughout your Scene.
You can split your Light Probes into multiple groups; all the groups will be merged and combined at run time, along with a pass to remove any overlapping probes. Use your best judgement on how you want to organize your Light Probes; limiting them to one group or spreading them out over multiple groups ultimately doesn’t make a difference.
5. Seeing Light Probes in Action
To see your Light Probes lit according to their environment, make sure the lighting is computed. Unless you have Auto Mode enabled in the Lighting Window, you’ll have to generate the lighting manually.
1. Open the Lighting window by going to the Window drop-down and selecting Rendering > Lighting Settings. This will open the Lighting Window (Figure 03).
2. Click Generate Lighting to light the Scene with your Light Probes.
3. Once the light generation process is completed, you’ll notice the Light Probes you previously set up are applied to the non-static GameObject in the Scene.
6. Conclusion
Light Probes help bring lighting from Emissive Materials, Area Lights, or any Baked lighting onto non-static GameObjects to better match the Scene lighting. They help make your project more dynamic and cohesive.