Create a character inventory
Tutorial
·
Beginner
·
+10XP
·
20 mins
·
(84)
Unity Technologies
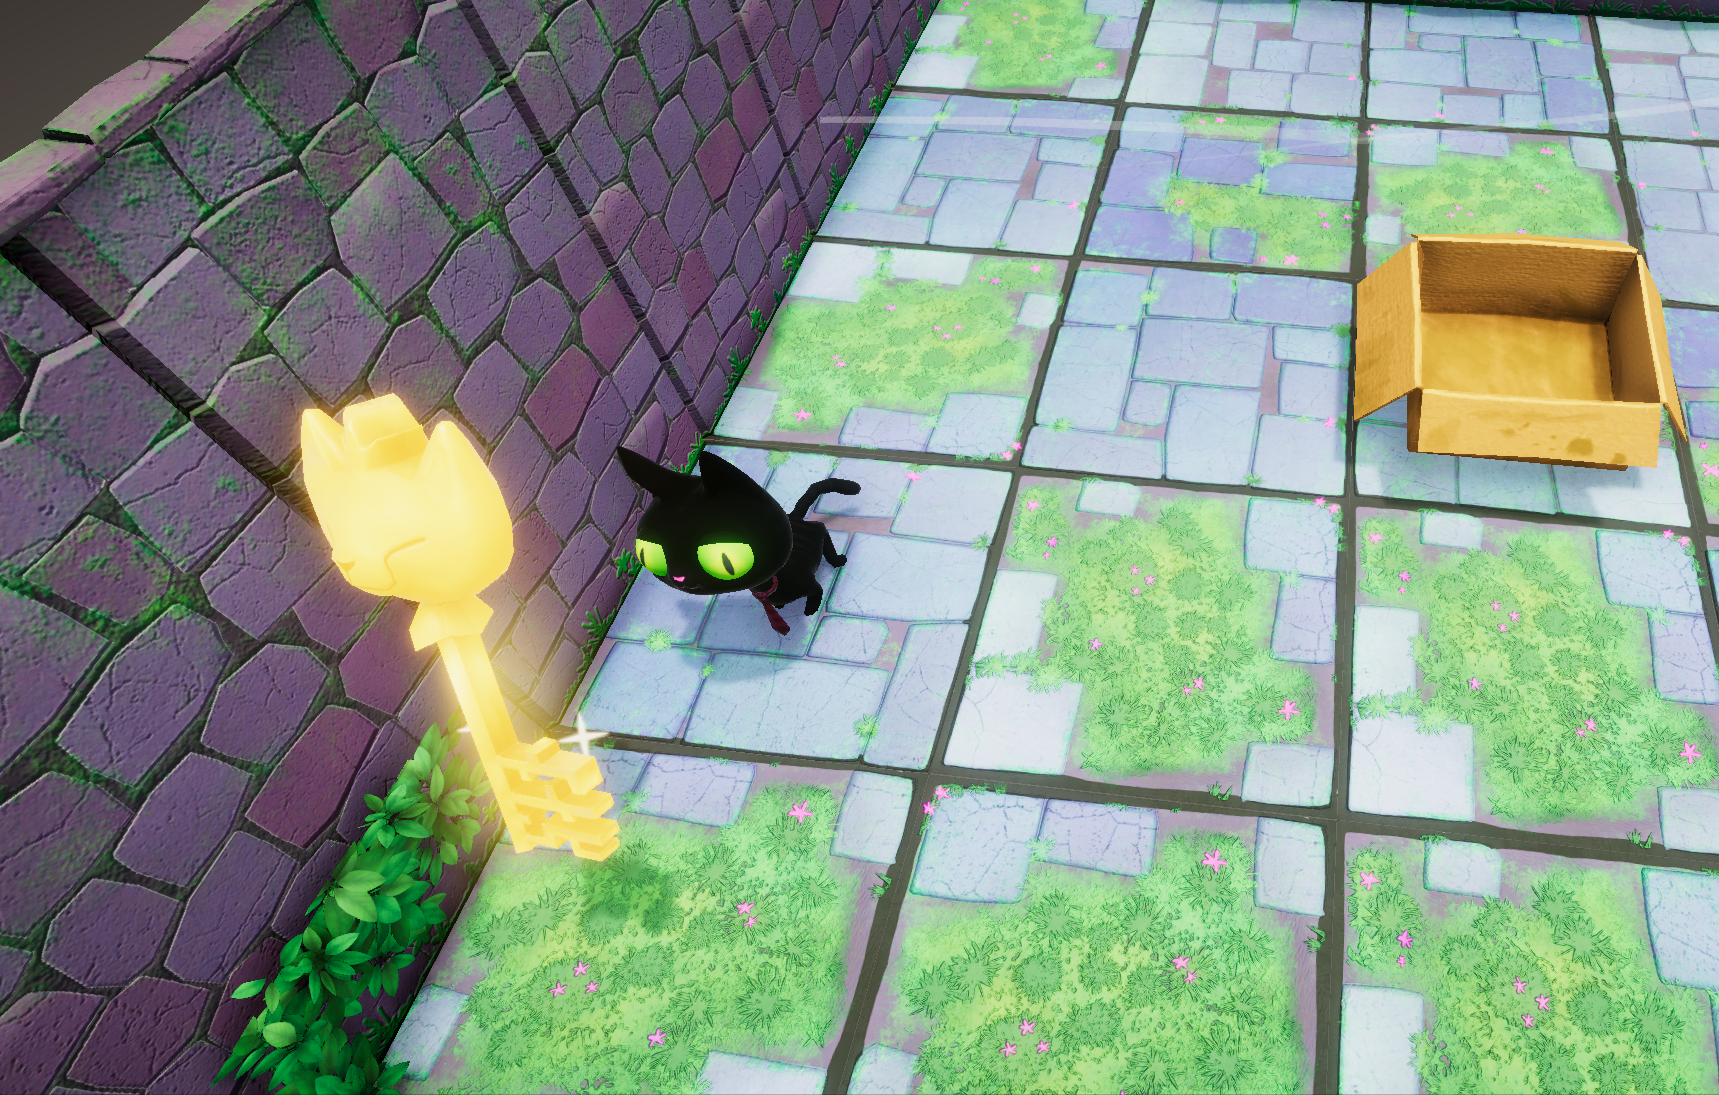
A common game mechanic is the player inventory: tools, weapons, powers, health, and other items that the player can gain or lose during play. In this tutorial, you will use visual scripting to create Clive’s inventory. In our case, Clive will need a key to unlock a door.
By the end of this tutorial, you’ll be able to:
- Create a player inventory using the List object type in a visual script.
- Create Scene variables for a visual script.
- Remove a GameObject from a Scene in a visual script.
- Given a desired result, code an appropriate visual script.
Languages available:
1. Overview
We’ll continue mapping out gameplay logic with a new task: Clive will “carry” a key to the door in order to open it. You'll use visual scripting variables to give Clive an inventory of items in his possession, and then search that inventory when he tries to open the door to make sure he has the key.
You’ll be able to use this technique to let characters in your own games carry tools and weapons, gain health or take damage, or score points.
2. Get the key
Let’s give Clive a challenge: require him to have a key to unlock the door.
There is a shiny gold key in the first room of this level. Let’s make Clive pick up this key and unlock the door — the door won’t open unless Clive has the key.
Here is the information you will need to write this visual script:
- You’ll add a new Script Machine component to the object ObjectRoot > Key in the Hierarchy. Then, add a new visual script in the graph section of the Script Machine component and name it “KeyScript”.
- The events that get triggered for different actions in the game can be found in the fuzzy finder, under Events/Tutorial.
- To simulate the action of Clive having objects in his possession, give him an inventory of items using a Scene variable so that any GameObject’s script can easily access this information. (Hint: with this inventory, Clive will be able to pick up other items later, if you’d like.)
- Since you might want to add more items to Clive’s inventory later, you’ll use a different object type for the Scene variable: a List, which can contain as many values as you want in one variable. This list will be a List of Strings, and it will store the names of items that Clive collects. Let’s call the Scene variable "Inventory", and name the key "CatKey".
- To add an item to the list, use the Add List Item node.
- When Clive enters the cell where the Key GameObject is, it will be added to his inventory and then disappear. To make the Key GameObject disappear, use the Component: Destroy (Obj) node. This node, by default, destroys the component it is in, which is the Script Machine — but that is not what you want! Instead, add a This node to specify that you want to destroy the Key GameObject.
Given all the information above, can you script this key yourself? We dare you to try it on your own. Check your work using the image in the next step as needed. Be sure to save your work with Ctrl+S (macOS: Cmd+S).
Enter Play mode to test your visual script. Before you make Clive enter the cell with the Key, open the Scene Variables object in the Hierarchy and look at the Inventory variable. After Clive enters the cell, the Inventory variable will contain a list of one string, “CatKey”. The key should disappear, and the string “CatKey” should appear in the Scene variable you have created.
When you are successful, mark the next step complete. If you get stuck, you can follow the instructions and the screen image in the next step.
3. Get the key (instructions)
Here are step-by-step instructions for scripting the key:
1. Select ObjectRoot > Key.
2. Add a Script Machine to the Key GameObject. Then, add a new visual script in the Script
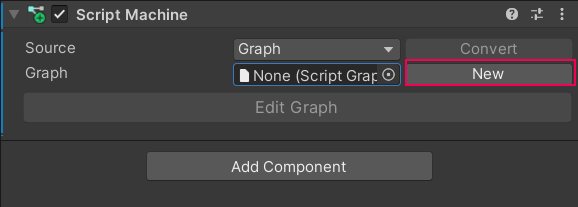
Machine component using the ‘New’ button in front of the Graph variable and name the visual script “KeyScript”. Be sure to save it to the VisualScripts folder to stay organized.
3. Begin the flow with the event Enter Cell, because this script will run when Clive enters the cell that Key GameObject is on.
4. Create a Scene variable named “Inventory”, with the object Type set to List of String. (Tip: The easiest way to do this is to search “list of string” in the Type menu.) Do not specify a Value.
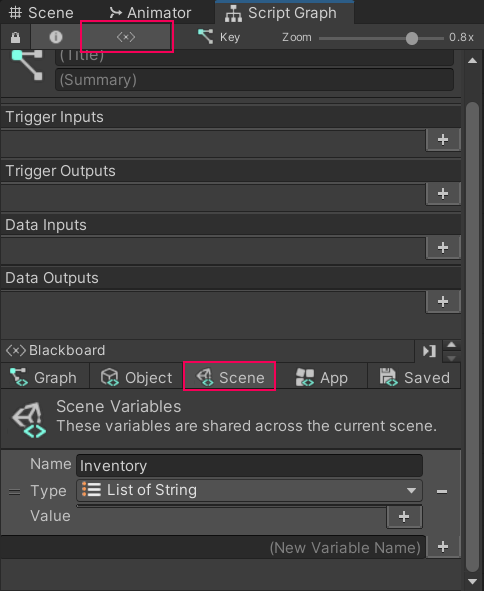
5. Create an Object variable named “KeyName”, with its Type set to String and write its Value as “CatKey”. This will be the string you look for later to open the door.
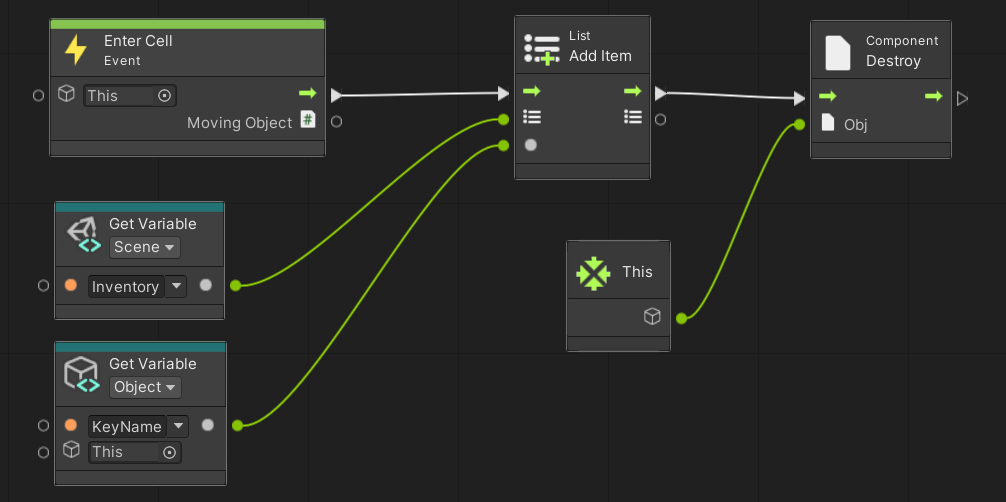
6. Add an Add List Item node in the “KeyScript” graph. Connect the flow to it from the Enter Cell event.
7. Add Get Variable nodes for the Inventory(list) scene variable and the KeyName object variable and connect these as inputs to Add List Item.
8. To make the Key GameObject disappear once Clive has it, add a Component: Destroy (Obj) node. Connect the flow to it from the Add List Item node output.
9. Add a This node to represent the Key GameObject and make this the input to the Component: Destroy (Obj) node.
10. Press Ctrl+S (macOS: Cmd+S) to save your work.
Your Graph should look like the image below.
4. Open the door with a key
Now let’s open the door. All you have to do is add a new condition that checks if “CatKey” is in the Inventory, and if so, change IsOpen to True and play the door opening animation and effects.
To search for “CatKey” in the Inventory list, use List Interface: Contains. It will return a Boolean that indicates whether Clive has the Key GameObject.
Where in the existing flow should the list be checked? If IsOpen is False, Clive’s movement must be canceled whether he has the key GameObject or not — so it must be after Cancel Movement. However, you can’t set IsOpen to True unless Clive has the key GameObject — so the list must be checked before the Set Variable node that sets IsOpen to True. Therefore, you’ll add an If node between Cancel Movement and Set Variable.
Tip: You'll be scripting several more doors. What can you do with groups to make this visual script more readable for later?
Write this script. Check your work using the image in the next step as needed. Be sure to save your work with Ctrl+S (macOS: Cmd+S).
Enter Play mode to test your visual script. Let Clive approach the door without the key, then make him get the key and try again. He will pause and the door will open, allowing him to the next room!
When you are successful, mark the next step as complete. If you get stuck, you can follow the instructions and the screen image in the next step.
5. Open the door with a key (instructions)
Here are step-by-step instructions for scripting the first door to open only if Clive has the key:
1. Return to the visual script on ObjectRoot > FirstDoor.
2. Create an Object variable named “KeyName”, with its Type set to String and write its Value as “CatKey”. You will use this value to search the list.
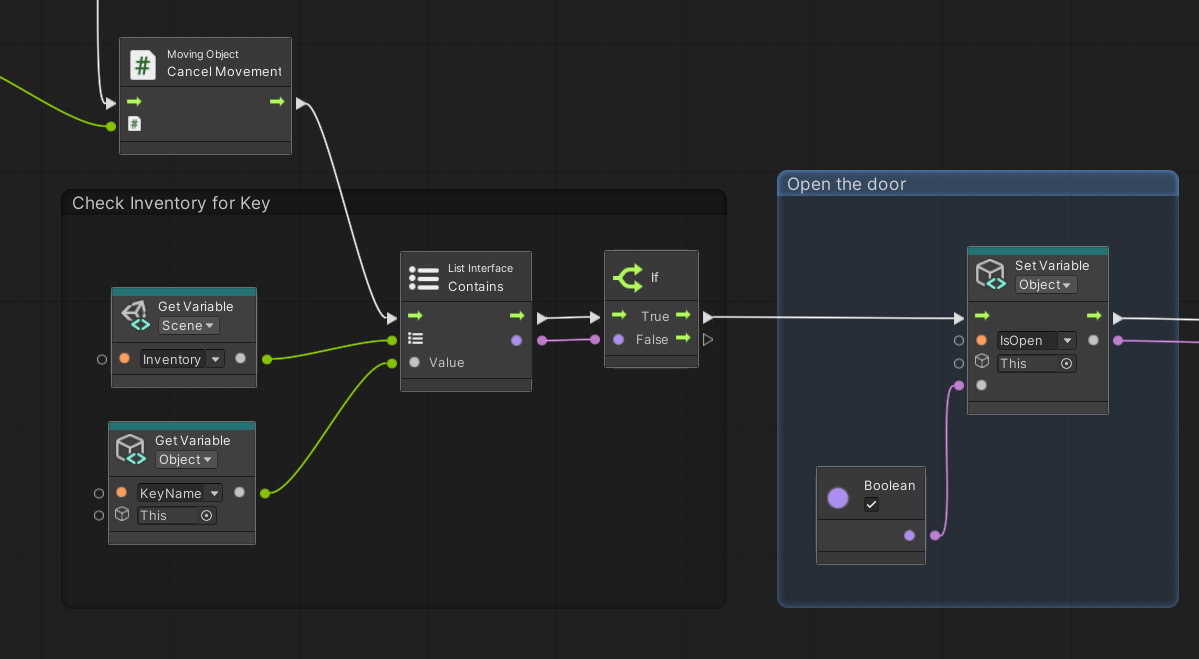
3 Add a List Interface: Contains node, and insert it in the flow between Cancel Movement node and the Set Variable node.
4. As input to the List Interface: Contains node, get the Inventory variable and the KeyName variable using Get Variable nodes.
5. The List Interface: Contains node outputs a Boolean. Use an If node to check this Boolean, and only continue the flow if this value is True.
Suggestion: try adding some groups to make this script readable.
6. Press Ctrl+S (macOS: Cmd+S) to save your work.
The new section of your Graph should look like the image below.
One way to make the entire visual script so far should look like the image below. We’ve included the extra credit (close the door behind) and added some groups for readability.
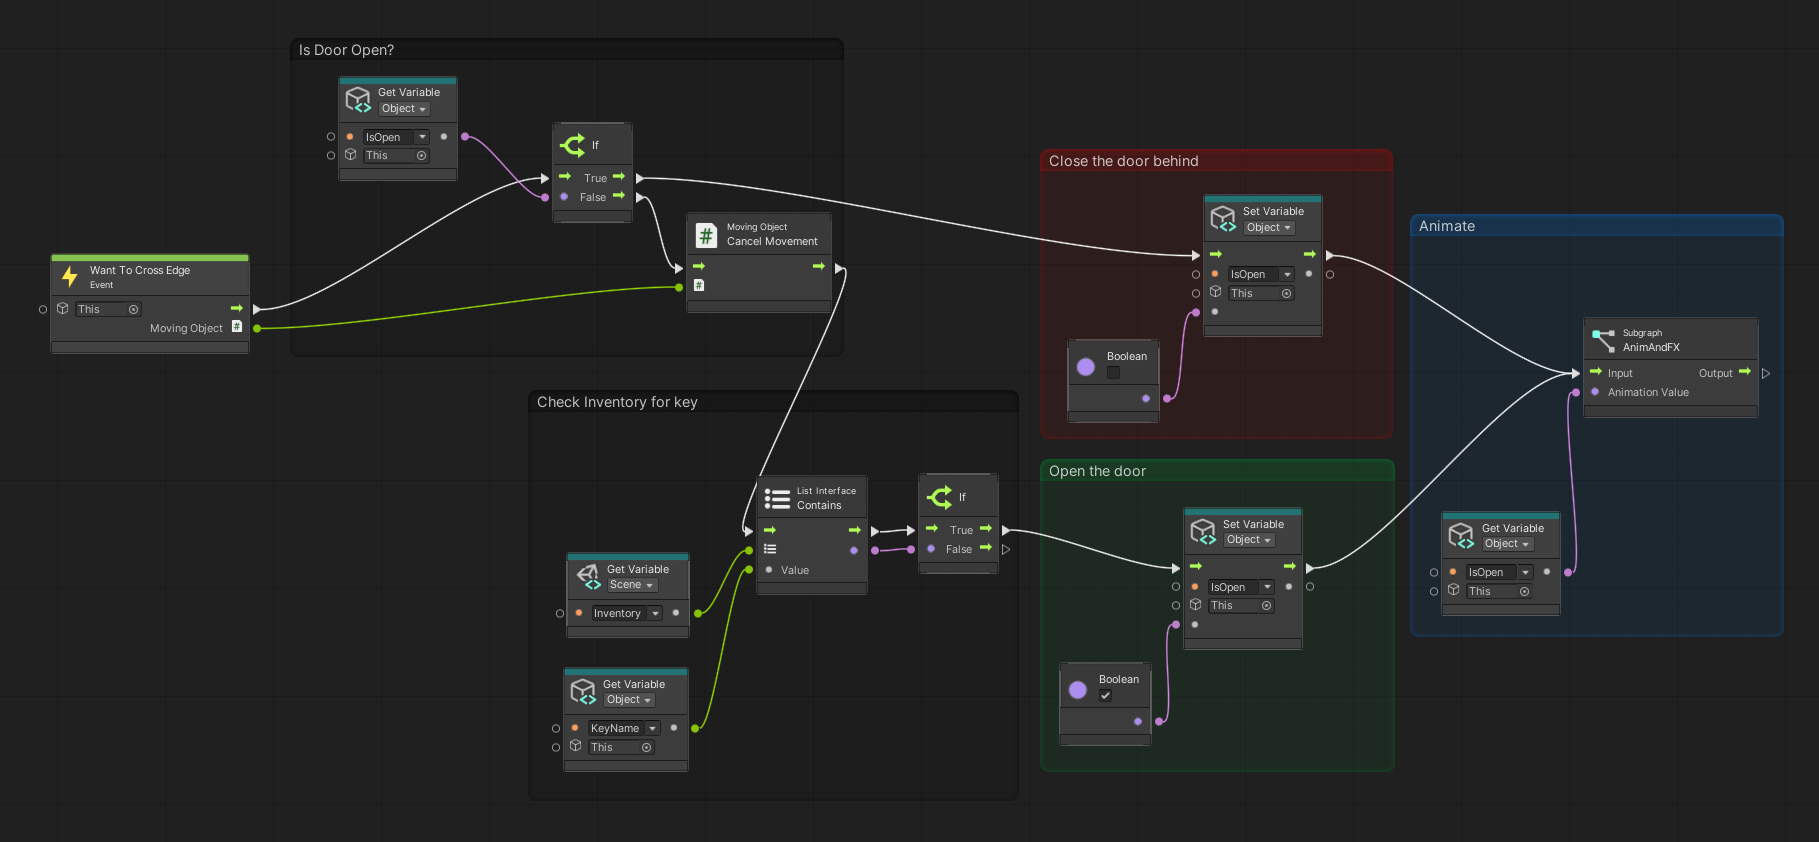
To view or use this script, see Key_FirstDoorScript in the Samples subfolder.
6. What’s next?
There are so many doors in Clive’s crypt, and so many ways to open and close them! You'll learn more gameplay mechanics in the next tutorial using custom events, which can tell us what is happening and when.