Create a visual script to detect a button press
Tutorial
Beginner
+10XP
60 mins
68
Unity Technologies
Now that you have buttons in your app, you will begin programming their functionality using Unity’s Visual Scripting editor. You can use Visual Scripting to create the logic for your Unity projects without writing actual code.
In this tutorial you'll do the following:
- Create your first visual script graph.
- Familiarize yourself with the Visual Scripting editor.
- Detect a button press with a visual script.
Languages available:
1. Overview
Up until this point you’ve been using built-in features that are part of AR Foundation to create your applications. AR Foundation goes a long way to take care of the technical aspect of AR development, but most applications that you’ll want to build include some kind of interactivity that is beyond the scope of built-in components.
Fortunately, one of Unity’s greatest strengths is the ease with which you can create interactivity. In this tutorial, you’ll start working with Unity’s Visual Scripting Graph Editor and create your first button detection script.
Unity’s Visual Scripting editor is very similar to the visual scripting editors that can be found in other AR creation tools such as Meta Spark Studio.
2. What is Visual Scripting?
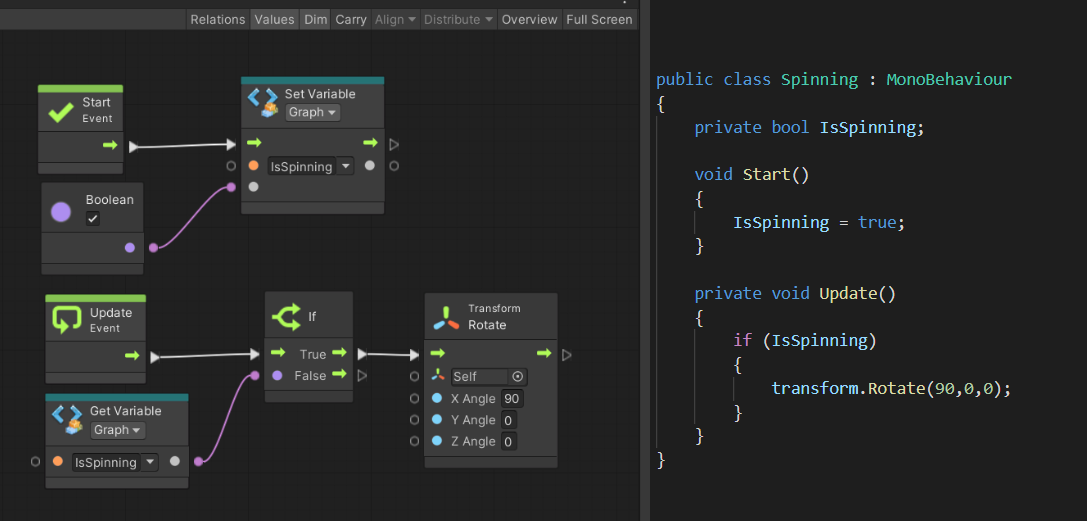
You can use Unity’s Visual Scripting functionality to create the logic for your Unity projects without writing actual code. Whereas traditional scripting in Unity is done in the C# programming language, Visual Scripting is a visual representation of logic that you can use to diagram your instructions. For example, these two scripts do the same thing — the one on the left is Visual Scripting and the one on the right is C#.
Why make scripting visual?
Visual Scripting brings the power of Unity scripting to non-coders and future coders. If you’re visually oriented, this approach can make it easier to learn and understand scripting concepts. You can even watch your scripts run in real-time. Visual Scripting empowers non-coders to extend or modify C# scripts, and it gives coders a way to better collaborate with artists and designers. If you’re a coder, you can also use Visual Scripting to create extensions, templates, and tools for other Unity users so that everyone can customize their Unity projects, whether or not they know C#.
What is the Unity Scripting API?
Visual Scripting also provides non-coders with access to the entire Unity Scripting application programming interface (API). This API contains the complete set of definitions of the classes, events, methods (behaviors), and properties (settings) you can manipulate in your Unity scripts. Although the API is big, you can do a lot in your scripts with just a few basics.
In Unity’s Visual Scripting editor, you can look up any class, event, method, and property in the API through a series of menus, which makes it easier to find or discover what you need. The best way to learn more of the API is to look things up (in the Unity Scripting API reference and even within Unity’s Visual Scripting editor) and experiment as you create your own scripts
3. Create your first graph
Visual scripts are contained in assets called graphs. Visual Scripting graphs can be applied to any GameObject in your scene, but to keep things simple you’ll create a dedicated game object in the Hierarchy window for all of your script graphs.
Important: If a warning dialog window asks you to change your Unity preferences during this process, select Change now.
Follow these instructions to create a new script graph:
1. In the Hierarchy window, right-click and select Create Empty.
2. Name the new empty GameObject “Visual Scripts”.
3. In the Inspector window, check that the GameObject’s three Position property values are set to 0.
4. Select Add Component, then add a Script Machine component.
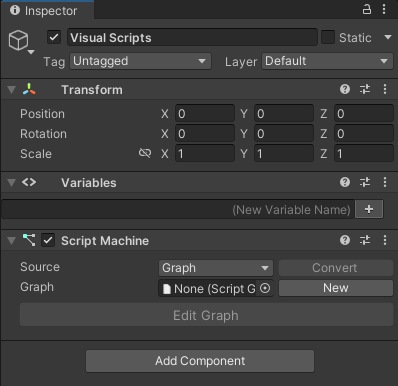
The Script Machine component is what runs the visual scripts that you will build. In Unity, the visual script itself is referred to as a graph. Note that the Script Machine component you just added has a space for a graph, but there isn’t one currently assigned.
5. Select New (by the Graph property).
6. When the Save Graph dialog window appears, create a new folder and name it “Visual Scripts”.
7. Name the new graph “MeshChanger” and select Save.
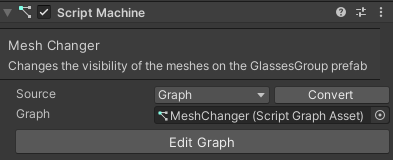
The MeshChanger graph will appear in the graph parameter of the Script Machine component. Notice that there are now two new parameters at the top of the Script Machine: one for a title and another for a summary. As you create more script machines, having a title and description for each will help keep you organized.
8. Update the graph text fields as follows:
- Title: Mesh Changer
- Summary: Changes the visibility of the meshes on the GlassesGroup prefab.
4. Open and navigate the Script Graph
You’re now ready to open your graph and begin creating your functionality:
1. In the Script Machine component, select Edit Graph to launch the Visual Scripting work area.
The first time you load the Script Graph, you might see a warning that states “Inspectors are disabled when plugin versions mismatch to prevent data corruption.” If this occurs, simply restart the Editor, and everything will load normally.

Note: When you first set up a script machine, a new GameObject named VisualScripting SceneVariables will be automatically generated in your Hierarchy window.
The first time the Script Graph window opens, it will appear as a separate window. You can maximize this window to make it fullscreen or dock it behind your Project tab (recommended).
The main work area on the right side of the window is the Graph Editor, where you will build your graph logic. On the left side of the window is the Graph Inspector, which will provide detailed information about objects that you select. Beneath the Graph Inspector window is the Blackboard, where you will create your variables.
Whenever you create a new graph, it will load with On Start and On Update nodes. Nodes are the components that are used to build the logic in the graph. There are several different types of nodes, which you will learn more about later. On Start and On Update nodes are often used when building application logic, but in this case you won’t need them.
2. Take a little time to get familiar with the interface. You can do the following:
- Move around the Graph Editor using middle-click and drag.
- If you’re using a touchpad, you can move around the Graph Editor by scrolling with two fingers.
- Zoom by holding Ctrl (macOS: Cmd) and either rotating the wheel button or moving up and down on the touchpad.
3. Select the On Start node.
Notice that when you select the On Start node, the Graph Inspector updates to show you all available information about what you’ve selected. In this case, the Graph Inspector only lists the node as having a single Output, which is called Trigger: Flow. Flow outputs (and inputs) determine the logic flow in a graph, or in what order a node should be called. You’ll learn about flow in more detail later in the tutorial.
5. Click and drag the On Start node across the Graph Editor.
6. Right-click the On Start node and select Delete to remove it from the Graph Editor.
7. Select the On Update node and press the Delete key (macOS: Cmd+Delete) to remove it from the Graph Editor.
You’ll now have a blank graph.
5. Create your first node
Your goal for this tutorial is to detect when the user has pressed a button in the app. Just as AR Foundation handles most of the work required to detect a user’s face, the Unity Scripting API provides functionality for virtually all major interactions you’ll want to build for your apps.
Knowing what part of the API to call comes with a lot of practice and experience, so don’t worry if you can’t predict which node to use — we’ll tell you. The more functionality you build with Visual Scripting (and traditional scripting, for that matter), the better you’ll get at guessing, but even the most experienced programmers still regularly search for guidance!
In Unity, a button interaction is considered a button click, whether it’s completed by clicking with a mouse or tapping a device screen. This will be the first node that you add to your graph.
Watch the video or follow the instructions below to add a node to your MeshChanger graph:
1. Right-click the Graph Editor. The context menu will appear — it is nicknamed the fuzzy finder.
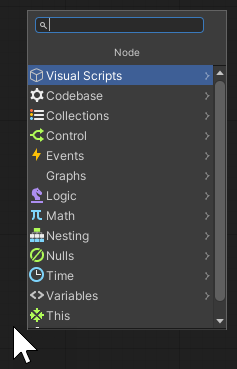
The fuzzy finder is a multi-level menu containing every type of node, including the entire Unity Scripting API! With the fuzzy finder, you can search for any node by name or find one using its category.
2. Search for “On Button Click” and select it to add the node. (Alternatively, you could use the fuzzy finder to navigate to Events > GUI > On Button Click.)

3. Select the On Button Click node and observe the data in the Graph Inspector window.
6. On Button Click node overview
Before you continue to set up your graph, let’s review the different parts of the On Button Click node.
Inputs section
Unlike On Start and On Update, which you previously observed, On Button Click has an Inputs section. There are two types of inputs: control inputs and data inputs. Control inputs control the logic flow of a graph. Data inputs receive specific types of values from other nodes, which the receiving node needs in order to perform its task. On its own, the On Button Click only does something when a button is pressed, but it needs to know which button it should be monitoring.
In this case, the Graph Inspector window shows that the On Button Click node input is looking for a GameObject target. This GameObject is the button that the On Button Click node will monitor for input.
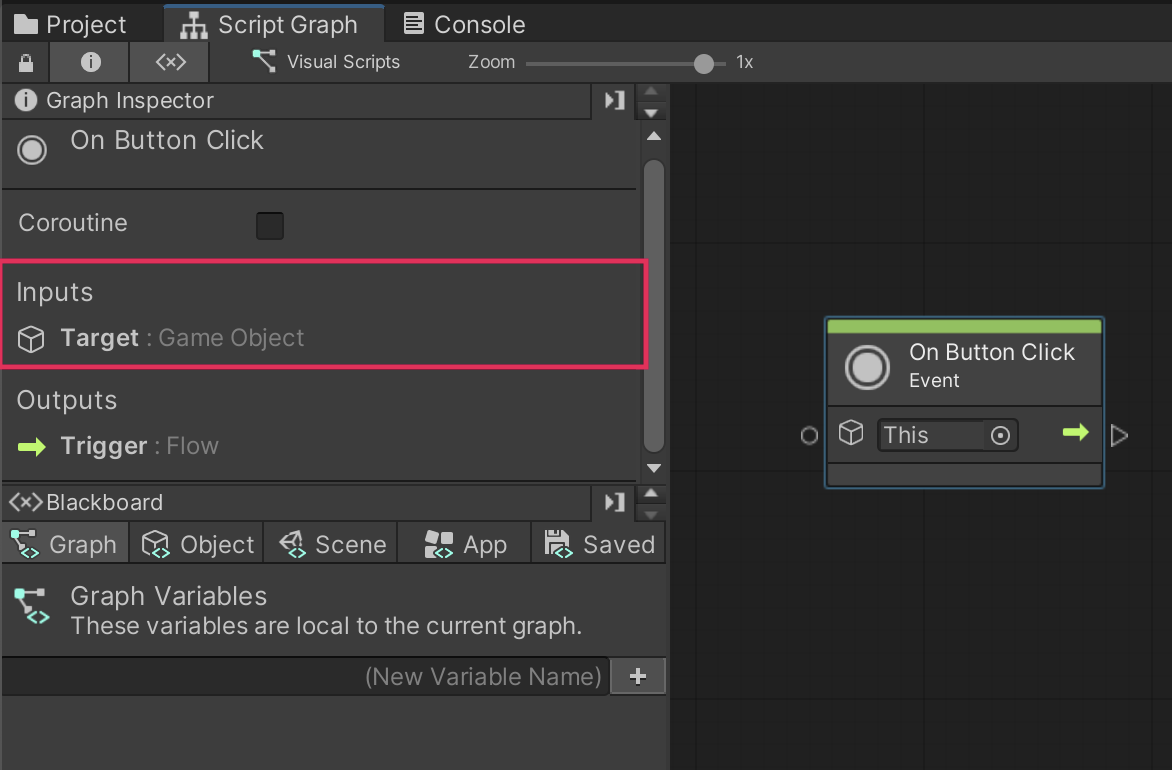
Target input parameter
By default, the On Button Click node has a parameter slot labeled This.

This parameter is where the target input will be connected. However, if no input is connected, the node has a failsafe: it will look for a target input on the GameObject that it’s assigned to. This failsafe behavior is why the parameter is currently labeled This — as in, “I’ll look for my input on This game object.”
In this case, if you left the parameter empty, the On Button Click node would search for a button component on the Visual Scripts GameObject that the Script Machine you created is attached to. If the script graph was attached to one of the AR_Canvas buttons then this would be fine, but what are you supposed to do if your graphs are on different GameObjects?
This is where variables come into play. Variables are containers for different kinds of data. That data can be numbers, GameObjects, sounds, or virtually anything. Variables can be generated within a graph itself or serve as references to other objects in an application. In this case, you’ll create a variable that will reference one of the buttons on the UI.
7. Create your first variable
As you learned earlier, variables are created in the Blackboard section of the Script Graph window. Notice that the Blackboard has the following tabs along the top:
- Graph
- Object
- Scene
- App
- Saved
These tabs are the different categories of variables that you can create. Because you need to create a variable that references a GameObject in the scene, you’ll be creating an Object variable.
Watch the video or follow the instructions below to create an Object variable:
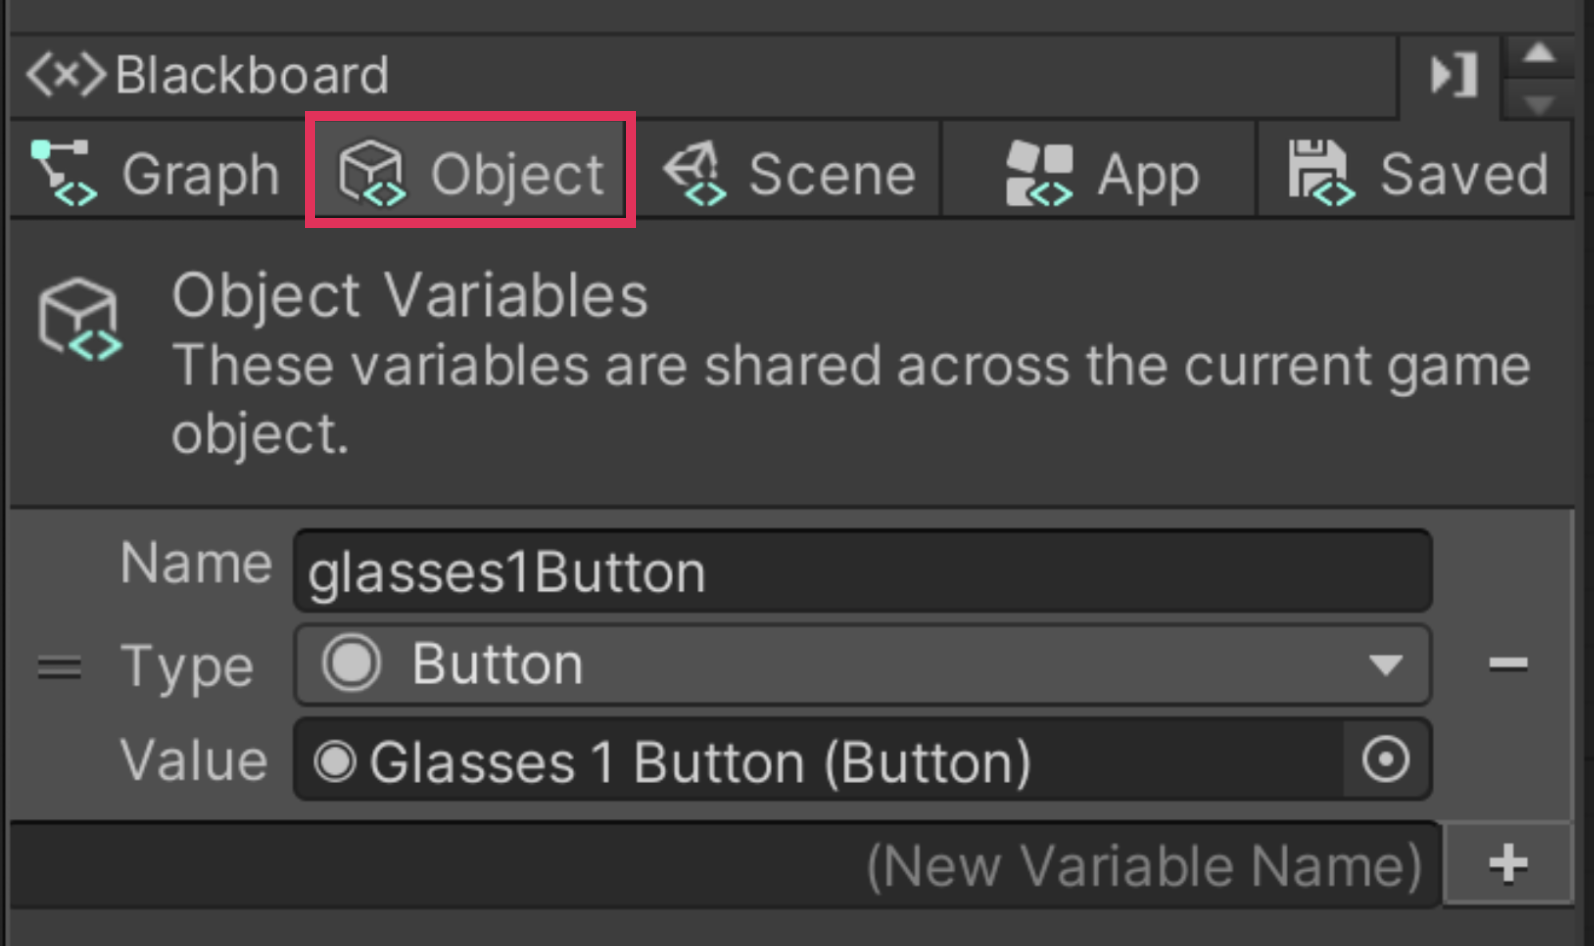
1. In the Blackboard, select the Object tab to access the Object variable creation options.
2. In the (New Variable Name) slot, enter “glasses1Button” and then select Add (+) or press the Enter key.
It is a typical naming convention to use camel case for variables, where the first word is lowercase, but all subsequent words begin with a capital letter. This is called camel case because the profile of the word resembles a camel, where the capital letters look like humps.
This creates the glasses1Button variable, but note that the Type property is set to (Null). This is because you haven’t yet defined what type of object this variable will hold.
3. Select the Type property dropdown, then search for and select Button. With glasses1Button now defined as a button variable, a Value parameter will appear. You can use this to create the reference to a specific UI button.
4. Select the Object Picker (circle icon) on the right side of the Value parameter.
5. Select Glasses 1 Button from the list of available assets.
6. Select the glasses1Button variable in the Blackboard and drag it into the Graph Editor.
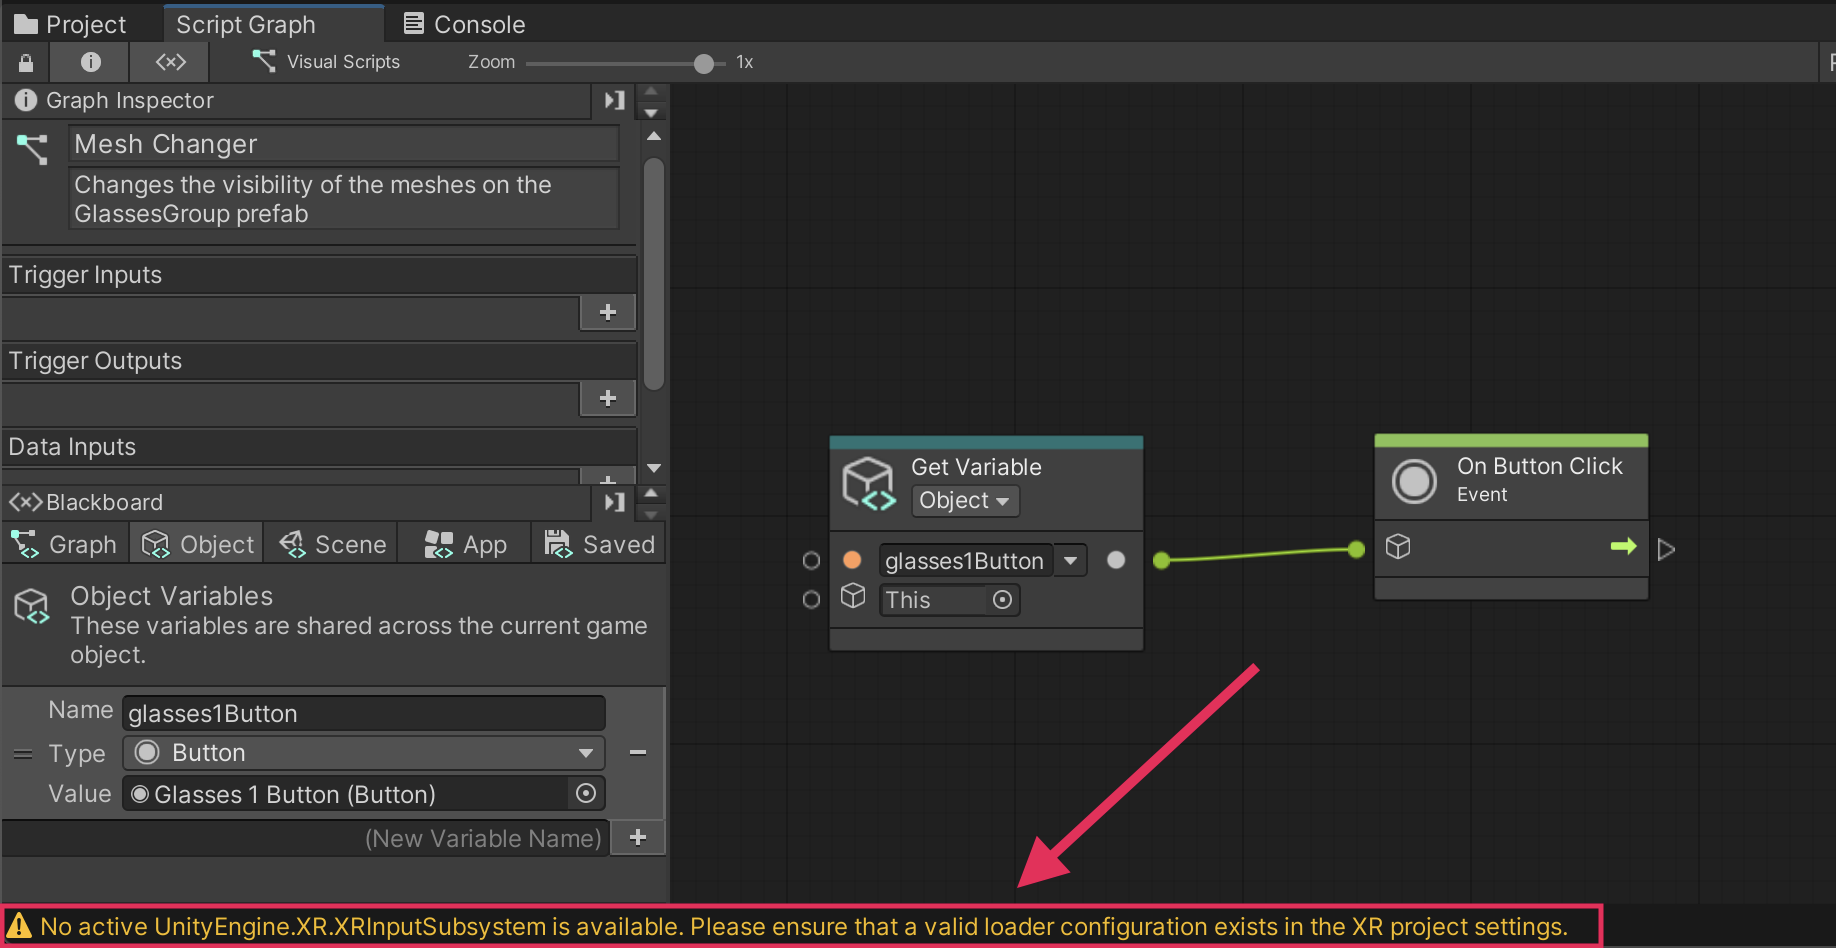
Notice that by adding the variable to the scene, you have generated a Get Variable node. Variable nodes can also be added to the Graph Editor via the fuzzy finder; however, you would then need to define which variable the Get Variable node should be referencing. By dragging the variable from the Blackboard, all of the information is already filled in.
Note that the This parameter is present on the glasses1Button Get Variable node as well. As was the case with On Button Click, this is a fallback option in case the details of Get Variable aren’t filled out. However, since this node is defined as glasses1Button, the fallback won’t be required.
8. Test the button functionality
Your variable can now be used with the On Button Click node. Once you connect it, the On Button Click node will monitor for any presses made on the Glasses 1 Button.
Watch the video or follow the instructions below to test the button functionality:
1. Select the white hollow circle icon on the right side of the glasses1Button Get Variable node. This is the node output. When you select the output, a green wire will appear and follow your cursor.
2. Select the white hollow circle icon on the left side of the On Button Click node to connect the two nodes together.
Notice that once connected, the This value on the On Button Click node disappears. This is because the node now recognizes glasses1Button as the variable assigned to it.
If you want to break a connection between two nodes, right-click either the connected input or output.
3. Select the Play button to test your app in the Unity Editor.
4. In the Game view, select the first glasses icon and observe the Script Graph window as you do so.
Along the connection wire between the two nodes, the name of the GameObject associated with the glasses1Button is listed, indicating the button that the On Button Click node is monitoring. Whenever that button is clicked, the On Button Click node will flash.
The functionality works! However, this can be somewhat challenging to see and right now relies on you observing the Script editor as you test the scene.
Note: Don’t worry if you see yellow warnings in the console. These should not cause any errors in your project.
9. Send a message to the console
To make it easier to tell what’s happening in the scene, you can use another node to print a message to the console.
Watch the video or follow the instructions below to send a message to the console:
1. Select the Play button again to exit Play mode.
2. Right-click the Graph Editor to access the fuzzy finder.
3. Search for and select the Debug Log (Message) node.
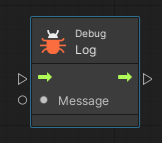
4. Select the new Debug Log node and observe the Graph Inspector.
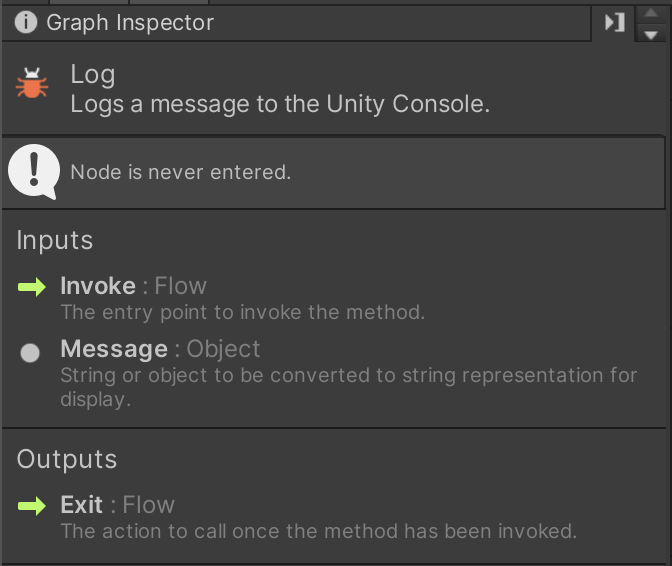
The Graph Inspector lists the node’s purpose as, “Logs a message to the Unity Console”, which is precisely what we’re looking for. The Graph Inspector also shows that the node has both a control (Flow) and data (Object) input. The data input reads, “String or object to be converted to string representation for display.” A string refers to words or sentences, so you’ll create a node for that.
5. Connect the flow output on the right side (arrow icon) of the On Button Click node to the flow input (arrow icon) on the left side of the Debug Log node.
6. On the Debug Log node, select the Message input on the left side of the node (circle icon) to create a connection wire.
7. In the Graph Editor, open the fuzzy finder and add a String Literal node.
8. In the empty field on the String Literal node, enter “Button 1 pressed.”
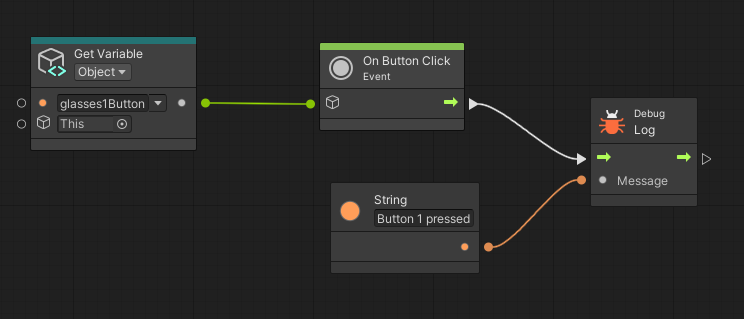
9. Select the Play button to test your app.
10. Select the first glasses button on your UI and observe the lower left corner of the Unity Editor, where you’ll see the “Button 1 pressed” message displayed.
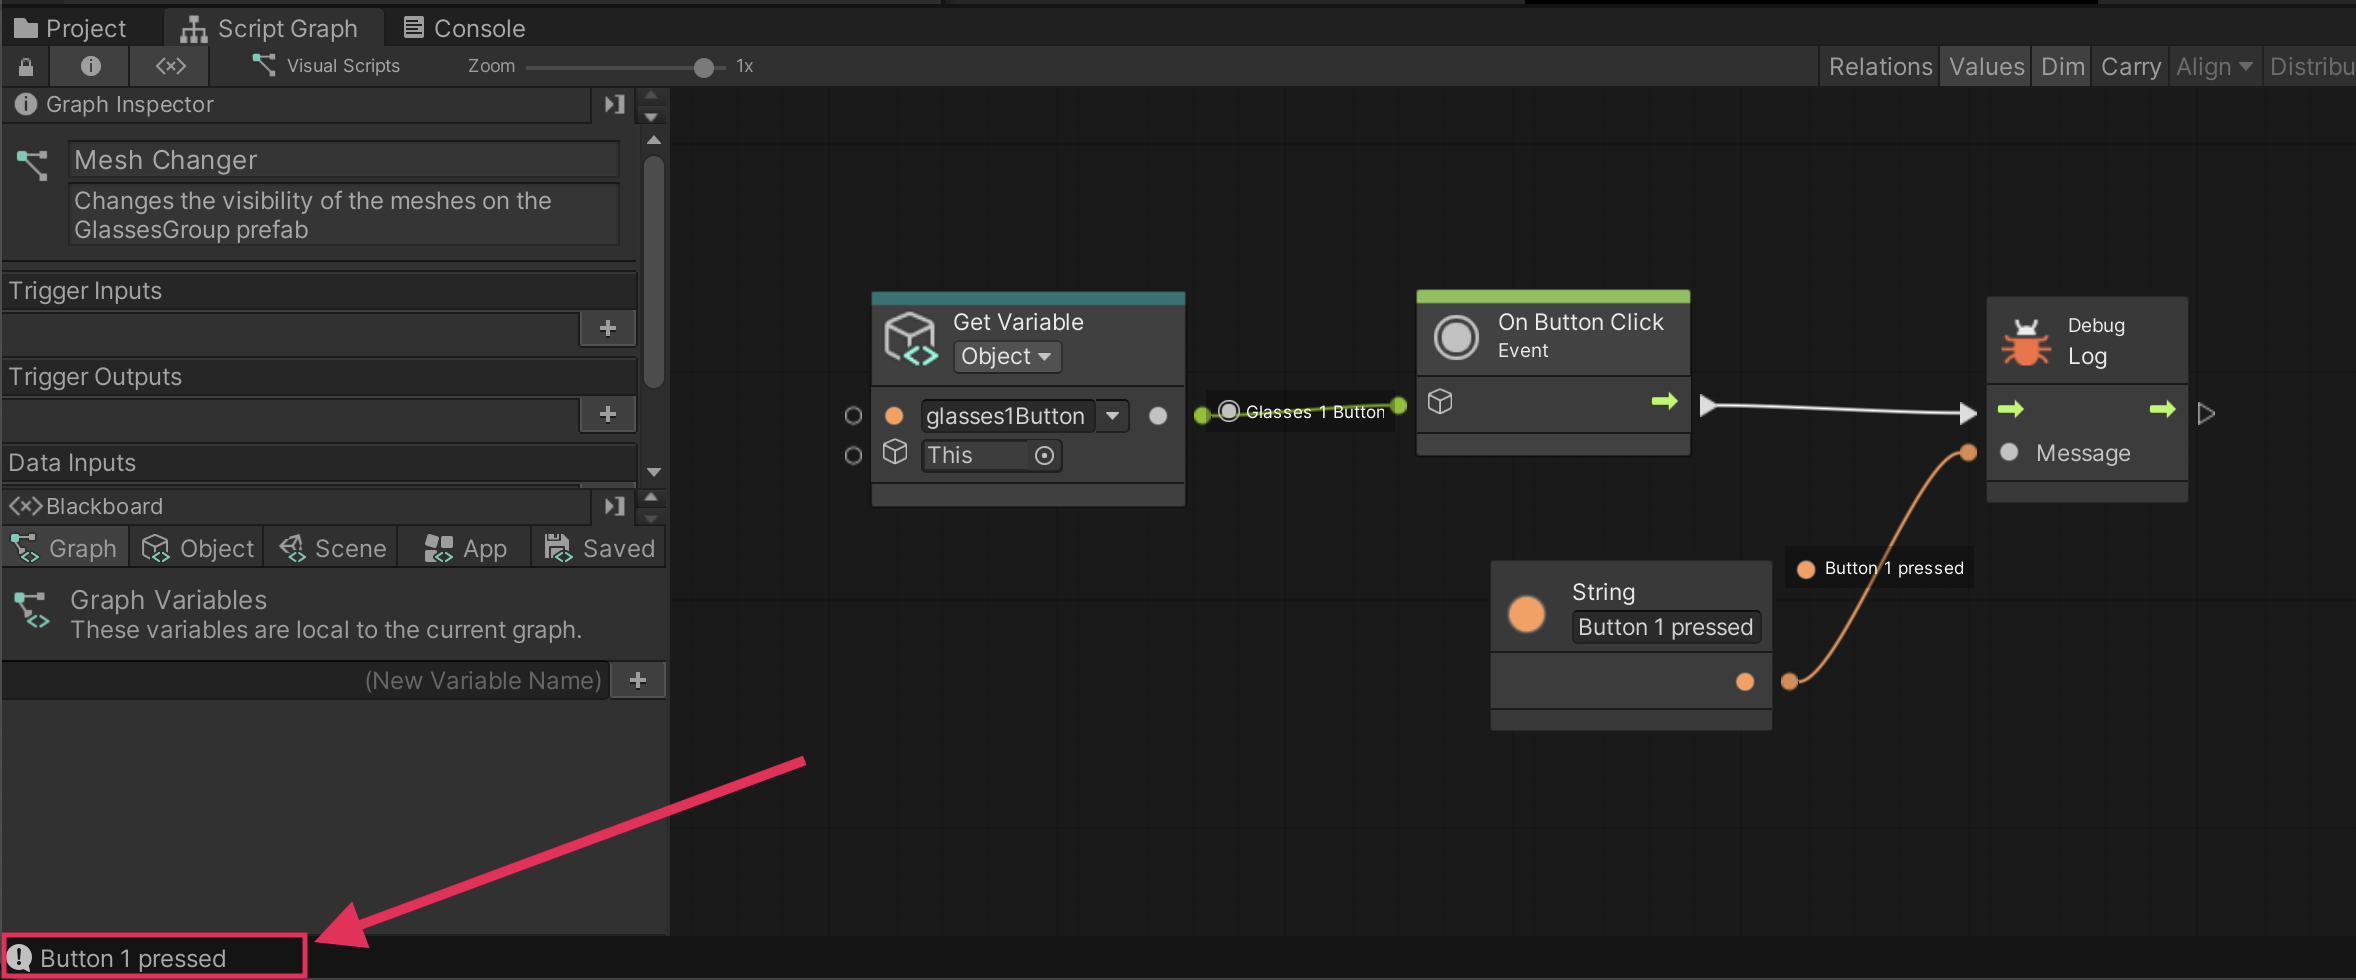
10. More things to try
If you want to further develop your skills, explore new concepts, or improve your project, check out some of the optional activities below. Each one is tagged as either Easy, Medium, or Difficult, so you can choose the level of challenge.
These activities are entirely optional, so if you’re not interested, no problem – just skip this step. We do recommend attempting at least one of them in order to get the most out of this learning experience. Good luck!
Easy: Learn more about Visual Scripting
If this tutorial has made you curious about Visual Scripting, try our Introduction to Visual Scripting course to learn more.
Medium: Try Debug Log Warning and Error
A Debug Log event allows you to send a message to the console and can be useful for testing your code. A Debug Log Warning event will send a message to the console, but it will also include a yellow triangle icon with an exclamation point to draw your attention to the event. Bringing attention to the comment can ensure that you or your programming team take the warning more seriously. For this challenge, create a visual scripting graph that warns users about the possible dangers of pressing a button when another button is already being pressed. To do this you will need to use the following Visual Scripting node:
- Debug Log Warning
Difficult: Add two strings together to make a complex message
One of the tasks you will do many times as a programmer is adding strings together. This process is called concatenation. Every GameObject in Unity has a name that is stored as a string value. See if you can add the name of the glasses1 variable to another string that says, “was clicked”. To do this you will need to use the following Visual Scripting nodes:
- Get Variable Object
- Game Object Get Name
- String Literal
- String Concat (with 2 arguments)
- Debug Log
11. Next steps
In this tutorial, you created your first script graph and built your first block of logic. In doing so, you learned how to navigate in the Graph Editor, access the fuzzy finder, manipulate nodes, and create variables. You also learned how to send data to the console, which is a helpful tool that you’ll use regularly as you continue to create application logic.
In the next tutorial, you’ll expand on your button functionality to make the glasses button turn on the glasses in your app.