Creating a Global Post Processing Volume
Tutorial
Beginner
+10XP
5 mins
366
Unity Technologies

Screen-based image effects add specialized filters to the application camera which can be used to drastically increase the visual quality of a project. Unity’s Post-Processing Stack replaces previous iterations of screen-based image effects and combines them all together in an easily configurable way. In this tutorial, you will learn to create and configure the post processing stack.
Languages available:
1. Creating a Global Post-Processing Volume Intro
This tutorial has been verified using Unity 2019 LTS and Post Processing 2.3.0
https://learn.unity.com/tutorial/creating-a-global-post-processing-volume-2019-3
2. Creating a Global Post-Processing Volume
Screen-based image effects add specialized filters to the application camera which can be used to drastically increase the visual quality of a project. Unity’s Post-Processing Stack replaces previous iterations of screen-based image effects and combines them all together in an easily configurable way. Designers can easily adjust the appearance of several effects without needing to worry about technical aspects such as render order, which allows them to focus purely on the visual aesthetic of the effect. A Global Post-Processing Volume allows a designer to use the Post-Processing Stack to create an overall look and feel for their Project.
In order to be used, Post-Processing must first be downloaded from the Package Manager.
1. From the Window dropdown, select Package Manager.
2. On the upper-left side of the Package Manager window, select All packages.
3. Select Post-Processing from the list on the left and click the Install button on the right side of the window.
4. After the Package Manager has refreshed, you should see Post-Processing in the In Project tab. Close the Package Manager window.
5. In the Project window, right-click and select Create > Post-Processing Profile
6. Give the new Profile a descriptive name that indicates where it will be used (Figure 01).

7. Before image effects are added to the Profile, the Scene should be configured so the effects can be viewed as they are edited.
8. In the Hierarchy, right-click and select Create Empty. This will create an empty GameObject in the Scene.
9. Rename the GameObject to “PostProcessingGO.”
10. In the Inspector, click the Add Component button and search for Post-Process Volume. Select the volume from the list to apply it to the object.
11. At the top of the Post-Process Volume component, check the Is Global box.
12. Leave Weight and Priority at default and drag the Post-Processing Profile you created in step 6 into the Profile slot (Figure 02).

13. At the top of the Inspector, click the Layer dropdown and select Edit Layers.
14. In an available Layer slot, type “PostProcessing.”
15. Select the PostProcessingGO again, and at the top of the Inspector, set its Layer to PostProcessing.
16. Select the Main Camera in the Hierarchy, and in the Inspector add a Post-Processing Layer.
17. In the Post-Processing Layer component, click on the Layer dropdown and select PostProcessing.
The Scene is now configured for editing the Post-Processing Profile. Any edits made to the profile will now be visible both in the Game view and the Scene view alike.
18. Select the PostProcessingGO. In the Post-Processing Volume component, click the
Add Effect button to add effects. Click on the new profile effect to open its options menu (Figure 03).

Despite being set to On by default, none of the options on the effect will be enabled. Click the All button at the top of the effect options list to enable everything. Once you have configured the effect to your liking, turn off any options that you did not use to keep things as efficient as possible.
Much of the process of configuring effects can be done based on what looks good to the eye. Keep in mind that the more effects that are added, and the more options with higher values, the less performant your application will be. A best practice with Post-Processing Effects is that less is more.
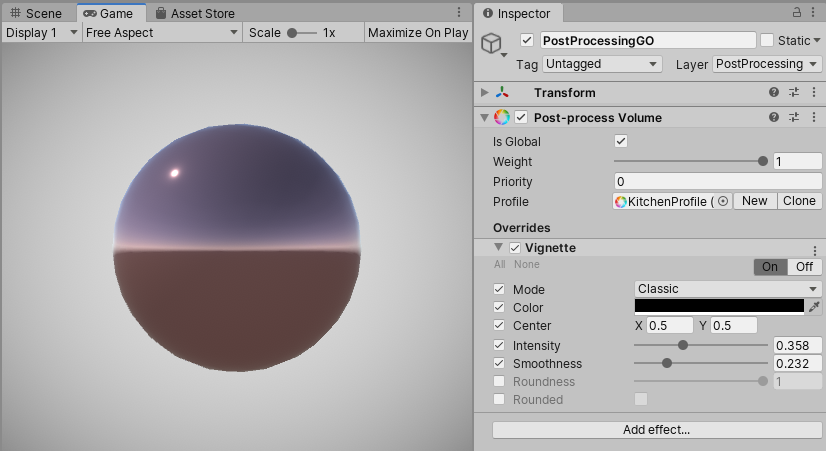
In the example below, the Vignette effect has been configured to give a subtle sense of shadowing around the edges of the screen. Note that the options that aren’t being used have been turned off (Figure 04).

3. Conclusion
This is just a quick guide to adding post processing, and there are many more effects. Try combining different effects together to create a unique look for your project.