
Creating a Time of Day Viewer
Tutorial
intermediate
+10XP
25m
(6)
Unity Technologies
The Reflect Viewer uses a standard Skybox that is defined in the Game Scene. The default Skybox Material uses the main Directional Light as the sun. When you move the light’s position, the sky will update to reflect the time of day. By animating the movement of the main light with a Playable Director component, we can access and control the movement through a script that will sync with the slider UI component.
This tutorial also covers how you would go about creating a button (slider) that is part of the Reflect menu system and will behave as expected within the user interface system.
Languages available:
1. Introduction
The Reflect Viewer uses a standard Skybox that is defined in the Game Scene. The default Skybox Material uses the main Directional Light as the sun. When you move the light’s position, the sky will update to reflect the time of day. By animating the movement of the main light with a Playable Director component, we can access and control the movement through a script that will sync with the slider UI component.
This tutorial also covers how you would go about creating a button (slider) that is part of the Reflect menu system and will behave as expected within the user interface system.
For this tutorial, you will need:
- The Reflect Package installed via the Package Manager
- A Pro license for the Unity Editor
- The Unity custom package TimeOfDayViewer.unitypackage
2. Creating the Button
1. Set up the project by installing the Reflect Package from the Package Manager and importing TimeOfDayViewer.unitypackage.
2. Drag the Reflect Viewer Prefab from the Reflect Runtime folder to the Scene Hierarchy.
3. Turn the Viewer into a Prefab by dragging it to the Assets folder (Figure 01).
4. Open the Reflect Viewer Prefab by clicking on the arrow to the right in the Hierarchy window (Figure 02).
5. Expand the Canvas element and then right-click on Settings Canvas. Make a copy by selecting Duplicate (Figure 03).
6. Rename the new Canvas element to Daylight Canvas (Figure 04).
7. Drag this Canvas element to a new position under Settings Canvas. The menu script will take care of the position of the new menu item at runtime, but, currently, if a new menu item is created at the bottom of the Hierarchy, it will display off-screen at runtime. Putting it in a new position takes care of that problem (Figure 05).
8. Next, you need to unpack the Prefab. This will allow you to delete the nested elements within it. Right-click on the Daylight Canvas Prefab element and select Unpack Prefab. (Figure 06).
9. Expand the Daylight Canvas and under the UI, delete the ButtonListControl element by right-clicking and selecting Delete. This element is a remnant of the Settings Canvas and you won't be using it (Figure 07).
10. Under Assets > Prefabs, you will find a Prefab called SunControlPanel. This was installed when you imported the tutorial resources. This Prefab consists of a standard UI panel and slider and will be the control element for the sun. Drag this Prefab under the UI element of the Daylight Canvas (Figure 08).
11. Now you need to prepare the scripts that will control the interaction of this new button. The script that’s currently applied is still the one that controls the Settings Canvas. You need to remove this and then use the generic script that is provided with the Reflect package. Select the Daylight Canvas and, in the Inspector, remove the Settings Top Menu (Script) component (Figure 09).
12. In the Inspector, select the Add Component button and add the Top Menu script component (Figure 10).
13. Drag the Daylight Canvas Button, Button Background, and UI elements in the Hierarchy to the corresponding slots in the script component (Figure 11).
14. Now, you need to add the functionality that will make the other buttons disappear and reappear when the button is selected. Select the Mask element of your Daylight Canvas (Figure 12).
15. In the Inspector, drag the Daylight Canvas element into the On Click () Event (Figure 13).
16. Select the function drop-down and change it to the TopMenu > Deactivate() function. This drop-down displays all the functions from the script applied to the element that was dragged to the OnClick () event slot. By selecting it, you specify which function in that script will run when the button is selected (Figure 14).
17. Click the + sign to add another event (Figure 15).
18. Repeat the process of Step 13, this time selecting the OnClick() Function (Figure 16).
19. Now you can set the image for the new Daylight Canvas button by selecting the Button element and, in the Inspector, changing the Source Image to sunControls (Figure 17).
20. With the Button element still selected, drag the Daylight Canvas to the On Click () event slot and change the function that will fire to TopMenu > OnClick (Figure 18).
This concludes setting up all the user interface elements for this tutorial. Next, you will add the Prefabs and scripts that will control the motion of the sun in the Scene.
3. Adding the Sun Controls Functionality
Drag the SunControls Prefab from the Assets > Prefabs folder to the root of the Scene Hierarchy. This Prefab contains an animated Directional Light that will act as the sun as well as a script that takes the input from the slider and translates it to the animation of the light (Figure 19).
The next step is to link the script with the slider. Select the Slider element under Reflect > Canvas > Daylight Canvas > UI > SunControlPanel. In the Inspector, find the Slider component. Drag the SunControls element into the On Value Changed slot (Figure 20).
Change the function that will be activated when the slider is moved to the Time function (Figure 20).
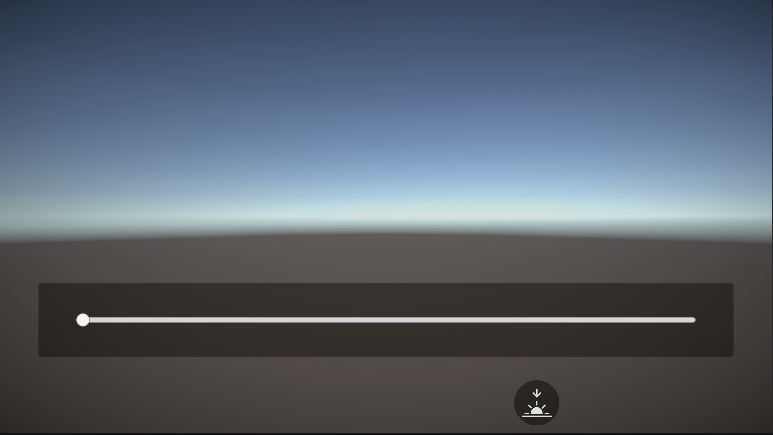
Run the project and select the new Daylight Canvas button. A slider will appear and when you move the slider button, the sun will move across the sky, updating the Skybox as it moves to reflect the relevant ambient light conditions (Figure 22).
4. Understanding the Script
The script used in this project is a very simple one that takes a click event and switches between two Materials as defined by the user.
The script starts by making sure there is a Playable Director component (1) on the game element it’s applied to. It will then gain access to the relevant Playable Director component (2) and finally initiate the update script when (3) the slider value is changed. This script evaluates the “time” on the slider and sets the Playable Director timeline position to the equivalent position.
5. Next Steps
This tutorial covered how you can create your own buttons and interaction in the Reflect Viewer as well as how to animate the sky. Now you can create your own custom menu systems in the Viewer as well as control animated object timelines through a script.