
Creating LWRP Materials - 2019.2
Tutorial
Beginner
+10XP
10 mins
(8)
Unity Technologies
LWRP stands for “Lightweight Render Pipeline,” which aims to optimize real-time performance on performance-constrained platforms, such as mobile devices or low-end consoles and PCs. It does this by making some tradeoffs in the lighting and shading sections of the pipeline. In this tutorial, you will learn about creating and updating projects, materials, and shaders to use LWRP.
Languages available:
1. Introduction
If you are using Unity 2018.3 or below, click here. If you are using Unity 2018.4, click here. If you are using Unity 2019.1, click here. If you are using Unity 2019.3 or above, click here.
Introduced in Unity 2018.1, the Lightweight Render Pipeline (LWRP) aims to optimize real-time performance on traditionally performance-constrained platforms, such as mobile devices or low-end consoles and PCs. It does this by making some tradeoffs in the lighting and shading sections of the pipeline.
If you wish to target a wide range of mobile devices, virtual reality, or your project has a limited need for real-time lighting, then using LWRP will be incredibly beneficial.
2. Creating a new project with LWRP
Let’s start a new project with LWRP.
1. Open Unity Hub and create a new project.
2. In the new window, select the LWRP Template (Figure 01).
3. Name your project and set the location for the project.
4. Finally click Create.
Once that’s done, your new Unity Project with the LWRP will be ready to go.
3. Upgrading an existing project to use LWRP
To upgrade an existing project, first download LWRP using Unity’s Package Manager.
1. Go to the Window > Package Manager to open the Package Manager (Figure 02).
2. Click the All button on the left.
3. Find “Lightweight RP” in the list and select it.
4. Click Install.
After the package has been installed from the Package Manager, you have to add the Lightweight Asset to the Scriptable Render Pipeline Graphics settings field.
1. Open the Project settings window by clicking Edit > Project Settings.
2. Select Player settings on the left side of the new window.
3. Set Color Space to Linear in the Player Settings. (Figure 03)
4. Create a pipeline asset by selecting the Asset dropdown and select Create > Rendering > Lightweight Pipeline Asset.
5. Open the Project settings window by clicking Edit > Project Settings.
6. Select Graphic settings on the left side of the new window.
7. In the Graphics Inspector, drag and drop LightweightAsset into the Scriptable Render Pipeline field. (Figure 03)
With that done, your existing project will now use LWRP.
4. Creating LWRP Materials
The LWRP has its own process for rendering and requires shaders that are written with that in mind. Unity developed a new set of Standard Shaders that are located in a new category.
1. Right-click inside of your Project and go to Create > Material.
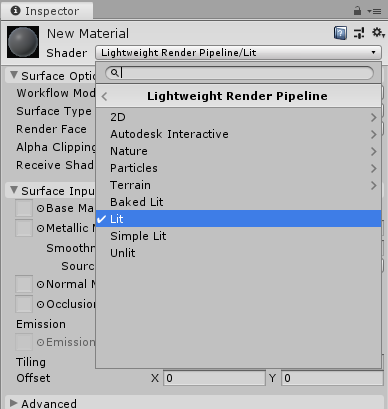
2. Click the Shader dropdown under New Material in the Inspector window.
3. Go to LightweightPipeline to expand the submenu for the available shaders. (Figure 04)
5. Lightweight Pipeline Shaders
You will notice there are several shaders to select from.
- Lit: The Lit Shader lets you render real-world surfaces like stone, wood, glass, plastic, and metals in photo-realistic quality. Your light levels and reflections look lifelike and react properly across various lighting conditions, for example bright sunlight, or a dark cave. This Shader uses the most computationally heavy shading model in LWRP.
- Simple Lit: Use this Shader when performance is more important than photorealism. This Shader uses a simple approximation for lighting.
- Baked Lit: Use this Shader for stylised games or apps that only require baked lighting via lightmaps and Light Probes. This shader does not use Physically Based Shading and has no real-time lighting, so all real-time relevant shader keywords and variants are stripped from the Shader code, which makes it faster to calculate.
- Standard (Simple Lighting): Replaces the legacy mobile/lit shaders. It performs a non-energy conserving Blinn-Phong shading and should be used for games that target devices with limited bandwidth.
- Unlit: An unlit shader with the option to sample Global Illumination. This replaces Unity’s stock unlit shaders.
- Particles: Contains the same three lightweight shaders for your particles.
- Terrain: The same as Unity’s stock terrain shader.
- 2D: Use this shader when developing 2D projects.
- Nature: Contains shaders specialized for Speed Trees.
- Autodesk Interactive: Shaders optimized to provide live updates to your shaders when you make an adjustment in an Autodesk application, and vice versa.
All Unity unlit stock shaders work with the Lightweight Pipeline, which means you can use legacy particles, UI, skybox, and sprite shaders with the pipeline with no additional setup required. Also, when the LWRP is set as the active render, all the game objects will be created with the correct shaders — the pipeline will override the default materials.
6. Upgrading Materials
To upgrade stock lit shaders to Lightweight shaders:
1. Go to the dropdown Edit and select Rendering Pipeline > Lightweight Render Pipeline > Upgrade Project Materials to Lightweight Materials or Upgrade Selected Materials to Lightweight Materials.
2. A window will pop up warning you that the upgrade will overwrite Materials in your project. Ensure you have made backups before proceeding and then click Proceed. (Figure 05)
This process will upgrade all Materials in the project or only the Materials you’ve selected.
7. Conclusion
Now you should have a better understanding of how to create and upgrade existing projects and materials to the LWRP. This pipeline is focused on performance and usability, allowing developers to create projects for performance-constrained platforms.