Deploy your project to iOS or Android
Tutorial
Beginner
+10XP
45 mins
389
Unity Technologies
Testing your AR applications on your mobile device is much more exciting and informative than doing so in the Unity Editor.
In this tutorial, you’ll deploy your AR project to your iOS or Android device. By the end, you’ll be able to see a spinning cube displayed in your surrounding environment through your device’s camera.
Languages available:
1. Overview
Testing your AR applications on your mobile device is much more exciting and informative than doing so in the Unity Editor.
In this tutorial, you’ll deploy your AR project to your iOS or Android device. By the end, you’ll be able to see a spinning cube displayed in your surrounding environment through your device’s camera. Not only will this be cool, but it will also ensure that your software and project are set up correctly for AR development.
The processes for building and deploying apps to iOS and Android are very different. Because of that, this tutorial is split into two sections: the first half is dedicated to iOS and the second half is dedicated to Android. To avoid confusion, each step will be also labeled with either [iOS] or [Android].
To deploy for iOS, continue on to the next step. To deploy for Android, jump to the Android section and continue from there.
2. Enable the ARKit XR plug-in [iOS]
The project is already generally set up for AR. Now you have to configure it to be compatible with iOS, specifically, by installing ARKit, Apple’s AR framework. The equivalent package for Android devices is ARCore.
ARKit is the API that provides access to the cameras, sensors, and other hardware that make AR experiences possible on iOS devices.
Follow these instructions to install ARKit in your project:
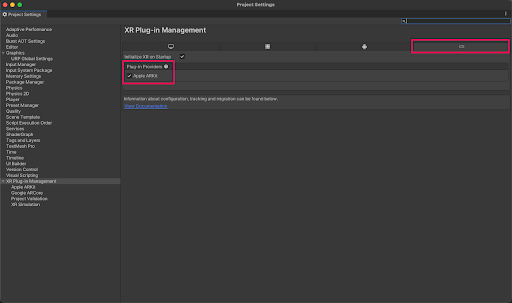
1. From the main menu, select Edit > Project Settings, then select XR Plug-in Management from the left panel.
2. Select the iOS tab from the XR-Plugin Management panel.
3. From the list of Plug-in Providers, make sure that ARKit is enabled.
3. Give your app a unique identifier [iOS]
In order to deploy a project to an iOS device, the app needs a unique identifier. For iOS projects, it is called a Bundle Identifier – and no two projects can have the same one. This identifier is a combination of a company name and a product name. Most of you'll not actually have a real company name at this point, but you'll still need to assign one to your project in order to successfully build your app.
To assign a unique bundle identifier, complete the following steps:
1. From the Unity Editor main menu, go to Edit > Project Settings.
2. In the navigation sidebar on the left side of the Project Settings window, select Player.
3. Change the Company Name property to a custom name of your choice.
Important: Your identifier cannot include any spaces or special characters. You can only use upper and lower case letters. If you include any special characters, your app will not build.
4. If you want, change the Product Name to a custom name of your choice. This is not necessary if you have already entered a unique company name.

5. Scroll down in the Player Settings panel and locate the Identification section. Notice that the Bundle Identifier field is automatically generated with com.CompanyName.ProductName.

6. Make sure that your unique Bundle Identifier does not include any spaces or special characters before moving on.
4. Configure build settings [iOS]
Before building your project, there are just a few last-minute steps to take care of. Follow these instructions to configure your build settings:
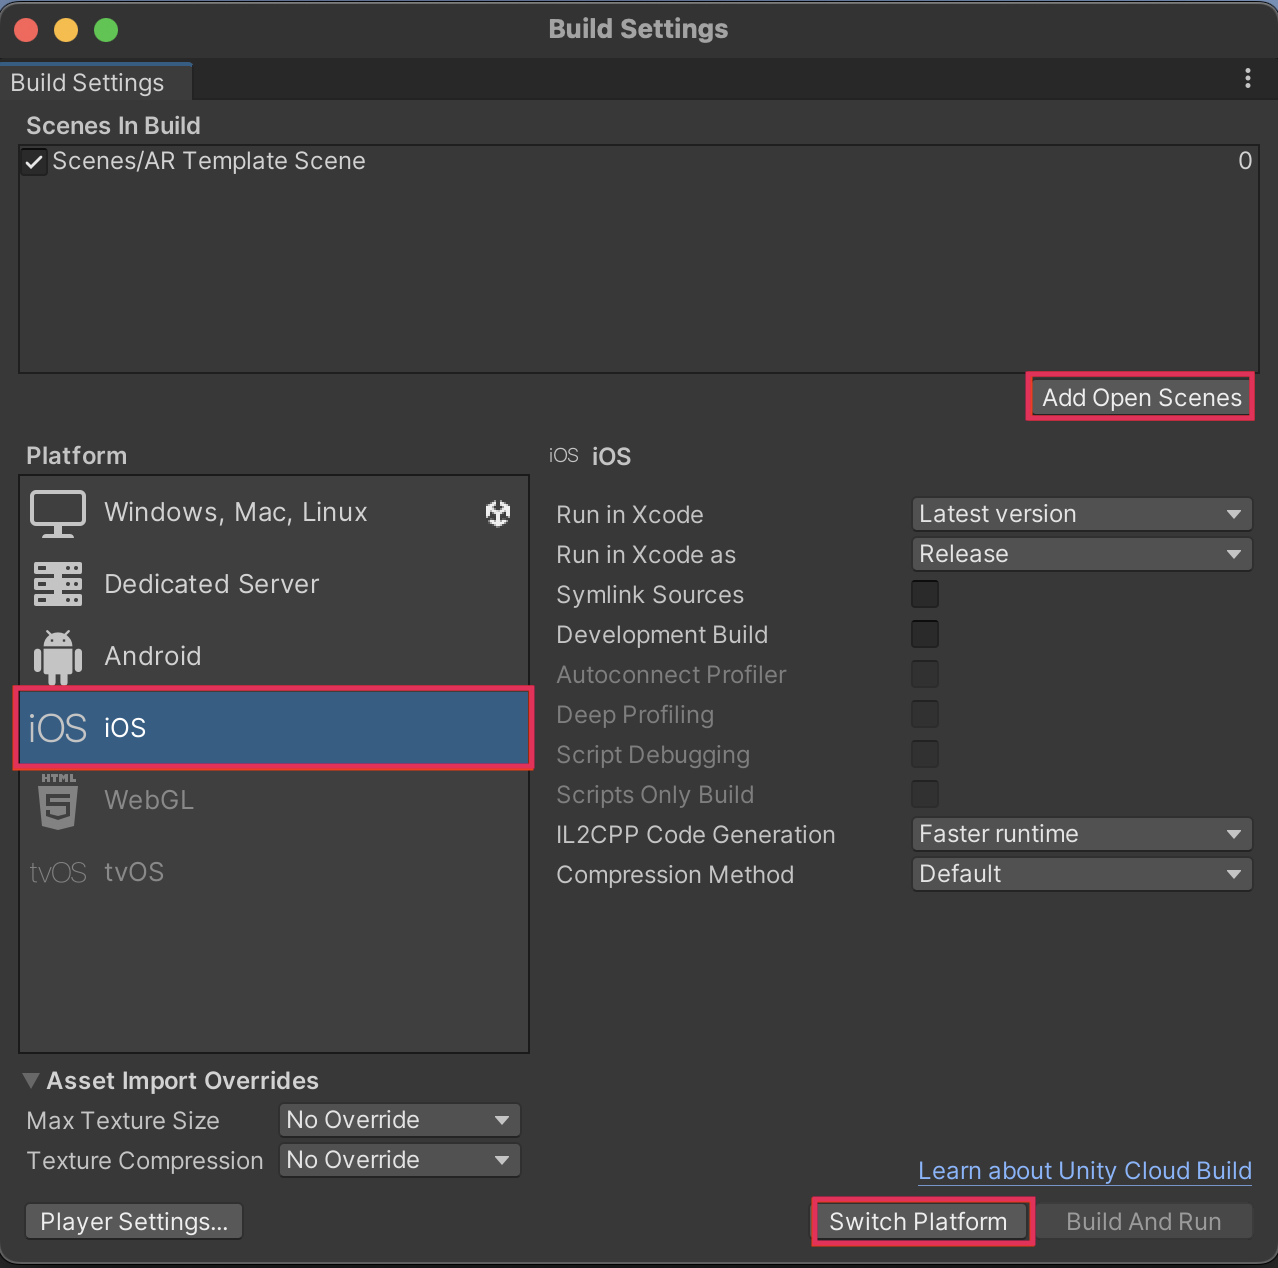
1. From the main menu, select File > Build Settings.
2. Select Add Open Scenes to make sure the currently-open scene will be included.
3. From the Platform panel, select iOS, then select Switch Platform. This process may take a few moments.
5. Build and run in XCode [iOS]
In the previous tutorial, you were asked to download XCode, Apple’s custom integrated development environment (IDE). If you haven’t done that yet, or the download is still in progress, you'll have to wait until it’s finished in order to continue.
When you select Build and Run to deploy a project from Unity to an iOS device, it initiates the following three-step process:
- A new XCode project (a .xcodeproj file and all supporting files) is created.
- XCode automatically opens that new project.
- XCode automatically runs that project on a connected target device.
However, the first time you attempt this process, a number of issues will arise and prevent step three above from completing. You’ll go through this process now and resolve all of these expected issues along the way:
1. Open a Finder window and go to your Applications folder, then double-click XCode to open it. The XCode welcome window should appear.
2. Connect your target iOS device to your computer with a cable and unlock the device screen.
3. From the Build Settings menu in Unity, select Build and Run. The Finder will open within the project’s top-level folder.
4. Create a new folder called “Builds” to hold all builds from this project, create a new folder within that called “AR Template” to hold this particular build, then select Choose.
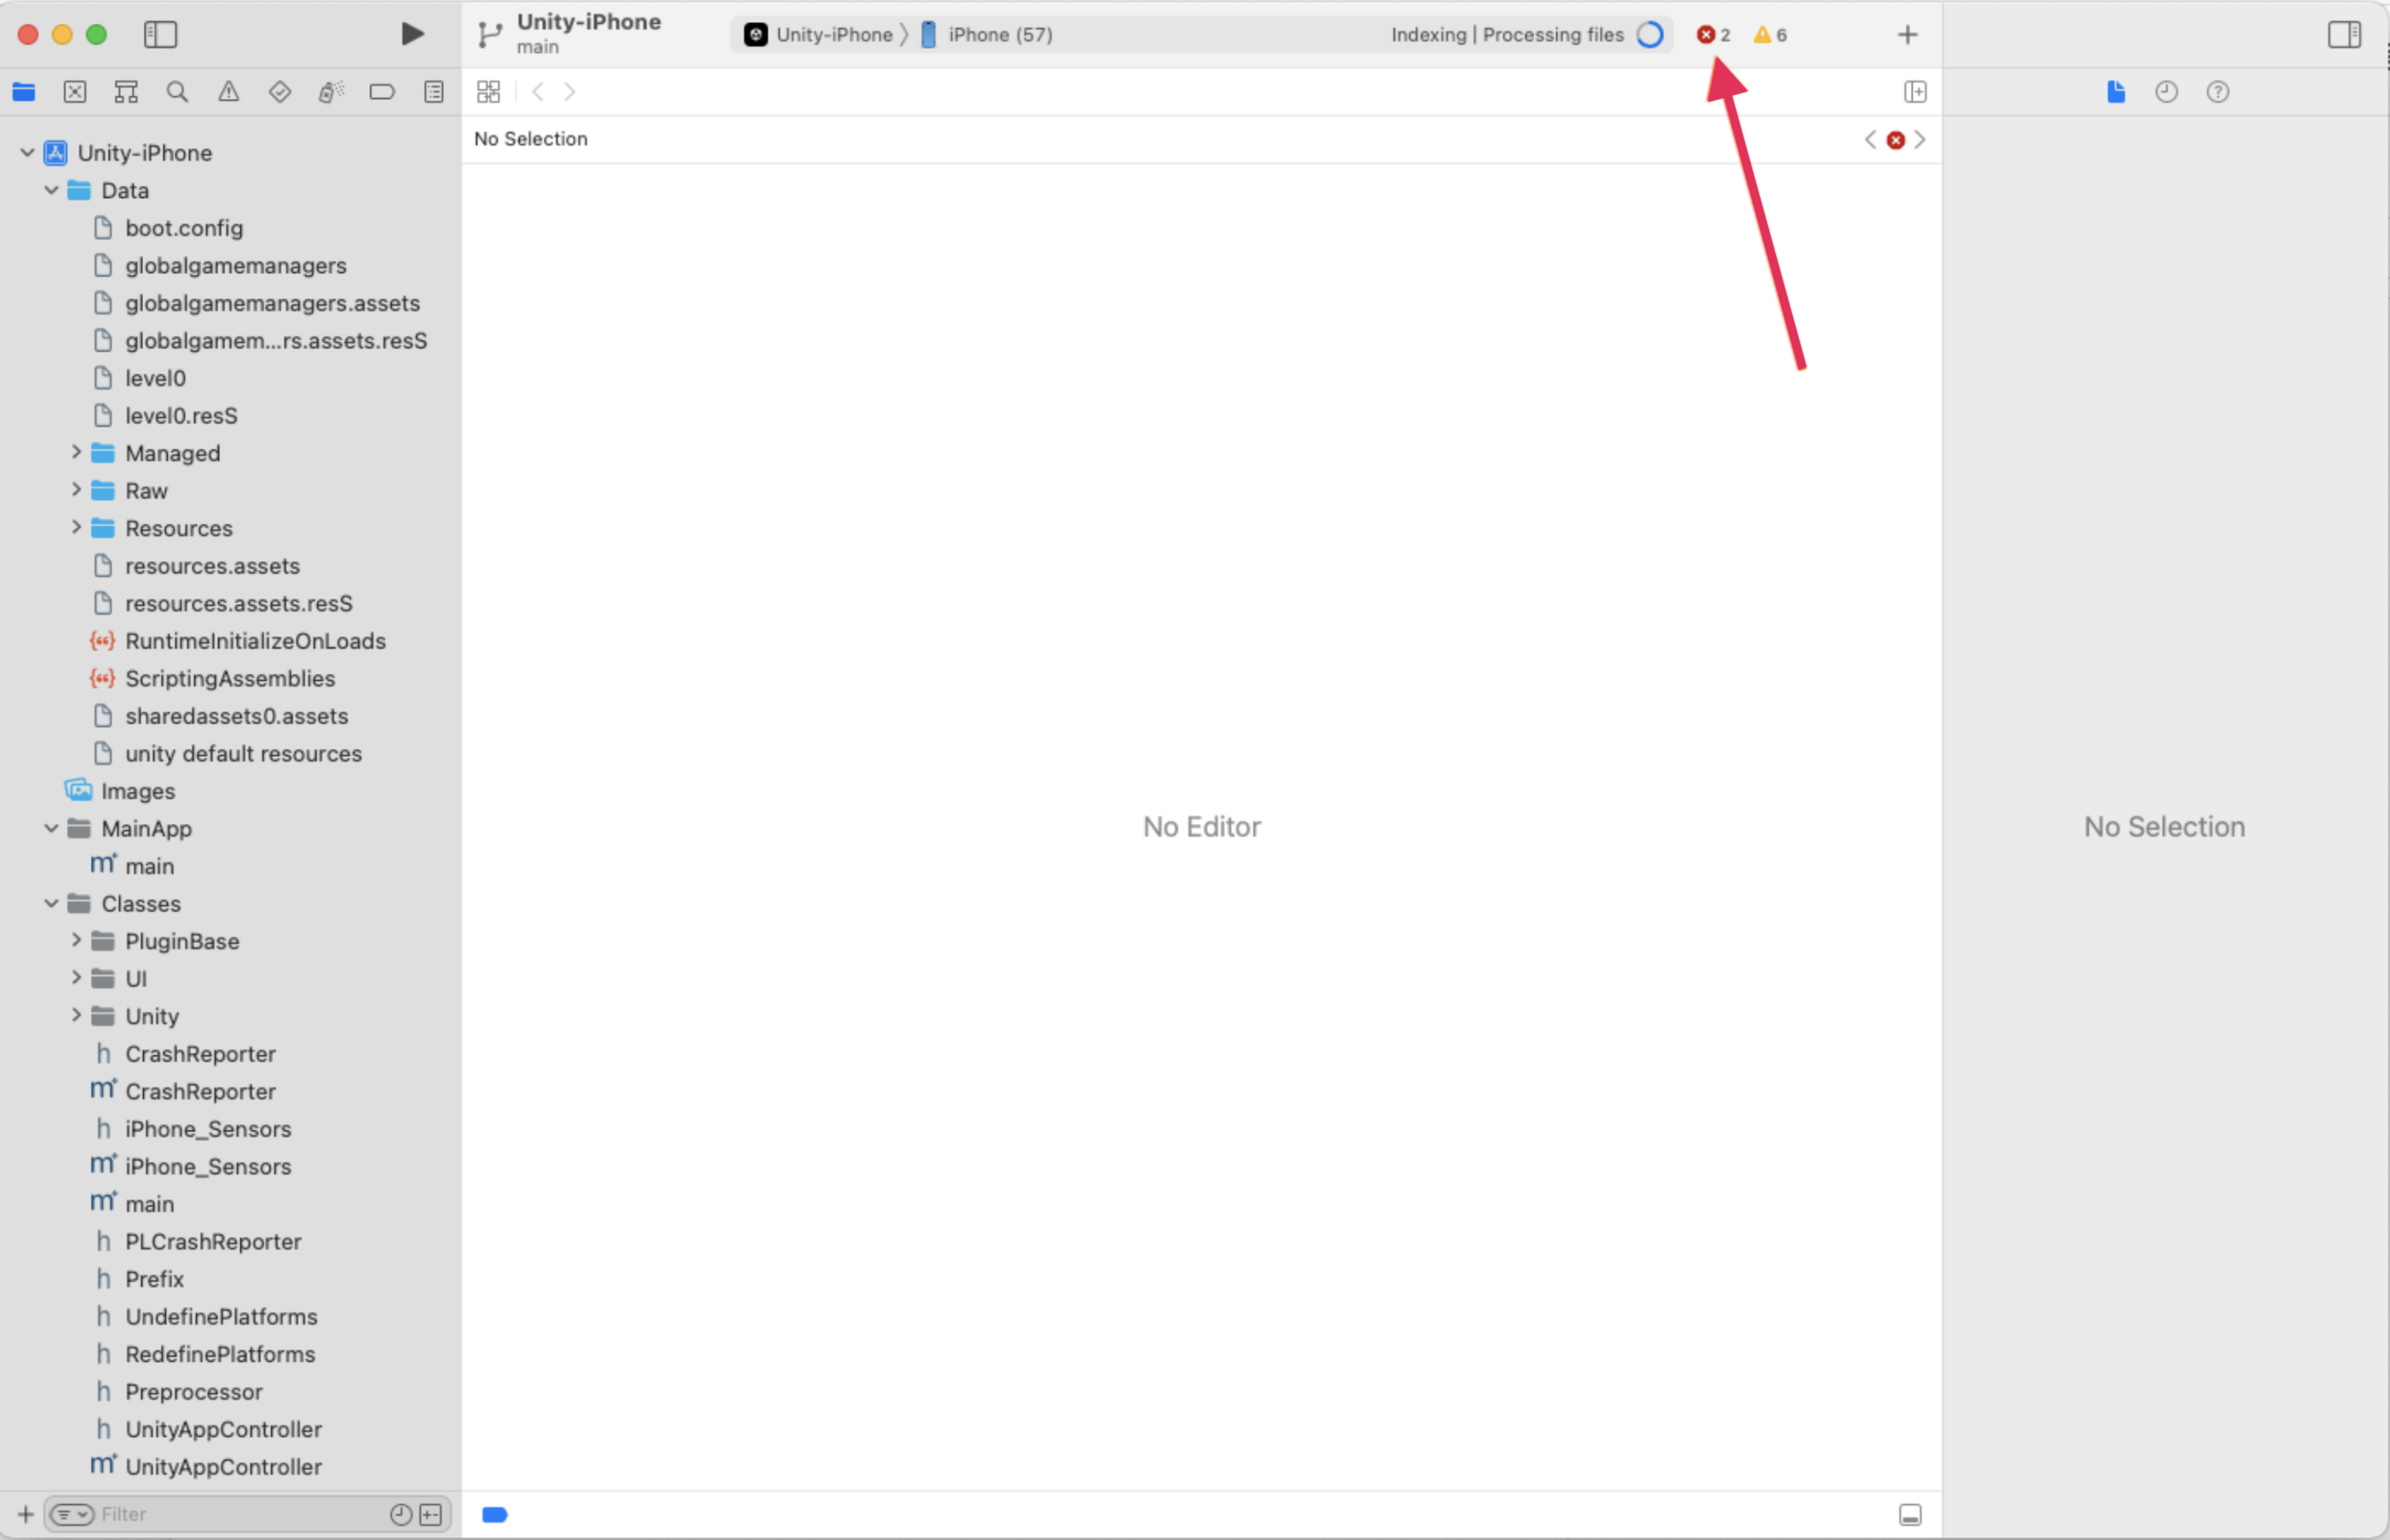
5. When the build process completes, XCode will automatically open on a mostly empty screen, with an error icon in the corner.
6. Familiarize yourself with XCode [iOS]
If this is your first time using XCode, it can be a bit overwhelming. You’ll take a minute now to explore the interface and get comfortable with it. If you’re already familiar with XCode, you can skip this step.
To explore your project in XCode, complete the following steps:
1. At the top of the navigator area in the left sidebar, select Unity-iPhone; this is the name of the automatically-generated XCode project from Unity.
2. Notice that the editor area in the center and inspector area in the right sidebar are now full of options and information.
3. Browse through the tabs at the top of the editor area (General, Signing & Capabilities, etc.) and scroll through the options available in each tab.
Most of the settings in this project are highly technical and will be unfamiliar — you don't need to worry about them in detail. However, as you browse the project, try to identify the cause of the errors. Look out for familiar terms you recognize, such as the settings for orientation, iOS versions, or app icons.
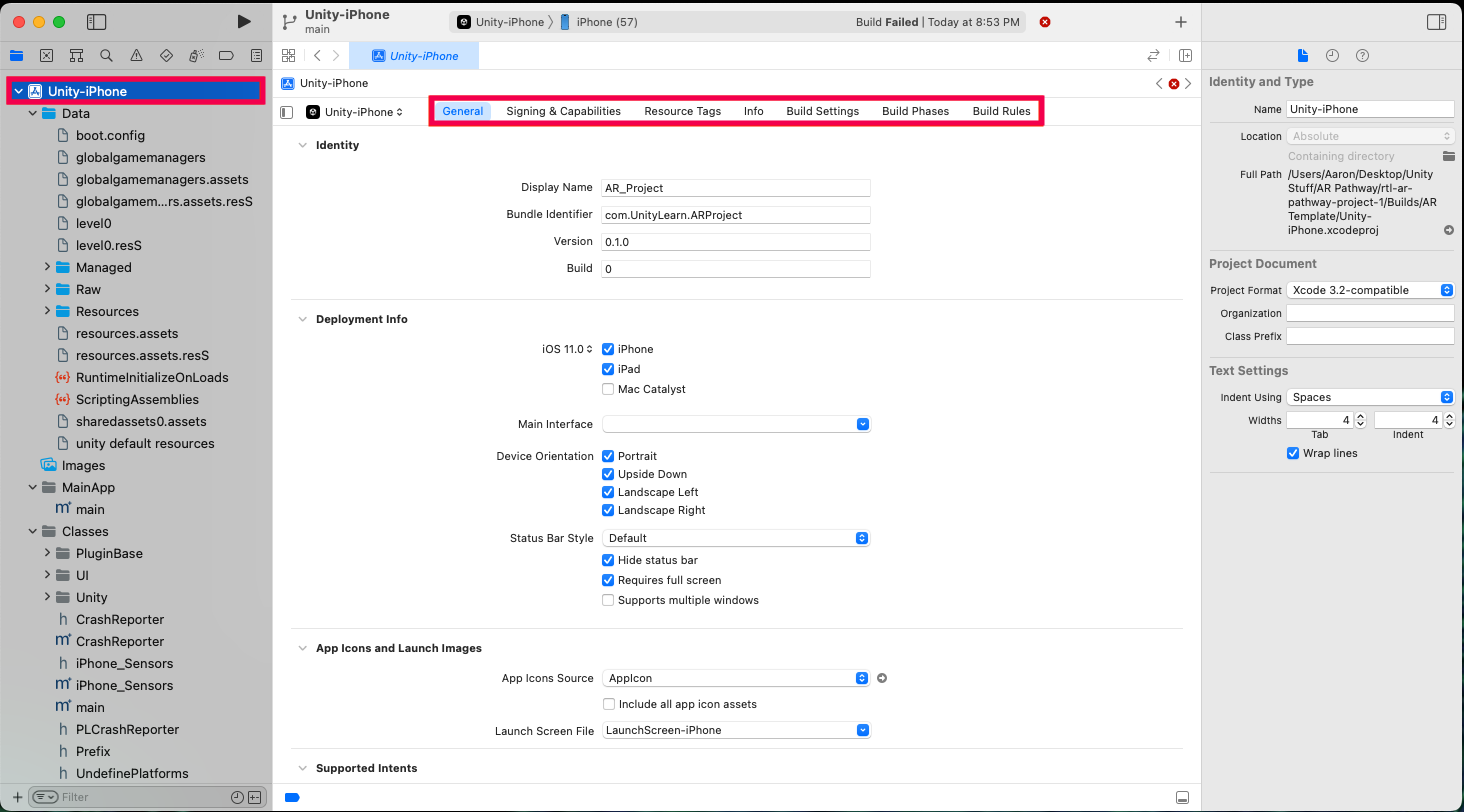
As you explored XCode, you probably noticed that its interface is pretty similar to Unity’s. It may help you feel more comfortable in XCode to consider the following parallels:
- The left panel is the navigator area, where you can select files to edit – just like Unity’s Hierarchy window.
- The large space in the center is the editor area, where you do most of your work – just like Unity’s Scene view.
- The right panel is the inspector area, where you can edit the properties of an individual file – just like Unity’s Inspector window!
If you’re interested, you can learn more about the interface from the XCode official documentation.
7. Resolve XCode errors [iOS]
Now that you’re a bit more comfortable with XCode, you're ready to resolve those expected errors.
The errors in this project don’t have anything to do with the functionality of the app – all the problems relate to signing. Signing your app is kind of like signing your signature at the bottom of a document: it tells XCode that you created the app and take responsibility for it. Without all the appropriate signing information, there will be errors and XCode will refuse to deploy the app to your device.
To review and address the problem, complete the following steps:
1. Select the Signing & Capabilities tab in the editor area.
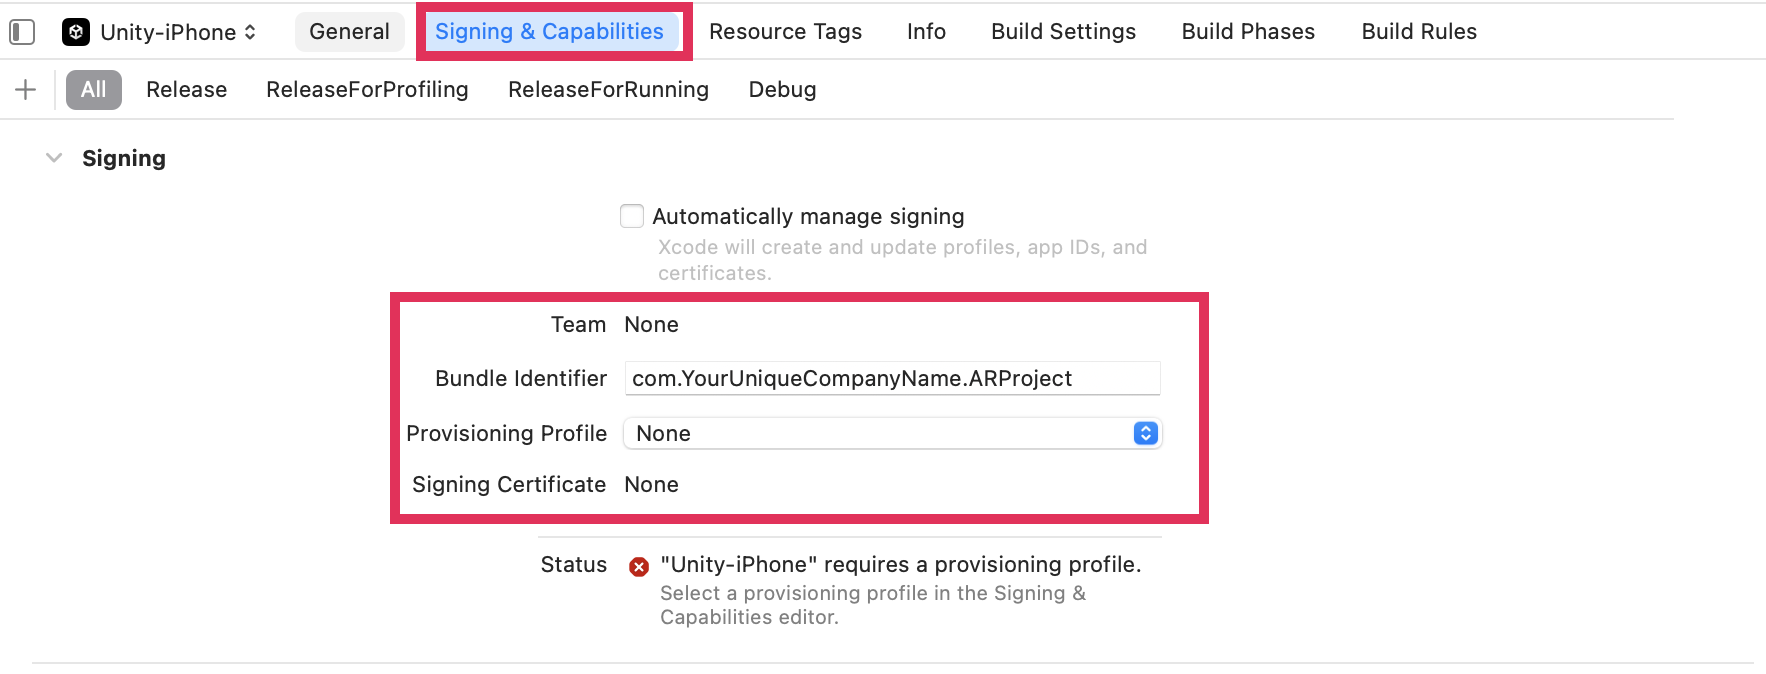
2. Check the four fields in the Signing & Capabilities tab. These fields must be set up properly to resolve the errors and run your app:
- Team: The individual or company responsible for the app.
- Bundle Identifier: The unique identifier for the project.
- Provisioning Profile: Something you install on a device that allows it to be used for testing apps.
- Signing Certificate: Permission Apple grants you to develop apps for its devices.
If that’s overwhelming, it’s OK — we’ll guide you through this.
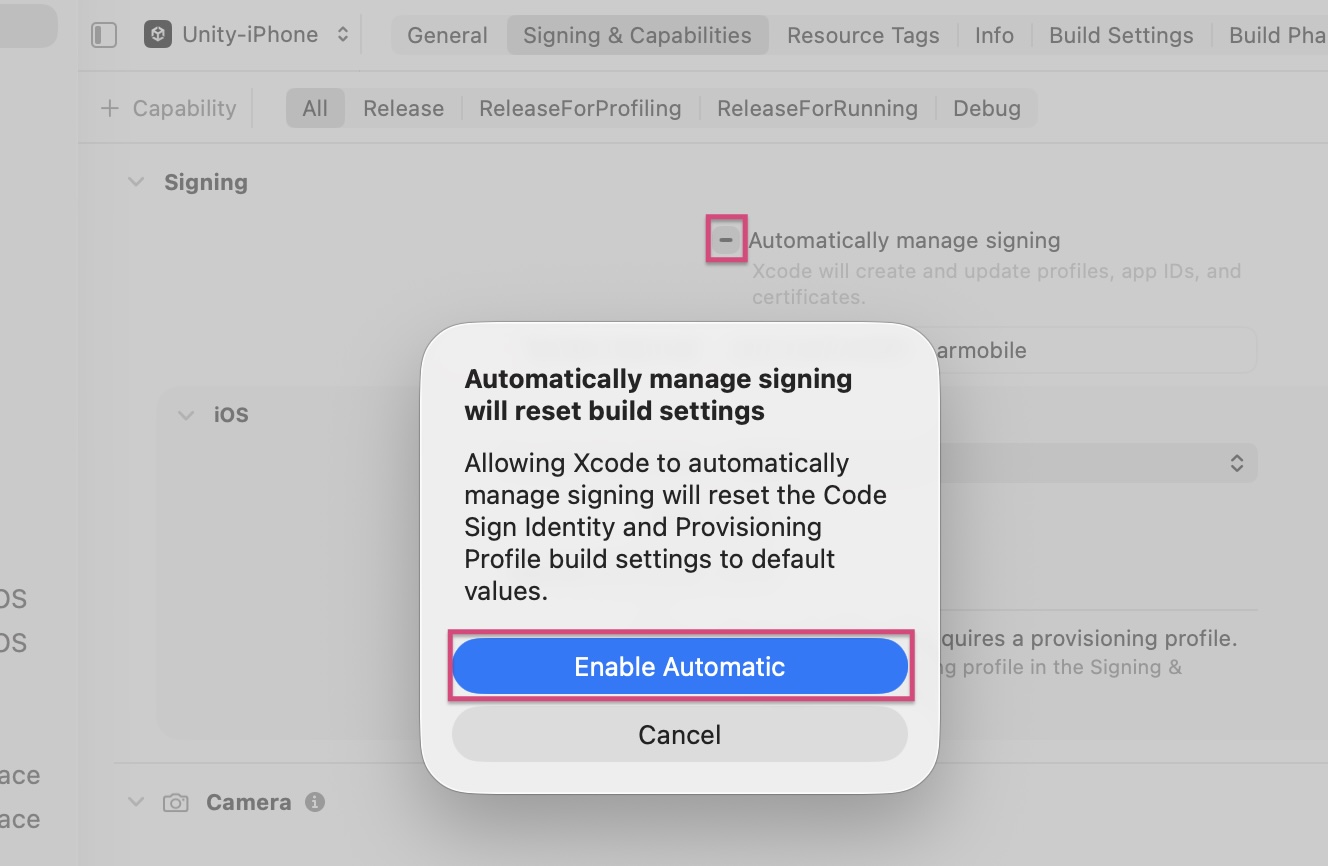
3. Enable the Automatically manage signing checkbox and then select Enable Automatic when prompted. This allows XCode to configure things automatically for you.
4. You now need to assign a Team. The error itself reads, “Signing for "Unity-iPhone" requires a development team.” Select Add Account next to the Team field. A new Accounts window will appear and prompt you to sign in with your Apple ID and password. Doing this will sign you in to XCode with your Apple ID. You can close this Accounts window after you sign in.
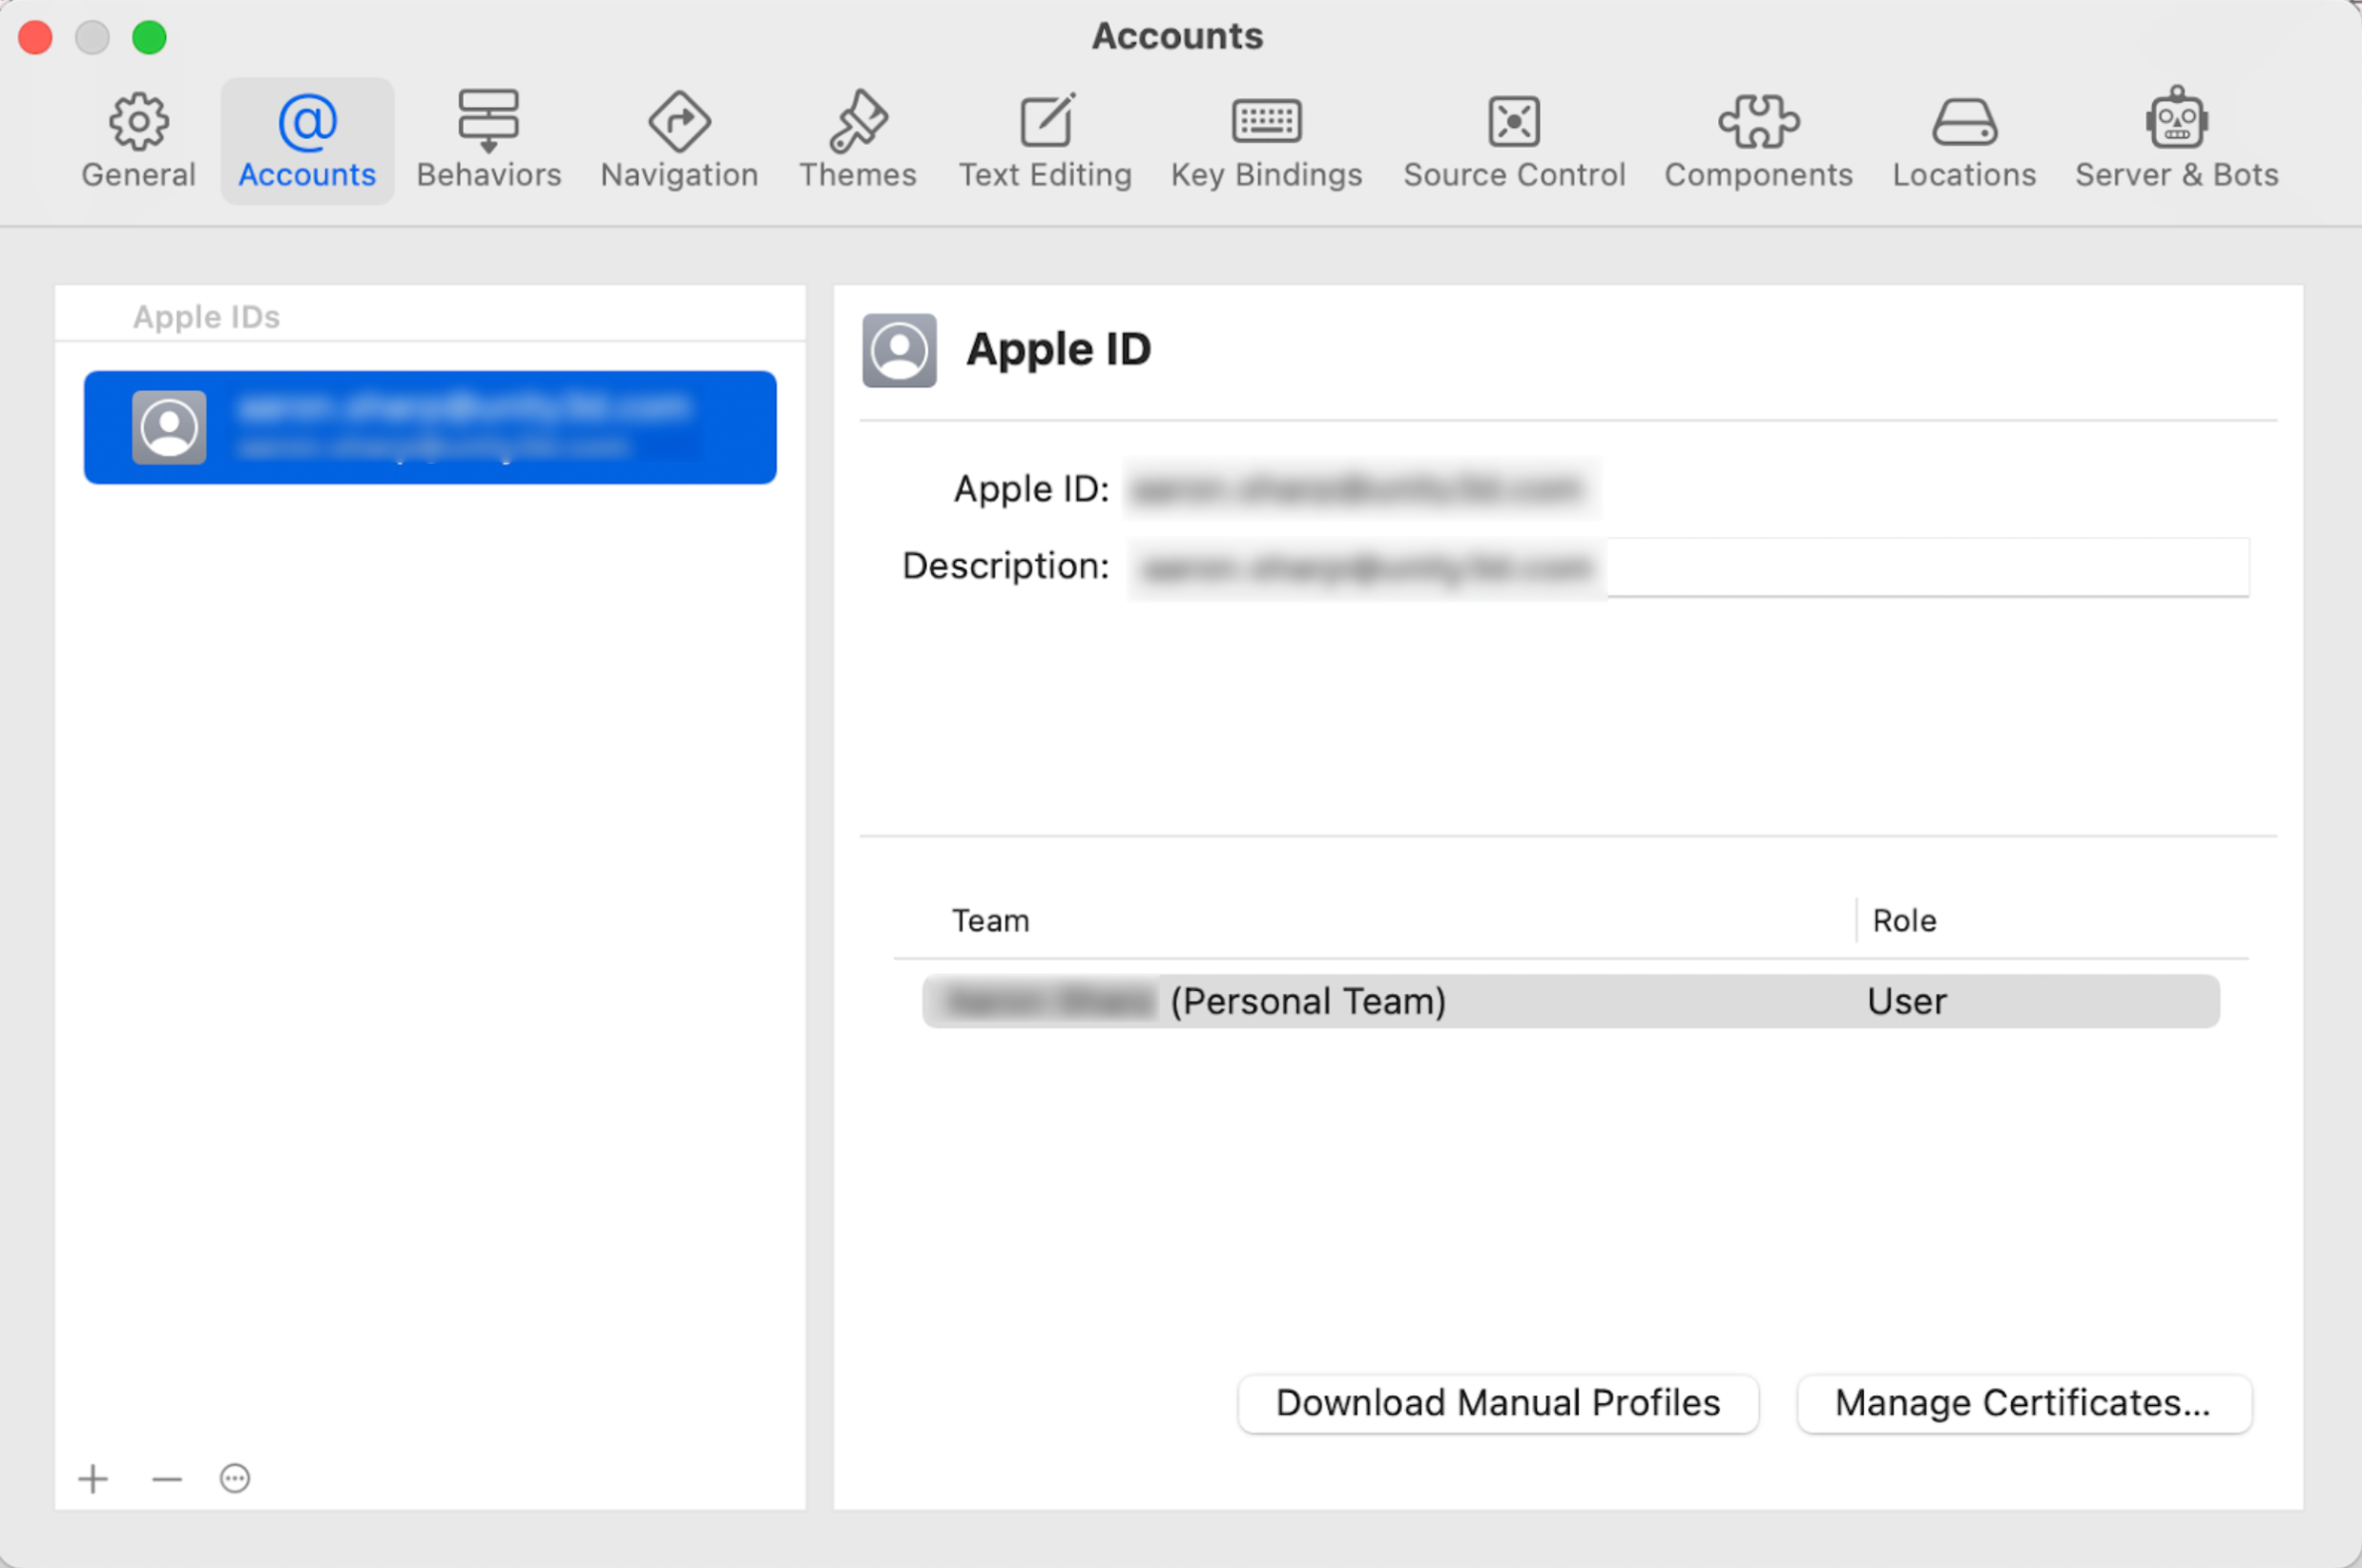
5. From the new Team dropdown that is currently set to None, select Your Name (Personal Team).
6. Make sure that the errors have cleared from the Signing & Capabilities tab.

8. Run the app on your device [iOS]
With all signing errors resolved, you’re ready to deploy and test the app on your device. To do this, complete the following steps:
1. Make sure your device is plugged in with its screen unlocked.
2. From the top toolbar, set the run destination to your connected iOS device.

3. Select the play button at the top of XCode to run the project (or press Cmd+R).

4. Monitor the progress of the build in the toolbar and wait for the app to run on your device.

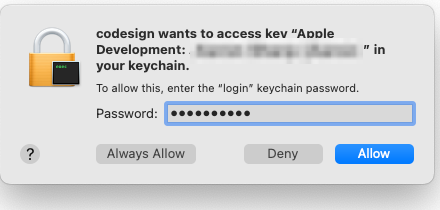
5. If you're prompted to give codesign access to your Apple Development certificate, enter your computer’s password and select Always Allow.
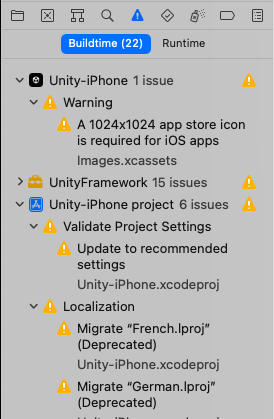
6. As the app builds, many warnings will appear in the left navigator area of XCode. These are only relevant when you're trying to submit your app to the App Store (they relate to the app icon, localization, and other distribution settings). You can ignore these warnings for now.
7. Your mobile device may display a message warning that the app cannot be opened (as it was not created by a trusted developer). On your device, go to Settings > General > VPN & Device Management. Select the Apple Development: [your Apple ID] app in the Developer App section, and then select Trust.
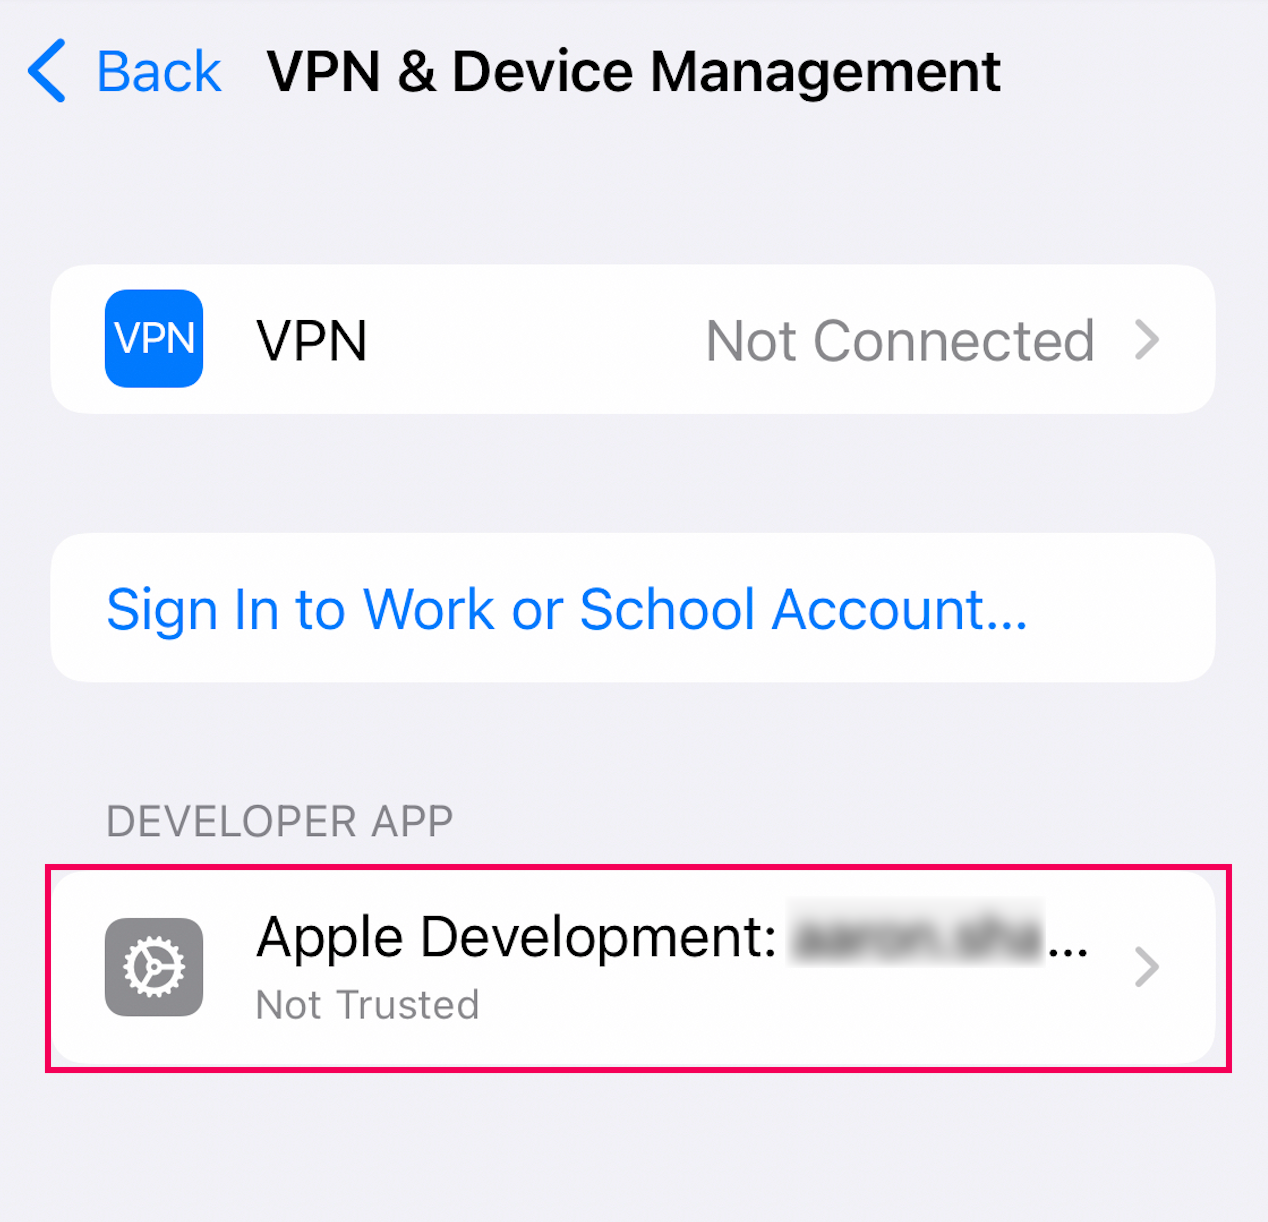
Note: If you're connected to a secure network with strict security settings, your device may have trouble connecting to Apple’s servers in order to validate and trust your developer certificate. You may need to connect to a different network or use mobile data to complete this step.
8. Re-run the device through XCode. When the app opens on your device, pick up your device and point the camera toward your environment.
The spinning cube will generate directly in front of wherever the camera is pointed the moment the app runs, so consider this before you point your device. The cube won’t stay perfectly in place, but it should stay in approximately the same area of your room.
9. When you're finished testing the app, select stop in XCode to fully close the app. Alternatively, you can also swipe up from the bottom of your device, hold, then let go. Then swipe up on the app to fully close it.
Important: Make sure that you stop or close the app rather than just minimizing it. If you only minimize the app, keeping it running in the background, changes you make in Unity may not build to the device.
Congratulations! You have successfully deployed an AR project to your iOS device.
9. Configure signing preferences in Unity [iOS]
You'll build your apps through XCode many times during development, so this process should be as efficient as possible. However, if you rebuild your app right now, you’ll need to take the same steps as you did above to resolve those signing errors.
Helpfully, you can pre-configure your signing preferences in Unity so that those errors never appear in XCode.
Note: During this process, you may be asked to input your computer password in a Keychain Access dialogue window a number of times. This is expected behavior.
To configure your signing preferences in Unity, complete the following steps:
1. On your computer, use Spotlight Search to open the Keychain Access app.
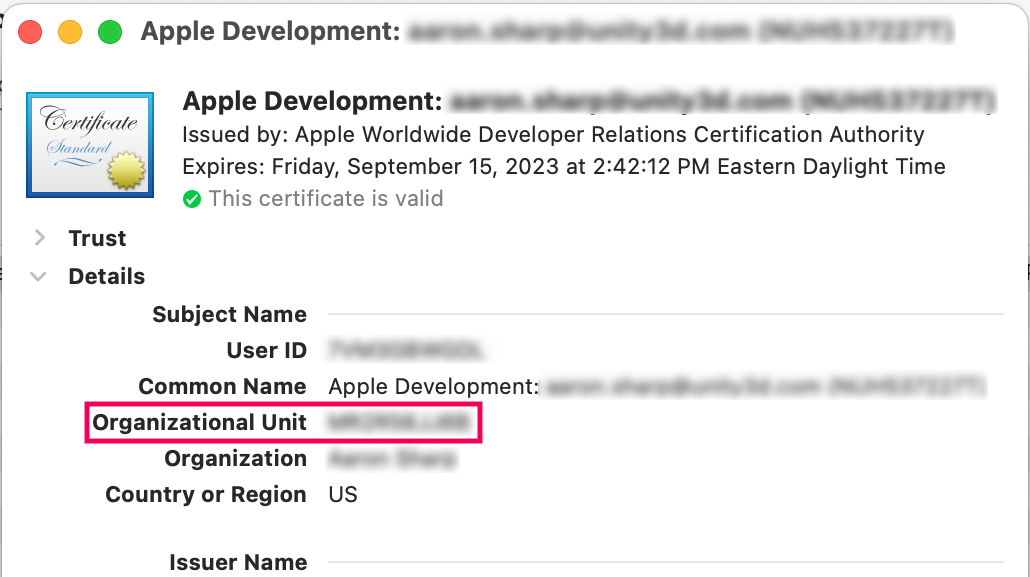
2. In the left sidebar, select the login filter, then in the tabs along the top, select My Certificates. This should reveal the Apple Development certificate that was automatically generated by XCode

3. Double-click the certificate to open it and locate the Organizational Unit property, then select and copy the ID associated with it. You’ll need to paste this value later.
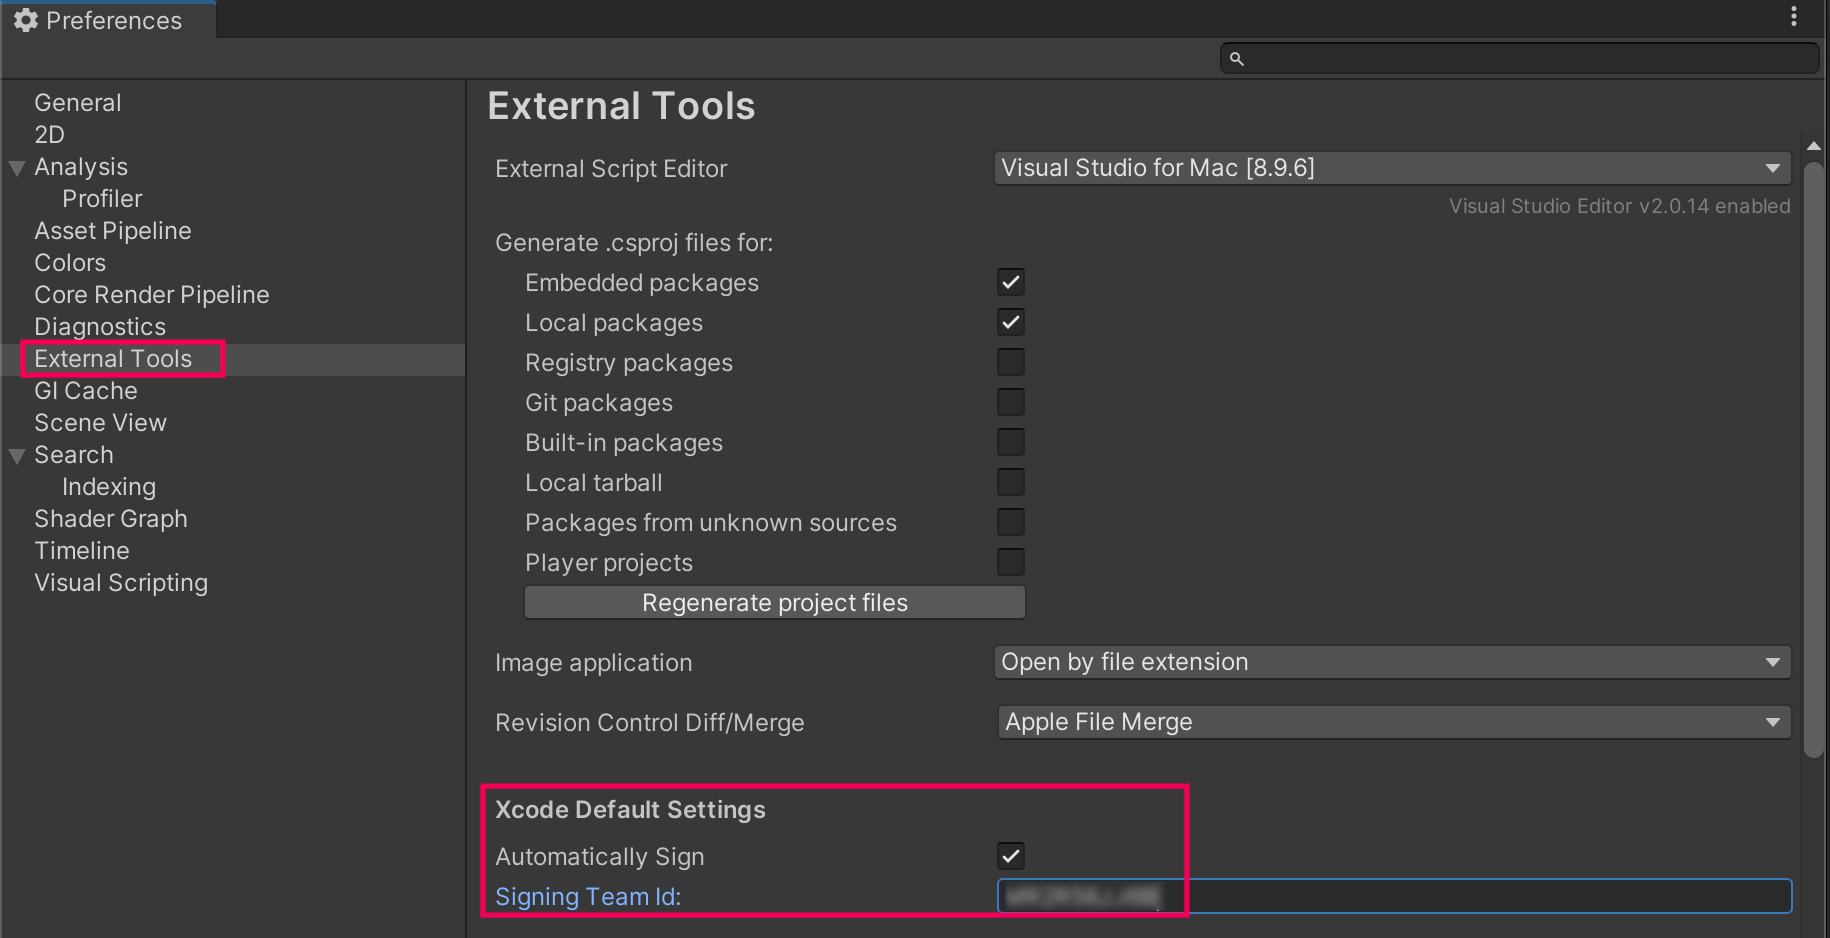
4. In Unity, press Cmd+Comma (,) to open the Unity Preferences dialog window.
5. In the navigation sidebar, select External Tools.
6. In the Xcode Default Settings section, enable the Automatically sign checkbox.
7. In the Signing Team Id property field, paste the Organizational Unit ID you copied earlier.
10. Rebuild a new version of your app [iOS]
You should now be able to build a project directly from Unity through XCode and onto your device without any errors. Before rebuilding, it is helpful to make a small change to the project – that way you know for certain that you’re running a new version of the app.
To make a small change and rebuild your app, complete the following steps:
1. In the Hierarchy window, select the Cube GameObject.
2. In the Inspector window, change the scale of the X, Y, or Z value to make the cube into a rectangular prism.
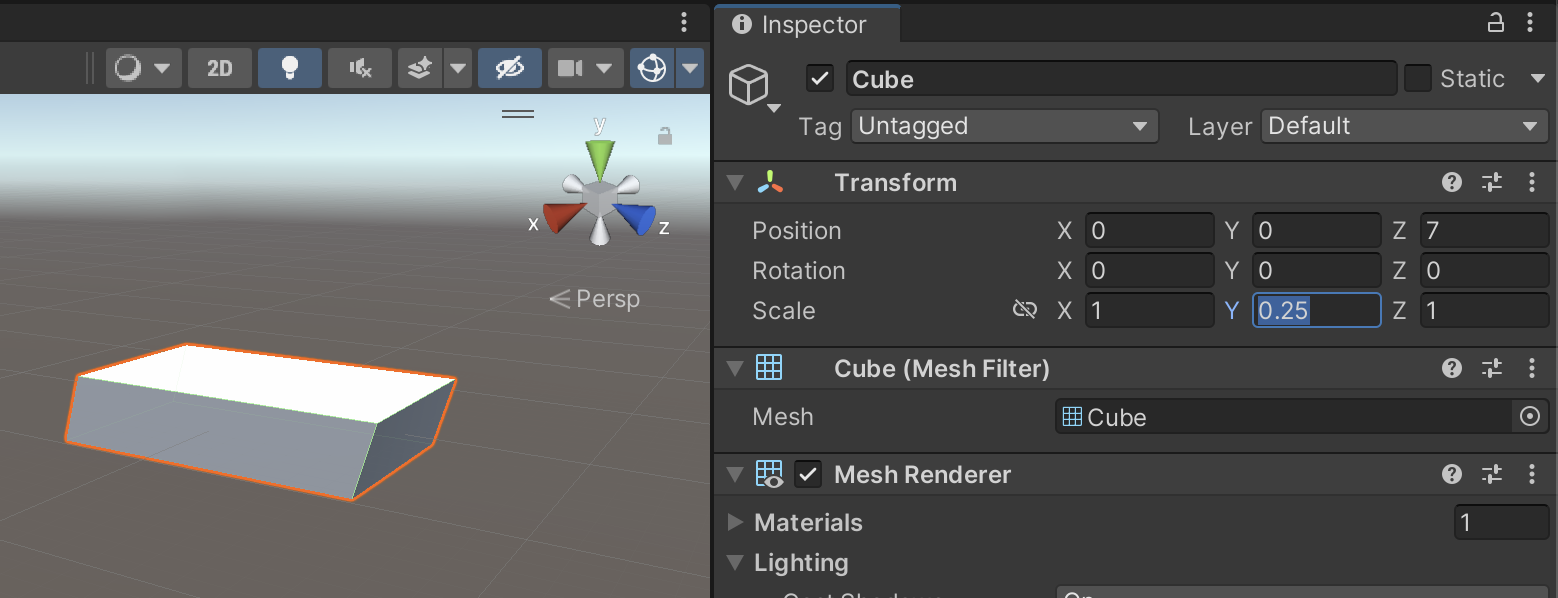
3. Press Cmd+B. This will automatically overwrite your existing XCode project and run it on your connected device.
If you have successfully built a new version of the app, you should see a rectangular prism floating in your room instead of a cube.
11. Configure the Game view aspect ratio [iOS]
When you run apps on your phone, they are either in portrait mode (vertical) or landscape mode (horizontal). The relationship between the width and height of a screen is called an aspect ratio. When you’re testing an app in Unity, the Game view should accurately reflect your device’s aspect ratio. This will allow you to better visualize how the app will look when it’s on your device.
To set up your Game view’s aspect ratio, complete the following steps:
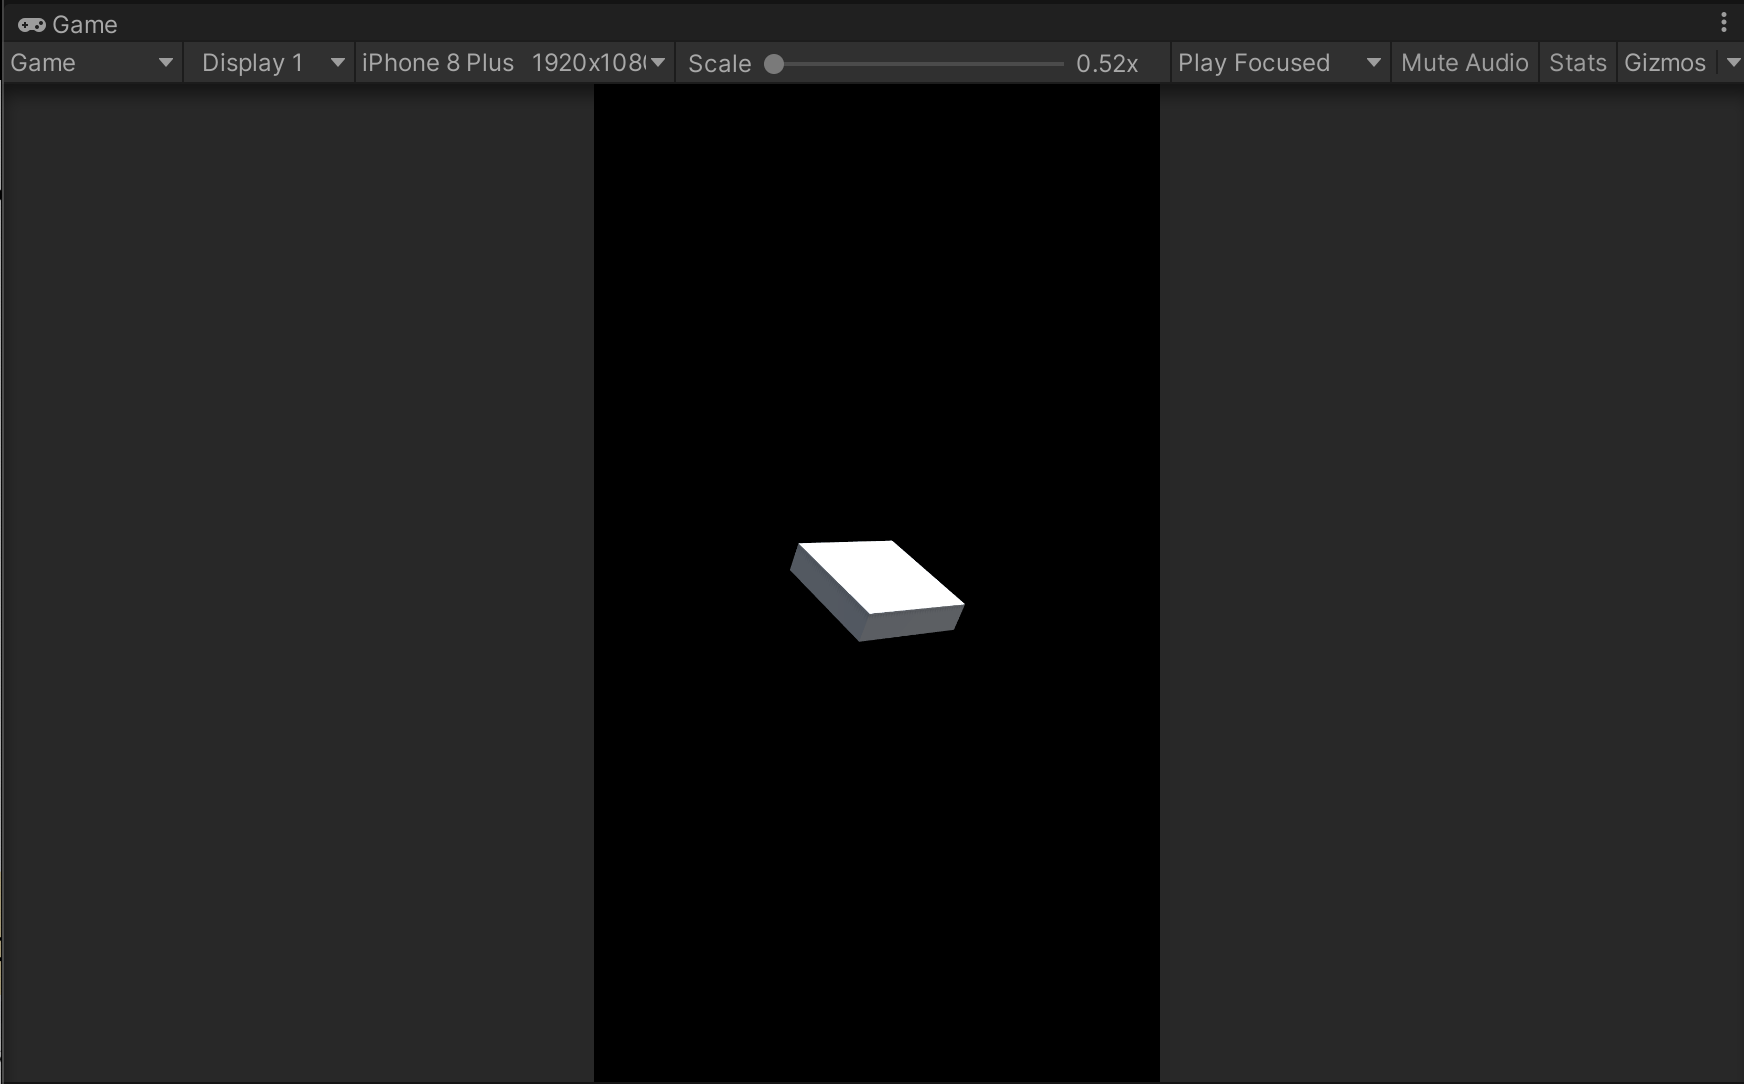
1. Select Play to preview your app in Unity. Notice that the black background takes up the entire Game view.
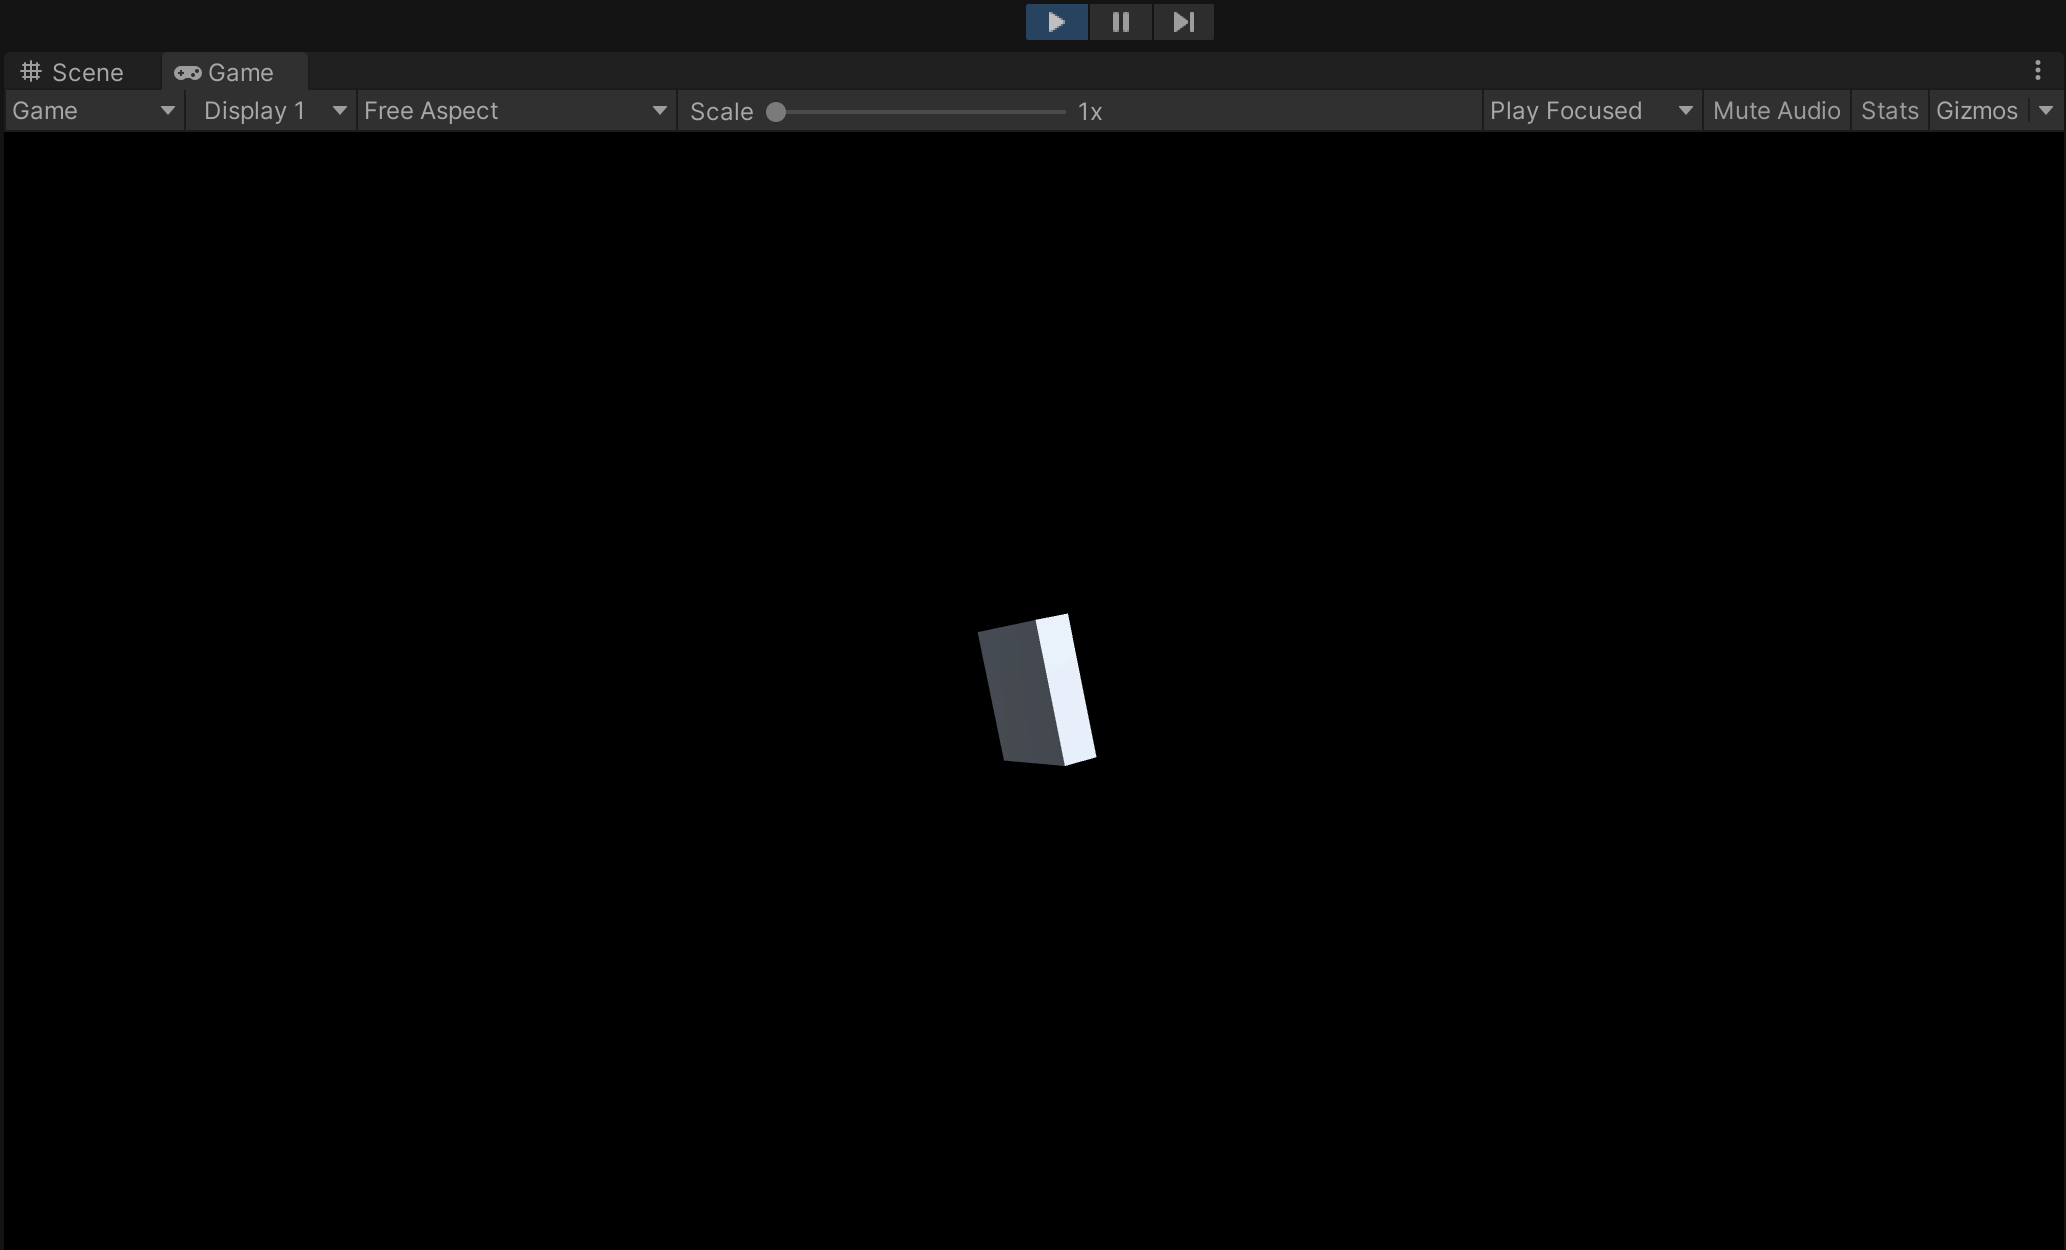
2. From the Game view toolbar, use the aspect ratio dropdown to change your preview from Free Aspect to one of the iOS device Portrait options. It’s OK if your specific device is not represented.
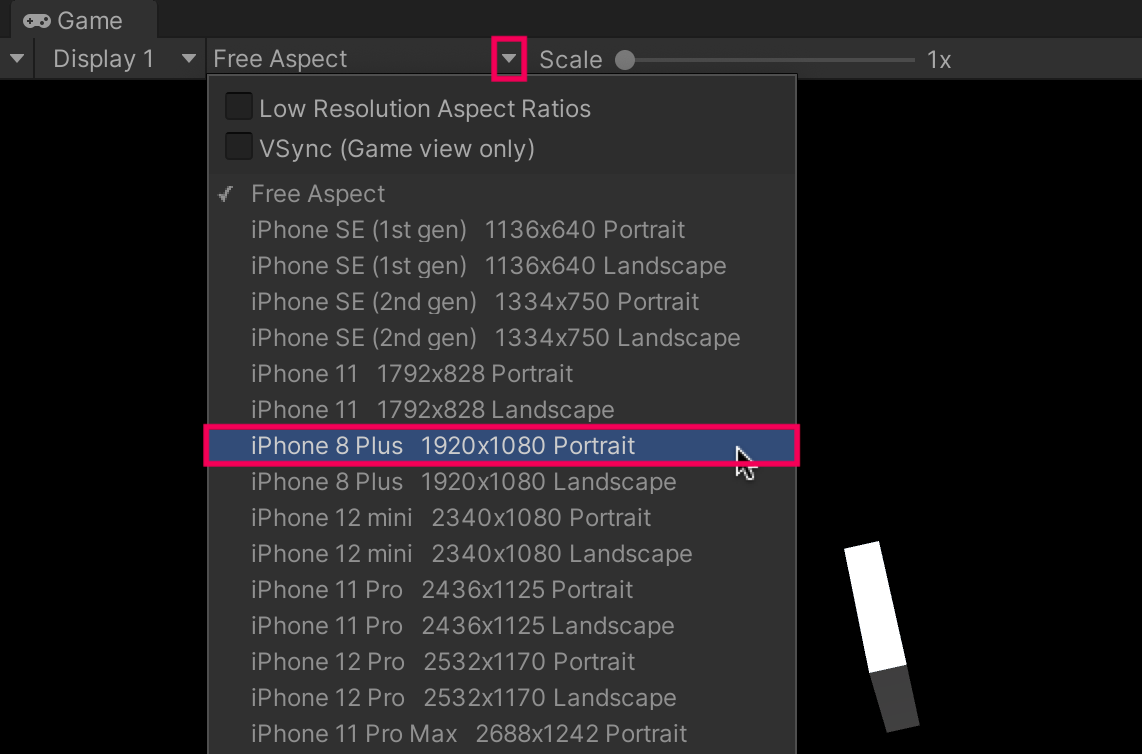
3. Notice that the Game view aspect ratio now closely resembles the experience of holding your mobile device in portrait mode.
You have completed the iOS section of this tutorial. The remaining steps cover how to build and deploy apps to Android devices. If you have an Android device that you want to test on you can follow these steps, but if you only want to test on iOS then skip to the final step of this tutorial.
12. Enable the ARCore XR plug-in [Android]
This is the first step in the Android-specific setup instructions. If you're using an Android device, you're in the right place.
The project is already generally set up for AR. Now you have to configure it to be compatible with Android, specifically, by installing ARCore, Android's AR framework. The equivalent package for iOS devices is ARKit.
ARCore is the API that provides access to the cameras, sensors, and other hardware that make AR experiences possible on Android devices.
To install ARCore in your project, complete the following steps:
1. From the main menu, select Edit > Project Settings, then select XR Plug-in Management from the left panel.
2. Select the Android tab from the XR-Plugin Management panel.
3. From the list of Plug-in Providers, ensure that Google ARCore checkbox is enabled.

13. Configure build settings [Android]
Before building your project, there are just a few last-minute steps to take care of.
To configure your build settings, complete the following steps:
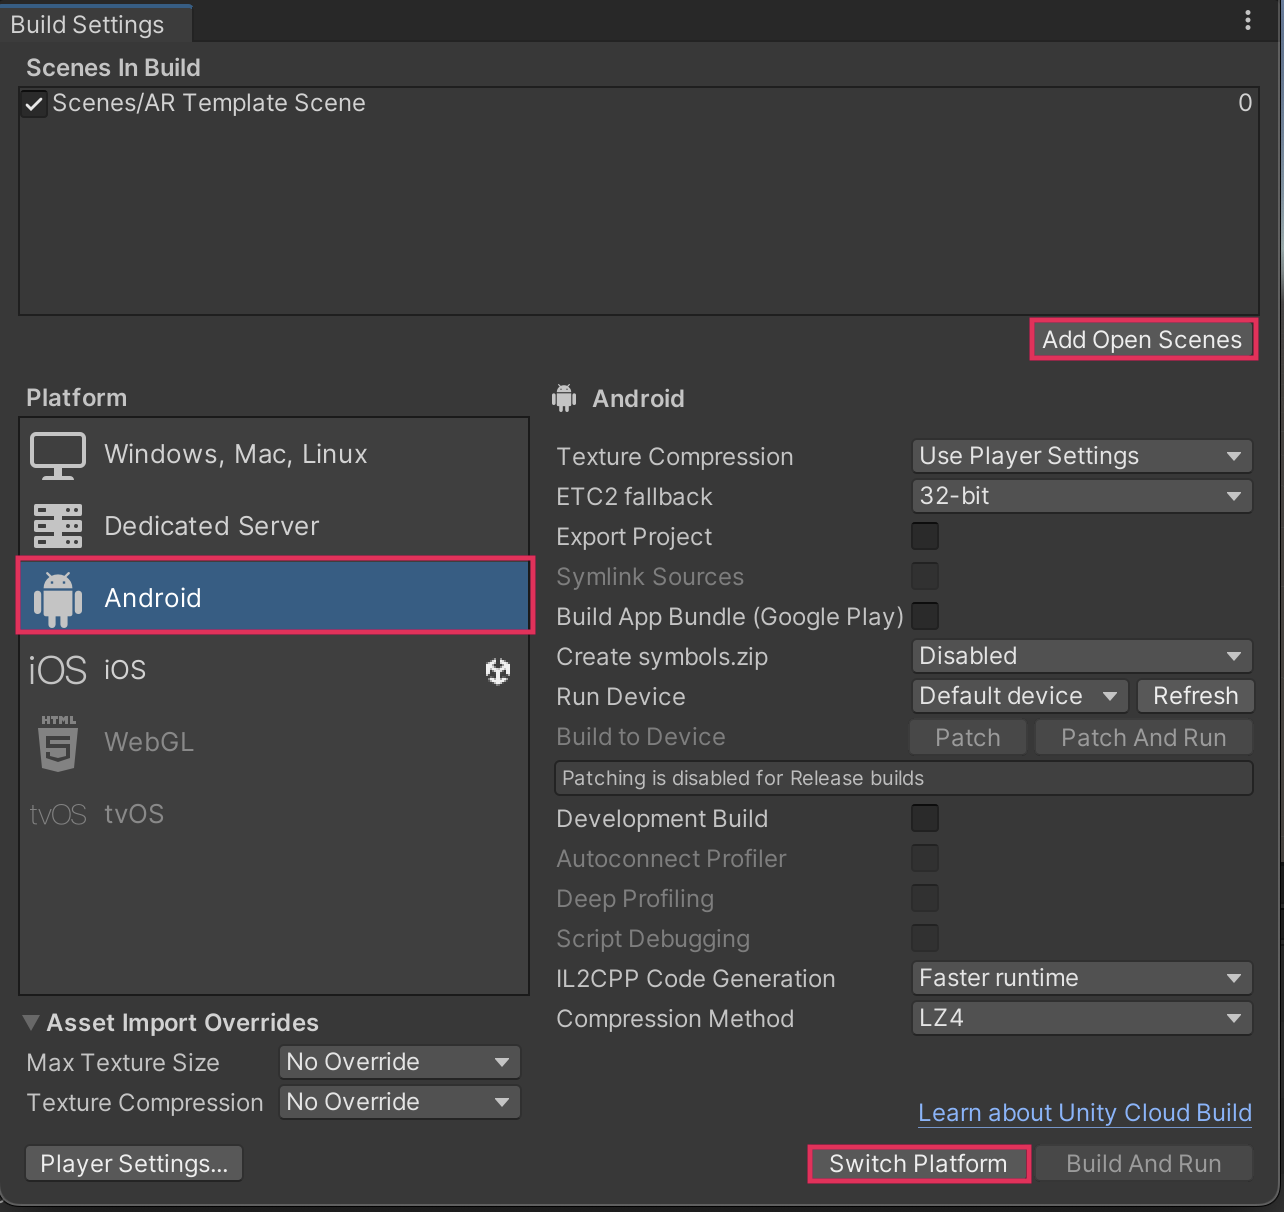
1. From the top menu, select File > Build Settings.
2. Select Add Open Scenes to make sure the currently-open template scene will be included.
3. From the Platform panel, select Android, then select Switch Platform. This process may take a few moments.
14. Enable USB Debugging on your device [Android]
Enabling USB debugging on your Android device will allow Unity to deploy apps directly to your mobile device through a USB cable connection.
Follow this Android documentation to enable USB debugging on your device.
15. Run the app on your device [Android]
With the build platform now set to Android, you're ready to deploy the app directly to your device from Unity. To finish this process, complete the following steps :
1. Connect your device to your computer with a cable.
2. In the Build Settings window, select Refresh next to the Run Device option to see a list of connected devices, then select your connected device.
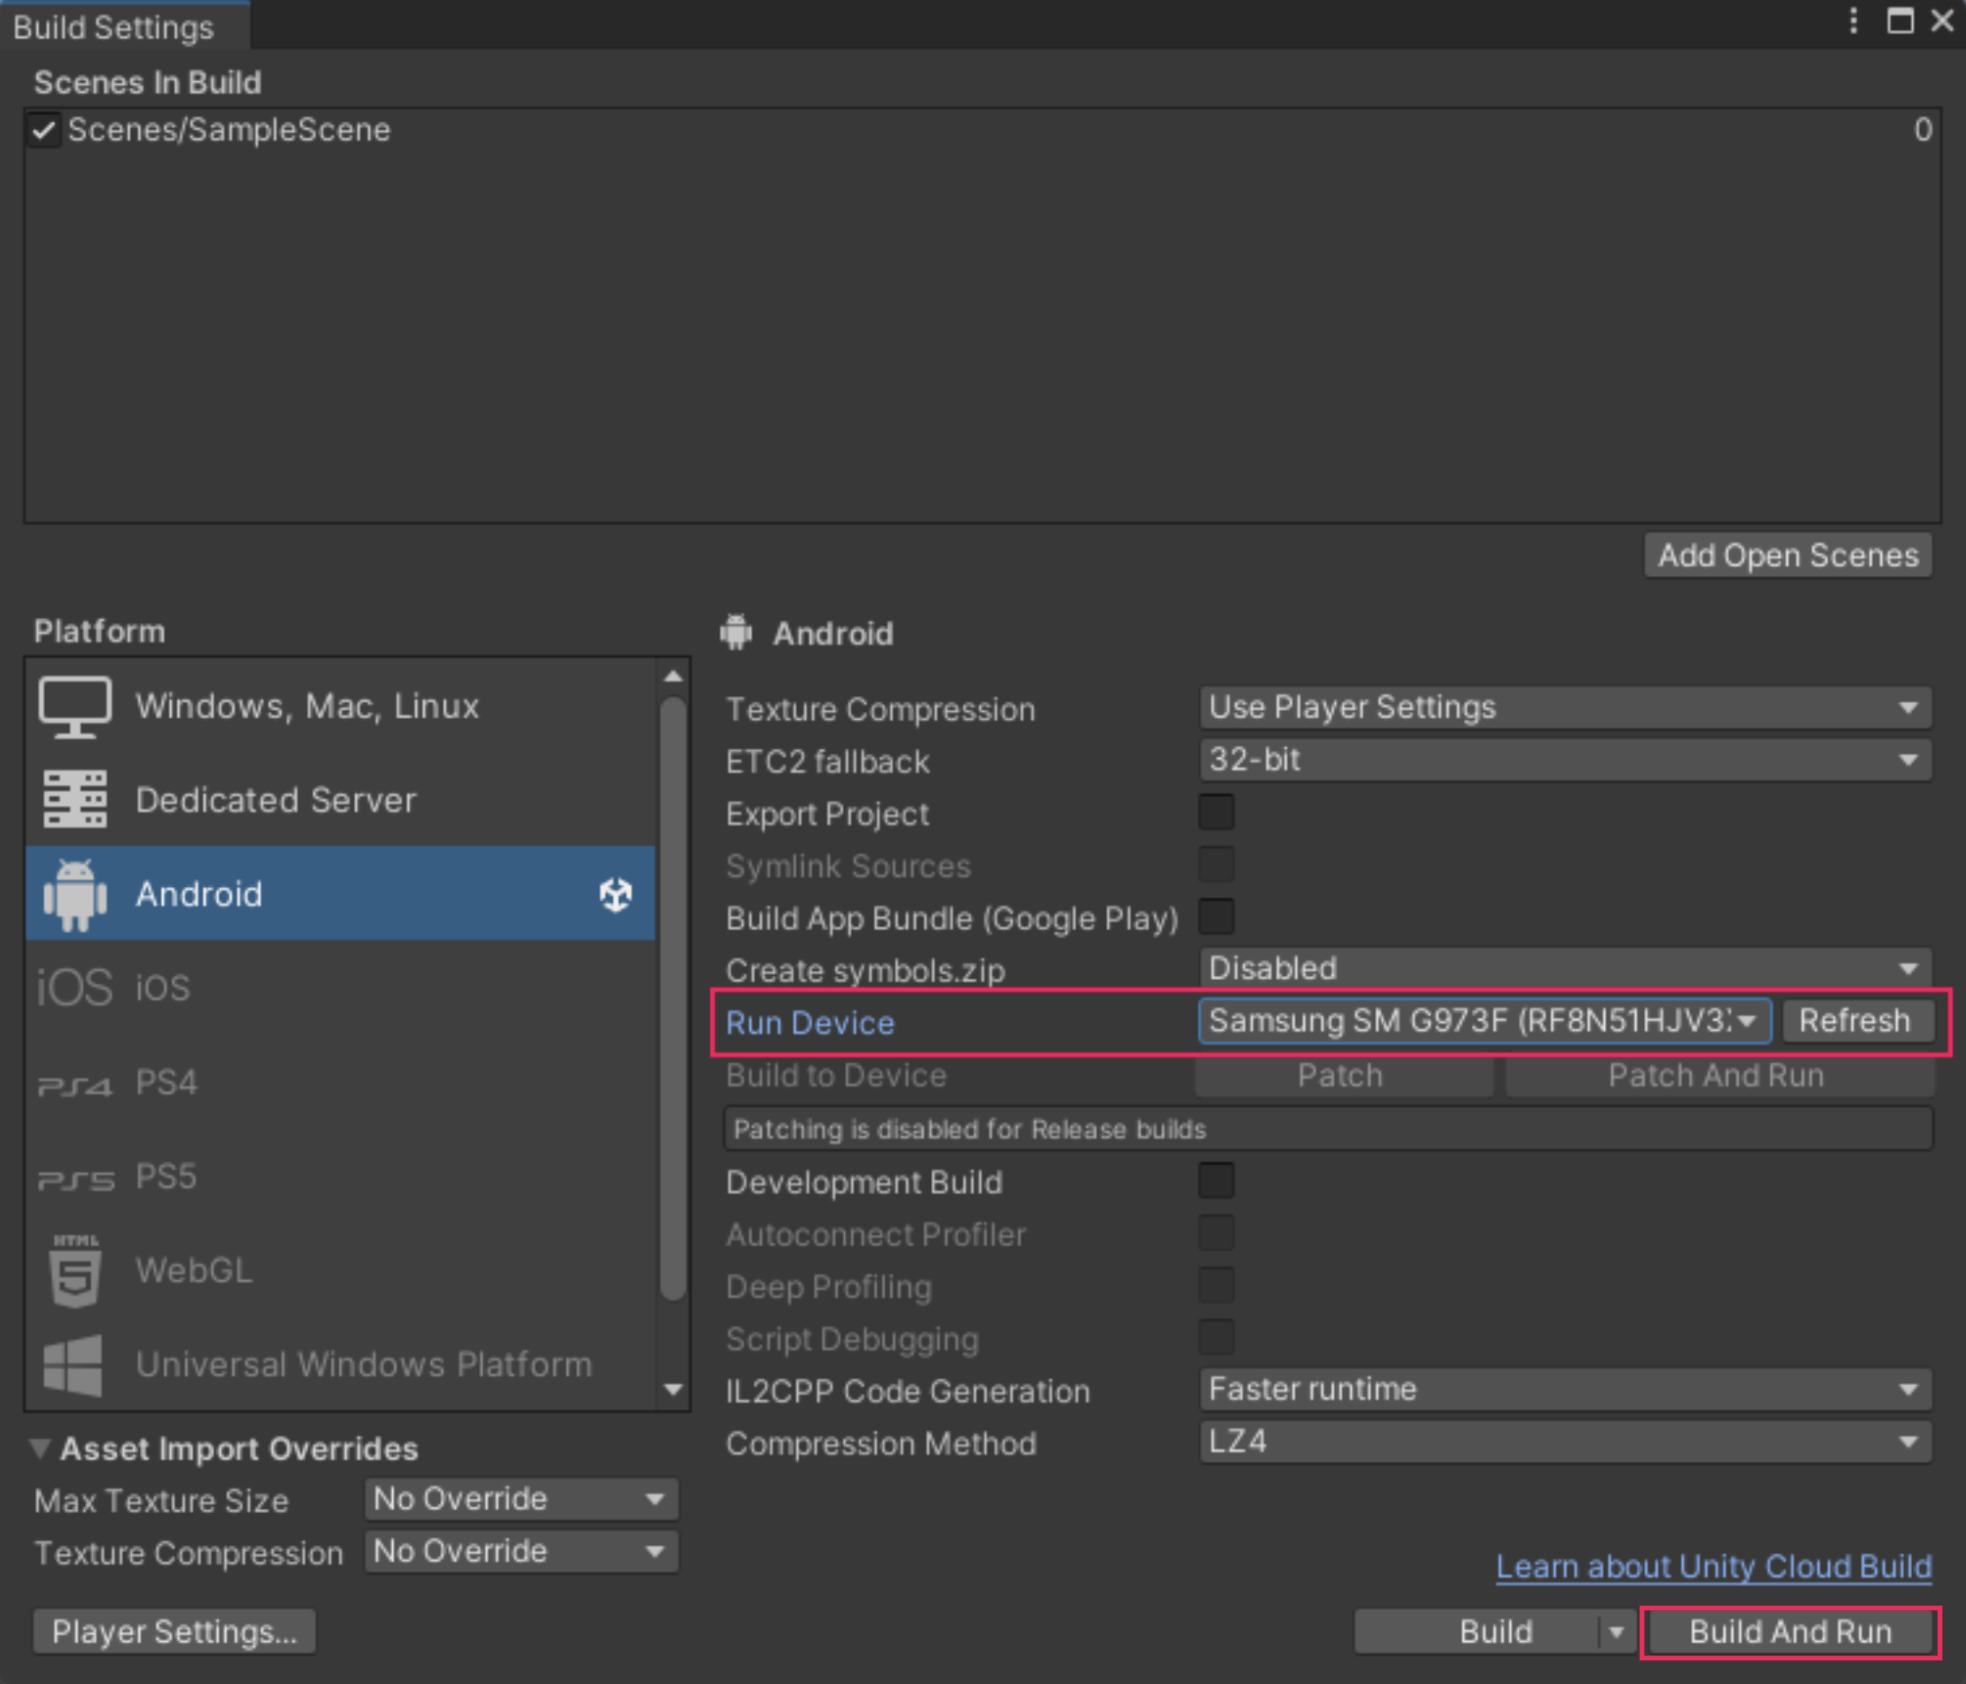
Note: If you do not see your device listed, try some basic troubleshooting steps like disconnecting and reconnecting your device, making sure USB debugging is enabled, or restarting Unity. If you still do not see your device, your phone may not meet the minimum requirements. Check Unity’s Android setup documentation for additional troubleshooting help.
3. Select Build and Run. This will open the file explorer window, asking you where you would like to save your app (.apk file).
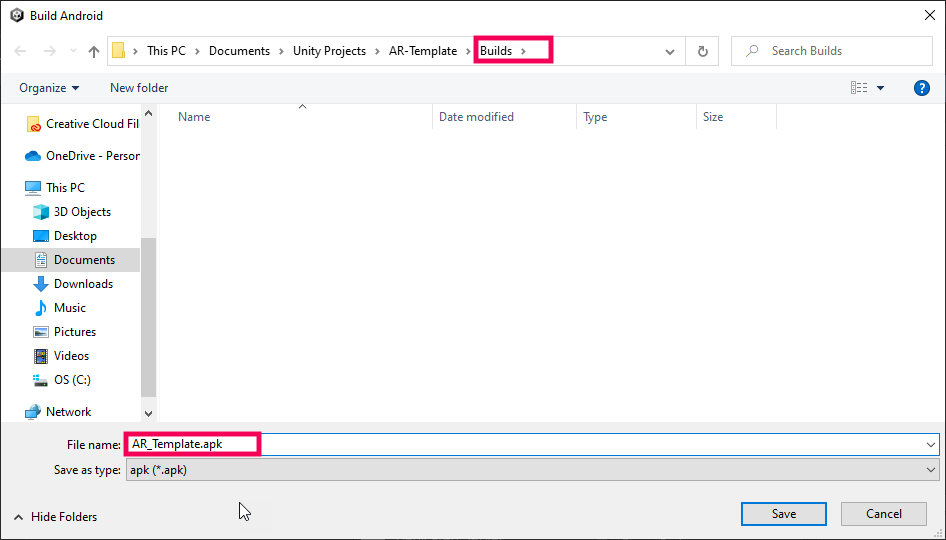
4. In the file explorer window, create a new folder called “Builds” in your project’s folder to hold all builds from this project, name your file something like “AR_Template.apk”, then select Save.
5. When the app automatically opens, pick up your device and point the camera toward your environment. You may have to allow the app access to the camera.
The spinning cube will generate directly in front of wherever the camera is pointed the moment the app runs, so consider this before you point your device. The cube won’t stay perfectly in place, but it should stay in approximately the same area of your room.
6. When you're finished testing the app, fully close the app. To fully close an app, swipe up from the bottom of your device, hold, then let go. Then swipe up on the app to fully close it.
Note: If you just minimize the app, keeping it running in the background, changes you make in Unity may not build to the device.
Congratulations! You have just successfully deployed an AR app to your Android device.
16. Rebuild a new version of your app [Android]
To get more comfortable with this process and double-check that everything is working as it should, take a moment to build and run a new version of your app. Before rebuilding, it is helpful to make a small change to the project – that way you know for certain that you’re running a new version of the app.
To make a small change and rebuild your app, complete the following steps:
1. In the Hierarchy window, select Cube.
2. In the Inspector window, change the scale of the X, Y, or Z value to make the Cube into a rectangular prism.
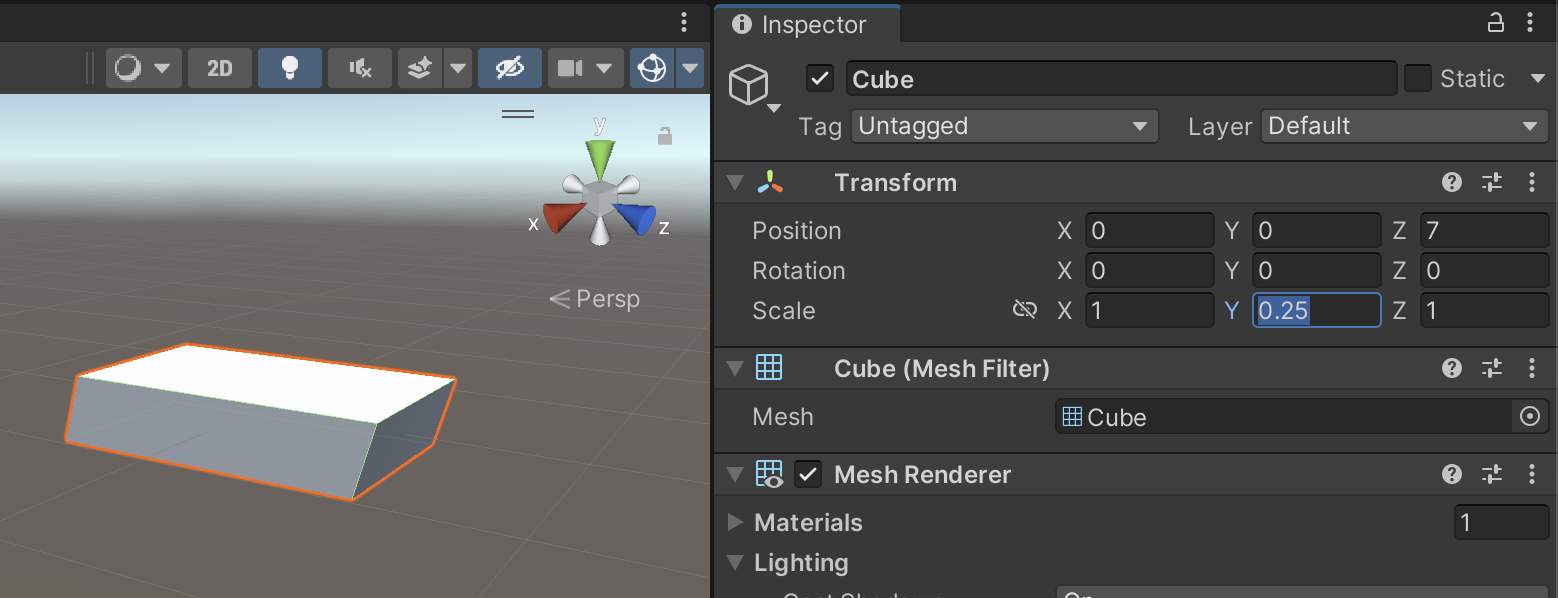
3. Press Ctrl+B (macOS: Cmd+B). This will automatically overwrite your existing project and run it on your connected device.
If you have successfully built a new version of the app, you should see a rectangular prism floating in your room instead of a cube.
17. Configure the Game view aspect ratio [Android]
When you run apps on your phone, they are either in portrait mode (vertical) or landscape mode (horizontal). The relationship between the width and height of a screen is called an aspect ratio. When you’re testing an app in Unity, the Game view should accurately reflect your device’s aspect ratio. This will allow you to better visualize how the app will look when it’s on your device.
To set up your Game view’s aspect ratio, complete the following steps:
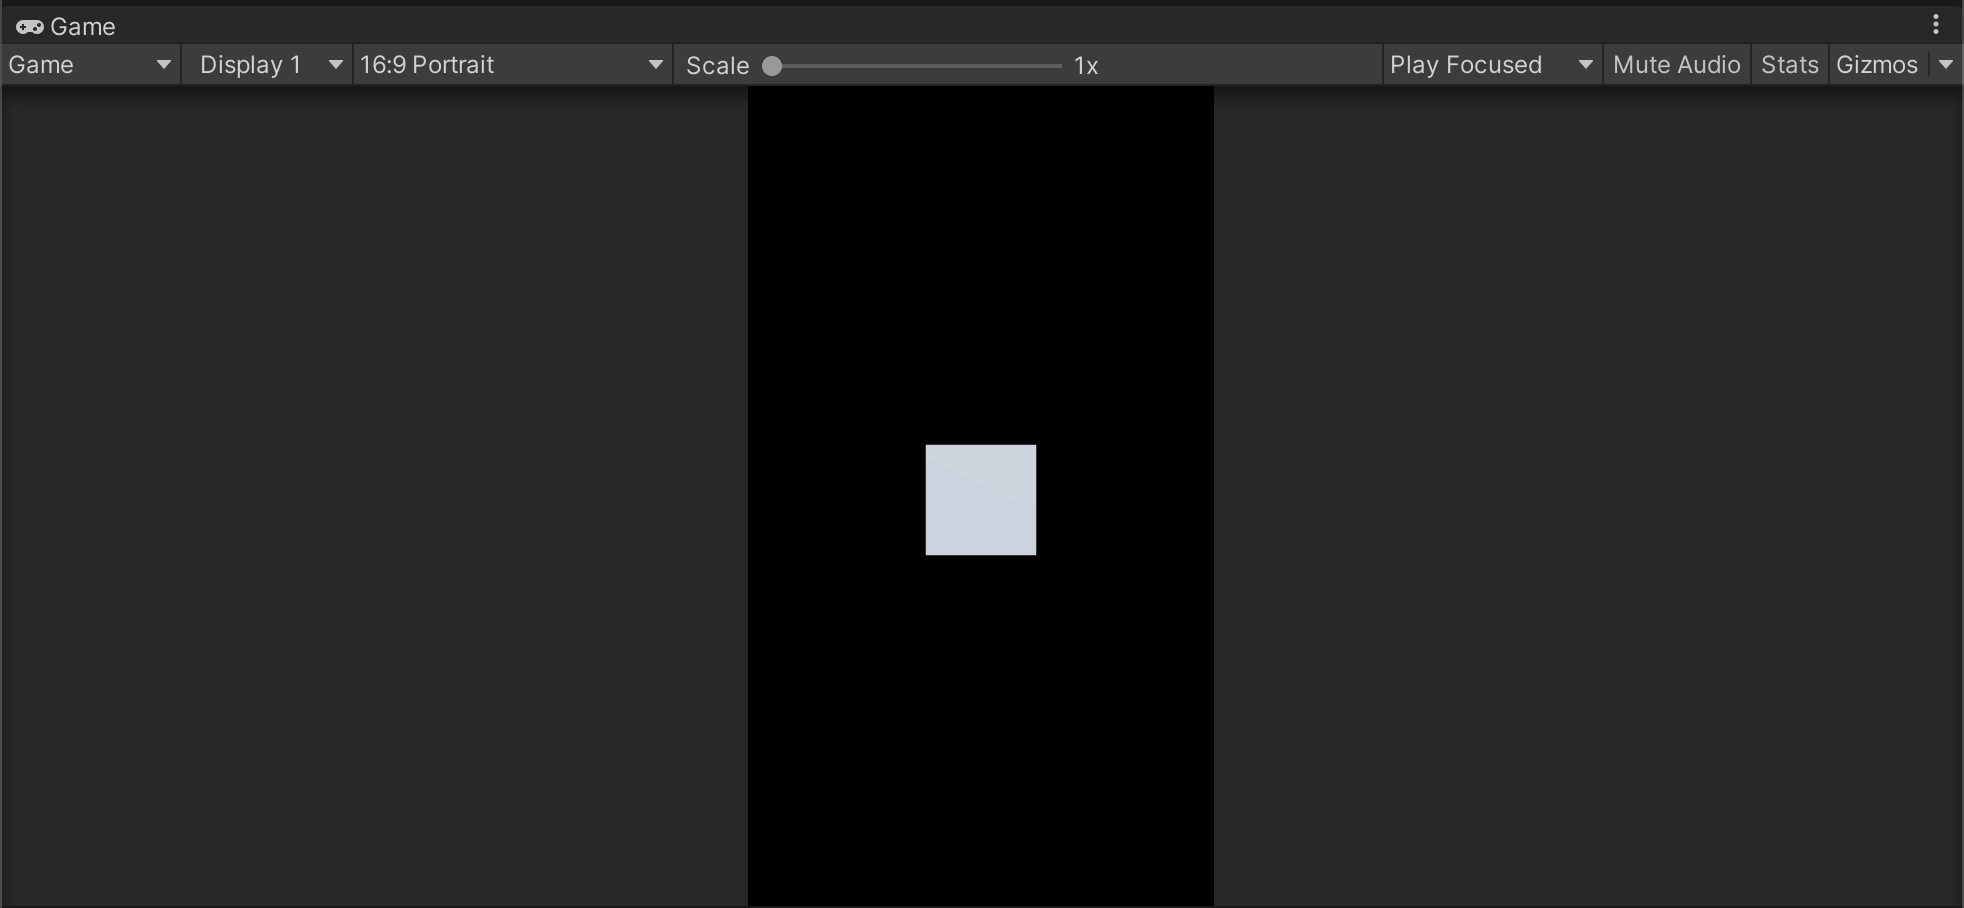
1. Select Play to preview your app in Unity. Notice that the black background takes up the entire Game view.
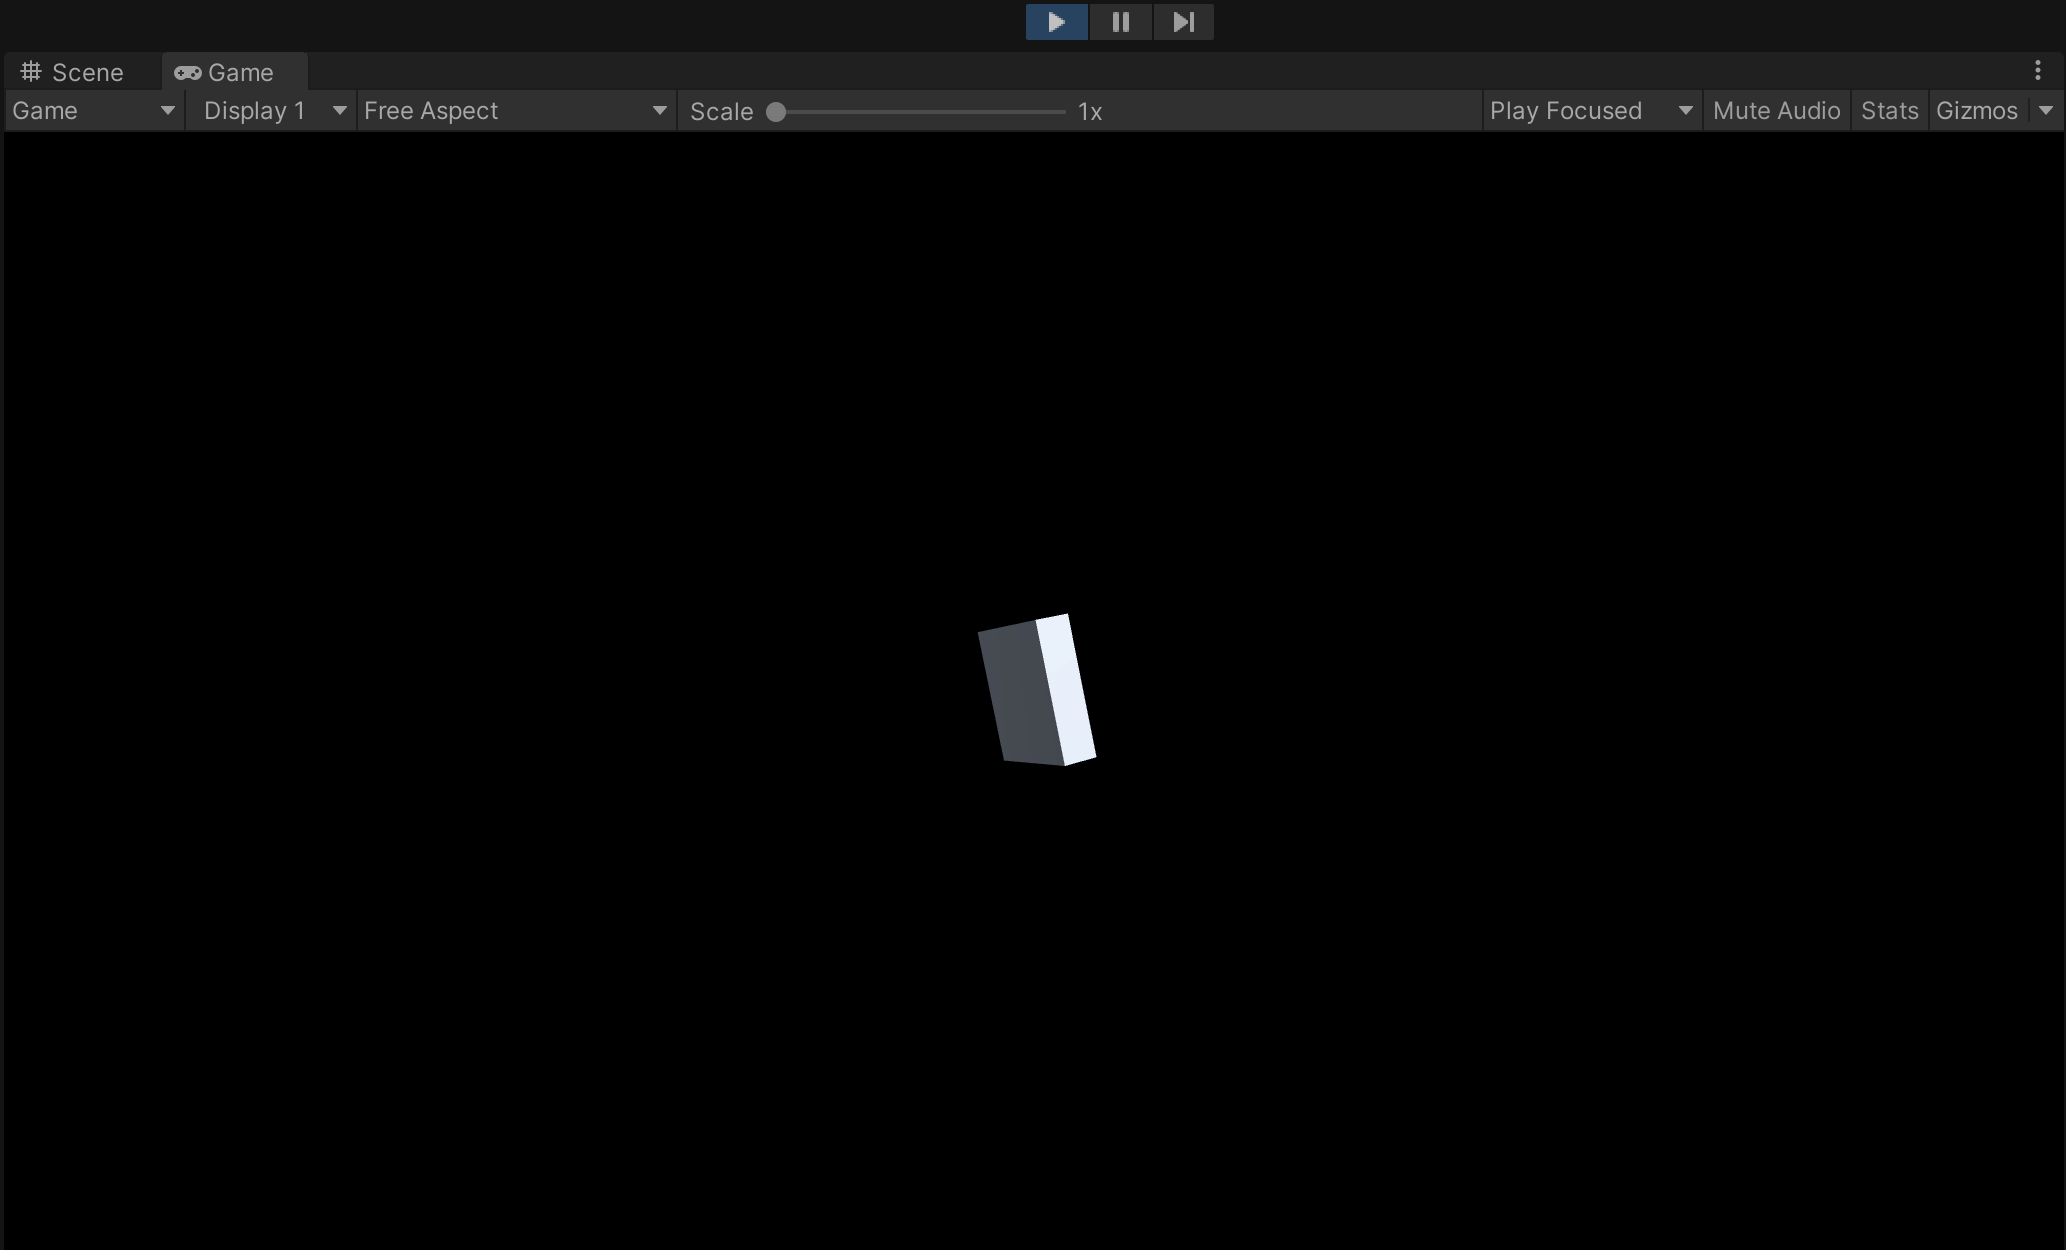
2. From the Game view toolbar, use the aspect ratio dropdown to change your preview from Free Aspect to 16:9 Portrait. This is the approximate aspect ratio for a wide range of Android phones.
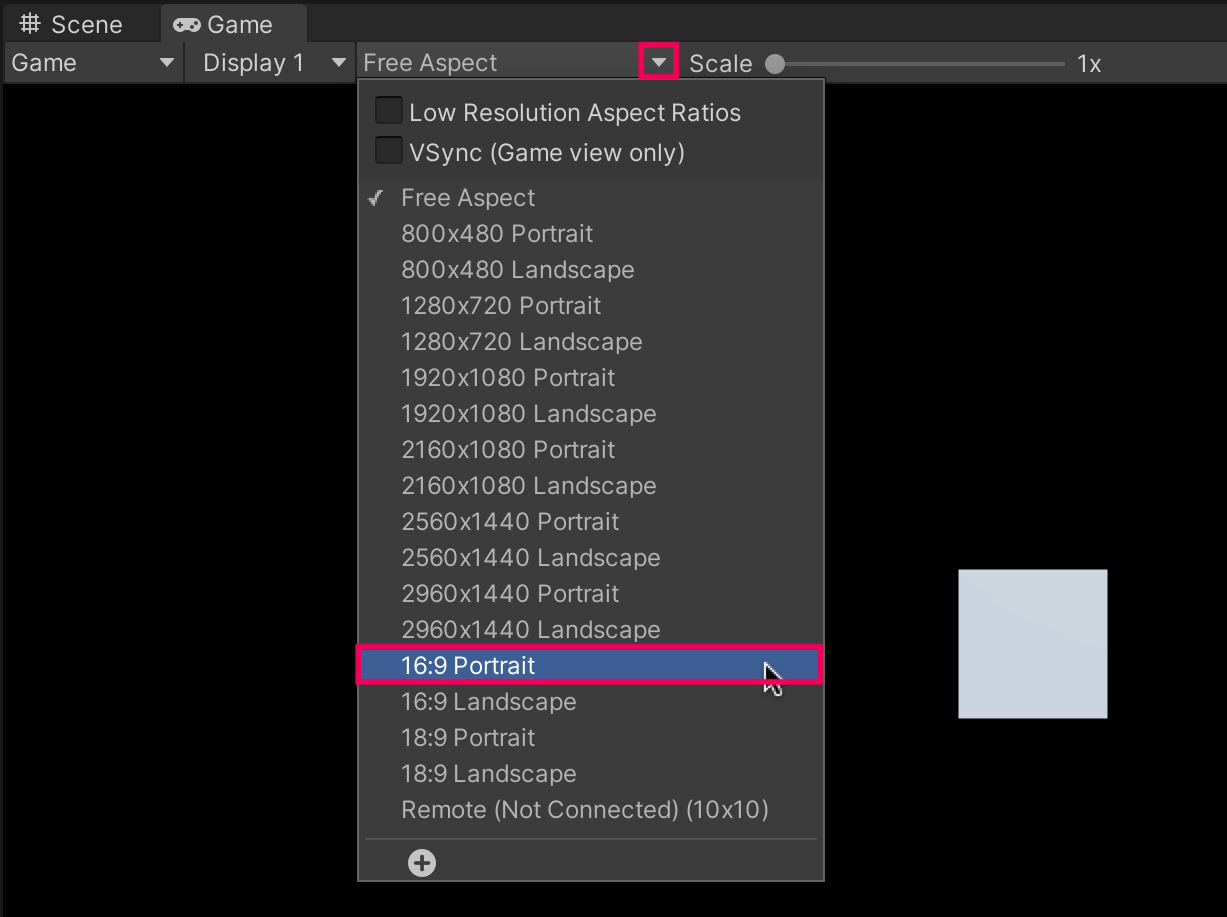
3. Notice that the Game view aspect ratio now closely resembles the experience of holding your mobile device in portrait mode.
18. More things to try
If you want to further develop your skills, explore new concepts, or improve your project, check out some of the optional activities below. It is tagged as Easy, Medium, or Difficult so you're aware of the level of challenge.
These activities are entirely optional, so if you’re not interested, no problem — just skip this step. We do recommend attempting at least one of them in order to get the most out of this learning experience. Good luck!
Medium: Customize the splash screen
A splash screen displays when your application starts. Often the splash screen will have the logo of the studio(s) or individual(s) that made the application. This screen can make your experience look and feel like a finished piece of software.
You can change the background color, background image, and duration of your logo. If you have a personal license, your splash screen will always include “Made with Unity” and the Unity logo, but if you have purchased a professional license you'll have the option to disable the Unity logo and text. You can find out more information about splash screens by exploring the Unity manual section on Splash Image Player Settings.
19. Next steps
In this tutorial, you deployed the default template project to your iOS or Android device. In doing so, you have verified that your AR development environment is set up perfectly.
Next, if you're continuing with the AR development pathway, you'll begin creating a new face filter app, which will be a lot more exciting than a spinning cube.