Ending the Game
Tutorial
·
Beginner
·
+10XP
·
45 mins
·
(3610)
Unity Technologies

The next step in developing John Lemon’s Haunted Jaunt is to create an end point to the game. This will enable you to create a complete experience for players, and develop your confidence writing code.
In this tutorial, you’ll:
- Use a UI (user interface) feature to create a game ending screen
- Create a GameEnding Trigger
- Write a custom game ending script
Once you’ve completed this tutorial, you’ll have a complete level ready to populate with enemies to make the player’s task more difficult.
Languages available:
1. Set up the UI
You’ve already done a lot of work to set up the character, environment and camera for your game. Next you need to create an ending, so that the game actually finishes when JohnLemon escapes the house. Once you’ve done this, you’ll be ready to populate your game with enemies and make some final enhancements.
Before you begin to create anything, it’s important to know what you’re trying to achieve.
When JohnLemon reaches the exit the game should fade out and quit, but you need to be careful with this — quitting in the Unity Editor and quitting in the final built version of the game are different.
First, though, you need to make the game fade out. To do that, you’re going to use Unity’s UI (user interface) system.
1. In the Hierarchy window, click the Create button. This can be used to create all sorts of basic GameObjects.
2. Go to UI > Image. A UI Image can be stretched across the player’s entire screen, and it;s opacity can be changed to create a fade effect. Perfect!
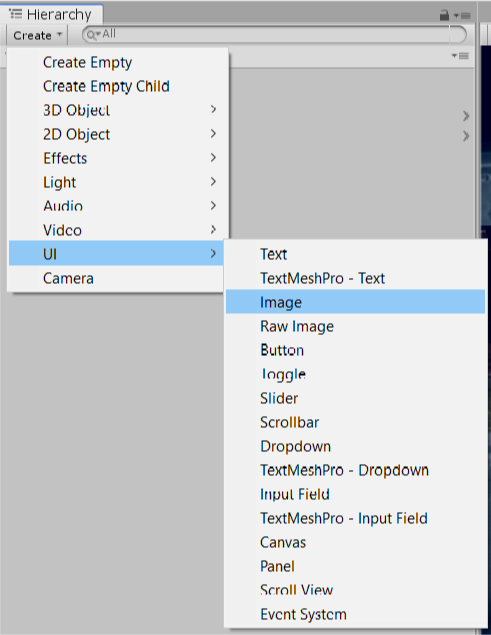
This will add a few new GameObjects to your Scene:

3. In the Scene window, click the 2D button in the top bar to enable 2D Mode. This will enable you to see the new GameObjects properly.

4. In the Hierarchy, select the Canvas GameObject. Place your cursor over the Scene and press F.
5. Zoom in to look at the Canvas and Image more closely. You can either use the scroll wheel or press Alt, right click, and drag.
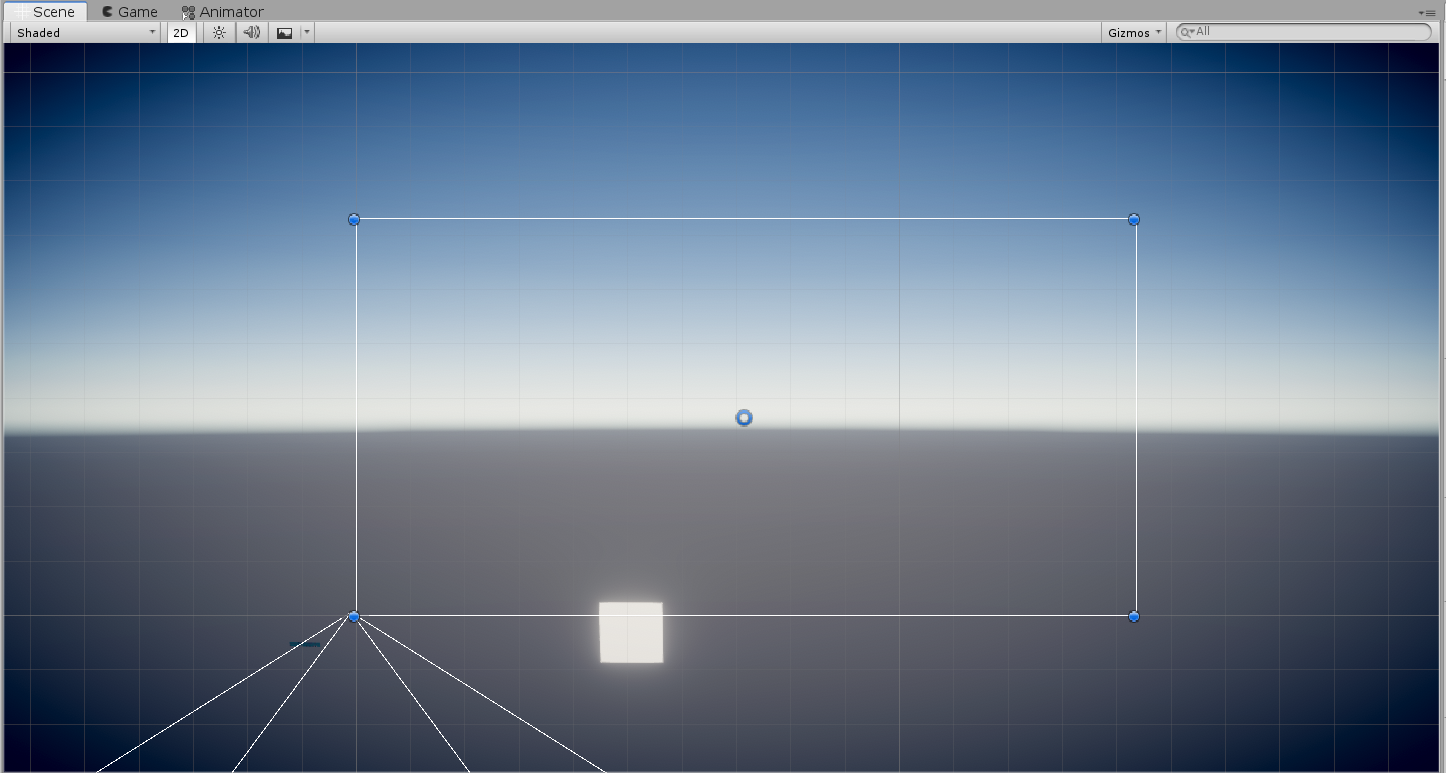
6. In the Hierarchy, select the EventSystem GameObject.
This GameObject has components attached which work together to allow any UI elements on the screen to interact with user input. However, in your game the player doesn’t need to be able to interact with the UI.
7. Right click on the EventSystem GameObject and select Delete.
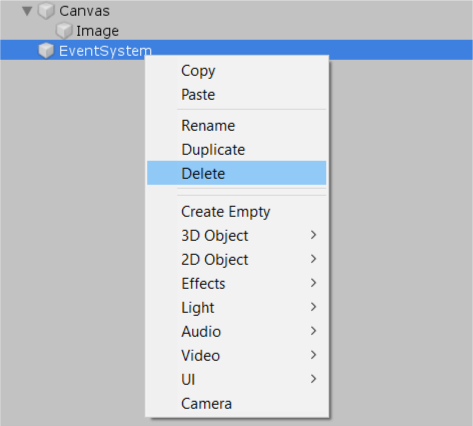
Next, you’ll use the two remaining GameObjects (Canvas and Image) to create the fade effect.
2. Configure the Canvas
1. In the Hierarchy, rename the Canvas to FaderCanvas.
2. In the Inspector, take a look at the components attached to FaderCanvas.
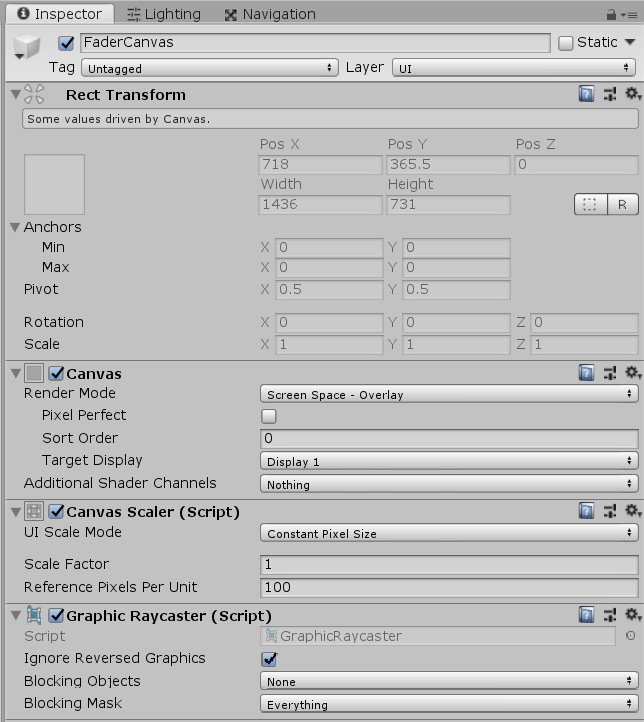
You should notice that its Transform component is different to the ones you’ve seen before. GameObjects that are part of the UI system need better control over their position, so have a Rect Transform component. For a Canvas at the root of a UI hierarchy, the Rect Transform settings are read only.
3. The Canvas component controls how UI elements which belong to that Canvas are rendered. This rendering is primarily controlled by the Render Mode setting.
It has three potential modes:
- Screen Space - Overlay, where the Canvas fills the screen and all the UI elements of the canvas are rendered on top of everything else
- Screen Space - Camera, where the Canvas fills the screen but it is rendered to a specific camera and is subject to distance from the camera
- World Space, where the UI exists in the Scene and is rendered in front or behind other objects (for example, name tags above characters in a 3D world)
You need to stretch an Image across the screen and have it rendered over the top of everything else. This means that the default Render Mode of Screen Space - Overlay is perfect for you.
4. The next component on the FaderCanvas GameObject is the Canvas Scaler. This is used as an easy way of controlling the relative sizes of UI elements when they are displayed on different screen sizes. Your Image will be stretched across the entire screen, so you don’t need to worry about its relative scale.
Click the cog icon in the top right of the Canvas Scaler component to open the context menu. Select Remove Component.

5. The final component on the FaderCanvas GameObject is the Graphic Raycaster. This is used to detect UI events such as clicks. It will determine which UI element was clicked on and send the event to that element so the appropriate component can react. The player won’t interact with the UI in your game, so this component is not needed.
Click the cog icon in the top right of the Graphic Raycaster component to open the context menu. Select Remove Component.
3. Stretch the Image
The next step is to stretch the Image across the screen:
1. In the Hierarchy, select the Image GameObject.
2. Select the Rect Tool from the toolbar, or press T.

3. Hold on! Something funny is going on here. Why is the Image not where the Rect Tool says it is?
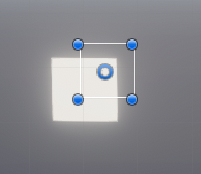
This is because the Scene window is using the post-processing you set up in the previous tutorial.
4. Click the Effects button in the Scene window to enable all the effects, then click it again to disable all the effects.

Now your Image should display properly:
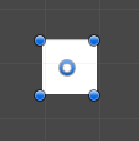
4. Explore the Rect Transform Component
Let’s have a closer look at the Rect Transform component:
A 3D GameObject’s position is represented by a single point at the GameObject’s pivot. The position of this pivot point in a Transform component is relative to the GameObject’s parent. Rect Transforms work similarly, but since UI elements can represent an area there are some differences. Instead of the position of a Rect Transform being relative to a single pivot point on their parent, they are relative to an area of their parent. This area of the parent is represented by a Rect Transform’s Anchors.
You may have seen a gizmo in the Scene window which looks like a flower:

This is actually multiple points all pulled together. Each of these points is an anchor. The rectangle created by the four anchor points is a proportion of the total area of the parent.
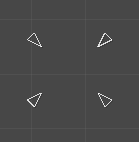
Your Image is a child of the FaderCanvas, which fills the entire screen. This means that your Image’s position is relative to an area of the entire screen.
The position of UI elements is measured in pixels. This is very important, particularly because not all screens have the same number of pixels. This is what makes the anchor system so powerful — when the anchors are all together and they show a point, the Rect Transform shows a position in pixels that the UI element is offset from that point.
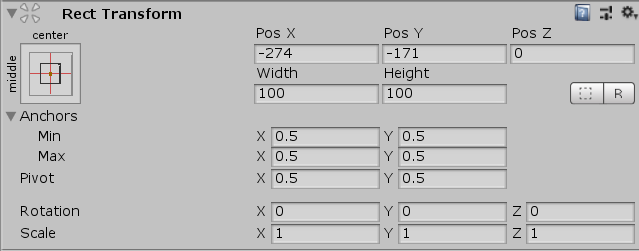
However, if the anchors are separated then the Rect Transform shows a pixel offset from the sides of the anchor area:
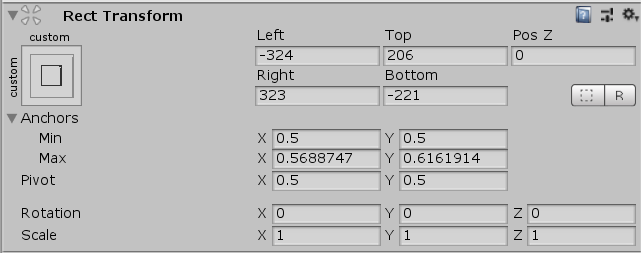
So how does this apply to your game? Well, you need the whole screen to fade. That means your Image should cover the entire screen no matter what the screen shape or size is. In order to achieve this, you need to make sure that the anchor area is the entire screen and that there’s no offset from that area.
5. Configure the Rect Transform Component
To configure the Rect Transform component:
1. In the Hierarchy window, select the Image GameObject.
2. In the Inspector, find the Rect Transform component. Expand the Anchors setting.
3. Set the minimum values for x and y to 0. Set the maximum values for x and y to 1.
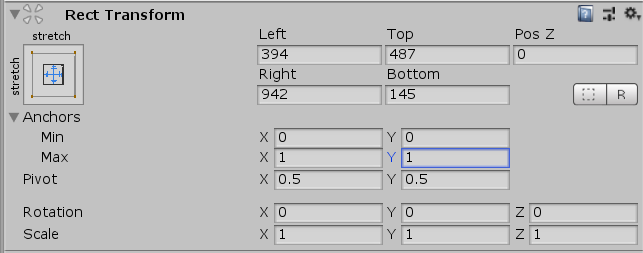
Remember that the Anchors are relative to their parent: 0 means the far left or bottom of the screen, 1 means the far right or top of the screen.
Now that you have set the Anchors, you should see that your Image’s position has changed. The position is now listed as Left, Top, Pos Z, Right and Bottom. Apart from Pos Z (which you can ignore), these are the distance of the GameObject from its Anchor area in pixels. A negative value indicates that the element is outside of the Anchor area. A value of zero means there’s no offset from the Anchor area.
In the example above, the left side of the Image is 394 pixels in from the left side of the anchor area; the right side of the Image is 942 pixels from the right side of the anchor area; the top side of the Image is 487 pixels from the top side of the anchor area and the bottom side of the Image is 145 pixels from the bottom of the anchor area.
4. Given that the Anchor area of your Image is now the whole screen, no offset is needed. On the Image’s Rect Transform, set the Left, Top, Right and Bottom properties to 0.
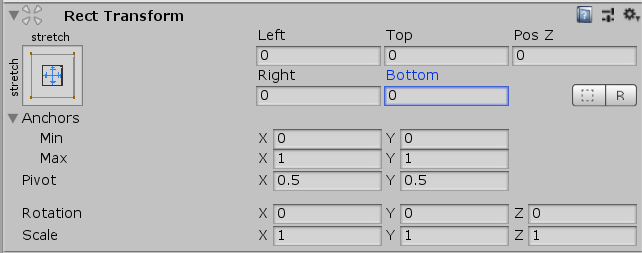
6. The Image is now stretched over the screen:
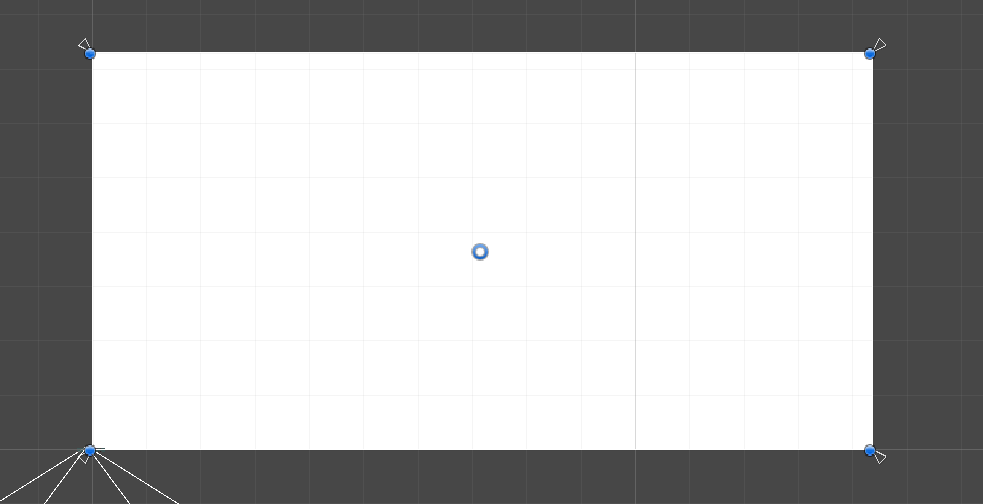
This Image is the right size now, but it’s not the right color.
7. In the Inspector, find the Image component.

The first property is called Source Image. This allows you to display a specific picture — if it is left blank then get a rectangle of solid color. This can be set with the Color property.
8. Open the Color picker window. Set the RGB channels to 0, leaving A at maximum (1 if the range is 0 to 1, or 255 if the range is 0 to 255). This will set the color to black.
A is the fourth channel making up Color: Alpha. The Alpha of a Color is how transparent it is. The lower the Alpha value, the more transparent the GameObject. Adjusting your Image’s Alpha will be the key to making fade in and out.
9. Click elsewhere in the Editor to close the picker window.
You now have a fully black screen!
6. Add a Victory Image
Next, you’re going to add a picture to display on top of the black screen:
1. In the Hierarchy, rename your current Image GameObject to ExitImageBackground.
2. Right click the ExitImageBackground GameObject. From the context menu that appears, select UI > Image.
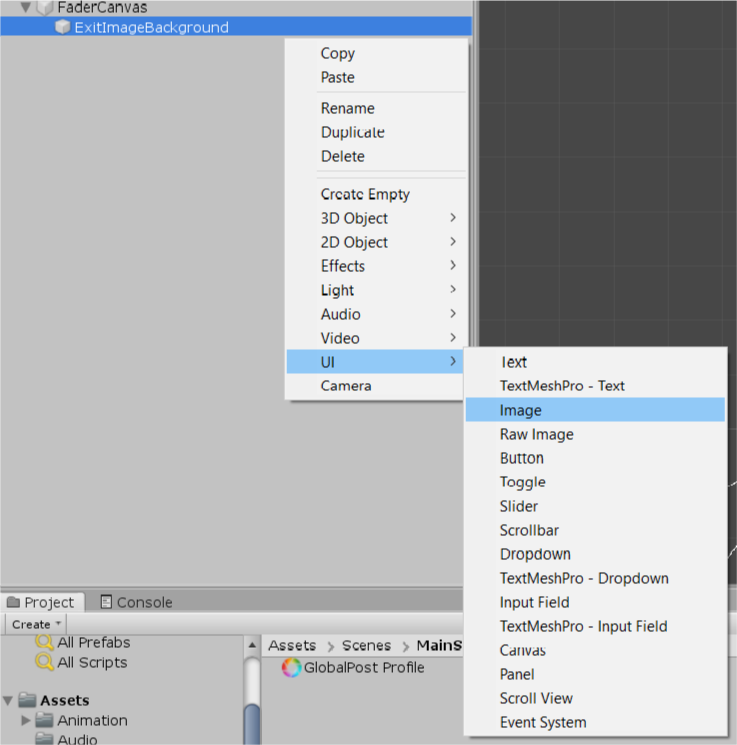
Right clicking on a GameObject to create another GameObject in this way automatically makes the newly created GameObject a child of the one that was clicked on. Because this new ExitImage GameObject is a child of the ExitImageBackground GameObject, it is rendered on top.
3. Rename this new Image GameObject to ExitImage.
4. Let’s add a picture. In the Inspector, find the Image component.
5. Click the circle select button for the Source Image property. In the dialogue box, search for and select the image called Won.
6. There are now additional settings available in the Image component:
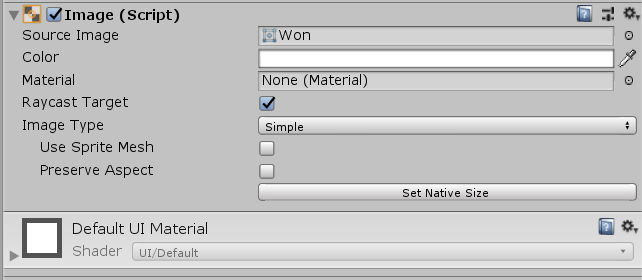
You will need these settings to fix an important problem: it will look best of the image fills as much of the screen as possible, but it needs to retain the correct aspect ratio. To see this problem, let’s resize the Rect Transform as we did with the parent.
7. In the Inspector, find the Rect Transform component. Expand the Anchors setting.
8. Set the minimum values for x and y to 0. Set the maximum values for x and y to 1.
9. Set the Left, Right, Top and Bottom properties to 0. The picture will now look stretched!
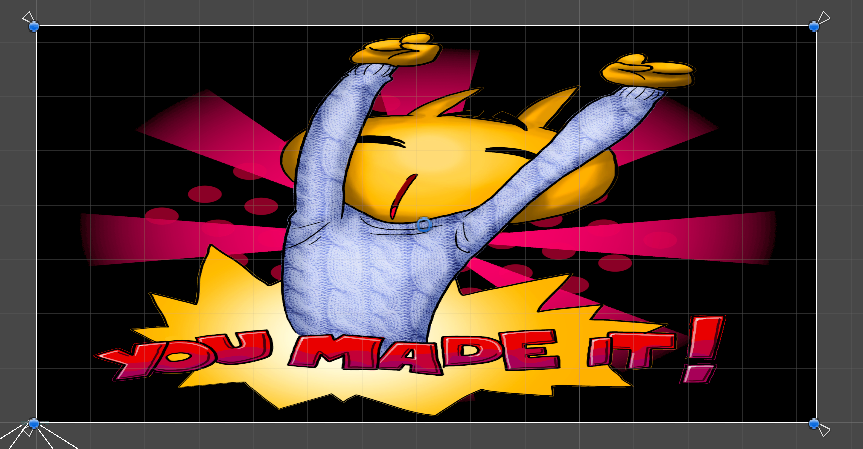
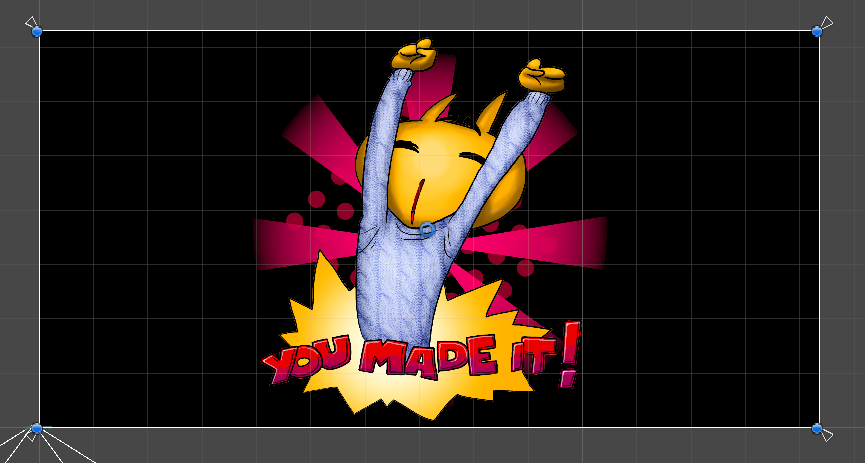
10. In the Image component, find the Image Type property. Enable the Preserve Aspect checkbox. This makes the Image as large as it can be within the Rect Transform without being squashed or stretched.
7. Add a Canvas Group Component
Next, let’s consider how to make these UI elements fade in and out when you want them to. You already know that you can adjust the Alpha value of an Image component to make it fade out. But because there are now two images, you’ll need to change both of the colors instead of changing just one value. To help you do this, there’s a component called a Canvas Group.
A Canvas Group allows you to control some aspects of all the visible UI elements on a GameObject and all of its children.
To add a Canvas Group component:
1. In the Hierarchy window, select the ExitImageBackground GameObject.
2. In the Inspector, add a Canvas Group component.

Change the Alpha property to 0.
3. Now you’re done with making the UI, let’s switch the Scene window back to the level. First, disable 2D Mode in the Scene window.
4. In the Hierarchy window, select the JohnLemon GameObject. WIth your cursor over the Scene view, press F to focus.
5. In the Hierarchy window collapse the FaderCanvas GameObject. Save the scene by pressing Ctrl + S on Windows or CMD + S on macOS.
That’s better, now you can see the level again. Next, you need a way to trigger and control the UI fade.
8. Create a GameEnding Trigger
The computer needs a way to recognise that JohnLemon has exited the haunted house, so that it knows when to change the value of the Canvas Group’s Alpha property. A common technique for detecting when a physical object (for example the JohnLemon character) has entered a specific area is to use a Trigger.
Triggers are Colliders that do not impede movement — instead they allow physical objects to pass through them freely, but report the triggering event so that other actions can happen.
First, let’s create a trigger:
1. In the Hierarchy window, click on the Create menu and select Create Empty. Rename this GameObject to GameEnding.
2. Set the Position of the GameEnding’s Transform to (18, 1, 1.5). This is in the middle of the level’s exit.
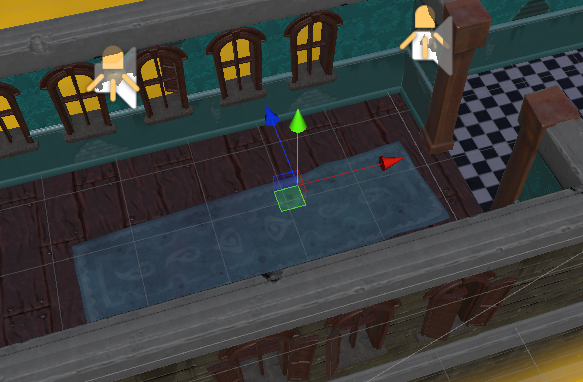
3. Now you need to add the Trigger. In the Inspector, add a Box Collider component to the GameEnding GameObject. (Be careful not to add a Box Collider 2D, as it won’t work!)
4. Enable the Is Trigger checkbox. This changes the Collider into a Trigger.

5. Next, you need to resize the Trigger so it covers the exit — JohnLemon will have to walk into it to escape. There are two ways to do this: click the Edit Collider button and resize the Box Collider in the Scene window, or set the Center and Size properties manually. Let’s try editing the Trigger in the Scene window.
Click the Edit Collider button; “handles” will appear on the sides of the Trigger in the Scene window.
6. To change any of the faces of the Box Collider, click and drag it to the position you would like. You need the Trigger to fill the corridor, so that JohnLemon can’t get out without moving through it.
When you are finished, click the Edit Collider button again. When the Handles have disappeared from the Scene window, you are no longer editing the Collider.
7. Alternatively, you can set the Size of the Collider to (1, 1, 3.5).
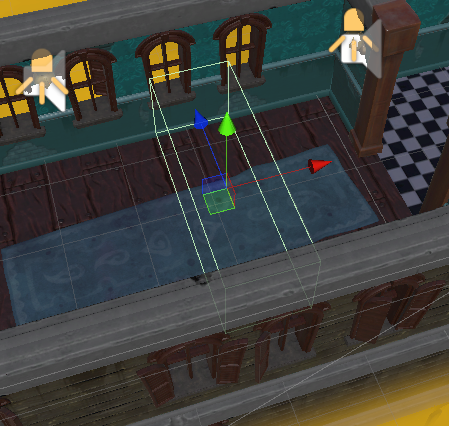
You’ve now completed the Trigger, but you’ll need to write a script to use it.
9. Create a New Script
To start off with, let’s create the script Asset:
1. In the Project window, go to Asset > Scripts.
2. Go to the Create menu and select C# Script. Name the script “GameEnding”.
Remember that the Asset’s name must be exactly the same as the class name within the script. If you make a mistake, delete the Asset and create it again.
3. Drag the script Asset from the Project window onto the GameEnding GameObject in the Hierarchy window. This will add it as a component.
4. Now you can start editing the script to give it some functionality. Double click on the script Asset to open it for editing.
10. Start the GameEnding Script
To start the script:
1. Remove the Start and Update methods and their comments. Your clean script should look like this:
using System.Collections;
using System.Collections.Generic;
using UnityEngine;

public class GameEnding : MonoBehaviour
{

}
2. Let’s think about the information you need:
First, you need the screen to fade out over a certain period of time. It should be a public variable, so you can adjust it from the Inspector. It should also allow for non-whole numbers, so the variable needs to be a float.
A reasonable default value for the fade to happen over is 1 second, so let’s set that as the default. Add the following line to your script, in between the braces:
public float fadeDuration = 1f;3. Next, you need to specify that the fade should happen when the player’s character hits the Trigger. To make sure that this only happens when JohnLemon hits the Trigger, you’ll need a reference to that GameObject. Again, this should be a public variable so you can adjust it from the Inspector.
Add the following line below the fadeDuration variable declaration:
public GameObject player;You now have two main variables declared.
4. One of the essential jobs of this class is to detect the player controlled GameObject. Next, you’re going to use another special method for MonoBehaviours called OnTriggerEnter. Add the following method definition below the variable declarations:
void OnTriggerEnter (Collider other)
    {

    }
5. To make sure that the ending is only triggered when JohnLemon hits the Box Collider, add the following if statement to the OnTriggerEnter method, between the braces:
    if (other.gameObject == player)
        {

        }
This uses a new operator called the equivalency operator. It is represented by a double-equals and results in a bool. The returned value is true if the things on either side are identical, or false if they are not.
The above code is instructing the computer, “If the other Collider’s GameObject (the one that entered the Trigger) is equivalent to our reference to JohnLemon’s GameObject, then do whatever is in the code block.”
6. Let’s review your script so far:
using System.Collections;
using System.Collections.Generic;
using UnityEngine;

public class GameEnding : MonoBehaviour
{
    public float fadeDuration = 1f;
    public GameObject player;

    void OnTriggerEnter (Collider other)
    {
        if (other.gameObject == player)
        {

        }
    }
}
Remember, in C# it doesn’t matter in which order methods are declared in a class — you may have used a slightly different order, and that’s fine.
11. Add an Update Method
Now you need to add code for the if statement which starts the UI fading in, then quits the game when it’s finished. There’s currently a problem: OnTriggerEnter is called only once when the Colliders first overlap. You need something that is called every frame, so you can gradually change the alpha of the Canvas Group.
In the third tutorial you used the Update method, which is called every frame — you can use this here:
1. Add an Update method as follows below OnTriggerEnter:
void Update ()
    {

    }
2. You need a way of knowing when to start fading the Canvas Group in. Since the Canvas Group should either be fading or not, a bool variable is perfect for this. Create a bool variable called m_IsPlayerAtExit as follows between the public variable declarations and the OnTriggerEnter definition:
bool m_IsPlayerAtExit;3. Let’s use the bool! First it first needs to be set. Within the code block of the if statement in your OnTriggerEnter method, set m_IsPlayerAtExit to true as follows:
m_IsPlayerAtExit = true;4. Now you’ve set the bool in OnTriggerEnter, you need to check whether it has been set in Update. Add an if statement within the braces of the Update method:
if(m_IsPlayerAtExit)
        {

        }
5. Your script should currently look like this:
using System.Collections;
using System.Collections.Generic;
using UnityEngine;

public class GameEnding : MonoBehaviour
{
    public float fadeDuration = 1f;
    public GameObject player;

    bool m_IsPlayerAtExit;

    void OnTriggerEnter (Collider other)
    {
        if (other.gameObject == player)
        {
            m_IsPlayerAtExit = true;
        }
    }

    void Update ()
    {
        if(m_IsPlayerAtExit)
        {

        }
    }
}
Let’s break down what you’ve coded so far:
You’ve added two methods, OnTriggerEnter and Update. When OnTriggerEnter is called, the computers checks whether the Collider that entered the Trigger belongs to the player’s character. Update is getting called every frame, and checking whether the player’s character is at the exit. If the player’s character is at the exit then it drops into the if statement’s code block; otherwise, it does nothing.
12. Write the if Statement Code Block
Next, you need to write that if statement code block:
1. Create a new method below Update called EndLevel. It doesn’t need to return anything and doesn’t need any parameters, so should look like this:
void EndLevel ()
    {

    }
This will help keep things tidy.
2. Within the if statement in the Update method, add a call to the EndLevel method:
EndLevel ();3. The EndLevel method needs to fade the Canvas Group and then quit the game. Previously when you’ve found references to components you’ve used the GetComponent method, but this only works for components on the same GameObject as this script.
This time, you're going to make a public variable for the Canvas Group component, which can be assigned in the Inspector.
Add this public variable declaration below the player variable declaration:
public CanvasGroup exitBackgroundImageCanvasGroup;4. You also need a timer, to ensure that the game doesn't end before the fade has finished. While we’re declaring variables, we should consider any others we might need.
Add the following variable declaration below the m_IsPlayerAtExit bool:
float m_Timer;5. Next, the EndLevel method needs to start counting up the timer. You may remember from the PlayerMovement script that there’s a way of getting how much time has passed since the last frame: using Time.deltaTime.
You could set the timer equal to itself plus the deltaTime. However, there’s a shortcut for saying exactly that using the plus-equals operator.
Add the following line of code to your EndLevel method, inside the braces:
m_Timer += Time.deltaTime;Here the plus-equals operator is saying set whatever is on the left to be equal to itself plus whatever is on the right.
6. It’s time to set the Alpha of your Canvas Group. The Alpha value should be 0 when the timer is 0 and 1 when the timer is up to the fadeDuration. In order to get this value, you can divide the timer by the duration.
Add the following code below the plus-equals operator line you’ve just added to the EndLevel method:
exitBackgroundImageCanvasGroup.alpha = m_Timer / fadeDuration;Now the Images will fade in when JohnLemon reaches the exit, but you still have a few more things to sort out before you’re done.
7. Finally, the game needs to quit when the fade is finished. The fade will finish when the timer is greater than the duration.
Add a new operator beneath the previous line you added:
if(m_Timer > fadeDuration)
        {

        }
The right facing angle bracket tests whether whatever is to its left is greater than whatever is on its right. If so then it returns true, otherwise it returns false.
The if statement’s code block will only be executed if the alpha is up to 1 so now all we need to do is add the following line to the code block to make the game quit:
Application.Quit();8. There’s something important to know here. This method will indeed quit the game, but it only works for fully built applications. Currently the game is just a project playing in the Editor, and so this won’t do anything yet. You’ll make a build of your game in the final tutorial of this series — when you have done this, the line of code will work properly. Until then you will need to exit Play Mode as you have done before.
9. In its current state, your script will cause the game to quit as soon as the Images have finished fading. It would be much nicer if the Images faded in, the player saw them for a brief time and then the game quit.
All you need to do to achieve this is to add some more time in the last if statement. Making this a variable means that you can change the duration the Images are shown for in the future, if you like.
Below the fadeDuration variable declaration (near the top of the class), add another duration variable declaration:
public float displayImageDuration = 1f;10. Now all you need to do is add this duration to the fadeDuration in the if statement, by changing it to:
if(m_Timer > fadeDuration + displayImageDuration)
        {
            Application.Quit();
        }
You’re done! The completed script should look similar this:
using System.Collections;
using System.Collections.Generic;
using UnityEngine;

public class GameEnding : MonoBehaviour
{
    public float fadeDuration = 1f;
    public float displayImageDuration = 1f;
    public GameObject player;
    public CanvasGroup exitBackgroundImageCanvasGroup;

    bool m_IsPlayerAtExit;
    float m_Timer;

    void OnTriggerEnter (Collider other)
    {
        if (other.gameObject == player)
        {
            m_IsPlayerAtExit = true;
        }
    }

    void Update ()
    {
        if(m_IsPlayerAtExit)
        {
            EndLevel ();
        }
    }

    void EndLevel ()
    {
        m_Timer += Time.deltaTime;

        exitBackgroundImageCanvasGroup.alpha = m_Timer / fadeDuration;

        if(m_Timer > fadeDuration + displayImageDuration)
        {
            Application.Quit ();
        }
    }
}
Make sure to save your script, then return to the Unity Editor.
13. Set the Variables for your GameEnding Script
In your script, you created a number of variables that need to be set in the Editor. These make it easier to customise the game and test changes easily.
To set the variables:
1. In the Hierarchy, select the GameEnding GameObject.

2. Drag the JohnLemon GameObject from the Hierarchy window onto the Game Ending script in the Inspector. This will assign the Player variable.
3. In the Hierarchy, expand the FaderCanvas. Drag the ExitImageBackground GameObject onto the Exit Background Image Canvas Group field of the Game Ending component. Unity will automatically find the correct component to assign the Exit Background Image Canvas Group variable.
4. Save the Scene.
You’ve finished creating an end for your game! Enter Play Mode to give it a try. Don’t forget to exit Play Mode when you are finished; the automatic quit won’t work until you create a build of your game in the final tutorial.
14. Summary
In this tutorial, you created a system for ending the game. To do this, you used UI features, added a Trigger and wrote another custom script. You now have a working game, but a spooky house is nothing without strange creatures to haunt it! Next, you’ll create some static enemies to populate your game.