Fine-tune your Lightmap Parameters
Tutorial
intermediate
+10XP
60 mins
54
Unity Technologies
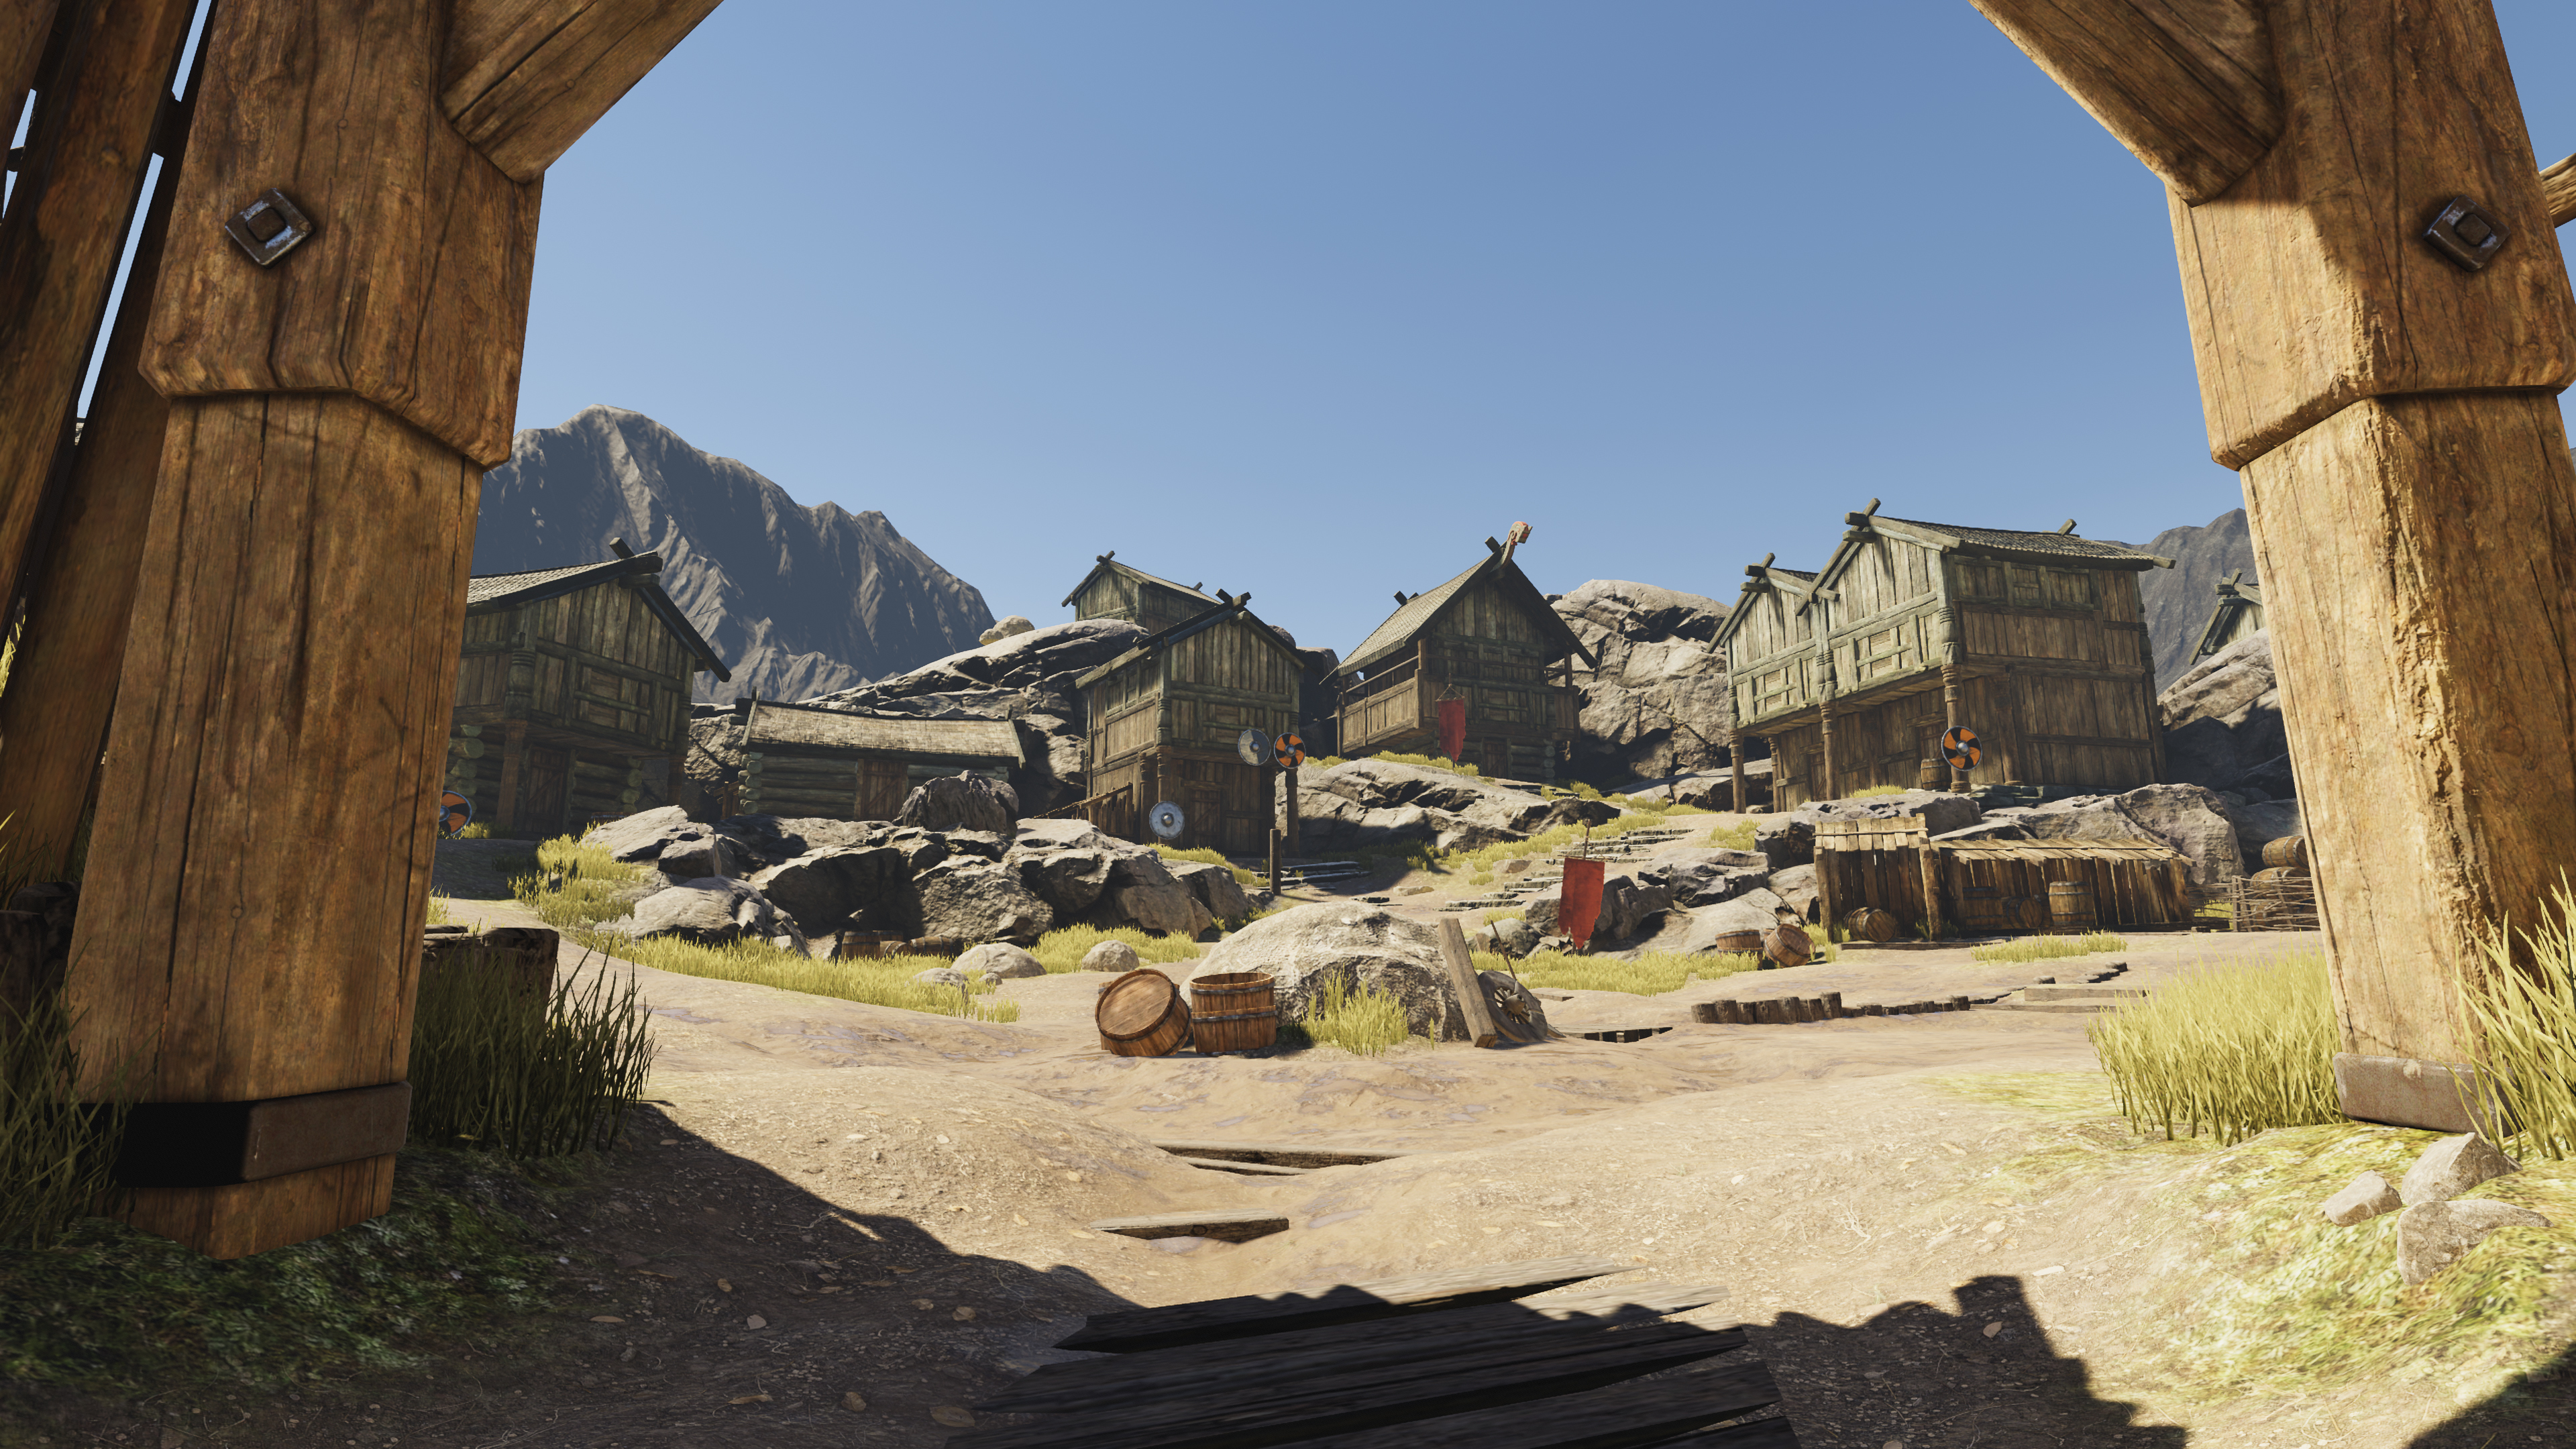
In this tutorial, you’ll learn about how Clusters are used to generate globally illuminated lighting and fine-time the lighting in the example scene on a per-object basis using Lightmap Parameters.
Languages available:
1. Overview
Up to this point in this learning project, you have considered Precomputed Realtime GI in terms of Charts. Reducing or otherwise optimizing the number of Charts in your scene limits the number of operations such as lightmap compositing and packing required during the precompute. This benefits precompute performance and is a broad approach to reducing the size of the data set required by Unity’s Precomputed Realtime GI solution.
Modifying Clusters is a finer-grained approach which will enable you to reduce the number of operations needed during later tasks in Unity’s precompute process. An additional benefit of reducing the number of Clusters is that run time performance will also be improved.
2. Introduction to Clusters
When generating the scene’s lighting solution using Precomputed Realtime GI, Unity simplifies the calculations required by working on a voxelized ‘proxy’ of the Static Scene. These voxels are called Clusters.
Clusters are effectively surface patches (small tiles) mapped onto Static geometry which you use for lighting. Clusters are stored in hierarchical relationships and are used for the complex irradiance calculations needed when precomputing Unity’s diffuse global illumination solution. Note that although Clusters are mapped in a similar way to Charts, the two are actually independent.
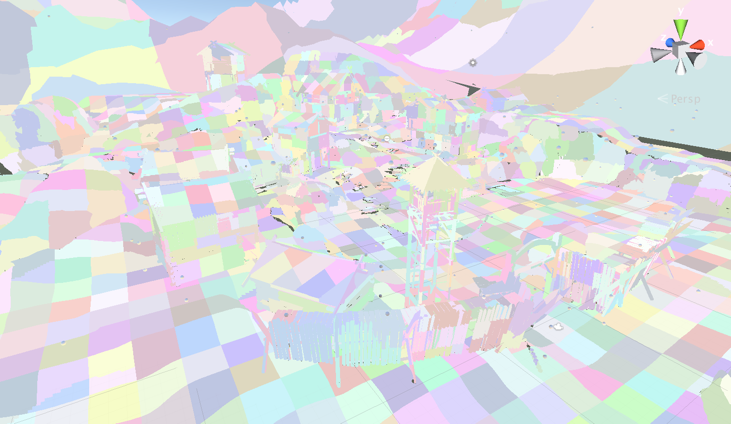
The Clustering Scene view Draw Mode can be used to visualize the size of clusters generated by Unity’s Precomputed Realtime GI.
How do Clusters work?
Clusters sample the albedo of the Static geometry to which they are mapped. Then, during the Light Transport stage of the precompute, the relationship between these Clusters is calculated so that light can be propagated throughout the Cluster network. Unity generates this low resolution approximation of the Static Scene in order to simplify the amount of lighting data which needs to be updated during run time in order to deliver global illumination at interactive frame rates with the limitations of current hardware.
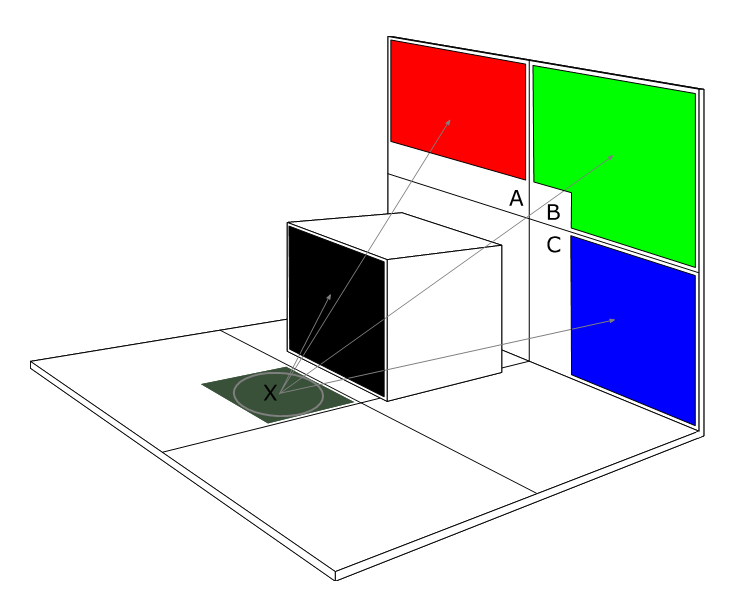
The diagram below demonstrates how the lighting value of Cluster X is related to the values of four nearby Clusters.
Once the precompute has been completed, ambient (skybox) lighting along with light positions, intensities and colors can then be modified without needing to restart the precompute process. These lighting changes will bounce and permeate throughout the Cluster network, taking into consideration the underlying albedo and emission of the scene’s materials in the eventual output.
Following this initial bounce, updated lighting results can then be applied to the Clusters themselves. Following each iteration, lit Clusters will be sampled into the corresponding lightmap texture before finally being used by shaders within the scene.
As this process is performed asynchronously on the CPU, the time it takes to refresh the global illumination solution is bound by the number of available worker threads.
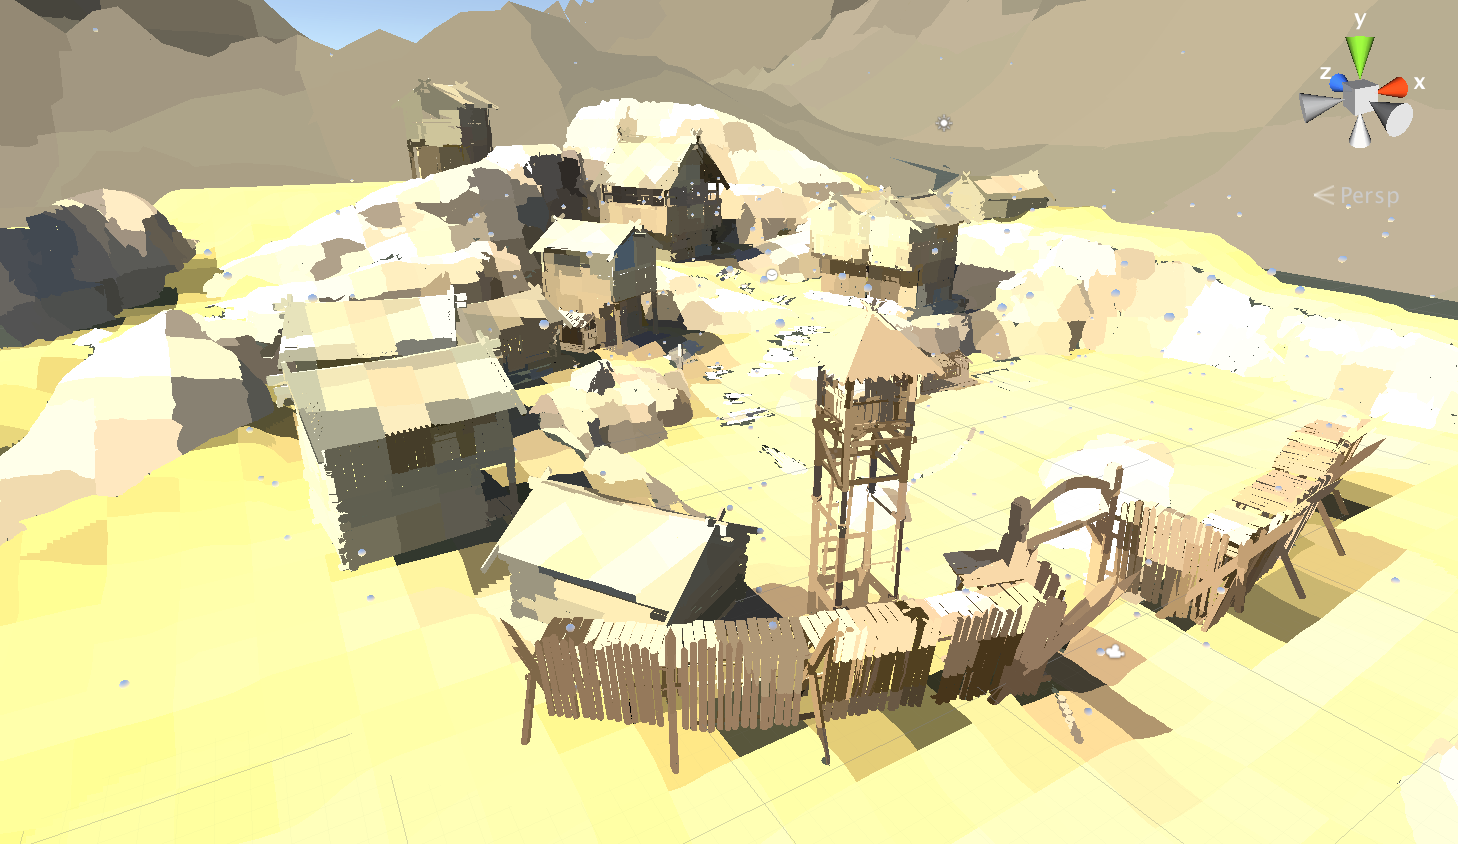
The Lit Clustering Scene view Draw Mode shows the Clusters once light has been bounced throughout the Cluster network.
Visualizing Clusters
Clusters can be visualized using the Clustering or Lit Clustering Scene view Draw Mode. Using Clustering, the scene will be overlaid with a diagnostic pattern made up of multicolored squares. The size of each square represents the size of a Cluster when mapped on to the corresponding Static geometry. Each unique color represents a different Cluster within the scene. Similarly, the Lit Clustering Scene view Draw Mode shows these Clusters once lighting has been bounced throughout the Cluster network and the results written back to the Clusters.
Reducing the Number of Clusters
Reducing the number of Clusters largely determines how quickly this update occurs and, as a consequence, how interactive Unity’s Precomputed Realtime GI appears on your target platform. More importantly, for the purposes of this tutorial, reducing the number of clusters will improve the time it takes to precompute your lighting. As a result, iteration speeds when lighting your scene will also improve. We will move onto techniques for reducing the number of Clusters in the following section of the tutorial.
3. Create a Lightmap Parameters asset
Many of the advanced lightmapping controls offered by Unity are available through the use of Lightmap Parameters. These settings are stored within a Lightmap Parameters asset. This allows lighting settings to be shared between scenes and version controlled for shared use in collaborative team environments.
To create a Lightmap Parameters Asset:
1. Navigate to the Project window.
2. From the Create drop-down menu in the top left of the Project window, choose Create > Lightmap Parameters.
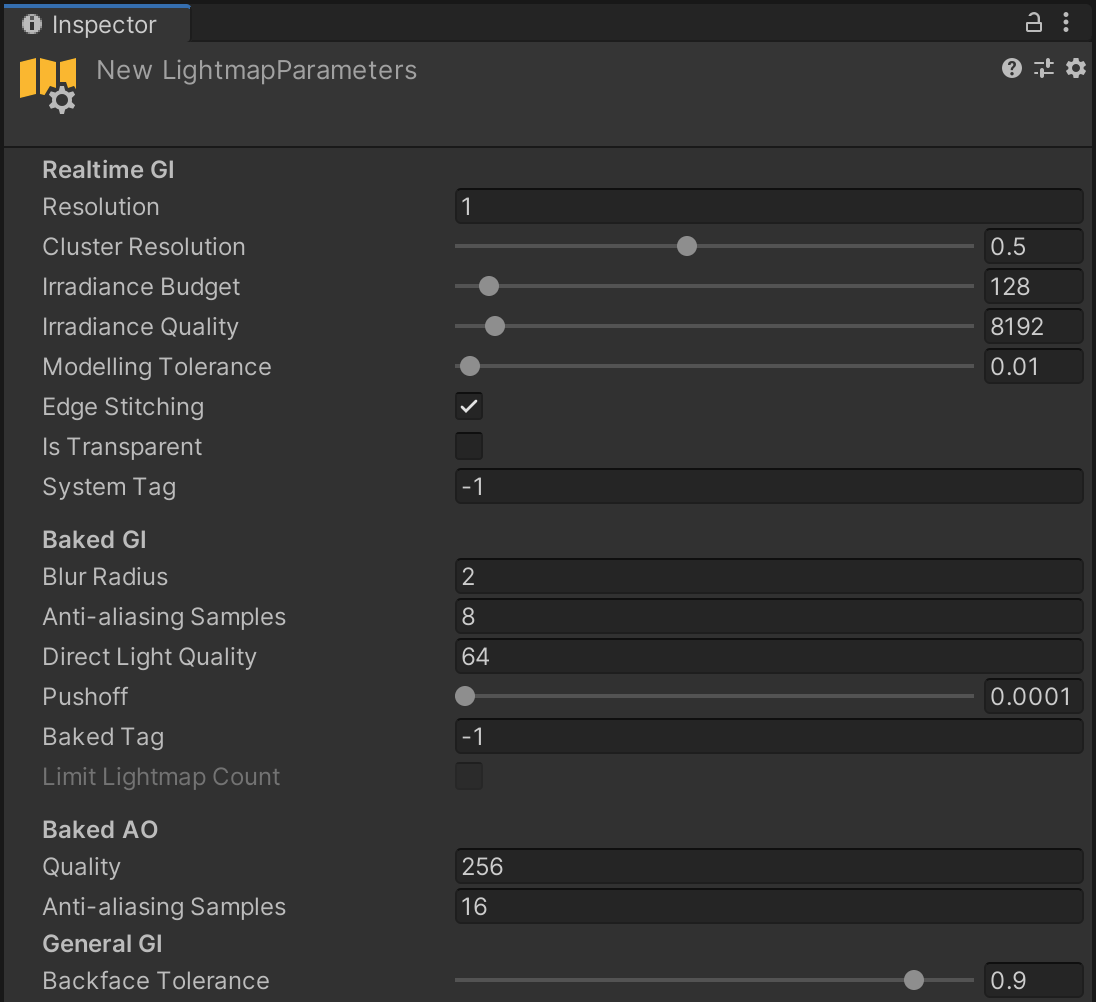
Advanced controls for both Baked GI and Precomputed Realtime GI are made available through Lightmap Parameters.
Note: You can also create a Lightmap Parameters asset from the right-click menu within the Project window, or from the top menu bar (Asset > Create > Lightmap Parameters).
4. Assign the Lightmap Parameters asset to the Game Object
Once created, a Lightmap Parameters asset can then be assigned to a Static MeshRenderer component:
1. Select the GameObject that you wish to assign the Lightmap Parameters asset to in the Hierarchy window. The GameObject must be marked as Static and have a MeshRenderer component.
2. In the Inspector window (Window > General > Inspector), unfold the Lightmapping header.
3. Use the Lightmap Parameters dropdown menu to assign the Lightmap Parameters Asset to the GameObject.
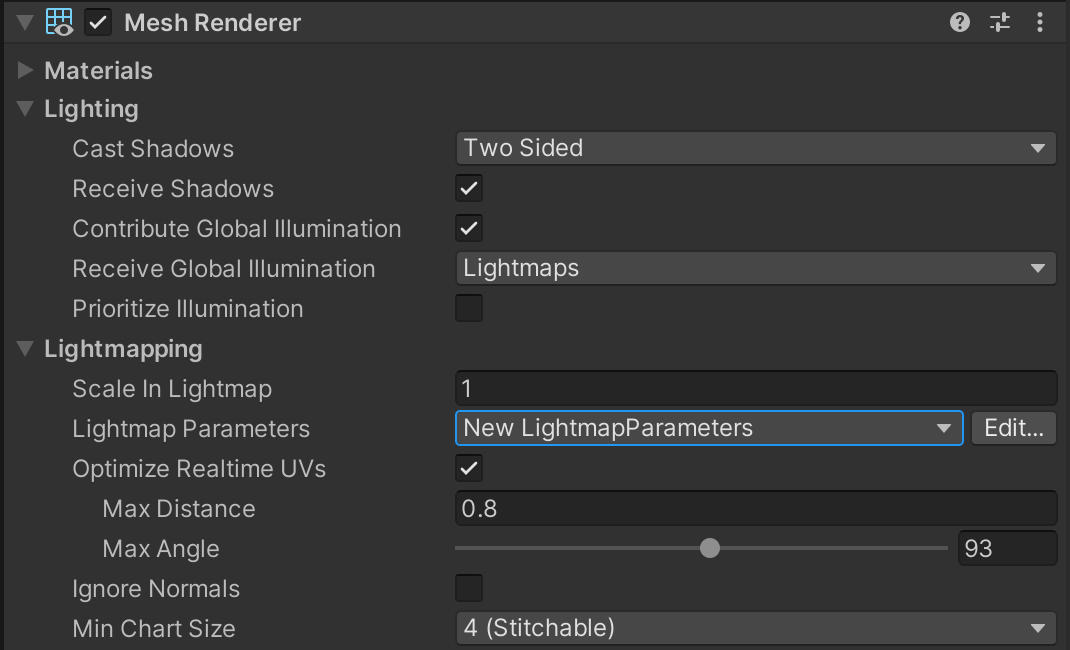
The Edit button to the right of the Advanced Parameters drop-down menu can be used as a shortcut to modifying the Lightmap Parameters assigned to the selected object.
The same Lightmap Parameters asset can be assigned to multiple objects. To do this, select multiple objects in the Hierarchy window and then follow the steps above. Changes to this Lightmap Parameter asset will then affect all objects to which it is assigned.
5. Lightmap Parameters: per-instance or per-Prefab?
Similar to unwrap settings, Lightmap Parameters assets can be assigned to a Prefab or applied to individual GameObject instances within the scene. Lightmap Parameters assets applied to an instance of a Prefab in a scene will override the Lightmap Parameters asset stored in the Prefab.
The advantage of this approach is that default Lightmap Parameters that are suitable for most cases can be applied to the Prefab. These defaults can then be overridden on a case-by-case basis in the scene when more fine-grained control is needed.
In this tutorial, you’ll have chosen to apply Lightmap Parameters assets on a per-instance basis. This is so you can select different Lightmap Parameters assets depending on the context in which each GameObject is used.
6. Review the scene default Lightmap Parameters
It is possible to configure scene-wide default Lightmap Parameters. These default Lightmap Parameters will be assigned to all existing Mesh Renderers within a scene not already assigned a Lightmap Parameters asset. Any Mesh Renderers that are then created in the scene will also use the default Lightmap Parameters. Using this approach reduces the amount of manual assignment which needs to be performed when setting up a scene for lighting.
To review these parameters:
1. Open the Lighting window (Window > Rendering > Lighting Settings) and select the Scene tab.
2. Navigate to the Lightmapping Settings header.
3. Use the Lightmap Parameters dropdown menu to assign the Lightmap Parameters asset to the scene.
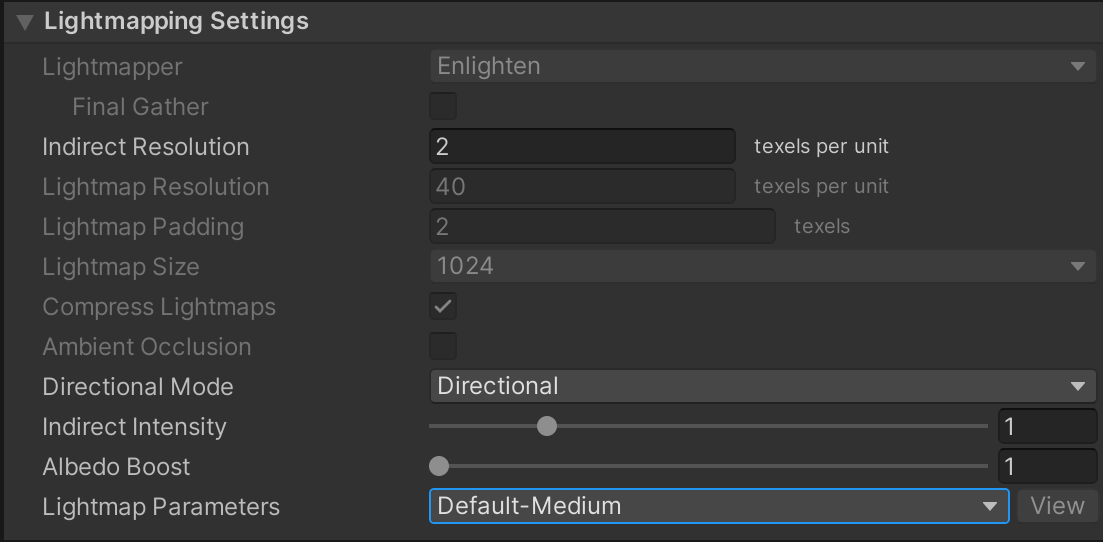
The Lightmap Parameters will be assigned to all newly-created Static Mesh Renders in the scene. Note that although this Lightmap Parameter will be applied to all newly created objects, it can still be overridden on individual objects by assigning an Advanced Parameter to the object, as described above.
Preconfigured Lightmap Parameters
Unity provides a number of preconfigured Lightmap Parameters to help quickly set up scene lighting. These are:
- Default - HighResolution
- Default - Medium
- Default - LowResolution
- Default - VeryLowResolution
Assigning one of these Lightmap Parameters will configure a number of settings that determine the overall lighting cost of the selected object. These settings include lightmap resolution, global illumination parameters and Cluster resolution, amongst other advanced per-object settings. These are important factors when trying to balance lighting performance throughout a scene.
7. Lightmap Parameters: Resolution and Cluster Resolution
Unity’s Default Parameters are intended to cover a number of common use cases and will be generally enough for many lighting scenarios. More fine-grained control over the Precomputed Realtime GI system can be achieved by creating your own Lightmap Parameters assets.
The Unity Manual page on Lightmap Parameters provides an overview of all of the settings contained within the Lightmap Parameters asset. However, in this tutorial we’ll focus on the settings that are most useful for lighting optimization.
Resolution
The Resolution value determines the lightmap resolution required by objects using this Lightmap Parameter. Resolution is a multiplier used against the scene-wide Indirect Resolution specified in the Scene tab of the Lighting window.
For example, if the scene’s Indirect Resolution is set to 2, and the Resolution property is set to 0.5, any objects which are assigned this Lightmap Parameter will use 1 texel per unit in the resulting lightmap texture.
As Precomputed Realtime GI represents only the diffuse, indirect lighting within a scene, you do not need to use the resolutions required by traditional baked lightmapping approaches. The lightmap resolution required by Precomputed Realtime GI will generally be 2-3 texels per unit as a maximum, as opposed to the 20-30 texels per unit you might use in traditional lightmapping. In most cases, particularly with large outdoor objects such as terrains, this value can be many times lower still. Here, a lightmap resolution as low as 0.1 texels per unit may provide sufficient detail.
Dappling artefacts when using high resolution lightmaps can be alleviated by increasing the Irradiance Budget value.
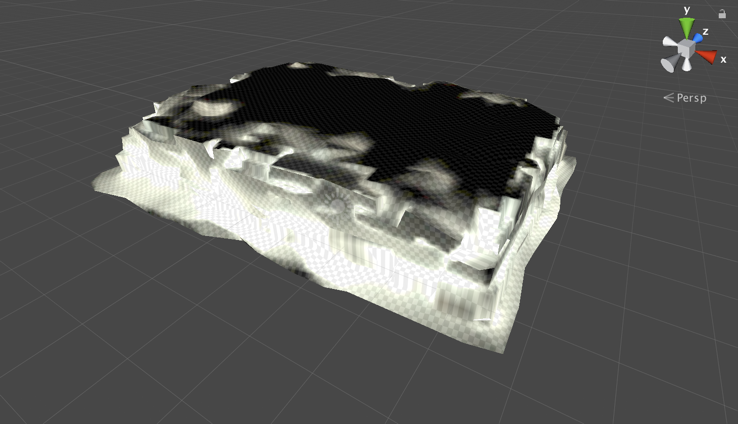
Bear in mind that when using very high lightmap resolutions, artefacts which are otherwise not noticeable at lower resolutions may become an issue. These artefacts may appear as dappling or smudged lighting in the resulting lightmap texture. If this happens, increasing the Irradiance Budget in your Lightmap Parameters can often reduce the appearance of such issues.
Cluster Resolution
Cluster Resolution specifies the number of Clusters that can fit within a texel of a Precomputed Realtime GI lightmap.
For example, if Cluster Resolution is set to the maximum of 1 there would be 1 Cluster for each texel within the lightmap. A Cluster Resolution value of 0.5 would mean that only 0.5 Clusters would fit inside the lightmap texel. In other words, the Cluster would be twice the size of a lightmap texel.
Extending this idea further, imagine this scene’s global Indirect Resolution was set to 1. You create a cube with a size of 1x1x1 units, and then assign a Lightmap Parameters asset to this object. If the Lightmap Parameters asset specified a Resolution of 1 and a Cluster Resolution of 1, you would have 1 Cluster per side of the cube.
If you then increased the Resolution to 2, the result would be 2x(1x1) Clusters per side of the cube, giving 4 (2x2) Clusters.
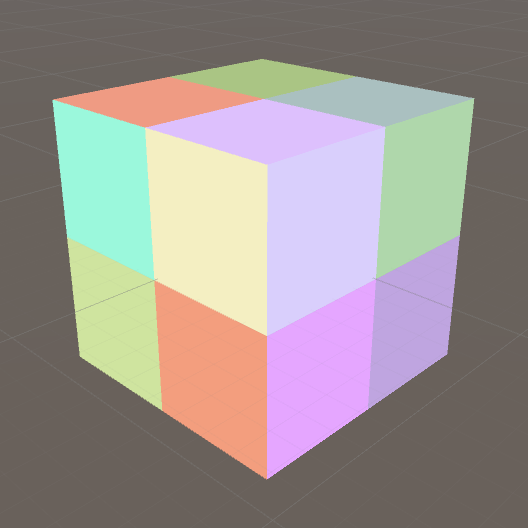
In most cases, Cluster Resolution only needs to be a fraction of the size of the lightmap texels. For example, the Default - HighResolution Lightmap Parameters asset which ships with Unity has a Cluster Resolution of 0.6.
A high number of Clusters in a scene can quickly drive up precompute times and reduce the interactivity of the scene’s global illumination at run time. You must therefore ensure that using more Clusters offers some tangible benefit to the quality of the lightmap output. If you can use fewer Clusters without a detrimental effect to your lightmaps, then this is always preferential.
Resolution, Cluster Resolution and scene-wide indirect Resolution
Specifying the Resolution of a lightmap and Cluster Resolution as a ratio means that you can build a relative relationship with the scene-wide Indirect Resolution property value. You can use the Indirect Resolution defined in the Lighting window as a high-level resolution value for the overall scene. Then you’ll be able to use Lightmap Parameters to exert fine-grained control over individual objects or groups of objects.
Unity takes this hierarchical approach in order to offer you more global control. If it was necessary to specify an absolute value for Resolution and Cluster Resolution, every Lightmap Parameter within a Project would have to be reconfigured by hand if you wanted to modify the overall lighting resolution.
8. Lightmap Parameters: Irradiance Budget and Irradiance Quality
Irradiance Budget
Earlier in this learning experience, you exploredl how Unity calculates Precomputed Realtime GI by generating an approximation of a scene’s Static geometry using Clusters. During the precompute, the relationships between these Clusters are calculated so that light can be quickly propagated throughout this hierarchical network.
Essentially, the value of a lightmap texel is determined by taking a ‘view’ of the scene Clusters from the texel’s position. This means you can quickly calculate light bounce between Clusters in order to create the effect of global illumination. These Clusters can then be sampled into lightmaps before finally being rendered.
Irradiance Budget determines the amount of memory used by each lightmap texel when sampling the Cluster network. This determines the precision (accuracy) of the lighting result. A lower Irradiance Budget means that each texel uses less memory when recording this view of the scene. This results in both reduced memory use and lower CPU cost at run time, but at the cost of lighting fidelity. Lower Irradiance Budgets will result in a lower frequency (blurred) lighting result. In contrast, a higher Irradiance Budget will deliver more accurate GI, but increased memory usage and additional CPU overhead at run time.
If your Precomputed Realtime GI is not updating quickly enough (lagging) during run time, it may be beneficial to lower the Irradiance Budget. This is best employed on objects where the advantages of higher fidelity lighting are perhaps not so noticeable, such as large, obscured or distant geometry.
Irradiance Quality
When Precomputed Realtime GI lightmaps are generated during the precompute, each lightmap texel fires rays into the scene in order to report the visibility of nearby Clusters. The percentage of each Cluster that the texel can see is then calculated. This value is used when determining the lighting contribution of visible Clusters to each texel in the lightmap. Irradiance Quality specifies the number of rays that a texel is able to shoot during this process.
You should consider increasing Irradiance Quality in situations where objects do not accurately match the lighting conditions of their surroundings. Sometimes situations can arise where lightmap texels have an unexpectedly bright result. This may be because insufficient rays have been cast into the scene and therefore Clusters which may occlude a lightmap texel have been missed. Similarly, brighter Clusters might not have been detected. Here, the lightmap result will be unexpectedly dark.
Firing more rays increases the likelihood that an accurate representation of the surrounding Clusters is reported back. These improvements to the accuracy of the lightmap output come at the expense of increased precomputation time. To optimize precomputation times, you should use the minimum Irradiance Quality needed to achieve the lighting results that you want. Note that this value does not affect run time performance.
9. Lightmap Parameters: Backface Tolerance and Modelling Tolerance
Backface Tolerance
Rays fired from lightmap texels can sometimes hit backfacing geometry when gathering lighting from the Scene Clusters. When generating global illumination, you are only concerned with the light which bounces from faces which are visible to the world. Light coming from backfacing geometry is always considered invalid. These backface hits have the potential to corrupt or otherwise invalidate the lighting result. Modifying the Backface Tolerance is a way to prevent such situations arising.
In this example image the dark lightmap texels on the floor are created by invalid backface hits during Unity’s radiosity calculations. Increasing the Backface Tolerance settings can be a solution to this problem.
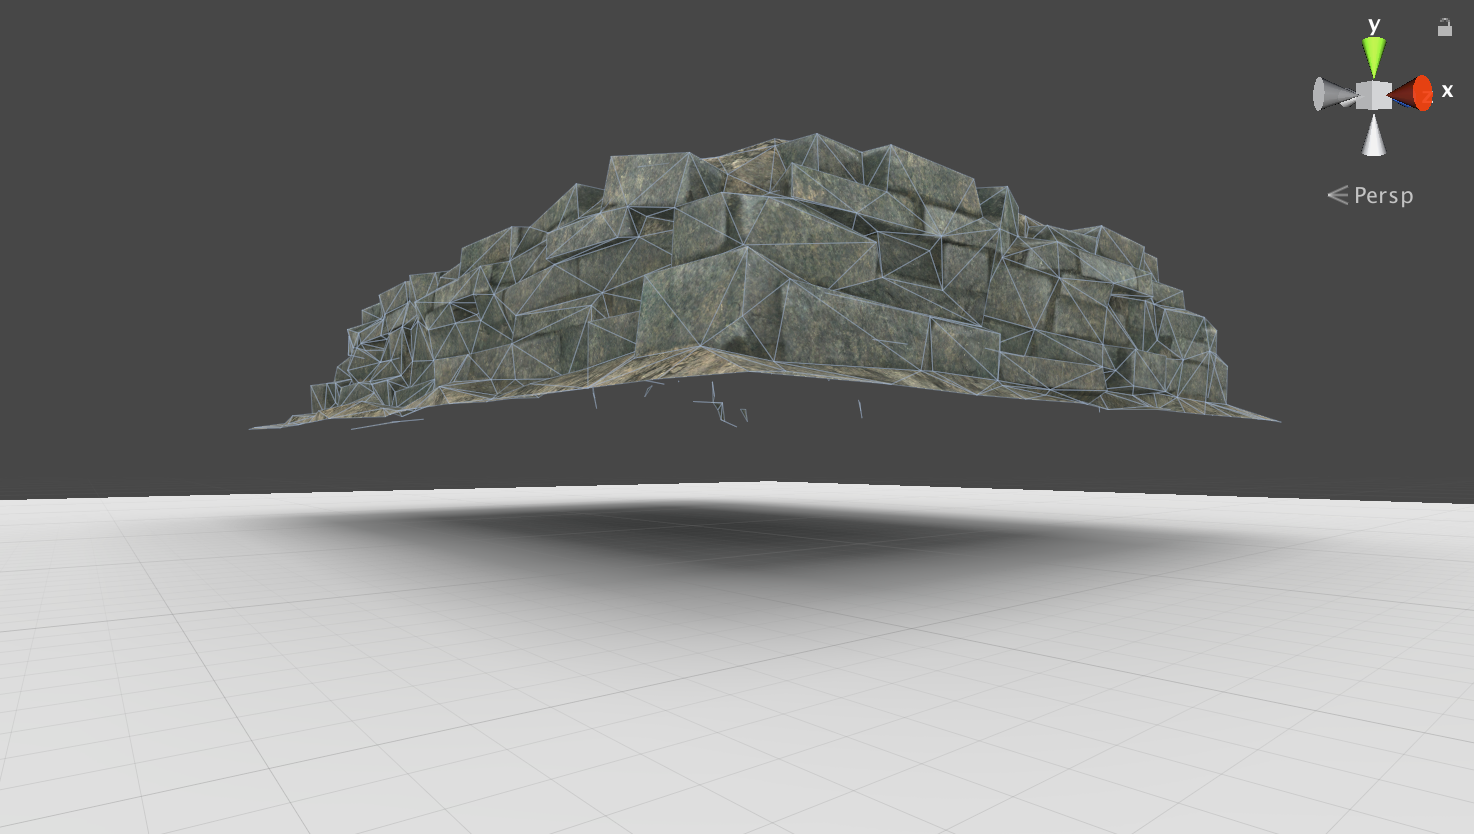
Backface Tolerance specifies a percentage of light that must come from front-facing geometry in order for a texel to be considered valid. If a lightmap texel fails this test, Unity will use the values of neighbouring texels to approximate a correct lighting result.
Modifying Backface Tolerance does not affect the optimization of your Precomputed Realtime GI. Changing this value will not have a great impact on the length of your precompute or affect run time performance. However Backface Tolerance is useful as a troubleshooting tool in situations where you have erroneous dark or light texels which remain despite increasing the Irradiance Budget.
Modelling Tolerance
Unwanted artefacts, such as black halos, can sometimes appear in areas where there are small gaps in the Static geometry within your scene. This can happen particularly in areas where there is opposing geometry in close proximity, such as objects on a floor.
Dark fringing artefacts such as the ones in this example image can often be fixed by increasing the Modelling Tolerance.
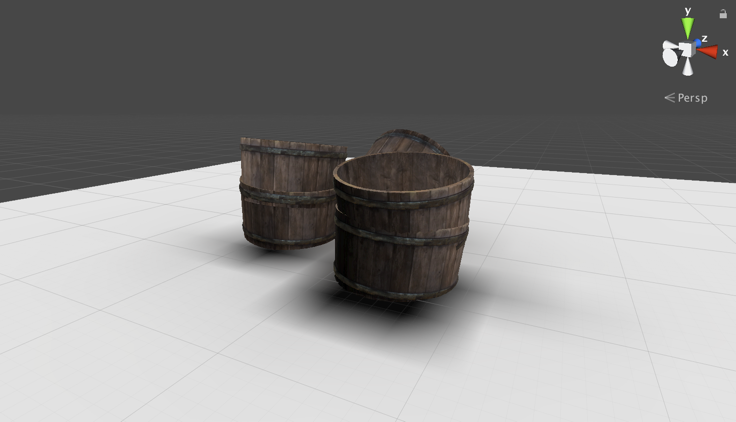
In these situations, there is a small gap between the object and the opposing surface where little or no light can enter. Very dark texels may be recorded in the lightmaps underneath. At lower lightmap resolutions, the size of the dark texels can mean they extend beyond the boundary of the occluding object and may cause some unwanted black fringing. In the context of lighting, the shadow values these small objects create may be unwanted or otherwise considered as noise.
Modelling Tolerance is used to ignore details smaller than the threshold value. Increasing this value will ensure that Unity’s GI calculations ignore parts of geometry which exist very near another surface. Higher values will force the Light Transport task of the precompute to ignore gaps smaller than this percentage of a lightmap texel. Decreasing the Modeling Tolerance ensures that smaller objects remain considered by the GI calculations.
Modelling tolerance does not affect the optimization of Precomputed Realtime GI. It does not negatively affect precompute times or run time performance. However you ca use it when troubleshooting unwanted visual artefacts. Modelling Tolerance may be useful if artefacts remain despite increasing other values such as Irradiance Budget or Irradiance Quality.
10. Building your Lightmap Parameters assets
Now that you have explored what the various Lightmap Parameters settings provide in terms of functionality, it is time to start applying this knowledge by building your own Lightmap Parameters assets and using them in the tutorial scene.
To build a Lightmap Parameters asset:
1. Open the LightingTutorialStart scene.
2. In the Project window, navigate to the folder Assets > LightmapParameters.
3. In the top left of the Project window, select Create > Lightmap Parameters.
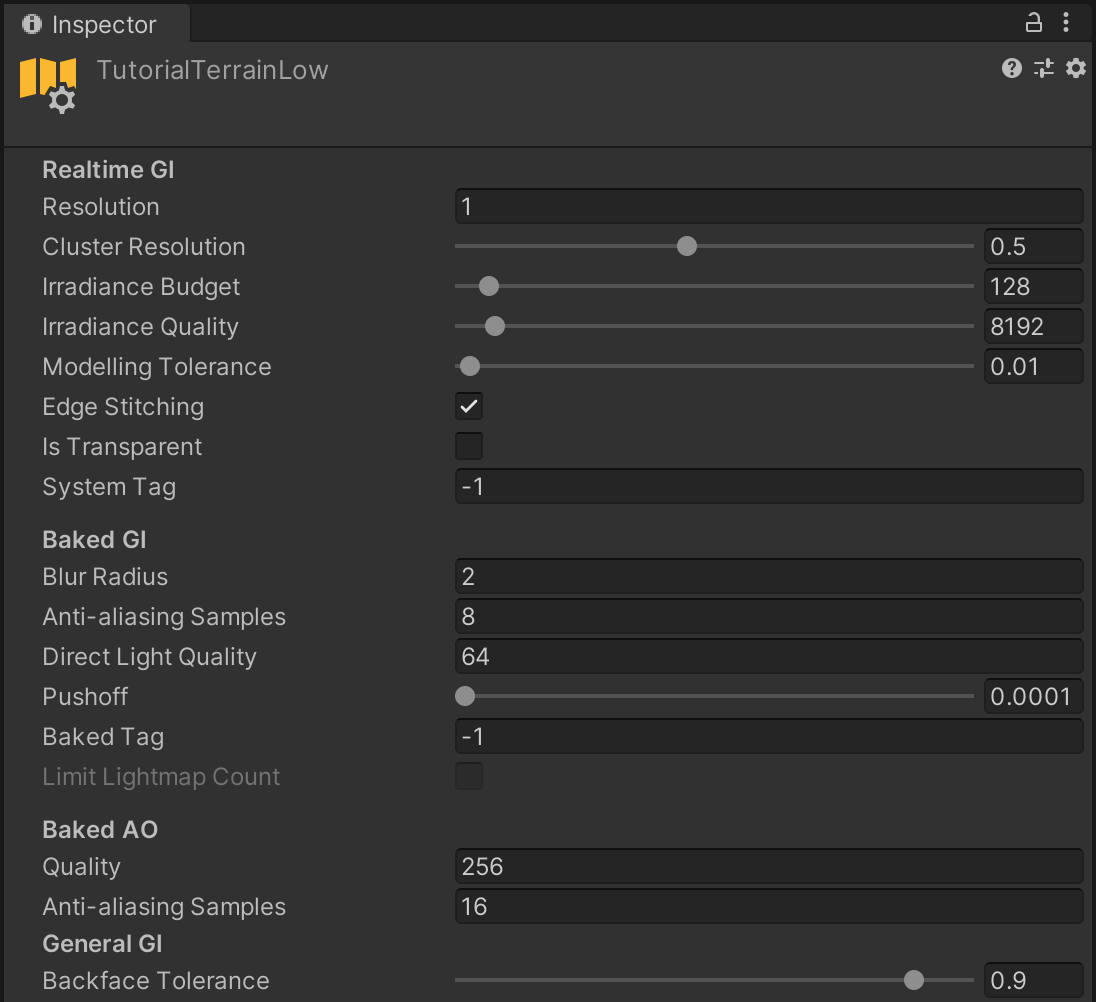
4. Name this newly created Lightmap Parameters asset TutorialTerrainLow.
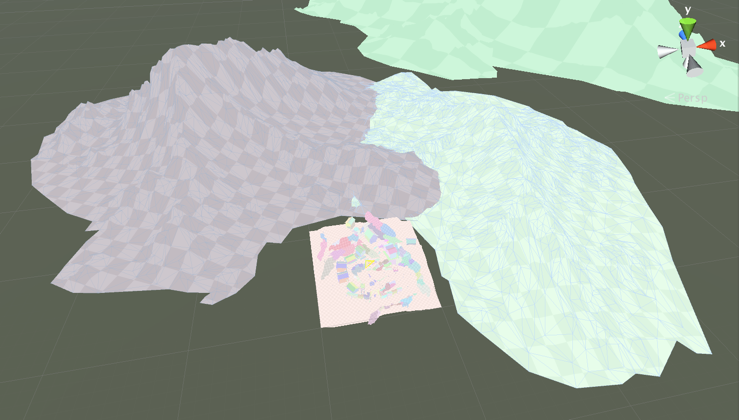
What can you assign this to? The MountainPeak GameObjects are very large in scale and distant from the Camera. This is a good case for selecting Lightmap Parameters other than the scene default.
11. Assign the Lightmap Parameters asset to objects
Next, you are going to assign this Lightmap Parameters asset to objects within the scene:
1. In the Scene view, select the two mountain GameObjects that are nearest to the playable area. These are both named MountainPeak. (You will ignore the furthest mountain for now.)
2. Using the Inspector panel, check that Static property is enabled for both MountainPeak GameObjects.
3. Open the Lighting window (Window > Rendering > Lighting Settings) and then select the Scene tab.
4. Check that the Auto Generate setting is enabled.
5. Now select both MountainPeak GameObjects.
6. From the Lightmap Parameters drop-down menu, select the newly created TutorialTerrainLow Lightmap Parameters asset. This will assign the Lightmap Parameters asset to the selected GameObjects.
7. Select Edit to the right of the Lightmap Parameters dropdown menu to begin editing the settings.
12. Set the Resolution
The first parameter that you will set is Resolution. Reducing the resolution of lightmaps improves both precompute times and run time performance, so you should aim to use the lowest Resolution value that we can without affecting the quality of the lighting.
Review the Resolution
A higher lightmap resolution is suitable for objects that will be seen up close, but the two instances of MountainPeak are both relatively distant from the Camera. Other factors suggest that a low lightmap resolution would be suitable here. These large objects are generally fairly consistent in the albedo of their materials. Additionally, from the camera’s perspective, there will be little variance in the color of light received by these objects given their scale. Without much lighting detail to capture, you can reduce the resolution of these objects’ lightmaps without affecting the quality of the result.
To review this:
- Try slowly decreasing the Resolution parameter of the TutorialTerrainLow Lightmap Parameters asset and observe the changes to the lightmap resolution in the Scene view.
For large scenery objects such as mountains and terrain, the default lightmap resolution would be wasteful.
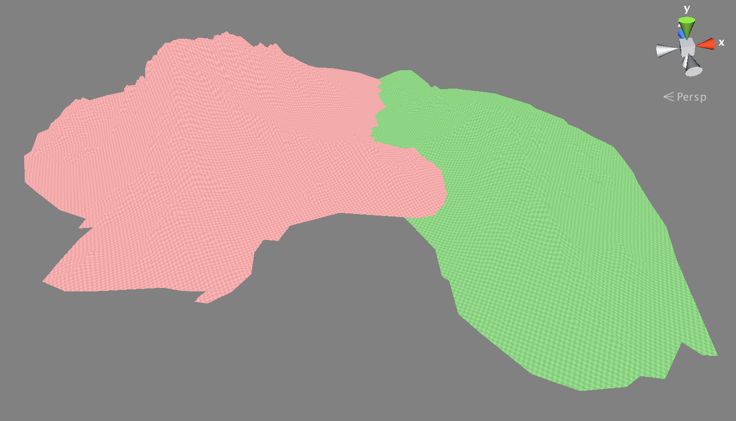
Using a lower resolution can result in great savings in precompute and run time performance with little detriment to the perceived quality of the lighting result.
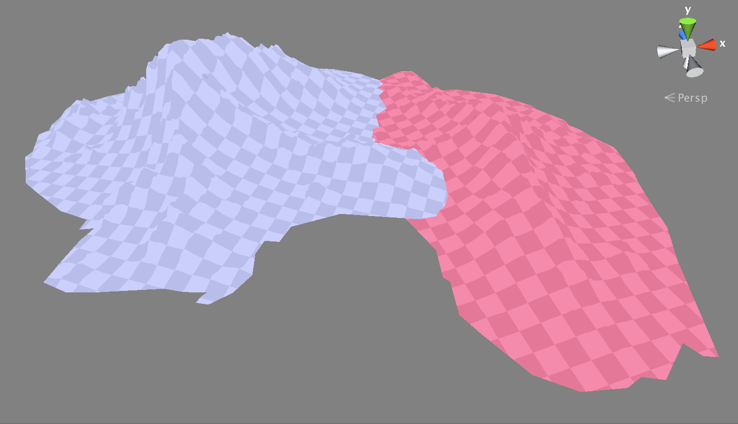
Remember, the Resolution value is a multiplier against the Scene-wide Indirect Resolution defined in the Scene tab of the Lighting window. In this scene, we have opted for an Indirect Resolution of 1. Therefore, if you then chose a Resolution value of less than 1 in the Lightmap Parameters, the resulting lightmap output would be less than 1 texel per unit.
Set the Resolution value
The MountainPeak objects are far enough away from other scene geometry that they are unlikely to receive any detailed or high frequency lighting. This means there will be little visual loss should we opt for a lower Resolution. In this tutorial scene, a Resolution value of 0.05 is enough to capture the very diffuse bounce lighting received by these objects.
Enter this value into the newly created TutorialTerrainLow Lightmap Parameters:
1. In the Project window, select the TutorialTerrainLow Lightmap Parameters asset.
2. In the Inspector panel, set the Resolution value to 0.05.
13. Set the Cluster Resolution
Next, let’s consider the Cluster Resolution value. As you reviewed earlier, Cluster Resolution is a multiplier used against the texel size of any lightmaps generated for that object. At a value of 1, a single Cluster will be the same size as a lightmap texel. Lower values will be a fraction of this. Remember that Clusters are essentially a voxelized approximation of the Static Scene used for Unity’s Precomputed Realtime GI. You only need to consider higher Cluster resolutions when the size of these voxels is insufficient to capture the variance in the color of light bounced to or from an object.
Review the Cluster Resolution
Similar to the resolution of the lightmaps, Cluster Resolution can be lowered substantially for the MountainPeak GameObjects. Using Clusters at the default resolution required throughout the rest of this scene would mean many hundreds were needed to cover an object of this size.
Considering that MountainPeak has a material with a fairly consistent albedo, and the object is relatively far from the Camera, you can make important savings by selectively reducing this object’s resolution. While accuracy of the lighting solution may not be the same as using higher resolutions, you are unlikely to notice any visual difference in the context that the object is used within our scene.
Cluster Resolution can be considerably lower for very large objects, far from the Camera.
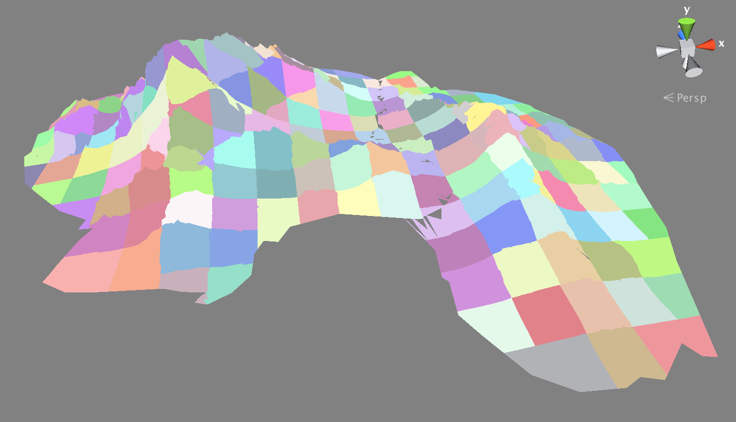
To review the Cluster Resolution:
1. In the top left of the Scene view, use the Draw Mode dropdown menu to select Clustering.
2. In the Project window, select the TutorialTerrainLow Lightmap Parameters asset.
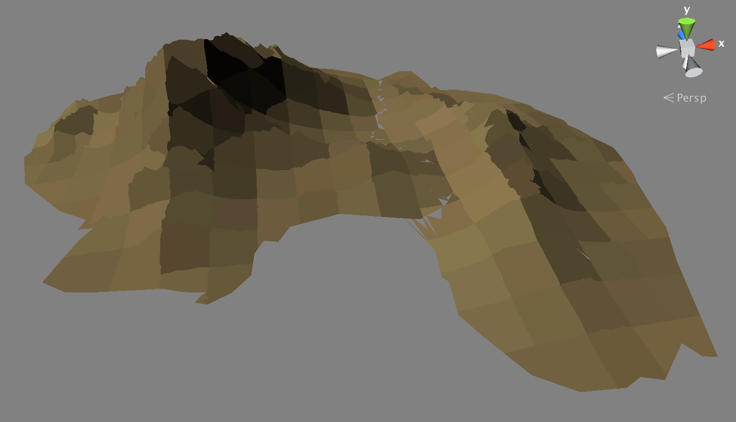
3. In the Inspector, reduce the Cluster Resolution value. Observe how the size of the colored patches increases as the value is lowered.
4. Alternatively, the Lit Clustering Draw Mode can be a useful way to assess whether the resulting resolution of the Cluster approximation is sufficient to capture details present in the scene lighting. In the top left of the Scene view, use the Draw Mode dropdown menu to select Lit Clustering instead.
5. In the Project window, select the TutorialTerrainLow Lightmap Parameters asset.
6. In the Inspector, reduce the Cluster Resolution value. Observe how the view changes as the value is altered. Lit Clustering Scene view Draw Mode is useful for evaluating whether you have sufficient Cluster resolution to capture the lighting present within the scene.
Set the Cluster Resolution value
When adjusting the value, it is always good to ask yourself whether any critical lighting detail is missed by using lower Cluster Resolutions. If there is no visual benefit to having a higher resolution, the preference should always be to use fewer Clusters. Remember that the number of Clusters within your scene will have a big impact on both the length of the precompute and the interactivity of GI at run time.
In this tutorial scene a Cluster Resolution of 0.4 works given the context of the MountainPeak instances. To set this:
1. In the Project window, select the TutorialTerrainLow Lightmap Parameters asset.
2. In the Inspector, set the Cluster Resolution value to 0.4.
In many cases, just lowering the resolution of your lightmaps and Cluster size will be enough to achieve big gains in lighting performance. However, you also can make additional finer-grained improvements by modifying the values used in Unity’s radiosity calculations: Irradiance Budget and Irradiance Quality.
14. Set the Irradiance Budget
First, let’s consider the Irradiance Budget. As you reviewed earlier, this value controls how much memory is allocated to each lightmap texel when its value is calculated. In the interests of runtime performance, you should use the lowest Irradiance Budget value you can without negatively impacting the appearance of the lighting.
You may wish to increase the Irradiance Budget if the Precomputed Realtime GI appears soft or otherwise indistinct. This can be particularly noticeable in areas where high contrast lighting in the scene is not being accurately represented.
Review the Irradiance Budget
In the case of the two MountainPeak GameObjects, the lighting here is generally low frequency. You don’t need to capture any dappled or high contrast lighting, which means that you can reduce the Irradiance Budget from its default value of 128 bytes without noticeable negative effects upon our lighting.
To review this:
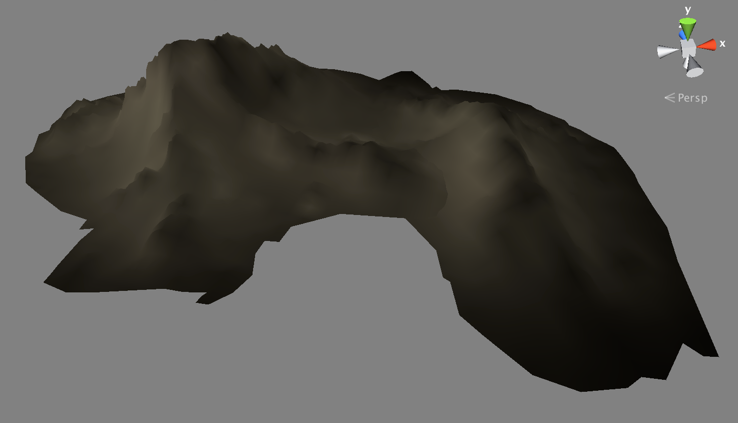
1. In the top left of the Scene view, use the Draw Mode dropdown menu to select Irradiance.
2. In the Project window, select the TutorialTerrainLow Lightmap Parameters asset.
3. In the Inspector, reduce the Irradiance Budget value. Notice how, as you reduce this value, the lighting on the MountainPeak GameObject becomes slightly softer. The Indirect Scene view Draw Mode is useful when assessing changes to the Irradiance Budget or Quality values.
Set the Irradiance Budget value
Following some experimentation in the tutorial scene, we found that halving the Irradiance Budget to a value of 64 bytes does not affect the lighting quality too noticeably. To set this:
1. In the Project window, select the TutorialTerrainLow Lightmap Parameters asset.
2. In the Inspector, set the Irradiance Budget value to 64.
15. Set the Irradiance Quality
Now let’s move on to the Irradiance Quality. As you reviewed earlier, Irradiance Quality determines the number of rays that each Cluster fires when calculating the value of a lightmap texel. Unlike the Irradiance Budget, which will impact runtime performance, Irradiance Quality only affects the lighting precompute time.
It may be useful to increase the Irradiance Quality in situations where small but important Clusters are missed due to an insufficient number of rays being fired. For example, in situations where you may have a very prominent color on a piece of geometry which does not feature in the resulting lightmaps.
Review the Irradiance Quality
With the MountainPeak GameObjects, the huge scale of the objects within the scene means that we are unlikely to miss nearby Clusters. This means that you can improve precompute performance by lowering Irradiance Quality without negatively affecting the lighting results. To explore this:
1. In the top left of the Scene view, use the Draw Mode dropdown menu to select Irradiance.
2. In the Project window, select the TutorialTerrainLow Lightmap Parameters asset.
3. In the Inspector, reduce the Irradiance Quality value. Notice how the resulting lightmaps become slightly less sharp as the value goes down.
Set the Irradiance Quality value
Having tested a number of results, we found that an Irradiance Quality of 2048 rays gives a good compromise between the quality of the GI lighting and the cost this places on precompute times. Despite some loss in accuracy, the overall lighting effect is sufficient for our needs with this distant object. To set this:
1. In the Project window, select the TutorialTerrainLow Lightmap Parameters asset.
2. In the Inspector, set the Irradiance Quality value to 2048.
16. Assigning Lightmap Parameters assets throughout the scene
With a Lightmap Parameters asset configured for the distant scenery, you can now apply what you have learned and create Lighting Parameters assets for the remaining Static geometry within the LightingTutorialStart scene.
Before you do, let’s review some key guidance and an example we prepared:
Decide on a taxonomy
Earlier in this learning experience, you explored how it is often a good idea to decide on a taxonomy, or ‘scheme’, for organizing objects within your scenes. Breaking the scene up into object groupings based on characteristics such as size or proximity to the Camera will help you make easier selections when applying Lightmap Parameters assets to fine tune lighting performance.
While working through the remaining Static objects under the Environment GameObject, look for distinct categorisations of objects in order to assign a shared Lightmap Parameters asset. For example:
- Is the object likely to be close to the playable area and seen up-close? In this case, increasing the Resolution value for this object may provide a tangible improvement in the lighting result.
- Is the object distant or perhaps partially obscured? Here you would be unlikely to need the same Resolution value as the visual benefits might not be noticed. Similarly, if an object’s material does not feature a great deal of variance in albedo, higher lighting resolutions may not deliver much benefit.
It is not necessary to be too fine-grained when assigning Lightmap Parameters assets. For most scenes, a handful of distinct variants is enough. Lots of subtle variants are difficult to work with, as any adjustments will need to be applied numerous times throughout the different Lightmap Parameters assets.
Review the example scene organization
In the completed tutorial scene LightingTutorialOptimal, we divided the scene up into the following categories based on the complexity of the object and the required resolution:
- RocksLow: Smooth, convex rock type meshes that are distant from the Camera. Their distance means these objects only require a low Resolution and reduced Cluster Resolution.
- RocksMedium: Smooth, convex rock type meshes that are closer to the playable area and the Camera and therefore more visible. For this reason we use a slightly higher Resolution and Cluster Resolution, along with a higher Irradiance Budget and Irradiance Quality.
- StructuresHigh: Important buildings that benefit from higher Resolution and Cluster Resolution. This therefore requires greater Irradiance Quality and Irradiance budget values.
- StructuresLow: Buildings which are far from the camera, needing only lower Resolution values.
- TerrainLow: Large, distant meshes such as mountains which do not benefit from higher resolution lighting.
- TerrainPlayable: Large terrain objects which will be close to the camera and require a lightmap resolution balanced for closer inspection by the Camera. The scale of the object means lower Cluster Resolutions are still feasible however.
- TerrainVeryLow: Very distant and partly obscured terrain objects needing only low Resolution and Cluster Resolution values. These also have low Irradiance Quality and Irradiance Budget settings.
Consider using Default Parameters
In addition to these custom Lightmap Parameters assets, in the completed tutorial scene LightingTutorialOptimal we also have a number of structures using the Default Parameters set from the Scene tab of the Lighting window. Here we are using Unity’s standard Lightmap Parameters Default-Medium.
Using the Default Parameters for the majority of Static objects within the scene reduces the amount of manual assignment that needs to be performed. It often is useful to set the Default Parameter to be the settings that the majority of objects will use. For our purposes, Default-Medium used in combination with an Indirect Resolution of 1 texel per unit gave us optimal results for the majority of objects within the scene.
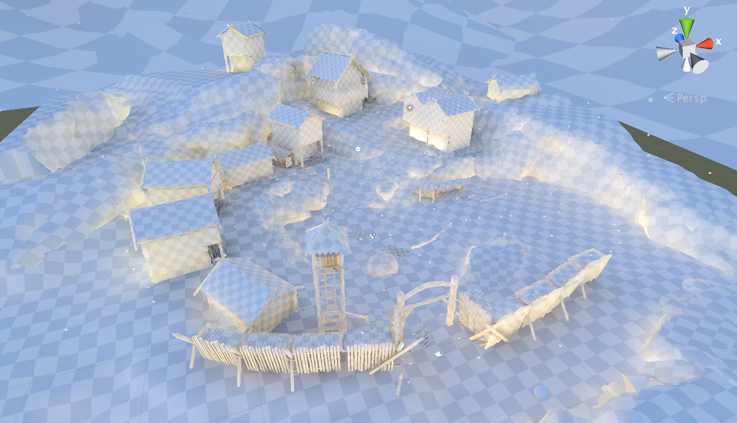
The Indirect Scene view Draw Mode is a useful tool when evaluating scene lighting as it shows your lighting results without the distraction of materials or non-Static objects which do not contribute to your Precomputed Realtime GI.
Use the example as a guide
Use the LightingTutorialOptimal scene as a guide when making decisions about assigning and configuring your lighting. It should not take long to assign Lightmap Parameters to the remaining Static objects within the scene.
While you are working through these remaining objects, remember to always question whether there is an objective benefit to keeping settings high. If it is possible to lower settings without negatively affecting the visual output, this will always be preferable.
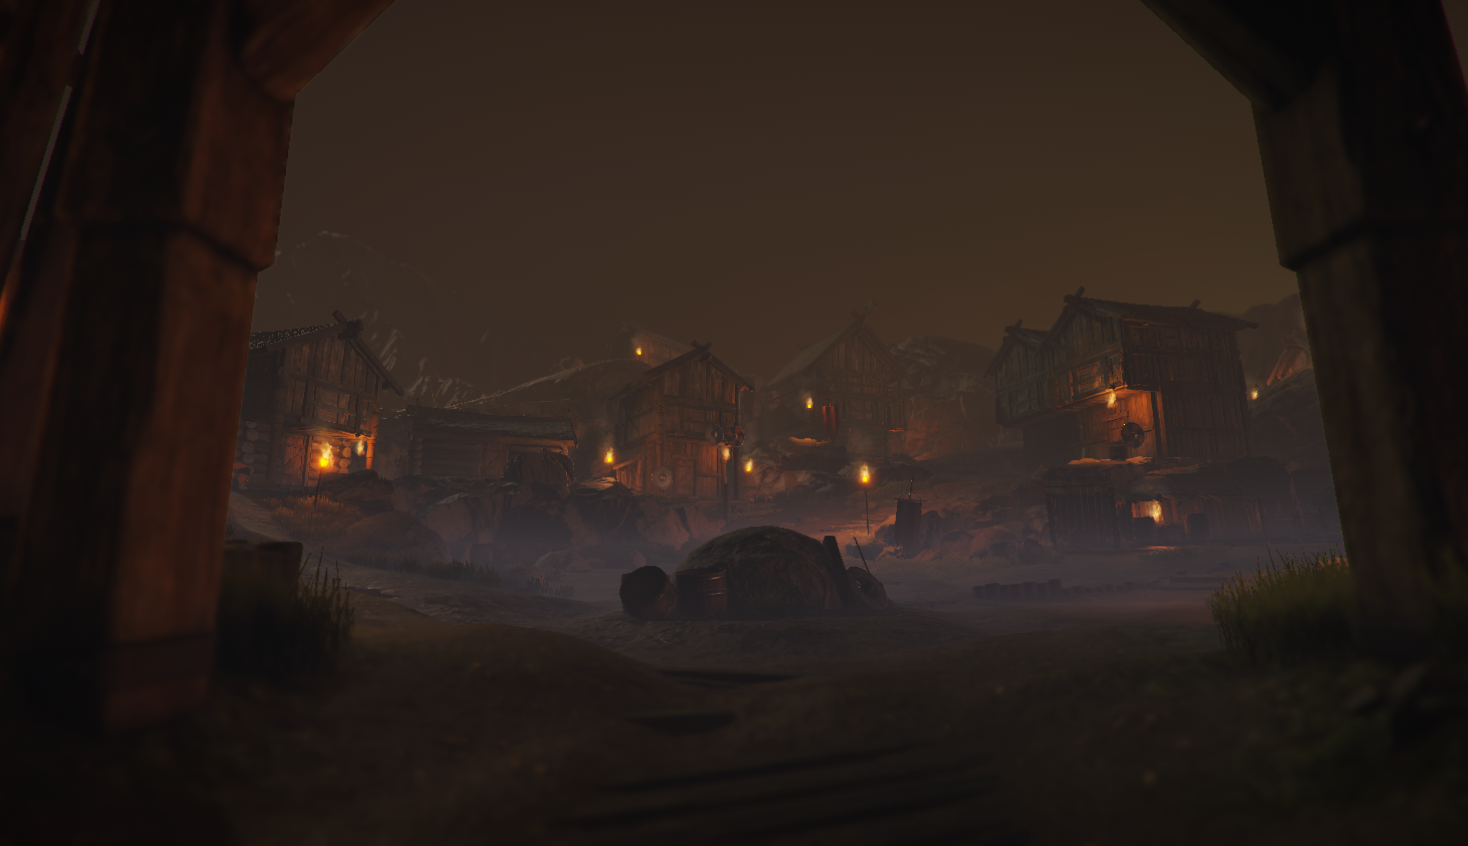
The image below shows the tutorial scene with a night lighting treatment applied. Following our initial precompute, no further precomputation was required while generating an alternative lighting solution. This would be impossible with ‘traditional’ baked lightmapping techniques.
17. Next steps
Like so many aspects of game development, optimizing scene lighting is about finding the right balance between desired visual result and performance cost. In many cases, it is worth sacrificing a small amount of lighting fidelity in exchange for reduced precompute times and improved run time performance.
Summary
In this tutorial you have:
- Explored how to evaluate scenes to make appropriate decisions about lightmap resolutions for Precomputed Realtime GI.
- Learned that one of the most costly elements in lighting precomputes is the number of Charts in your scene, and examined a number of techniques that can reduce Chart counts.
- Set up efficient Light Probes volumes for use by small props and debris-type objects.
- Reviewed how adjusting the parameters of Unity’s Precomputed Realtime GI unwrapping algorithm can help it make better decisions about stitching lighting UVs, therefore reducing the Chart count.
- Learned what Clusters are, how they are used to calculate global illumination in Unity and how they can affect lighting performance.
- Experimented with using Lightmap Parameters to fine tune resolution and lighting fidelity for objects within the scene, reducing the precompute costs of objects that are less visually important.
Next steps
Employing all of these techniques together should enable you to create production-quality lighting results in your scenes with minimal precompute times. Combining this with the ability to quickly iterate on lighting with realtime updates to GI, plus the ability to change bounced lighting at run time, you should now have a deeper understanding of the power and flexibility Unity’s Precomputed Realtime GI and the benefits it offers many realtime applications.
To extend your learning further, you can review the ARM Guide for Unity Developers.