Gameplay logic in Visual Scripting
Tutorial
Beginner
+10XP
15 mins
100
Unity Technologies
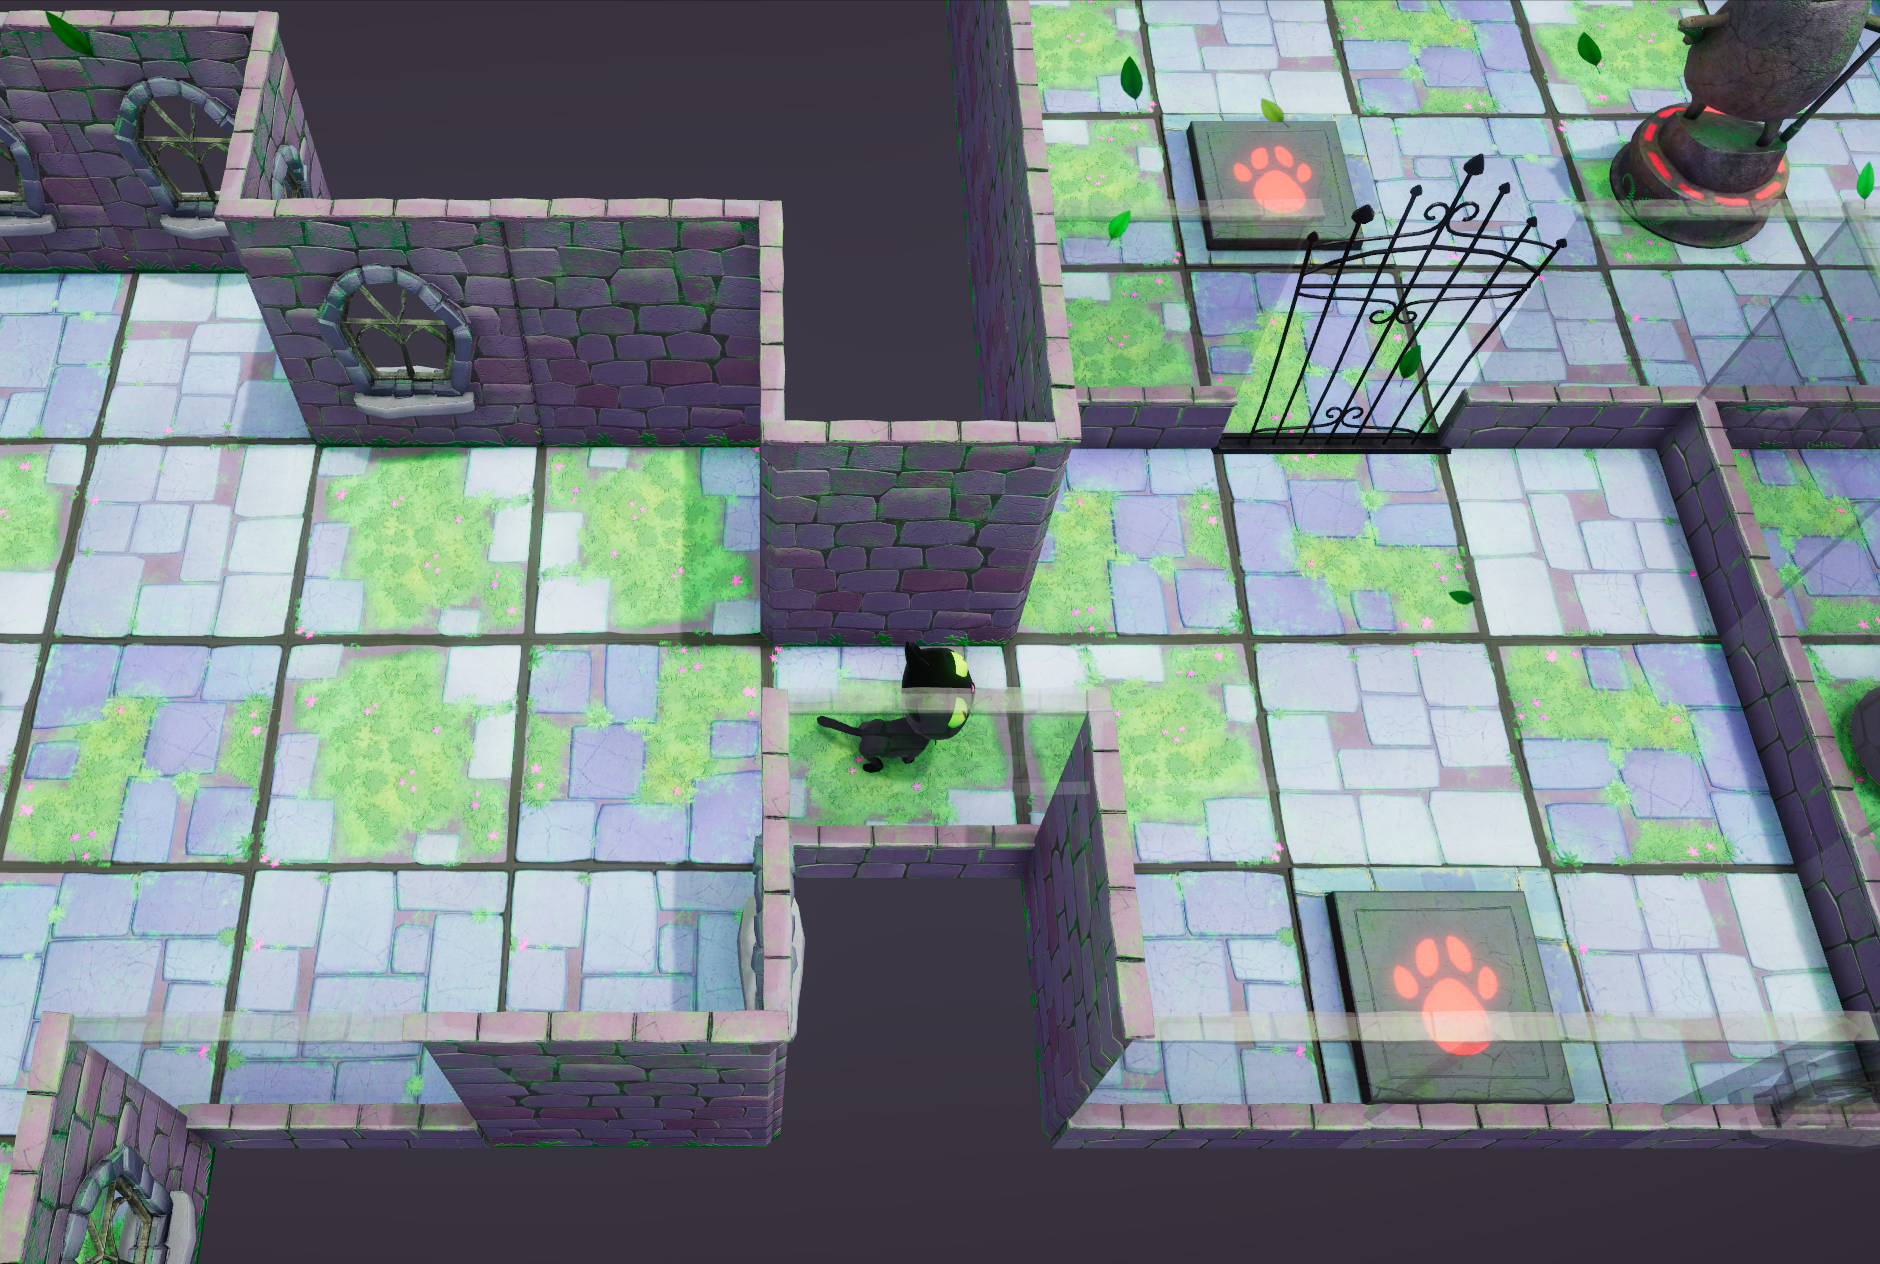
Scripting is all about logic: devising logical sequences and coding those sequences into your scripts. In this tutorial, you will start with the essential scripted object in this game — a door — and work through the logical sequence to make it open and close.
The main goal of this tutorial is to help you code these logical sequences on your own. We have provided step-by-step instructions that you can either follow or skip as you desire.
By the end of this tutorial, you’ll be able to:
- Replace a Script Machine’s visual script.
- Apply Boolean values and branching to a visual script.
- Retrieve and set variable values in a visual script.
- Apply existing events to a visual script.
- Apply a subgraph to a visual script.
- Given a desired result, code an appropriate visual script.
Materials
Languages available:
1. Overview
Scripting in Unity — whether visual scripting or in C# — makes gameplay possible in the Unity project. In scripts, you create the logical structure of your project. In this tutorial, we’ll map out the logic in simple gameplay mechanics, like Clive opening a door, and you’ll apply that logic in visual scripts.
2. Scripted events in this game
This prototype includes several scripted events, written in C#, which you will use to check and control objects as they move in the game. You don’t have to memorize these, but if you understand how they work by their names, you’ll understand how to use them throughout these tutorials.
Events on cell GameObjects
The game is organized on grids of 1x1 cells. Each cell of the grid can trigger these events when a moving GameObject, such as Clive the Cat or his crate, moves into or out of each cell:
- Want To Enter Cell triggers when a moving GameObject wants to move into a cell. You can use this event in a script that determines whether that object is allowed to enter.
- Enter Cell triggers when a moving GameObject enters the cell. You can use this event to determine what happens next.
- Want To Exit Cell triggers when a moving GameObject wants to move out of a cell. You can use this event to determine whether that object is allowed to exit.
- Exit Cell triggers when a moving GameObject exits the cell. You can use this event to determine what happens next.
Events on edge GameObjects
Objects such as doors can trigger these events:
- Want To Cross Edge triggers when a moving GameObject wants to cross through or over the edge. You can use this event to determine whether that object is allowed to cross.
- Crossing Edge triggers when a moving GameObject crosses the edge. You can use this event to determine what happens next.
3. Examine script for a closed door
Let’s take a look at the visual script that controls the first door and see what is happening.
1. Select ObjectRoot > FirstDoor.
2. In the Inspector, remove the Script Machine component with the AnimAndFX script — you are finished testing that script. Select the three dots in the component section, and select Remove Component.
3. The remaining Script Machine component has the BaseDoorScript visual script attached. This script is attached to multiple doors, so please don’t edit it. Instead, select BaseDoorScript in the Project window (Assets > UnityTechnologies > VisualScriptingTutorial > Tutorial > VisualScripts > BaseDoorScript) and press Ctrl+D / Cmd+D to duplicate it.
4. Rename the duplicate "FirstDoorScript".
5. Drag FirstDoorScript to the Script Machine’s Graph property, replacing BaseDoorScript.
6. Select the Edit Graph button.
7. Enable the Values button on the Script Graph window.
Your Script Graph window should look like the image below.
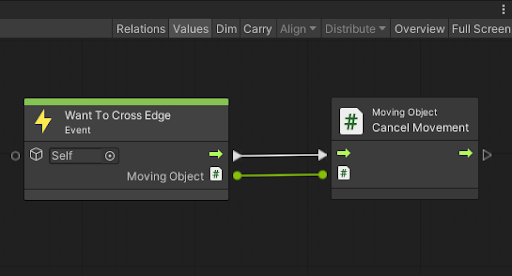
8. Play this level with the Script Graph window open. Try moving Clive through the door on the right side of the room where he starts. You’ll find that he can’t get through, and you’ll see this script run each time you try.
9. To see what is happening in the Graph, select the Want To Cross Edge node and look at the Graph Inspector. The output of this node is an object referred to as Moving Object, which is defined in the C# code as the GameObject that the user wants to move across this edge.
10. Select the Cancel Movement node. This is a C# node (a method, for you coders) that acts on the input Moving Object and stops it from moving.
In short, when Clive wants to cross this edge, the movement is canceled. This door is locked.
4. Allow Clive through the door
Let’s use a variable to unlock this door. You'll use an Object variable named IsOpen to specify whether the door is open, and control its value in the Inspector. The script will work like this:
When Clive wants to go through the door:
- If the door is open, let Clive proceed normally (do nothing).
- If the door is closed, cancel Clive’s movement.
Build this flow on your own — you are ready! As needed, check your work using the image in the next step. Be sure to save your work (Ctrl + S / Cmd + S).
Enter Play mode to test your visual script. Use the Object variable setting in the Inspector to change the value of the IsOpen variable. Then select the Game view window to return focus to the game.
When IsOpen is True, Clive jumps right through an iron door — that’s not ideal, but it’s a start!
When you are successful, mark the next step complete. If you get stuck, you can follow the instructions and the screen image in the next step.
5. Allow Clive through the door (instructions)
Here are the step-by-step instructions to allow Clive through the first door:
1. In the Graph Inspector, under Blackboard, create an Object variable named "IsOpen", with a Type of Boolean and a Value of False (unchecked).
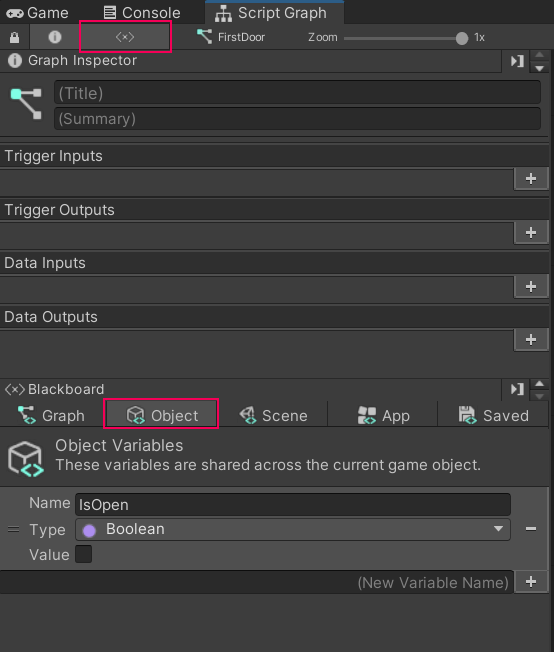
2. Click and Drag the IsOpen variable from the Object tab of the Blackboard into your script to create a Get Variable node.
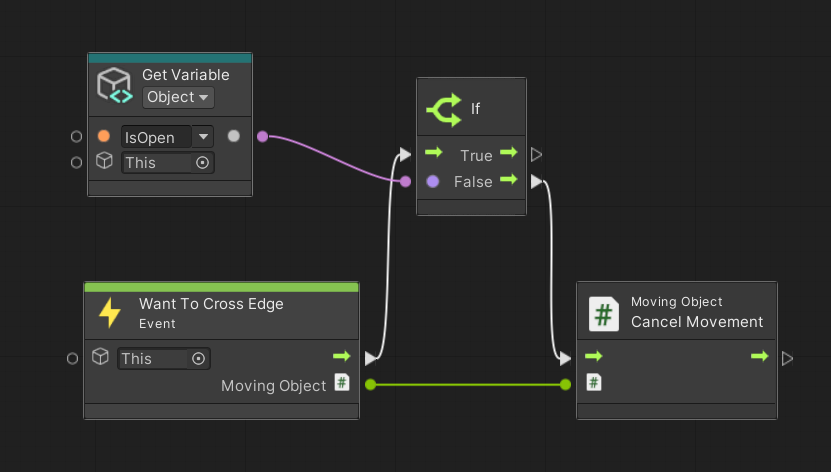
3. To check whether IsOpen is True, add an If node, and add a connector from Get Variable to the input of the If node.
4. Remove the flow connector (arrows) from the Want To Cross Edge node to Cancel Movement node, and instead make the connection from Want To Cross Edge node to the If node.
5. Keep the Moving Object node’s data output connector (dots) from the Want To Cross Edge node to the Cancel Movement node — this tells Cancel Movement node which GameObject’s movement to cancel.
6. Continue the flow from the If node's False flow output to the Cancel Movement node.
7. Don’t connect the flow from the If node's True output, because nothing will happen in this case (the movement won’t be canceled).
8. Save your work (Ctrl + S / Cmd + S).
Your Graph should look like the image below.
6. Let Clive open the door
Let’s change this Graph to let Clive open it, instead of controlling it ourselves. The first time he tries to pass through the door, he will not move forward, but the door will open. The next time he tries, the door will be open and his movement won’t be canceled. The script will work like this:
When Clive wants to go through the door:
- If the door is open, let Clive proceed normally (do nothing).
- If the door is closed, cancel Clive’s movement and set the door to open. (The door itself won’t change, but Clive will be able to go through.)
Apply your skills and update this script. As needed, check your work using the image in the next step. Be sure to save your work (Ctrl + S / Cmd + S).
Now when you test the script, Clive will be stopped at the door the first time you try to move him through, but you’ll see that the IsOpen variable value is now True. When you try again, Clive will go through.
When you are successful, mark the next step as complete. If you get stuck, you can follow the instructions and the screen image in the next step.
7. Let Clive open the door (instructions)
Here are the step-by-step instructions to let Clive open the door:
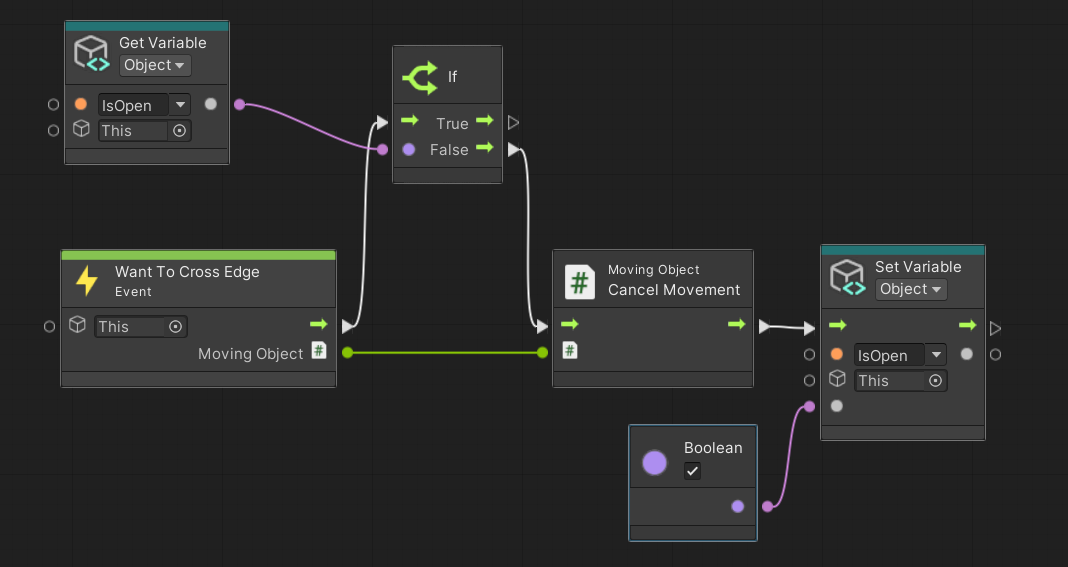
1. Add a Set Object Variable node by Right-Clicking in the Graph inspector and then select Variables > Object > Set Object Variable and specify the variable name "IsOpen".
2. Connect the flow from Cancel Movement node to the Set Variable node.
3. Add a Boolean literal object by Right-Clicking in the Graph inspector and then select Codebase > System > Boolean > Boolean Literal and check the checkbox to create the value True.
4. Connect that Boolean value to the Set Variable input.
5. Press Ctrl+S (macOS: Cmd+S) to save your work.
Your Graph should look like the image below.
8. Animate the door
Clive is still jumping through an iron door like a ghost! Next, let’s play the animation on FirstDoor before Clive goes through it.
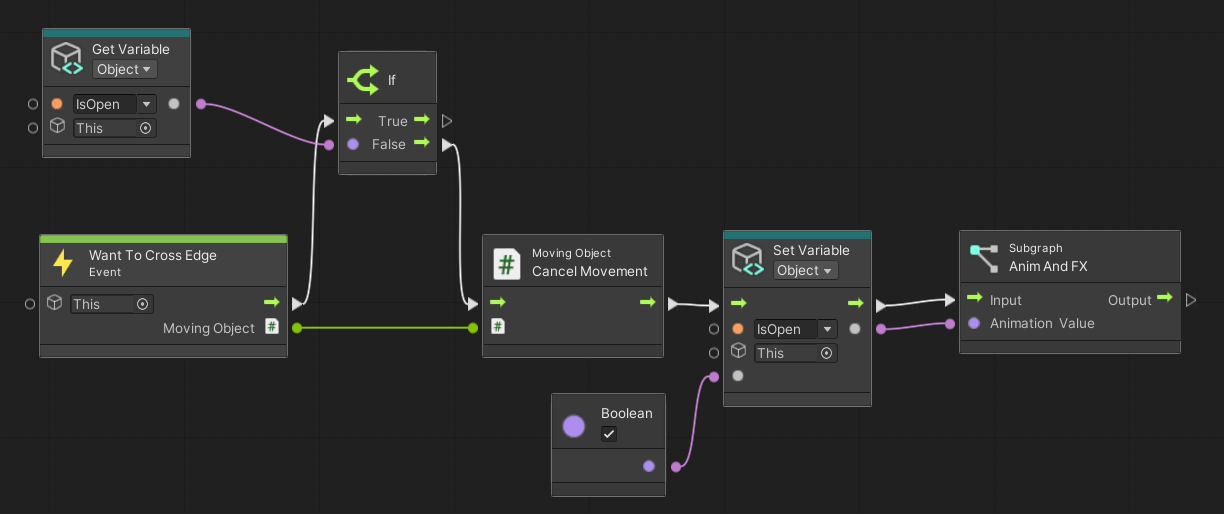
All you need to do is add the AnimAndFX subgraph and input the required value to it. You’ll find the subgraph in the fuzzy finder!
Check your work using the image in the next step as needed. Be sure to save your work with Ctrl+S (macOS: Cmd+S).
Play the level and watch Clive open the door properly, all by himself!
When you are successful, mark the next step complete. If you get stuck, you can follow the instructions and the screen image in the next step.
9. Animate the door (instructions)
Here are step-by-step instructions to add the door animation::
1. Add the AnimAndFX subgraph you created in the previous step. It’s in the fuzzy finder in the Graphs section!
2. Connect the flow and value outputs from the Set Variable node to AnimAndFX subgraph, so that the subgraph receives a Value of True. (You can get this value from the existing Boolean node, or a new Boolean node.)
10. Extra credit
For an extra challenge, make the door close behind Clive as he goes through!
Hint: to play the door closing animation, set the Boolean input to the AnimAndFX subgraph to False.
For the final script with this feature added, check out Extra_FirstDoorScript in the Samples subfolder. If you like, you can attach this visual script to the Script Machine for the FirstDoor GameObject.
11. What’s next?
In this tutorial, you went step-by-step through the logic and scripting of a GameObject that is very important in this game — a door. You now have a door-opening visual script that you can adapt for many of Clive’s conundrums.
Next you'll script another common gameplay mechanic: the player character’s inventory.