Get started with the Unity Editor
Tutorial
Beginner
+10XP
90 mins
2181
Unity Technologies
Feeling comfortable working in the Unity interface is the first essential step towards creating amazing digital experiences. In this tutorial, you will create a new project, navigate Unity's interface, experiment with 3D objects and materials, integrate Unity's physics system, and learn how to use prefabs.
Materials
Languages available:
1. Overview
Welcome to this absolute beginner tutorial, designed to give you a hands-on introduction to the world of real-time 3D development with Unity. By the end of this tutorial, you will have taken your first steps into creating an interactive experience with Unity.
More specifically, you’ll do the following:
- Navigate Unity's Scene view, focus on specific objects, and explore from different angles.
- Create a new scene, add and adjust 3D objects like planes and cubes, and experiment with Unity's materials.
- Make your cubes obey gravity and tumble using Unity's physics system and Play mode.
- Create a stack of tumbling cubes, explore global and local coordinates, and scale objects for variety.
- Use Unity's prefabs to add characters and visual effects.
By the end of this tutorial, you’ll have a unique scene that you designed from scratch that you can explore with the character of your choice. It could look something like the example below — or it could look completely different!
This tutorial is perfect for absolute beginners - you don't need any prior experience with Unity or game development.
Note: If you are already very confident in positioning yourself in Scene view using a variety of 3D navigation techniques, and you have a lot of experience using the Move and Rotate tools, this tutorial might not be appropriate for you. In this case, feel free to skip to the bottom of the tutorial and select Mark all complete and continue.
If you’re ready to get started, proceed to the next step!
2. Create a new Unity project
The first step you need to take is to create a new Unity project from the Unity Hub. Watch the video or follow the instructions below to create a new Unity project:
1. Launch the Unity Hub.
- Begin by opening the Unity Hub application.
- The Unity Hub is a desktop application that streamlines the way users manage their Unity projects and installations. It allows easy access to different versions of Unity and extensions, and the creation, management, and launching of projects.
- If you haven't installed Unity Hub yet, you can download it from the official Unity website.
2. Create a new project.
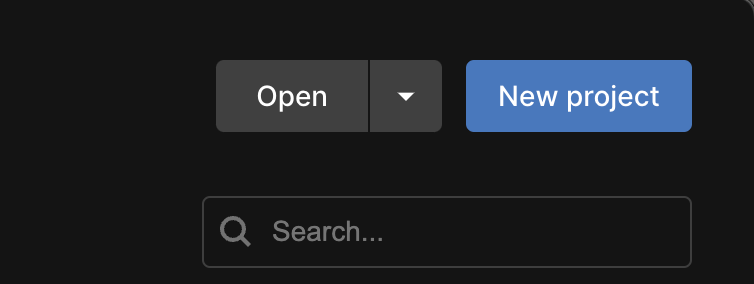
Select the New Project button.
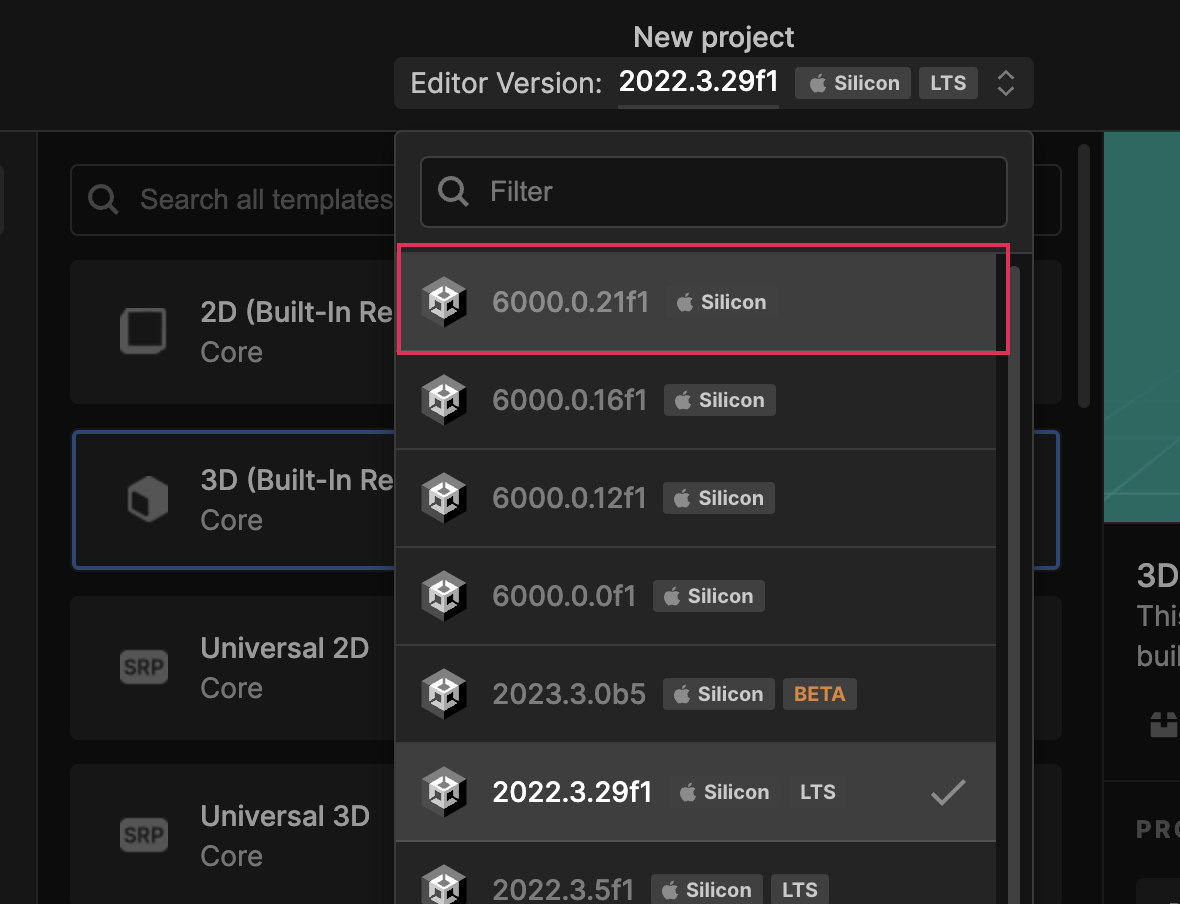
3. Select the appropriate Editor version (2022.3 or Unity 6).
- From the Unity Hub, you can select which version of the Unity Editor you want to create your project with. This is especially useful if you have multiple versions installed.
- It is always recommended that you use the latest Long Term Support (LTS) version of the Unity Editor.
- Long Term Support (LTS) versions of Unity are stable releases that are supported for two years after their launch, providing users with a reliable and fully tested platform for their projects with guaranteed ongoing updates and bug fixes.
- From the Editor Version dropdown, any version that starts with 2022.3 or any version of Unity 6 will work for this project.
If you don’t already have this version installed on your machine, you can follow these instructions on how to install a version of Unity.
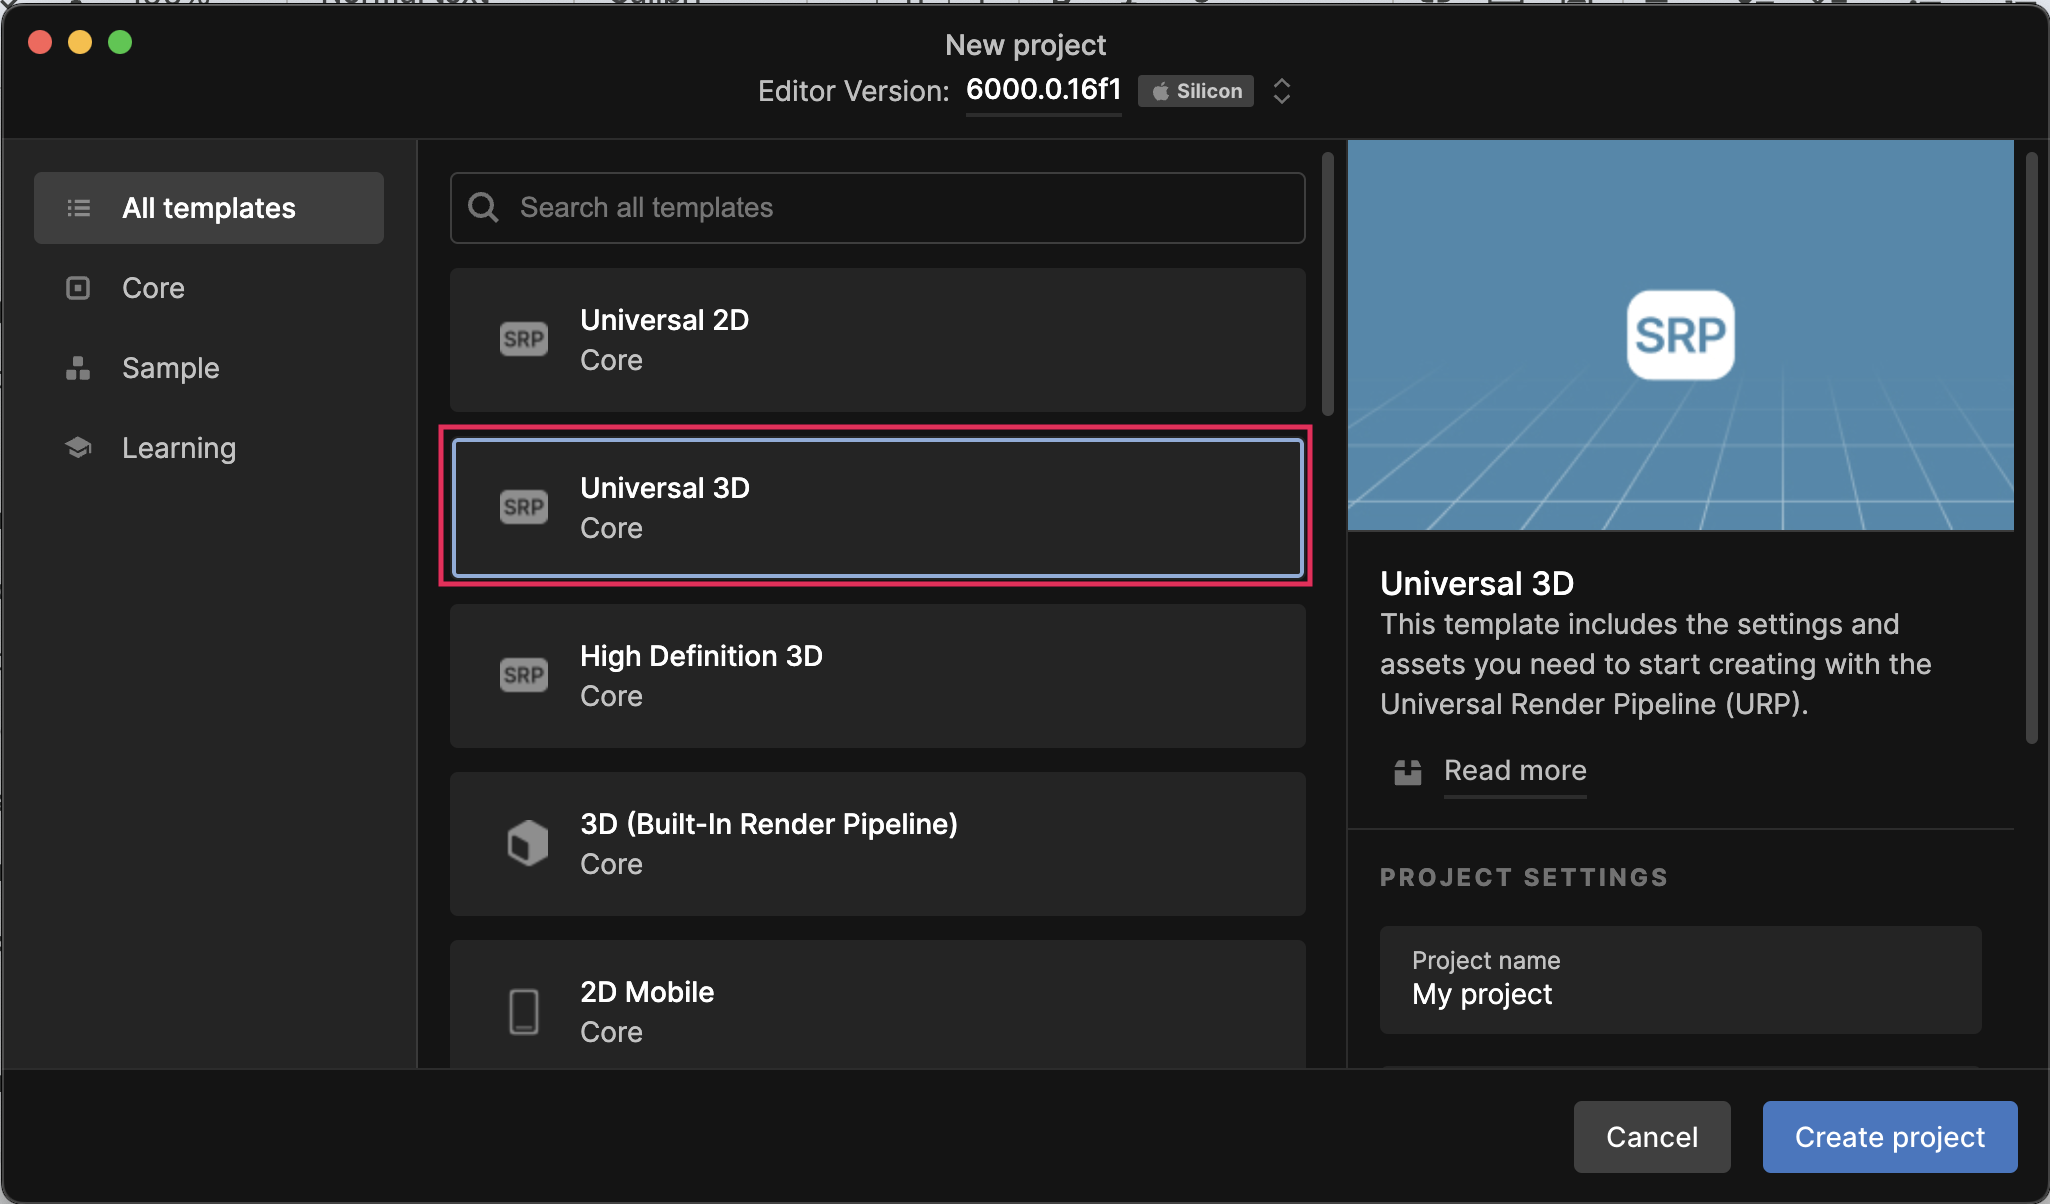
4. Choose the Universal 3D Template.
- In the template section, select Universal 3D. This template comes with settings and assets useful for 3D projects.
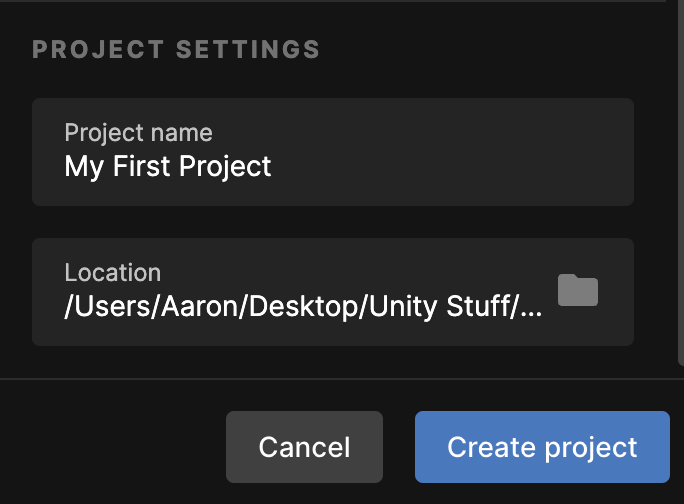
5. Name and create your project.
- In the Project Settings window, give your project a name - for this tutorial, let's call it “My First Project”.
- Choose a location on your computer to save your new project.
- Finally, select the Create Project button. Unity will take a moment to set up your new project.
You might also find it helpful to watch the quick video demo of this entire step below.
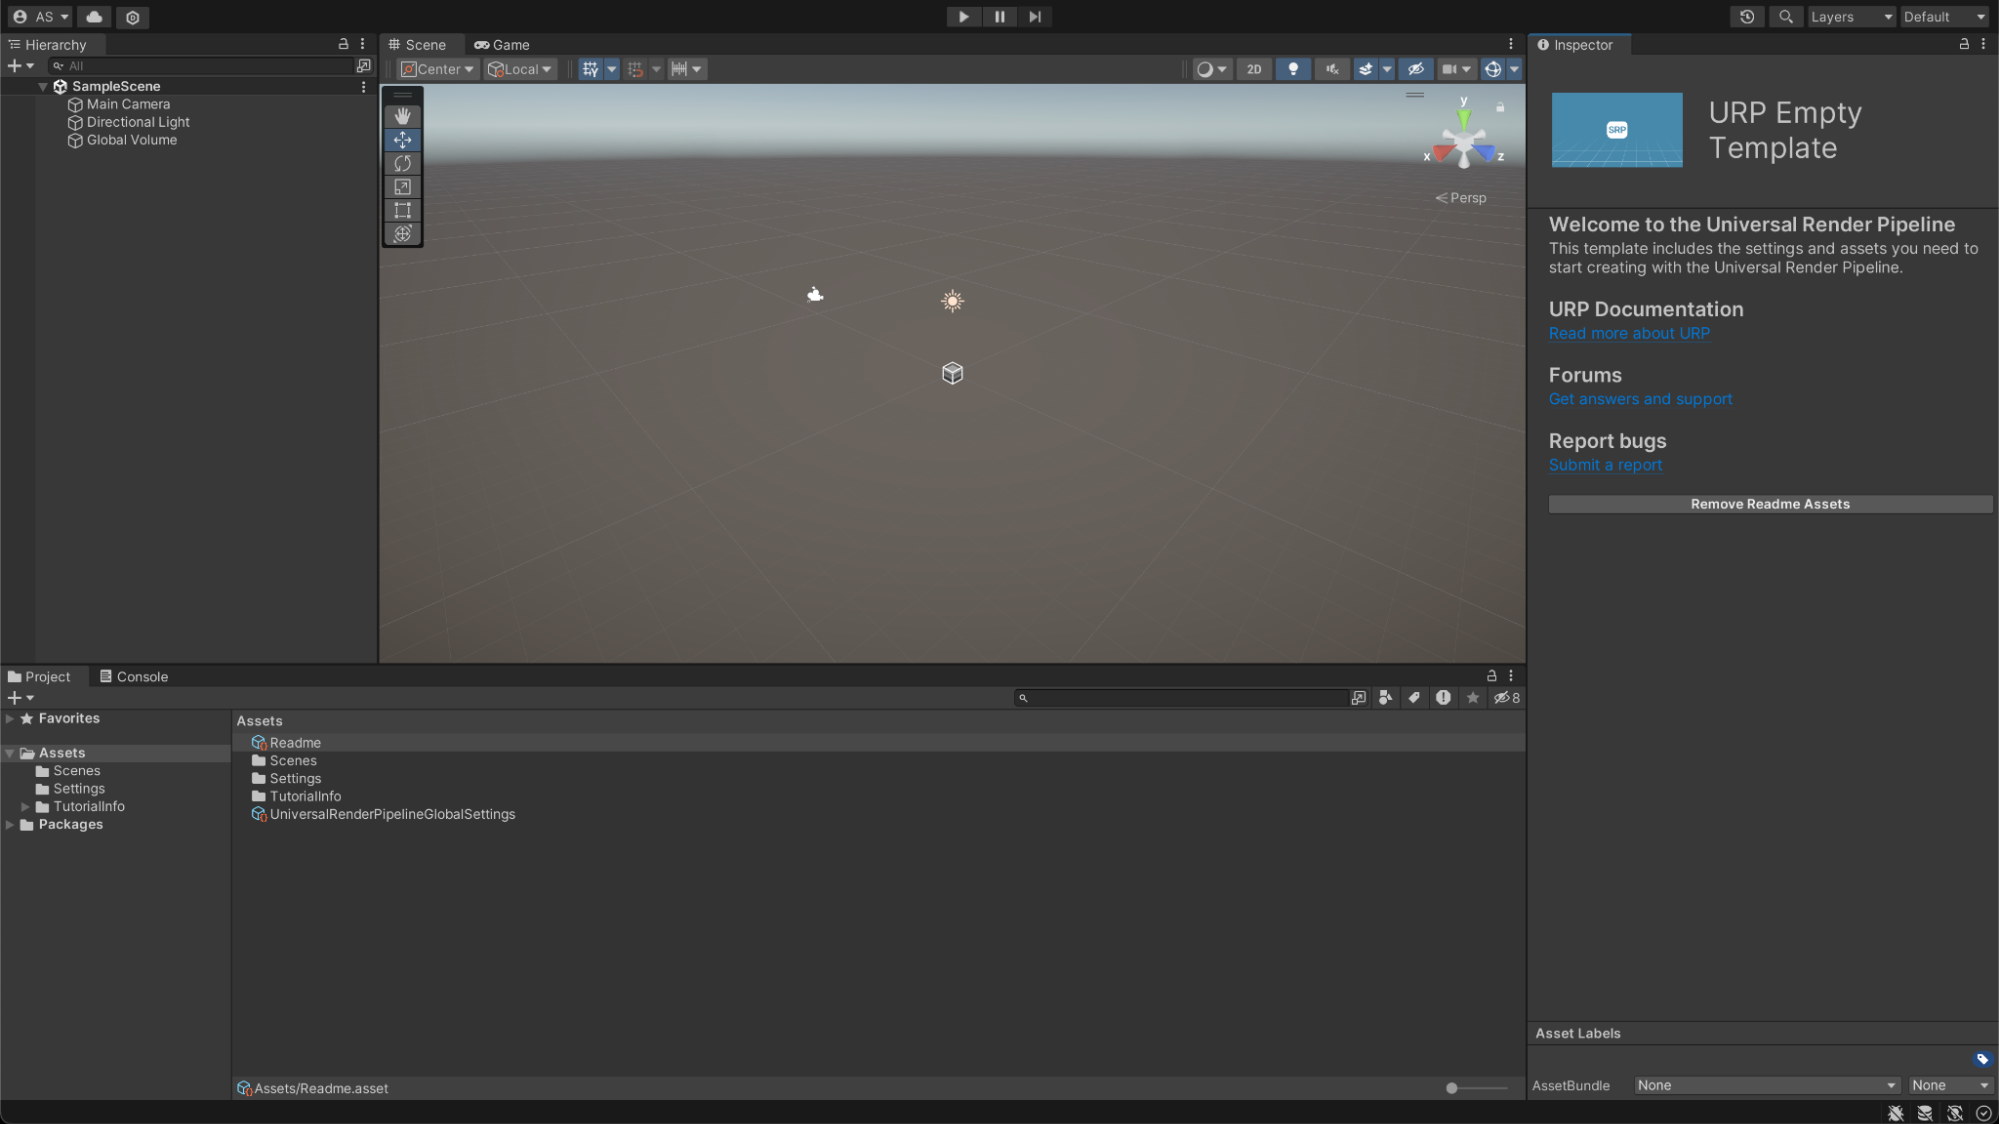
You've successfully created a new Unity project! By the time you’ve completed this step, you should see an empty Unity project, similar to the image below.
3. Import the tutorial assets and open the Playground scene
Unity uses assets to build the scenes, characters, and everything else you see in an application. These assets can be textures, models, animations, sounds, scripts, and more.
We have provided you with a Unity package that includes a range of interesting assets to play with. In order to use those assets in Unity, you first need to import them into your project.
To import your assets and open a pre-built scene, follow these instructions:
1. Download the asset package.
- Open the link to download the IntroToUnity asset package.
- This package contains a bunch of assets that you will use in this project.
2. Unzip the folder.
- On Windows: right-click the downloaded zip file and select Extract All.
- On macOS: double-click the zipped folder.
- Inside you will find IntroToUnity.unitypackage.
3. Import the assets.
- After you've downloaded and unzipped the asset package, go back to Unity.
- In the main menu, select Assets, then select Import Package > Custom Package.
- Find the IntrotoUnity package that you just unzipped and select Open.
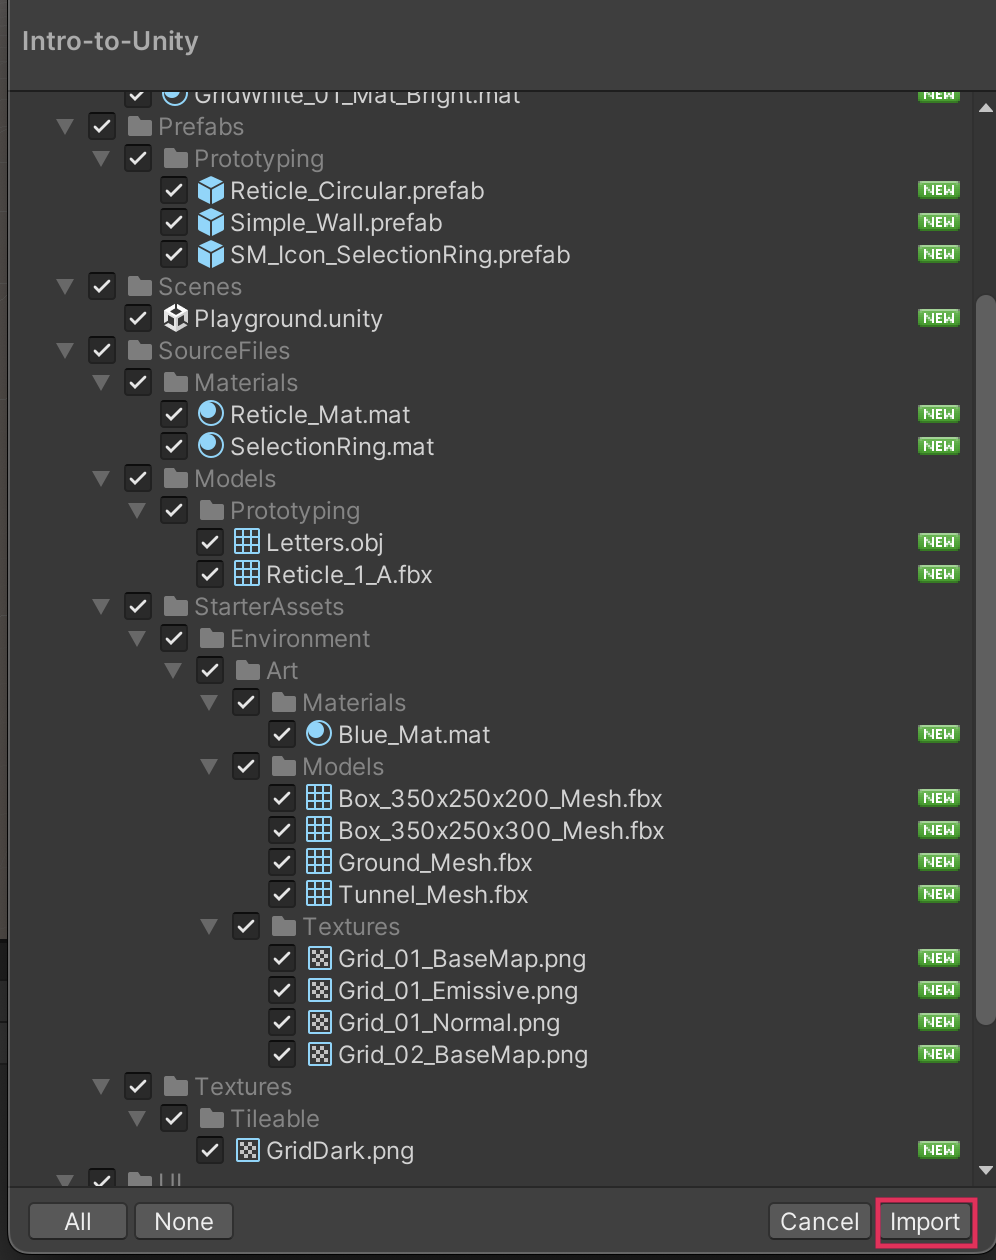
- A new window will open with a list of assets. Select Import to bring them into your project.
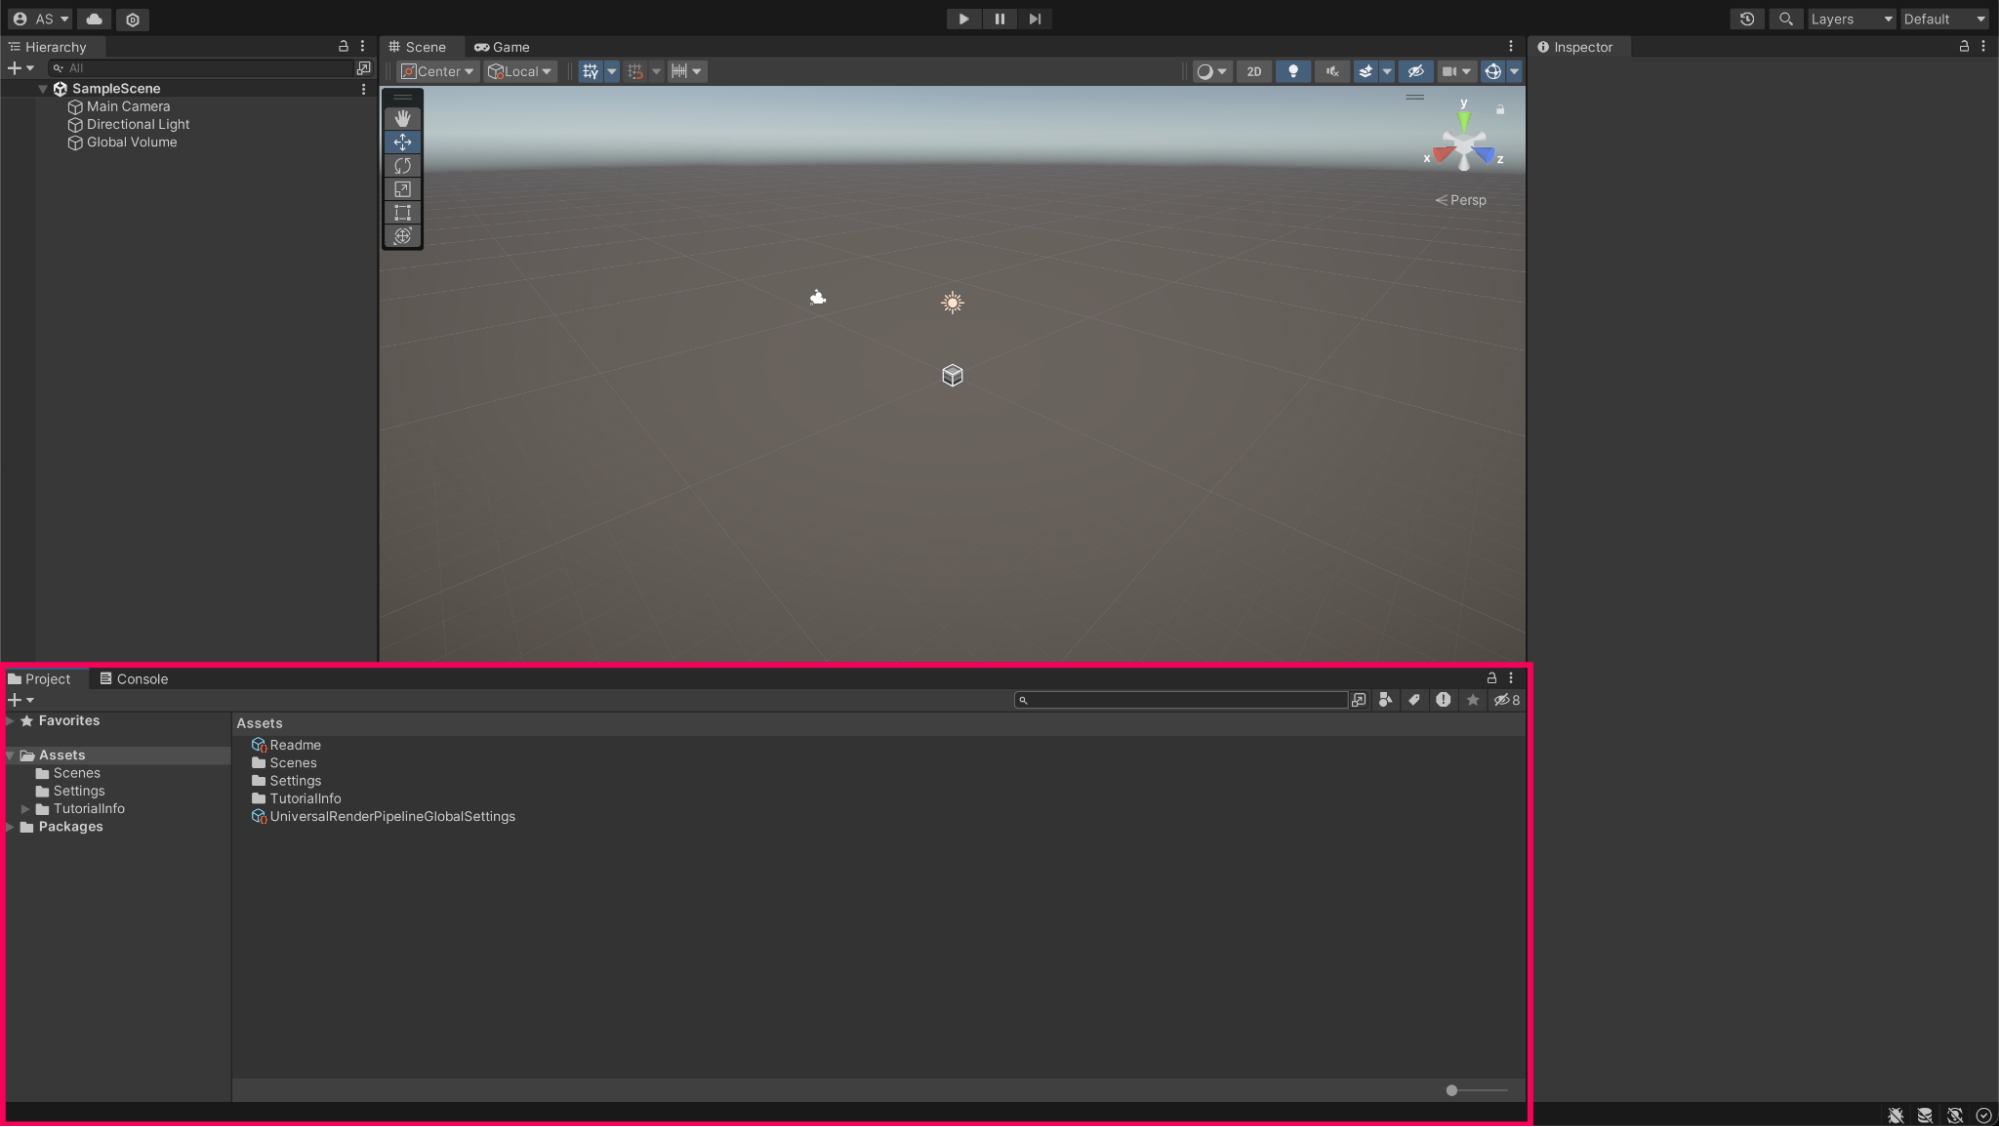
4. Locate the Project window.
- The Project window is typically found at the bottom of the screen, but it can be moved or docked elsewhere based on your personal layout preference.
- The Project window is essentially the file manager of your Unity project. It's where all the files you'll use in your application, such as scripts, textures, audio clips, and scenes, are listed and can be managed.
5. Open the Playground scene.
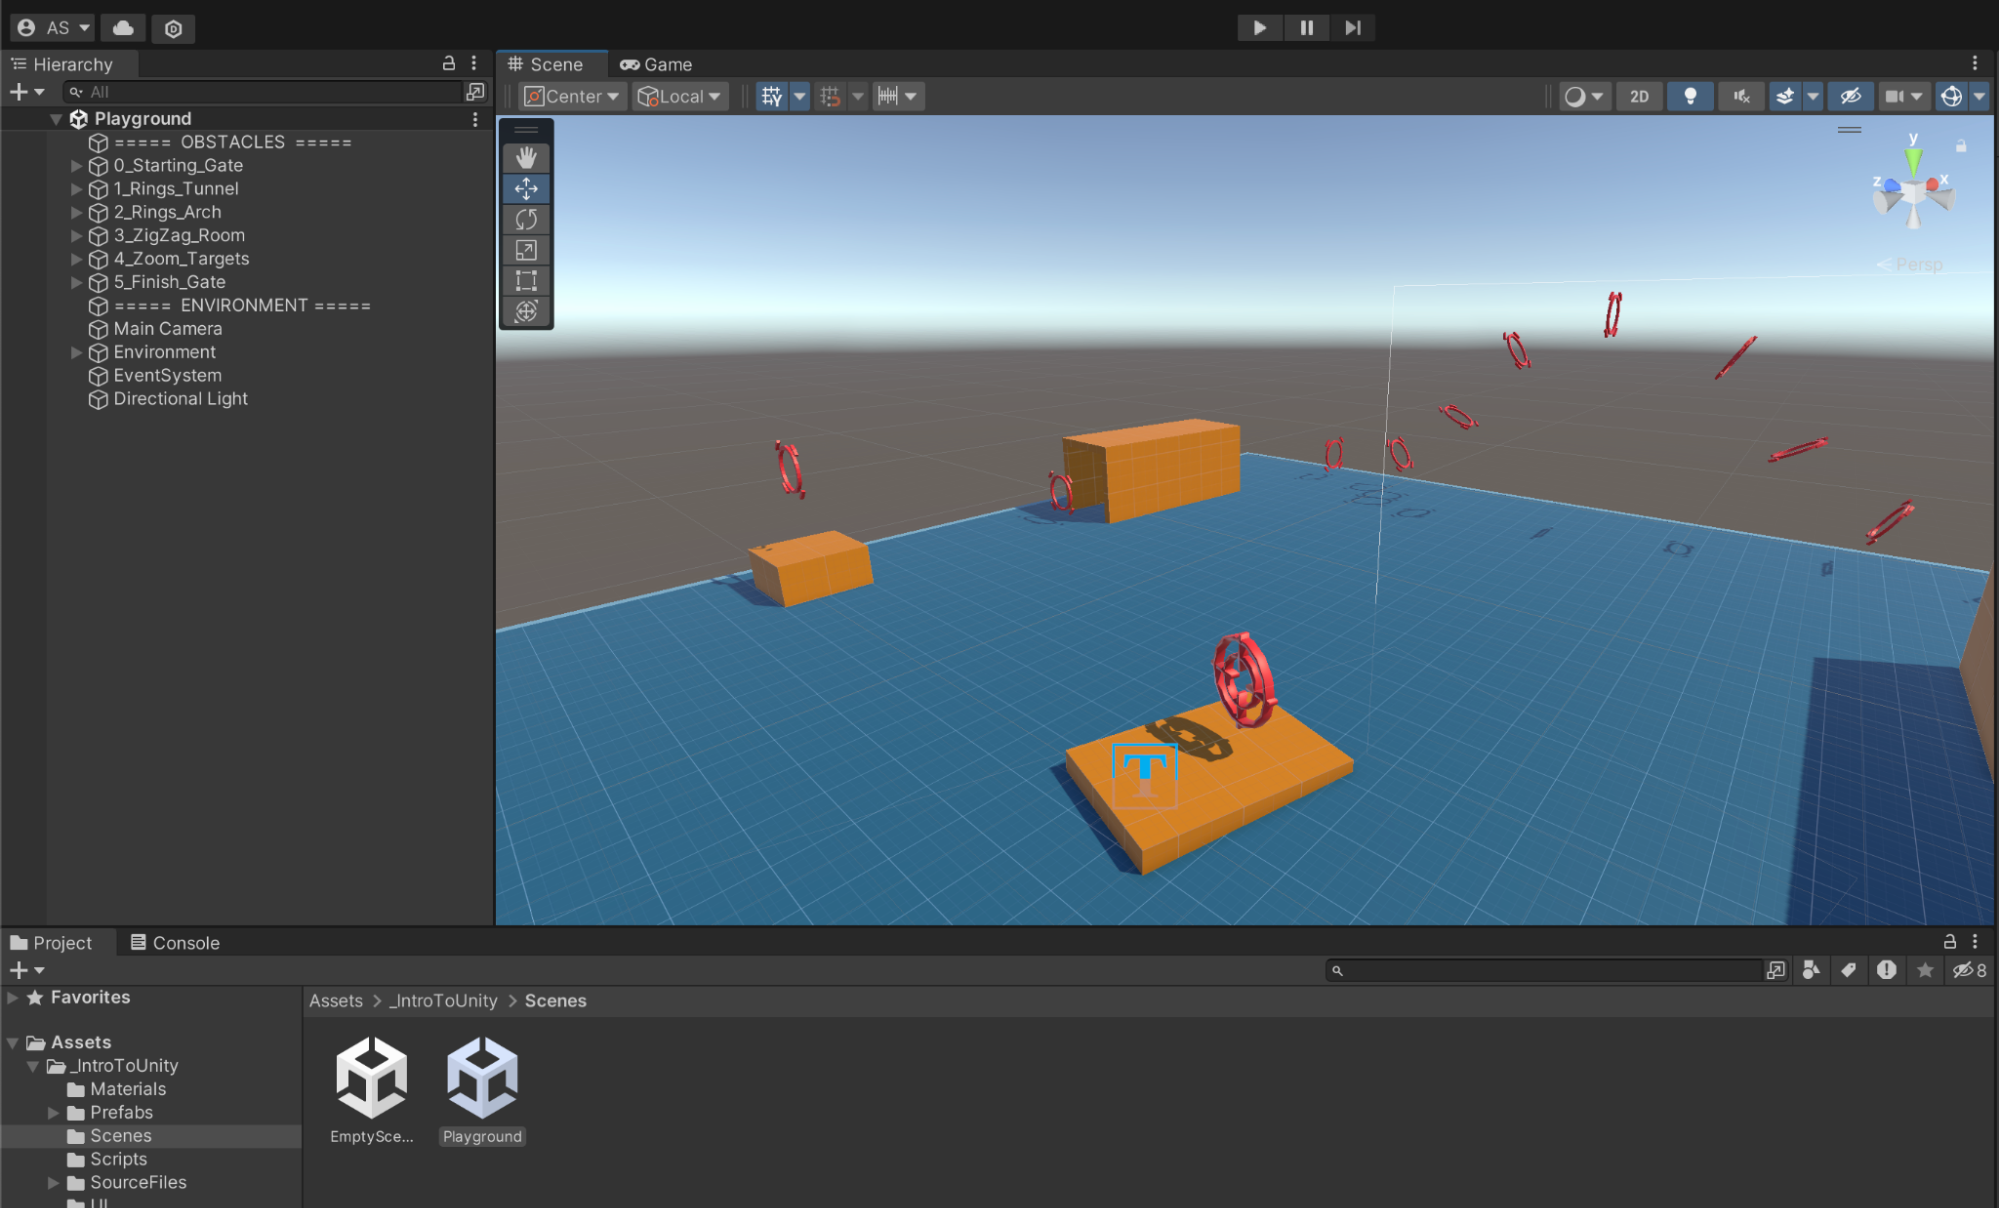
- In the Project window, navigate to the _IntroToUnity > Scenes directory and double-click the Playground scene.
- This opens a pre-built scene designed to help you learn 3D navigation.
6. Import TMP Essentials.
- TextMesh Pro (TMP) is a powerful text rendering tool for Unity that offers advanced text styling and layout options.
- When the TMP Importer window opens, select Import TMP Essentials, then close the window.
You might also find it helpful to watch the quick video demo of this entire step below.
By the time you’ve completed this step, you should see a colorful scene in the center of the Unity Editor, similar to the image below.
4. Pass the Scene view flythrough test
Navigating a 3D space efficiently and effectively is a crucial skill when designing 3D applications in Unity. The more comfortable you are navigating 3D space, the faster you’ll be able to work and the less frustrated you’ll become trying to bring your ideas to life.
In this step, you’ll use the Playground scene to learn the critical skills for navigating in the Scene view — the Scene view is a visual editor in Unity that allows you to create, edit, and manipulate 3D scenes and objects in your game, making it easier to design and test your game, and to identify and fix issues with your game objects and environment.
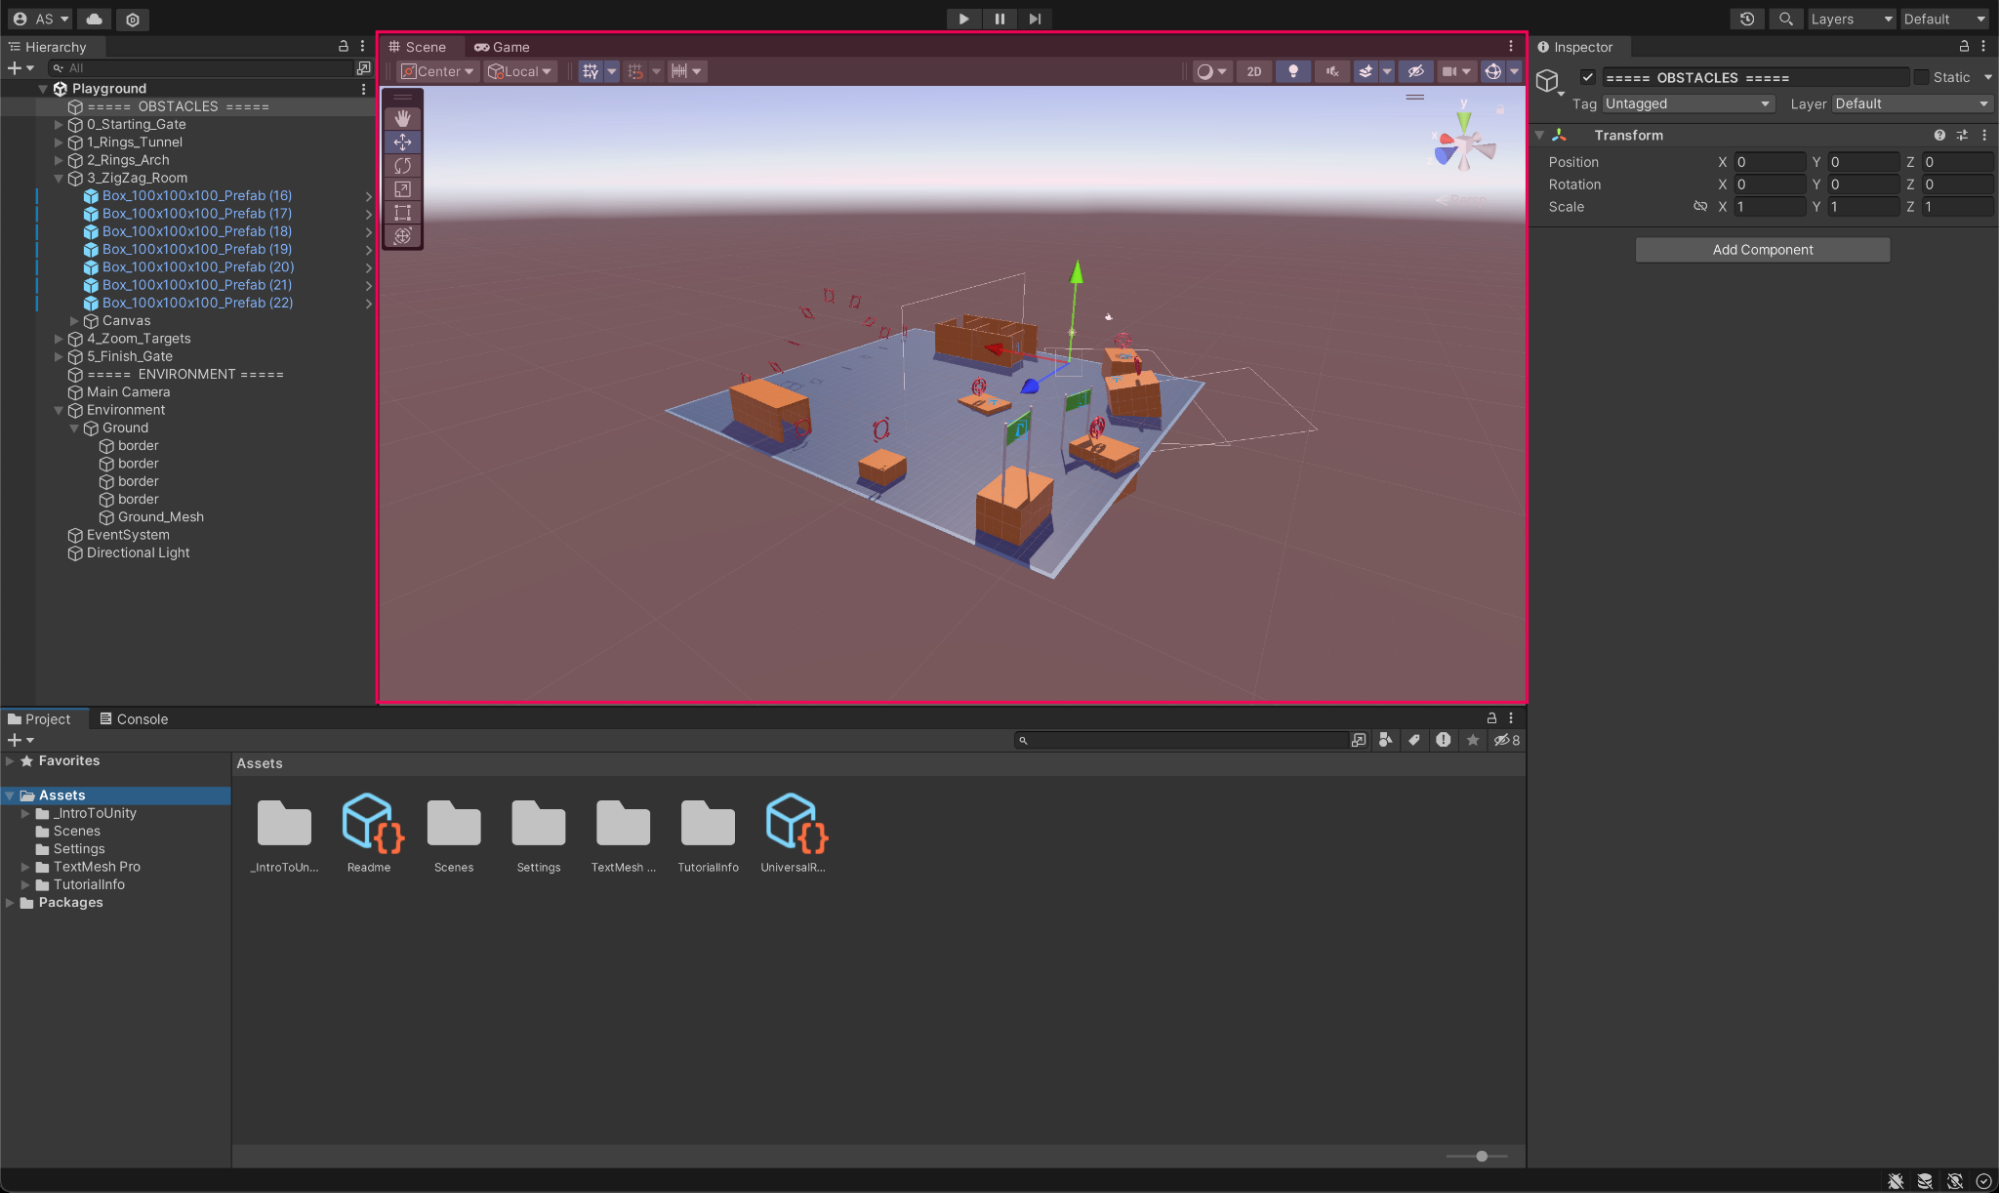
Your goal in this step is to get comfortable enough navigating 3D space in the Scene view so that you can successfully navigate the obstacle course set up in this playground using a variety of 3D navigation techniques. Here is a video preview of what you’ll try to do in this step:
Now it’s your turn! To learn more about navigating through a 3D scene, follow these instructions:
1. Frame in on objects using the Hierarchy window.
- The Hierarchy window lists all the objects in your current scene and is located on the leftmost side in the Default layout.
- When you double–click on an object in the Hierarchy window, you select that object and the Scene view focuses on it, centering the object in the camera's perspective. This feature is particularly useful for quickly locating and working with specific objects within a large and complex scene.
- Double-click on some of the objects in the Hierarchy window to frame in on them in the Scene view.
2. Look around the scene.
- Hold down the right mouse button and move the mouse to look around. This is the basic way of changing your view in the 3D space.
3. Orbit the starting gate.
- In the Hierarchy window, double-click the 0_Starting_Gate to frame in on it.
- In Scene view, hold Alt (macOS: hold Option) and left-click, then drag your mouse to orbit the view.
- This allows you to position yourself right behind the gate.
- Orbiting is particularly useful when you want to inspect an object from all angles. By orbiting around an object, you can see its front, back, and sides, helping you ensure that your edits and additions look good from all perspectives.
4. Fly through the rings, the archway, and the hallway.
- Activate the Flythrough mode by holding down the right mouse button and use the WASD keys to move around the space, just like in a first-person video game.
- If you are new to this kind of 3D navigation, try to move in small increments by tapping the W, A, S, and D keys.
- Fly through the series of rings through the tunnel, then over the archway, then through the zig-zagging hallway. Stop when you get to the end of the hallway.
- Tip: If you get lost, remember you can always reframe on the starting gate by double-clicking on it in the Hierarchy window.
5. Frame and zoom.
- An alternative to double-clicking on objects in the Hierarchy window is to select them in the Scene view and then press the F key to frame in on them.
- After you are framed on an object, you can zoom in and out relative to that object using the scroll wheel (or by scrolling on a trackpad).
- Frame in on the targets in the next section, orbit around them to face the next target, then zoom through their center.
- Repeat this process for all targets until you reach the finish line!
Remember, mastering 3D navigation is a process, and it's okay to feel disoriented at first. Practice flying through the scene until you feel comfortable and can easily navigate through the course. Once you've mastered this, you're ready for the next step!
5. Use the Scene gizmo to read the hidden word
Floating beneath the obstacle course, you may have noticed some giant 3D letters.
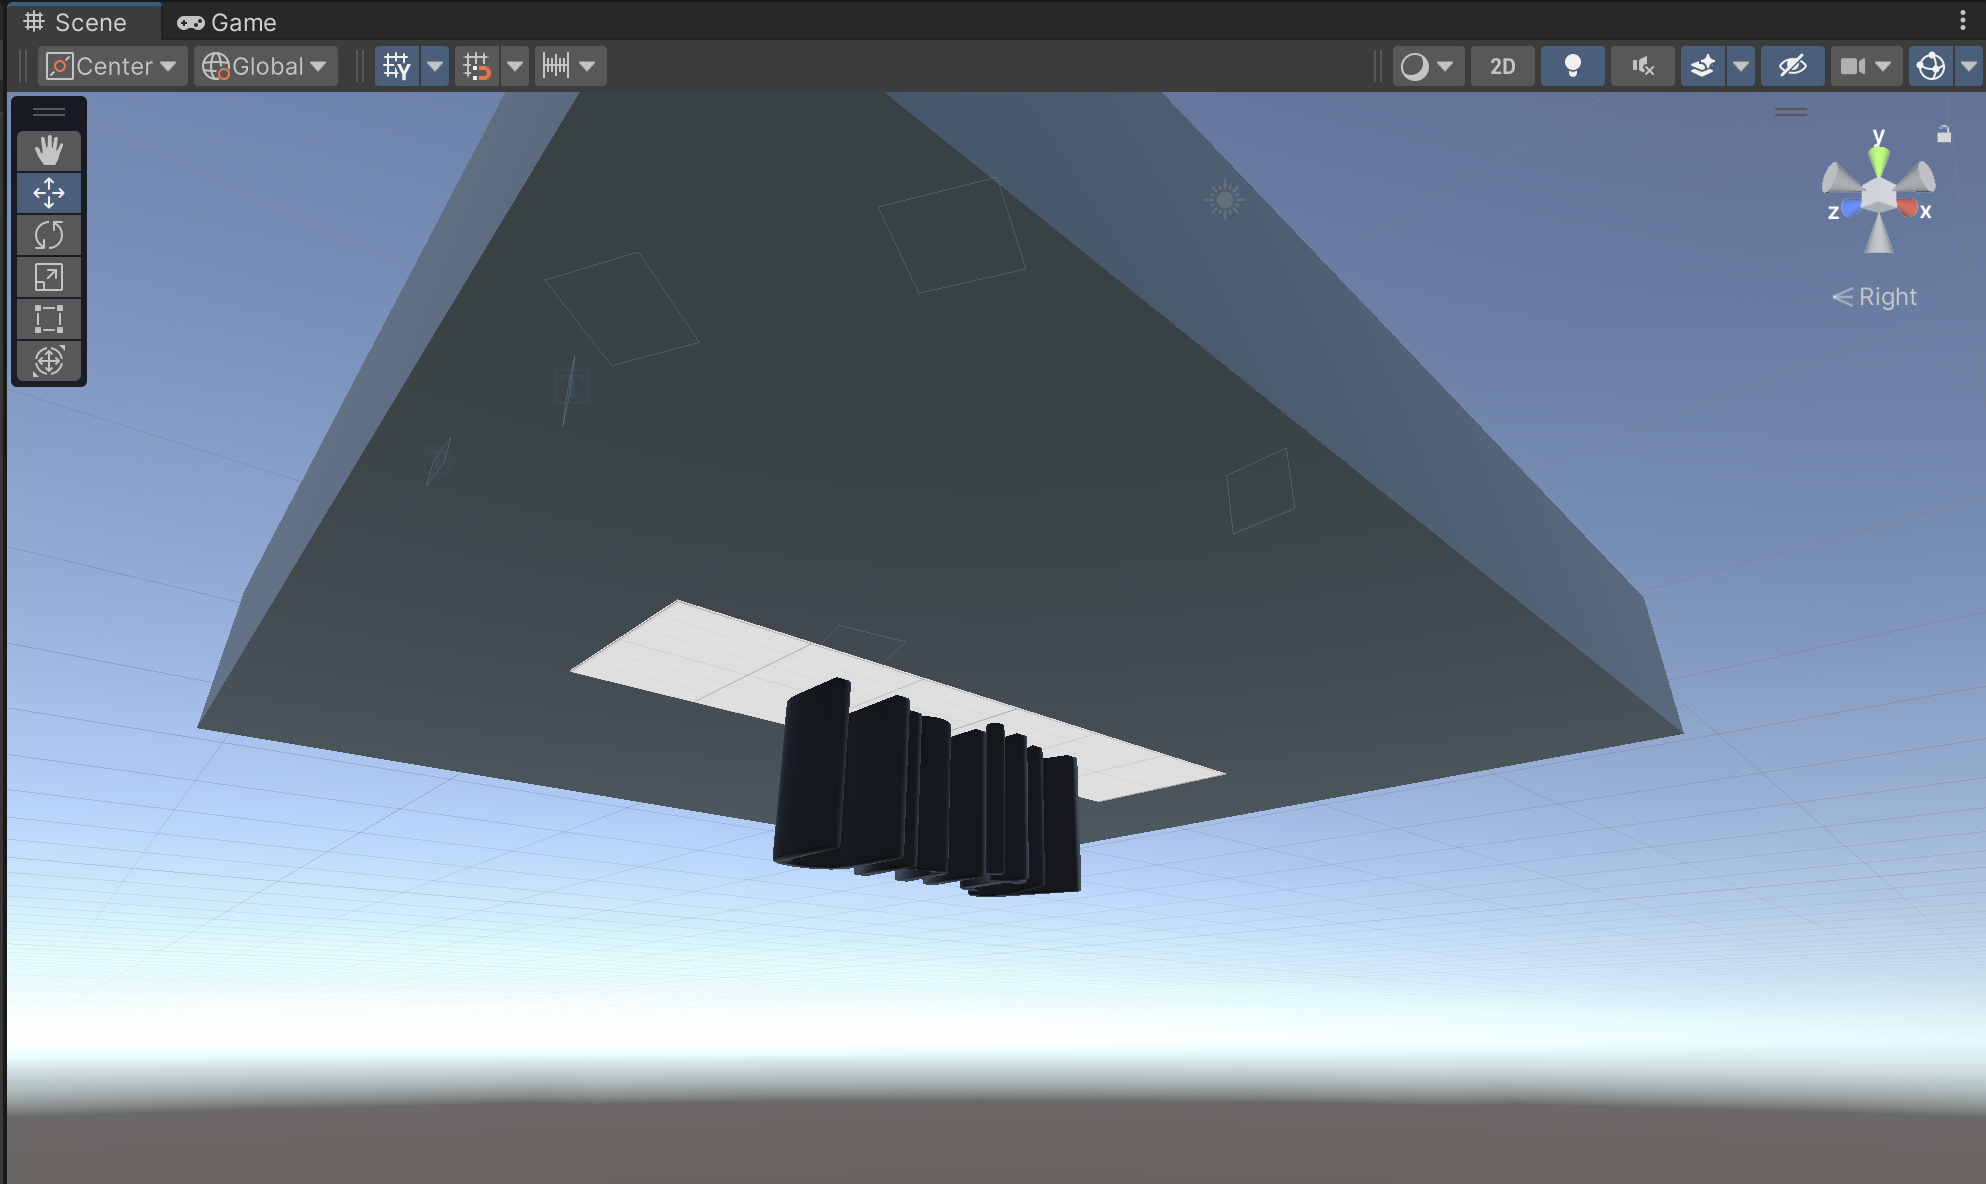
To read what these letters say, you can use flythrough mode or frame in on them as you have been doing — but there’s a more convenient way to quick view the scene from certain angles.
What is the Scene gizmo?
At the top-right corner of the Scene view is the Scene gizmo. The Scene gizmo presents a visual representation of the Scene view camera's current orientation and serves as a control center for adjusting your viewing angles and projection modes.
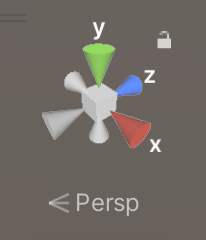
The gizmo has a cube at the center with three conical arms labeled X, Y, and Z extending out from it. If you select each of these axis arms, the Scene view camera will instantly snap to the axis it represents.
For instance, selecting the Y arm will give you a top-down view of your scene. You can also right-click the cube to see a list of viewing angles at your disposal. To revert to the default free view, simply right-click the Scene gizmo and select Free.
Use the Scene gizmo
- Try clicking around the different axes to get a good view of your scene from all angles.
- If you click the negative Y cone and zoom in or out, you will see that the word written beneath the obstacle course is “UNITY”.
Use projection modes
Next, let's talk about projection modes. By selecting the text beneath the gizmo — which says “Persp” (short for perspective) by default — you can toggle between Perspective and Orthographic (also known as isometric) modes. The Orthographic mode, devoid of perspective, pairs excellently with an axis arm click to give you an undistorted front, top, or side view of your scene. This is very helpful when you’re arranging objects in your scene since it limits you to a 2D perspective, sort of like you’re looking down at a map.
- Use Isometric/Orthographic mode to view the Unity text with no perspective.
6. Add 3D GameObjects to a new scene
Now that you’ve flown around in an existing scene and are comfortable navigating 3D space in the Scene view, you’re ready to work on a new scene from scratch.
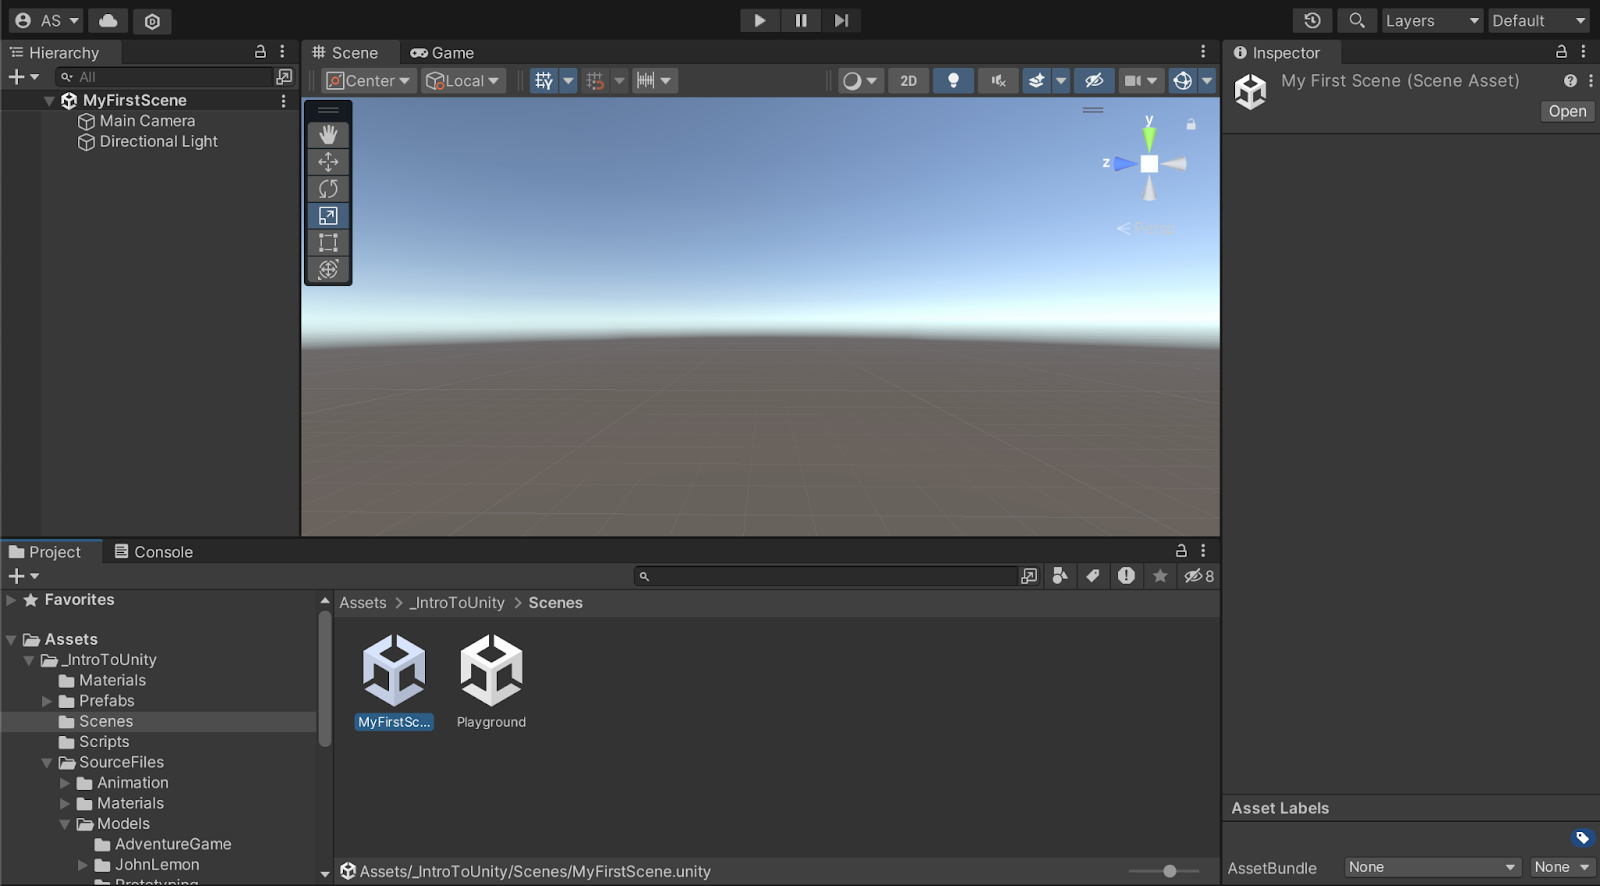
1. Open an empty scene.
- In the Project window, go to _IntroToUnity > Scenes.
- Right-click on the EmptyScene and select Rename, then rename the scene something like “MyFirstScene”
- Double-click on the renamed scene to open it.
- By default, the Hierarchy window in a new empty scene usually contains a Directional Light and a Main Camera — you’ll learn more about those later.
Note: You can also select the scene in the Project window and press Enter to rename it.
2. Add a plane.
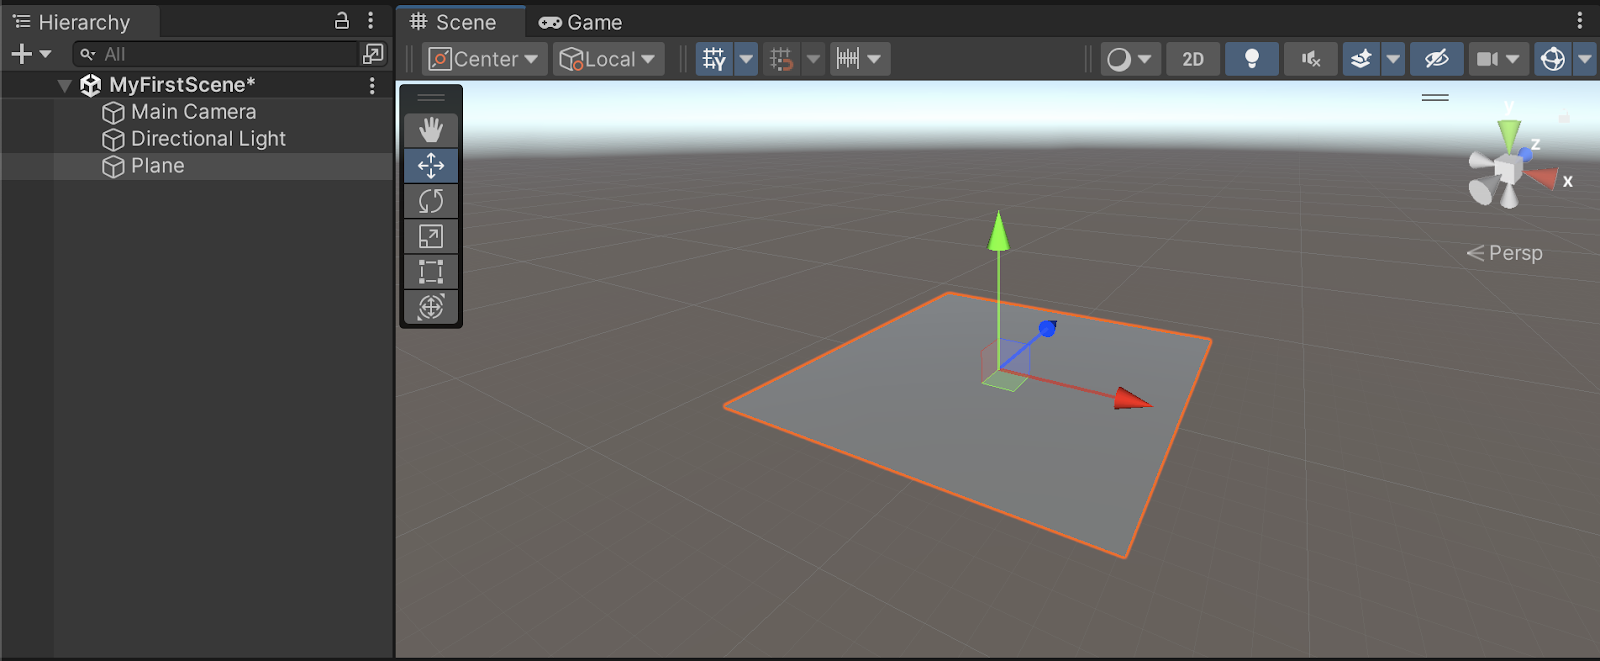
- Right-click in the Hierarchy window, then select 3D Object > Plane. This will create a new plane GameObject in your scene, which will act as the ground for your game.
- Use your 3D navigation skills to get a good view of the plane in the Scene view.
3. Ensure the plane is at the origin.
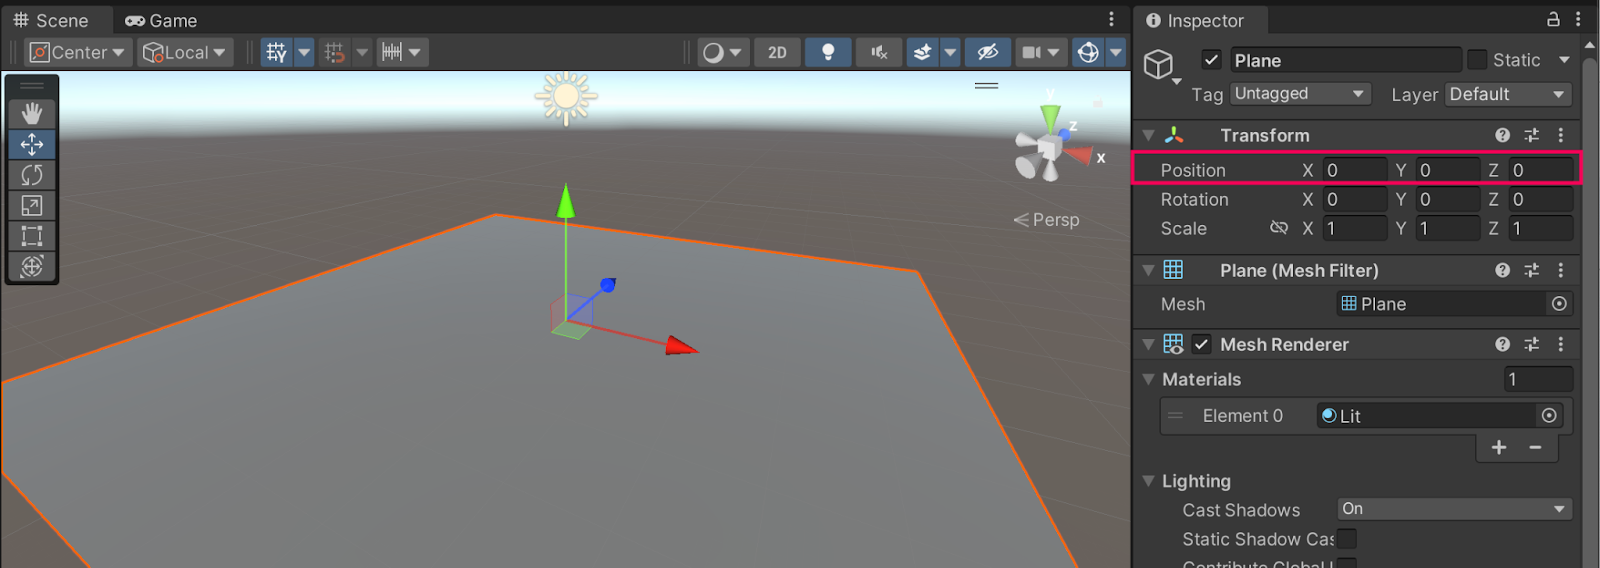
To position the plane accurately, you need to set its position to the center of the scene, otherwise known as the origin. The origin is the point where the X, Y, and Z axes intersect (0, 0, 0).
- Select the plane in the Hierarchy window.
- On the right, you'll see the Inspector window. This window shows the properties of the currently selected GameObject.
- Locate the Transform component in the Inspector window. This component determines the GameObject's position, rotation, and scale in the scene. Every GameObject in Unity must have a Transform component.
- Make sure the Position fields for X, Y, and Z are all set to 0. This ensures the plane is at the center of your scene, providing a good starting point for building your environment. Use your 3D navigation skills to get a good view of it in the Scene view.
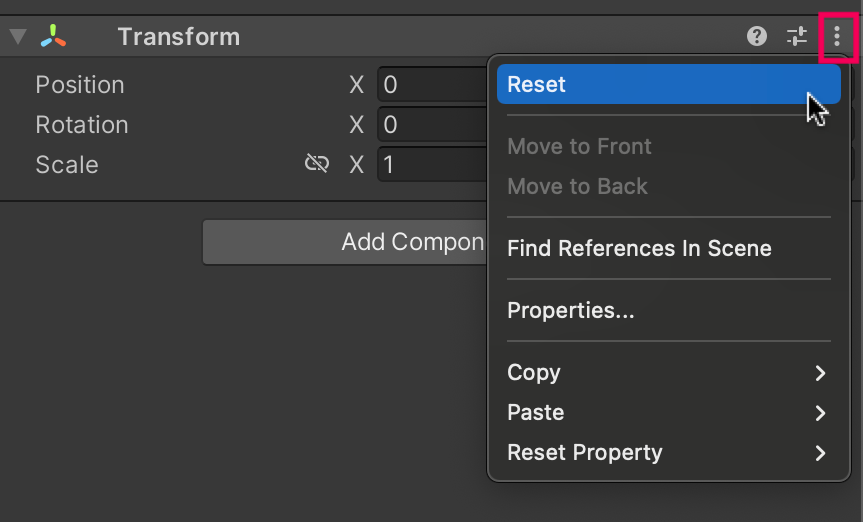
Note: To reset the Transform coordinates, you can also select the More (⋮) menu in the top-right corner of the Transform component, then select Reset
4. Add a cube.
- Right-click in the Hierarchy window, then select 3D Object > Cube.
- This will create a new cube object that will be floating in your scene, likely intersecting with the plane.
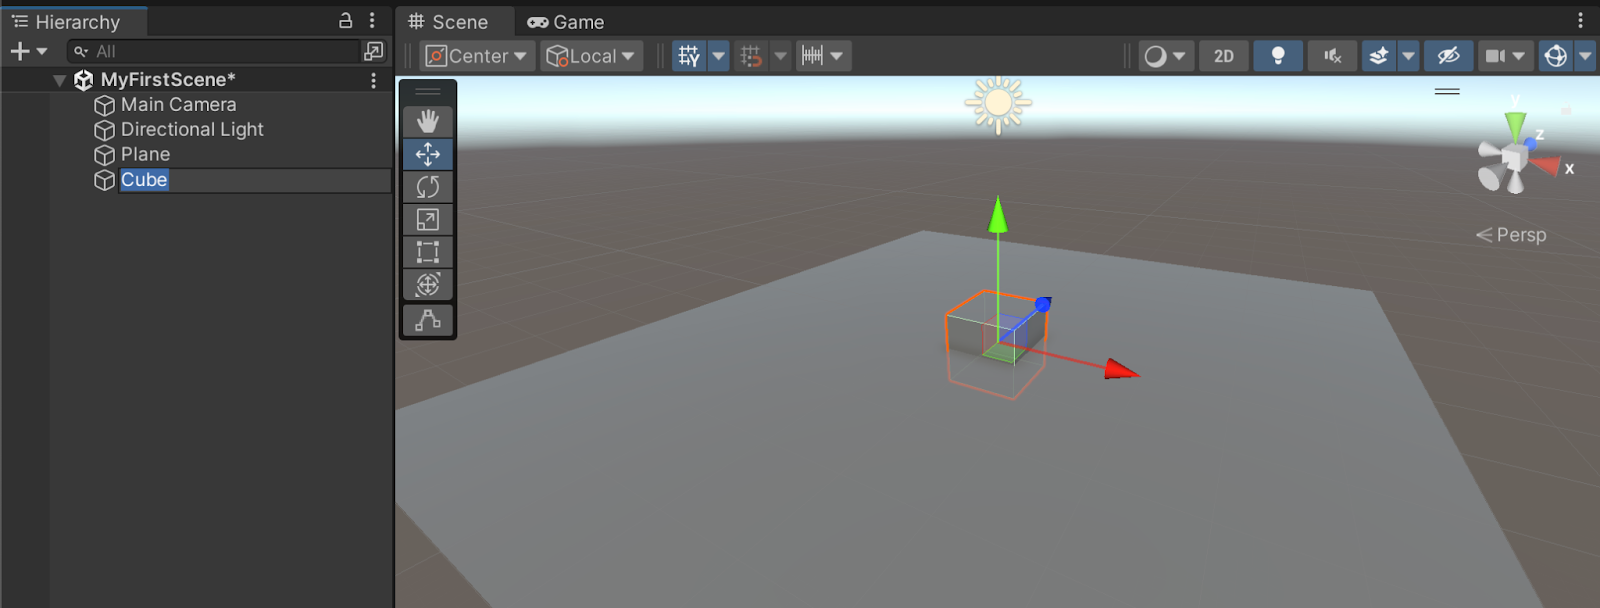
5. Move the Cube:
- You may notice the cube is intersecting the plane. We want the cube to be above the ground.
- Select the Move tool from the toolbar at the top of the Scene view, or press W on your keyboard.
- Click and drag the green arrow (the Y-axis) to lift the cube up by 4 meters.
- You can also verify this position in the Inspector window. Like with the plane, the Transform component of the cube lists its position. The Y value should read 4.
7. Apply materials and save your scene
You have a gray cube hovering above a gray plane — these objects need some color! To add color to you GameObjects, follow these instructions:
1. Create a new material.
A Unity material is an asset that helps you change how 3D objects look by using colors, textures, and special effects.
- In _IntroToUnity > Materials, right-click in the Project window, go to Create > Material, then name the new material “Ground”.
- After creating the material, in the Inspector window, select the color box next to Base Map property and select a color for your ground.
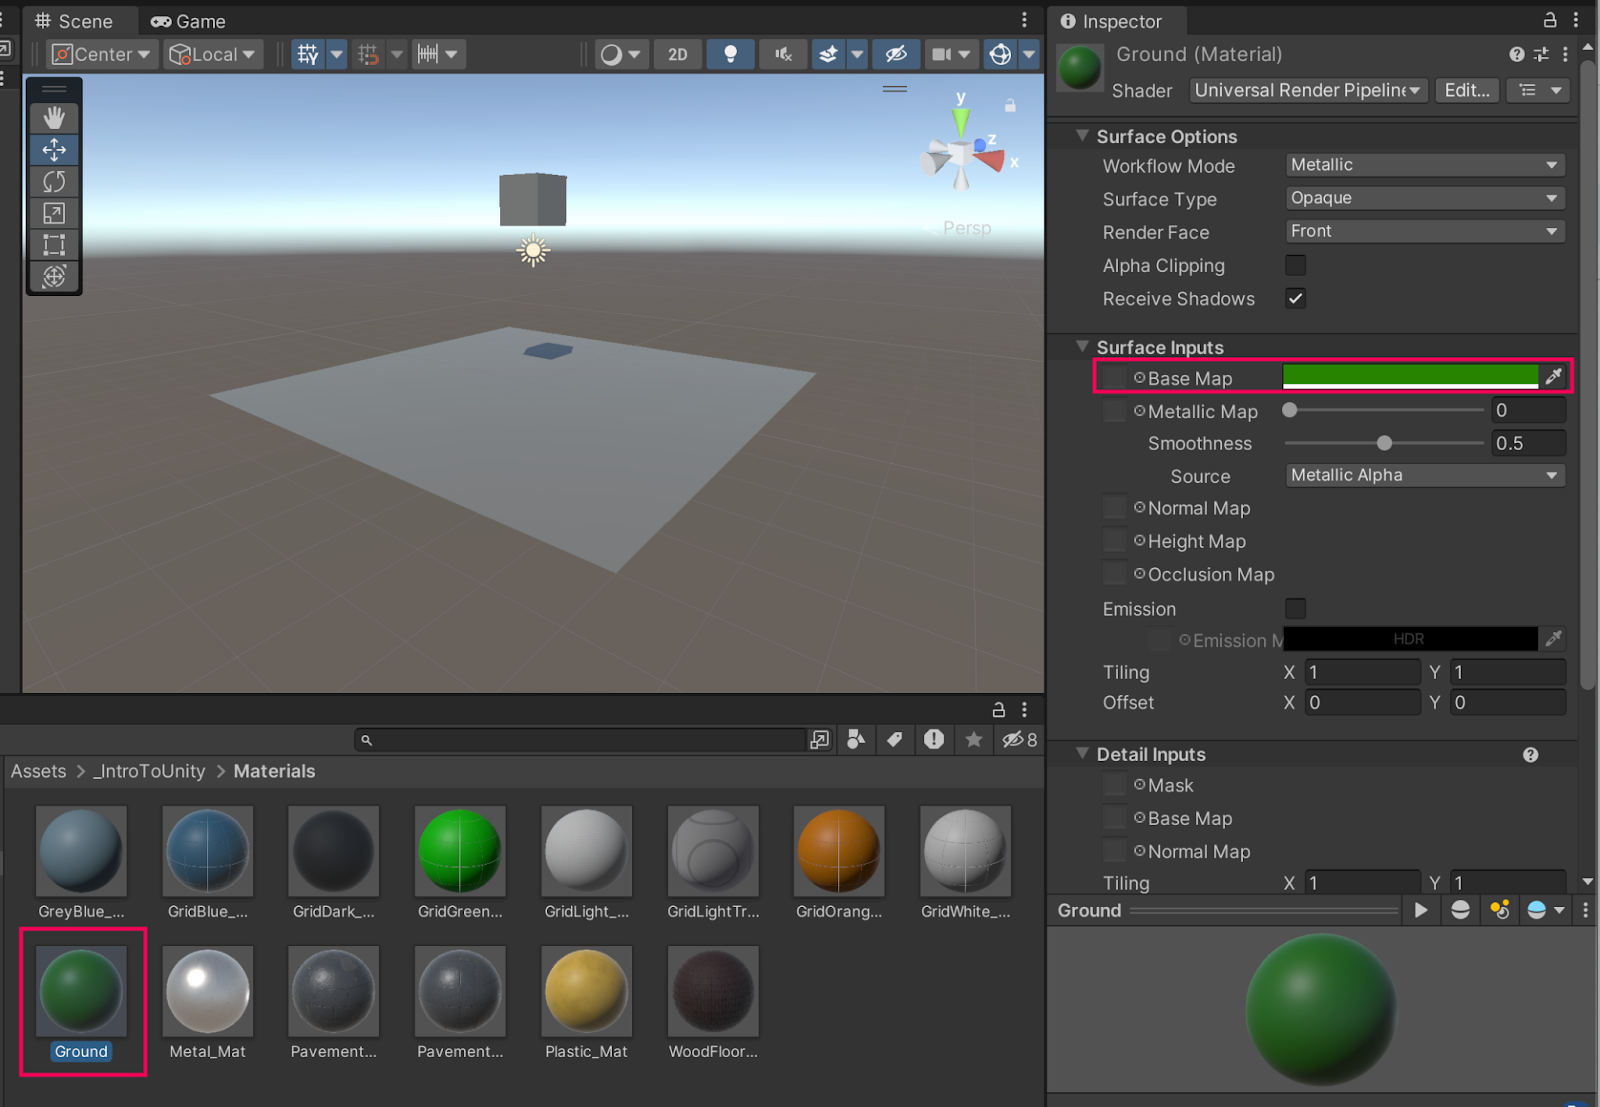
2. Apply the material to the ground.
- Simply drag and drop the Ground material onto the Plane GameObject in the Scene view. You'll see the plane change to the color you selected.
- After you see the material on the Plane GameObject, you may want to adjust how it reflects light by adjusting the Metallic Map and Smoothness sliders in the material properties.
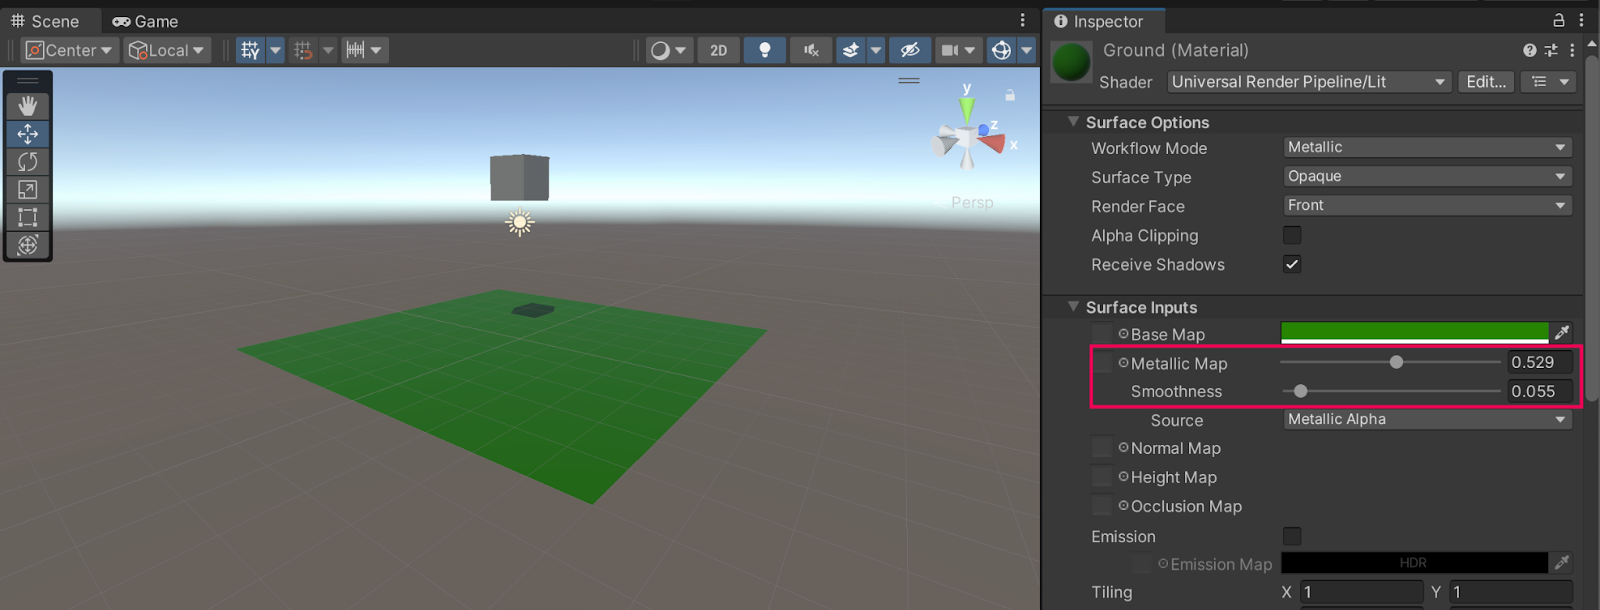
3. Create and apply a cube material.
- Repeat the same process to create a new material for the cube.
- Right-click in the Project window, go to Create > Material, and name it “Cube”.
- Choose a color in the Inspector window.
- Drag and drop this material onto the cube in the Scene view.
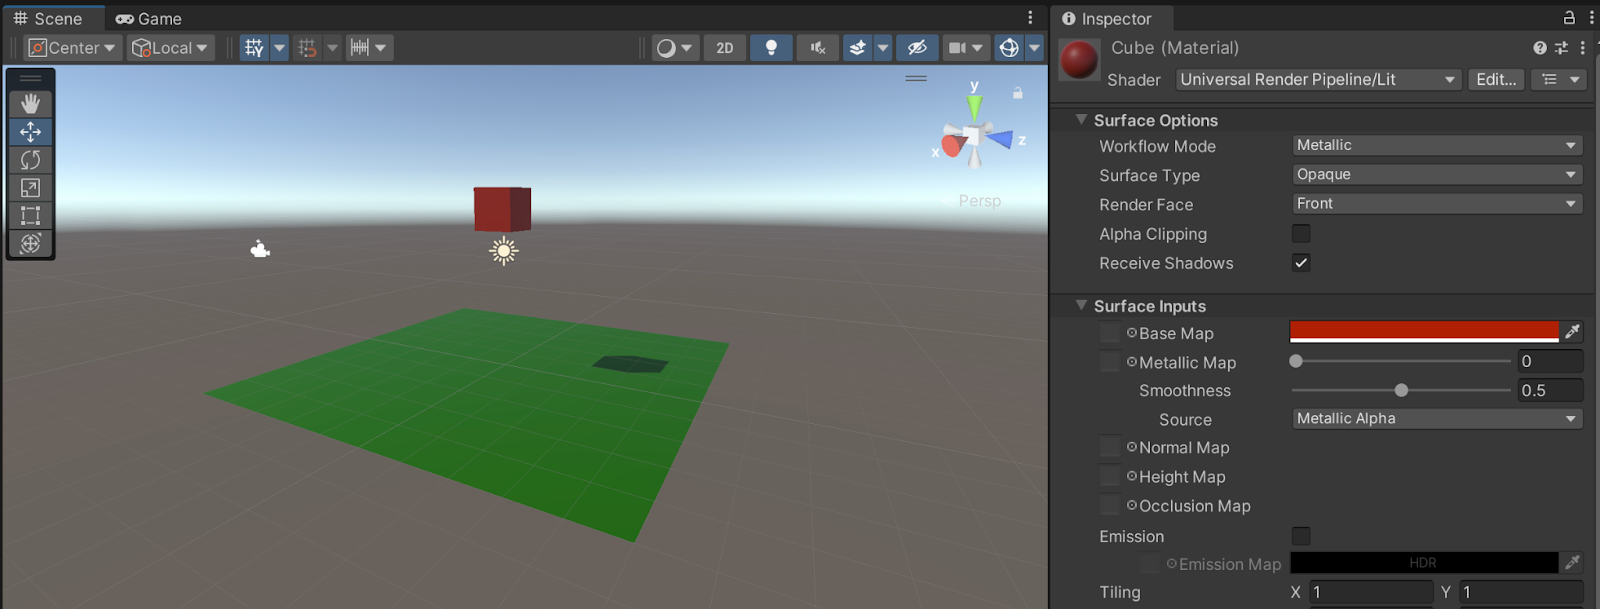
4. Save your scene.
Now that you have personalized your scene a bit, you should make sure to save your scene. Saving a scene preserves the current state of your project, including the position and configuration of all the GameObjects listed in the Hierarchy window. Try to save your scene regularly so you don’t lose any progress!
- Press Ctrl+S (macOS: Cmd+S) to save your scene.
- Note: You can also go to File > Save to save your scene.
8. Add physics and enter Play mode
In this step, we're going to make your cube fall and then duplicate it to create a stack of tumbling cubes.
1. Enter Play mode:
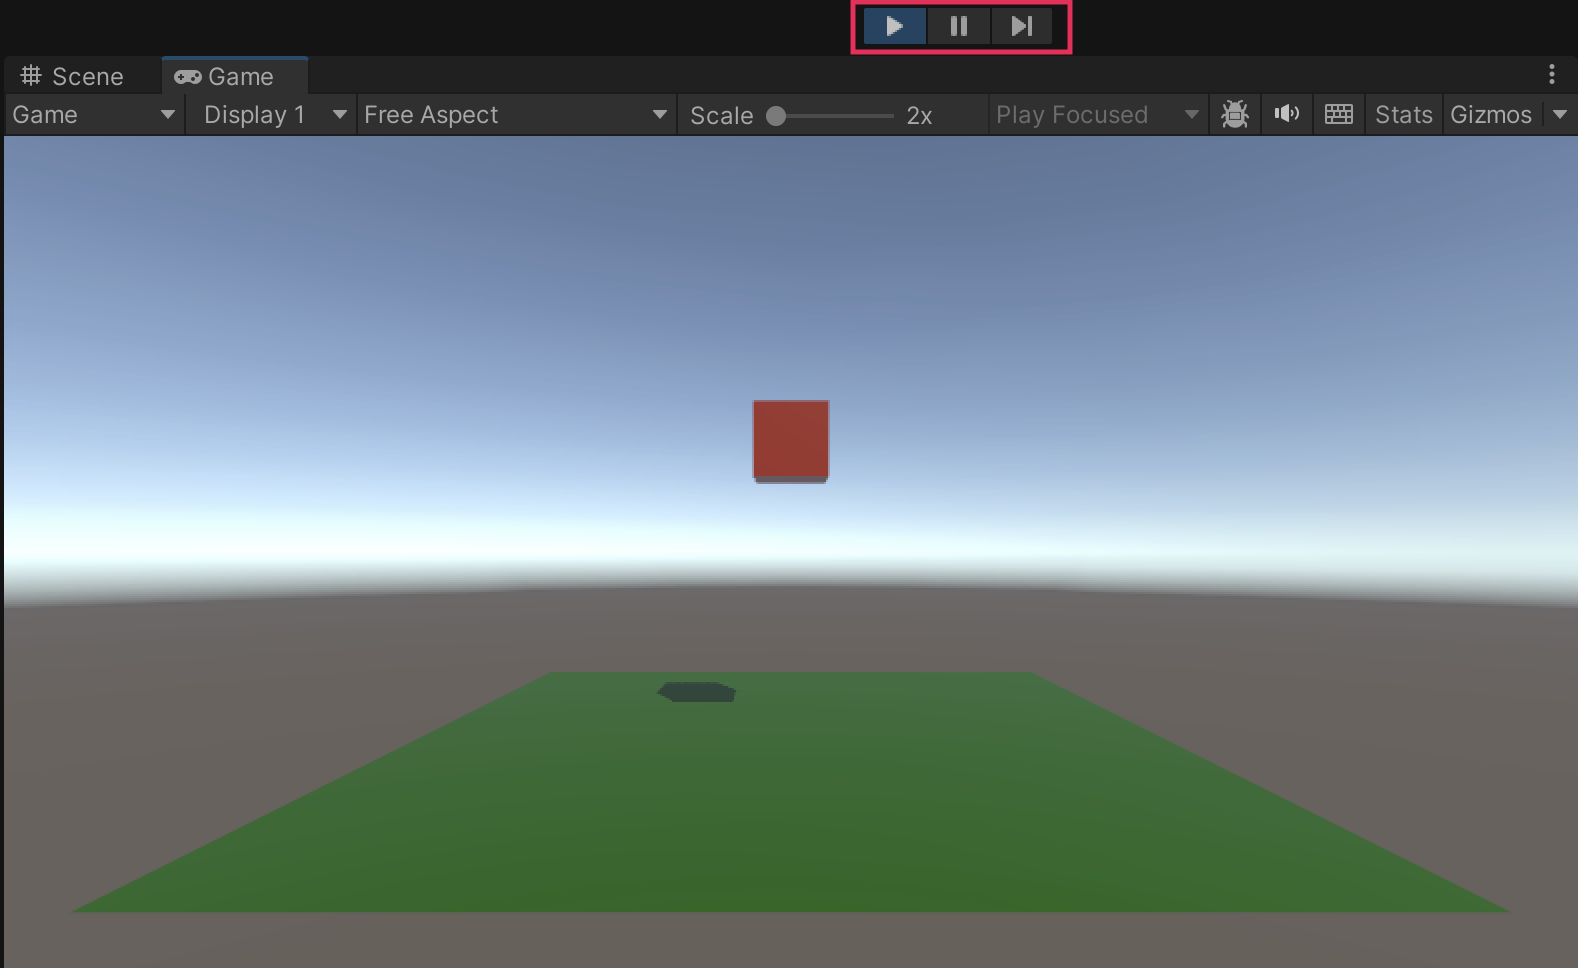
- At the top of the Unity Editor, select the Play button, which will automatically open the Game view. The Game view lets you see the game from your Main Camera's perspective, as if you were a player experiencing the game firsthand.
- You'll notice that your cube simply hangs in the air.
- To stop the game, exit Play mode by clicking the Play button again.
2. Add physics.
- Make sure that you are no longer in Play mode. If you are still in Play mode, none of the changes you make will be saved.
- Select the Cube GameObject in the Hierarchy window.
- At the bottom of the Inspector window, select Add Component. Components are fundamental building blocks of Unity GameObjects that define their behavior and appearance.
- In the search bar that appears, enter "Rigidbody" and select it to add a Rigidbody component. The Rigidbody component equips your cube with physical properties, such as gravity.
- Test your change by entering Play mode again.
- Now, you'll see the cube fall due to gravity! This demonstrates how adding components can significantly change the behavior of GameObjects in your Unity scene.
3. Rotate and play again:
- Select the Rotate tool from the toolbar, or press E on your keyboard.
- Click and drag on the rotation gizmos around the cube in the Scene view to rotate it slightly. This will cause the cube to tumble as it falls, making the movement more interesting.
- Press Play to observe the tumbling cube.
9. Make more cubes using global and local coordinates
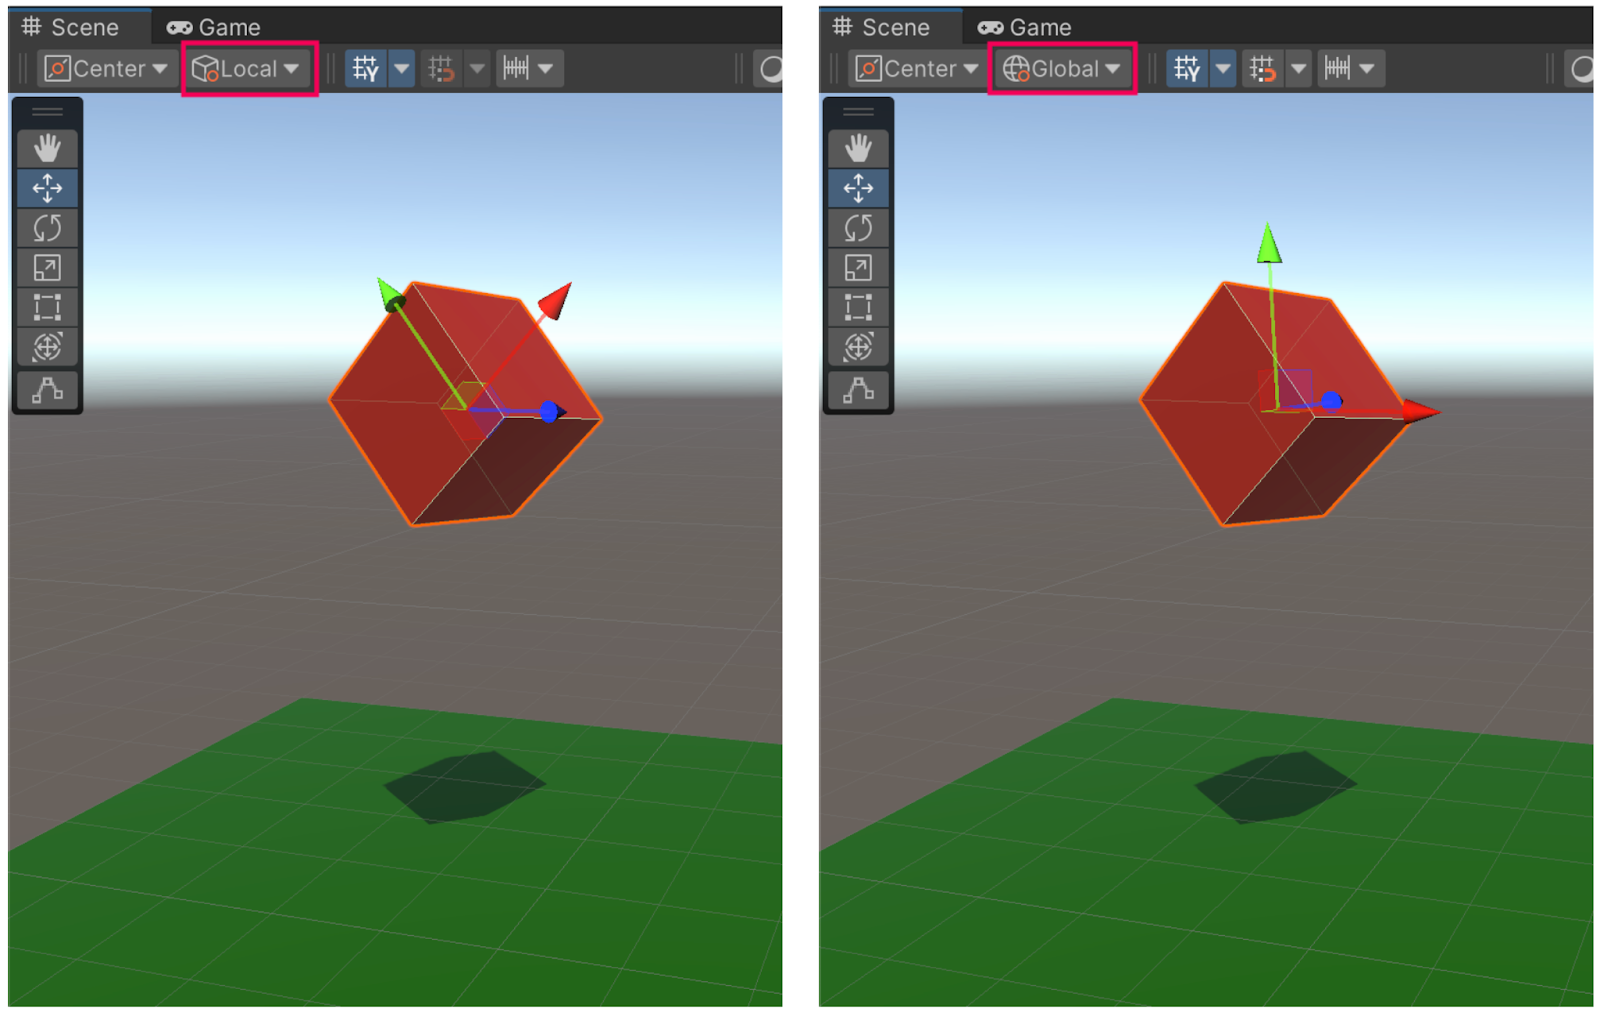
In Unity, you can toggle between Global and Local coordinate systems by selecting the tool handles toggle at the top of the Unity Editor.
- Global coordinates refer to the world's XYZ axes, which remain constant.
- Local coordinates refer to the GameObject's own XYZ axes, which can change if the object is rotated.
With both the Cube GameObject and the Move tool selected, notice what happens when you switch from Global to Local. In Local coordinates, the Y axis points in the upward direction of the cube. In Global coordinates, the Y axis points in the upward direction of the world.
1. Create a stack with different coordinate systems.
- Select the Cube GameObject in the Hierarchy window and duplicate it by pressing Ctrl+D or (macOS: Cmd+D).
- Use the Move tool (W) and the Rotate tool (E) to position the new cube on top of the original one.
- Repeat this process a couple of times to create a stack of cubes.
- Try moving the cubes in both Global and Local coordinates to see the difference.
2. Scale your cubes.
- Select the Scale tool from the toolbar or press R on your keyboard.
- Click and drag on the Scale gizmos in the Scene view to adjust the size of the cube.
- You can click and drag the gray cube at the center of the gizmo to scale the object uniformly.
- Make each cube a different size for variety.
- Enter Play mode again to watch your various sized cubes tumble!
10. Add prefabs and other assets to the scene
Up to this point, you have created everything in the scene using Unity’s provided selection of primitive shapes.
In this step, you'll add a prebuilt character along with other interesting assets to the scene so you can walk around the environment and make the experience a bit more immersive.
1. Add a prefab character.
A Unity prefab, short for prefabricated object, is a reusable asset that you can create, configure, and store in your project for use in multiple scenes or across different projects. We have provided you with a wide range of prefabs in these assets, including some characters.
- Navigate to Assets > _IntroToUnity > Prefabs > Characters.
- Browse through the character options — you can preview the characters using the Preview window at the bottom of the Inspector window.
- Choose any character and drag it into the Scene view.
- If you enter Play mode now, the character should be able to walk around, but the camera will stay fixed — you’ll fix that next.
2. Disable the Main Camera.
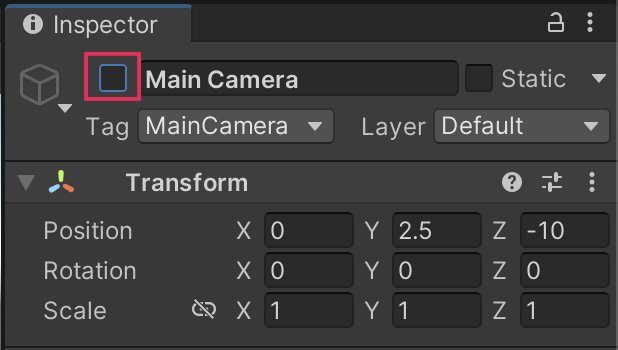
By default, Game view will show the first active camera in the Hierarchy window, which in this case is the Main Camera. There is actually another camera attached to each of the characters, which will follow the character around. You need to disable the Main Camera in order to activate that player camera.
- In the Hierarchy window, find and select Main Camera.
- In the Inspector window, next to the object’s name, disable the box at the top to mark the Main Camera as inactive.
- Re-enter Play mode. You can now move around the scene with the camera following behind the character.
Note: The character will not fall off the edge of the plane because their Y position is constrained in the Rigidbody component.
4. Enhance the scene with more prefab objects, visual effects, and materials.
- Exit Play mode.
- From the Prefabs folder, drag and drop new objects and visual effects (VFX) like snow or fire into the scene.
- Use the Move, Rotate, and Scale tools to make an interesting environment for your character to explore.
- You can also apply new materials to the ground and the cubes.
- If you want, increase the scale of the Plane GameObject to create a larger surface area.
- Enter Play mode one more time and walk around your enhanced scene as your character!
11. Next steps
Congratulations on completing this beginner's tutorial! You've successfully set up a Unity project, imported assets, mastered 3D navigation in the Scene view, manipulated 3D objects, experienced Unity physics, and designed an environment.
With these foundations, you're well on your way to creating more complex projects. As you explore Unity further, you'll start adding animations, scripts, audio, and more. The possibilities are limitless in your journey as a Unity developer.