
Hosting the Unity Editor on AWS AppStream
Tutorial
intermediate
+10XP
180 mins
Unity Technologies
As more schools and districts move towards a remote learning format, we at Unity want to help recommend ways to get your students set up with Unity if they don’t have access to a computer at home. In this tutorial, we’ll help you get set up with AWS AppStream to provide Unity over a web streaming experience. This means that they no longer need to have a computer to run Unity - as long as they have an internet connection, they’ll be good to go!
Note: Using AppStream for a large amount of students over a long period of time can become very costly. We recommend working with your IT Department for a solution like this to take advantage of the Academic License pricing. You can see the calculated costs of AppStream here: https://aws.amazon.com/blogs/desktop-and-application-streaming/amazon-appstream-2-0-releases-a-simple-pricing-tool/. When calculating costs, set the “Instance type and size” to graphics-design.large.
Languages available:
1. Getting Started with AWS
Before we can start using AppStream, we need to create an account for AWS. Luckily, if you’re a student, educator, or institution, you can sign up for AWS Educate, which will provide you with AWS credits upfront, so you can test out different AWS services.
We will generally be following the Getting Started Guide found on the AWS AppStream website to use Unity on AppStream.
- Create an AWS Account
- Log into the AWS Management Console
- Open up the AppStream Getting Started Guide
2. Services to Set Up
Before we can get started with AppStream, we’ll need to set up AWS CloudFormation and a Virtual Private Cloud (VPC). These services will help us host our virtual computers which are running Unity, so that students don’t need their own strong computer to run Unity.
CloudFormation & VPC
In the Getting Started Guide, you should select the closest region to you to set up a CloudFormation stack.
You can edit “Stack Name” to whatever is appropriate - I’ve renamed mine UnityTestVPC for my own purposes. You can see when AWS has finished setting it up by refreshing the page.
Once the CloudFormation stack is created, you can continue through the Getting Started Guide to check and see that a VPC has been made by heading to the VPC Dashboard and selecting Your VPCs in the dashboard menu on the left side.
3. Create an AppStream Image
Now, we can start setting up an AppStream image to use Unity on. Starting with the AWS AppStream Quicklinks, we will be selecting Custom Set Up instead of Set Up with Sample Apps. You should now see a list of options to select base template images to get you started. You want to make sure you look for two specific options:
- The latest Windows Server that you can run (which is Platform: Microsoft Windows Server 2019 Base as of this tutorial)
- You want to use an instance that has Instance Family: Graphics Design. This will provide the minimum for what we need to run Unity.
Afterwards, you can scroll all the way to the bottom and select Next. You should then see a page to Configure Image Builder.
On this page, you can rename the image to whatever you want it to be. I named mine UnityImageBuilder.
You’ll then want to select an Instance Type. You should see different options to choose from. The minimum requirements we are looking for are under Type -> stream.graphics-design.large. The difference with each type is as you get a larger instance type, you have to start paying more to keep them running.
Once you click Next, You will be prompted to configure a network.
I would recommend not providing Default Internet Access. Since students will only be using Unity and Visual Studio on this image, they can use their own internet browser to look up questions.
Afterwards, you will be prompted to assign two fields:
- The VPC that we created - you can select the drop down to find the one that was made before.
- A subnet to use. I would recommend selecting one of the private subnets. You can see which subnets are private by hovering over the different options when you open the dropdown menu. A little pop out message will say if one is a “public subnet” or a “private subnet.”
Once these are set up, you can click Review, which will bring up an image that looks like this:
If your image has similar settings, you can click Launch. The Image Builder will take a little bit to start running.
4. Set Up the Image
On the AppStream page, you can go to the Images tab to see the image being set up.
Once the Status says Running, you can click the button next to the Name and click Connect.
To start setting up, select Administrator. From here, this desktop will be like working on your computer. You can open up Firefox and head over to the Unity website to Download Unity Hub. From there, you can follow the standard installation process to download the appropriate version of Unity and Visual Studio. This step will take a while to install everything.
Once everything is downloaded, we’ll need to set up our template image.
5. Configure Image Assistant
From here, you can follow the Getting Started Guide again to set up images starting from Step 5: Use Image Assistant to create an AppStream 2.0 image.
In order to add Unity, Unity Hub, and Visual Studio, you’ll need the exact filepath for the applications. The easiest way to find those is by right clicking the desktop shortcut, selecting Properties, and copying the Target - this is the location of the application on the computer. Make sure to remove the quotation marks when pasting.
These were the filepaths for:
- Unity Hub: C:\Program Files\Unity Hub\Unity Hub.exe
- Visual Studio: C:\Program Files (x86)\Microsoft Visual Studio\2019\Community\Common7\IDE\devenv.exe
Now, you’ll need to actually configure Unity Hub to use the right license. This is done by following the steps in the Assistant and Switching User. You’ll need to set up a Template User.
On the Template User Account, you’ll need to open up Image Assistant again.
This time, when you double click on Unity Hub, it will open up the application. This is where you should activate your license. Ideally, if you have an Education Grant License, you can follow the same steps to activate the Grant License for any images created from this template. Try creating a Unity project and running Visual Studio to make sure everything is set up correctly.
Once the license is assigned, you can Switch User to go back to the Administrator view.
From here, you can test that the license was applied properly by using the Test User account. If you open up Unity Hub on this view, you should see that the license was activated. This view won’t actually be what the students see. They will be limited to see only application windows - not the desktop itself.
Once you’ve tested creating a new Unity project, you can start optimizing the applications to have them launch faster for students. Here, you can follow the Getting Started Guide to finish setting up your Image.
As you progress through the Getting Started Guide, you will be led to start a Fleet that will run your Image (On Demand is the recommended setting to help save on costs), and set up a stack that your students can connect to with their own user accounts that you’ll set up for them.
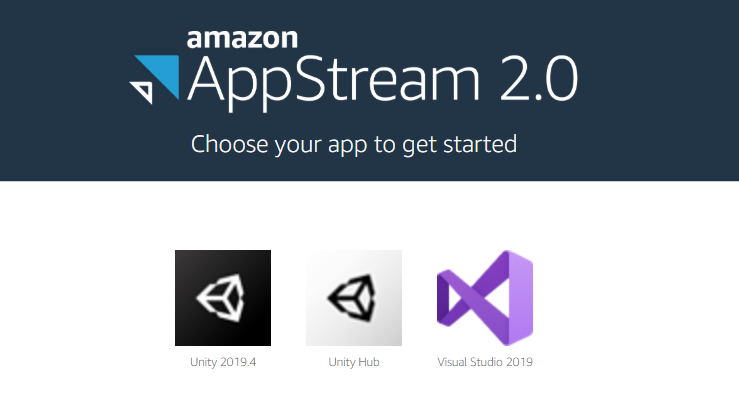
6. Student View
Once AppStream is fully set up, students should be able to:
1) Log onto your AppStream Stack:
2) See the Applications they can open:
3) Start using Unity:
Note: in order to switch windows, students need to select the Switch Windows button at the top of the AppStream window. This will show them what applications are currently open.
On occasion, there may be licensing issues for students, where the license won’t be set up on Unity Hub. You can have Students log into their accounts and activate their own license to fix this.