
Importing the Reflect Package into Unity
Tutorial
Beginner
+10XP
15 mins
(25)
Unity Technologies
Unity Reflect allows you to import CAD projects from software such as Autodesk Revit into Unity to build XR experiences with a single click. In this tutorial, you’ll learn how to import the Reflect plugin into Unity.
Languages available:
1. Importing the Reflect Package into Unity
1. The Reflect plugin is installed via Package Manager. To launch the Package Manager window, select Package Manager from the Window drop-down (Figure 01).
2. In the Packages window, click Advanced and enable Show preview packages (Figure 02).
3. In the left column, select Unity Reflect, and click Install in the lower right (Figure 03).
4. Unity Reflect requires changes to the InputManager settings. When prompted, click Apply (Figure 04).
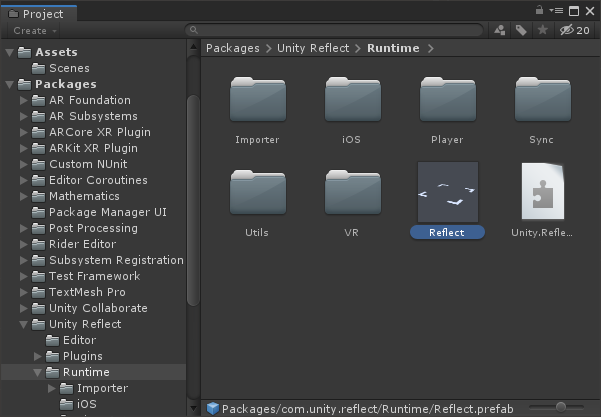
5. Inside the Project view, navigate to Packages > Unity Reflect > Runtime and select the Reflect Prefab. Drag it into the Hierarchy view to place it into your Scene (Figure 05).
6. The Reflect plugin uses TextMesh Pro. If you haven’t already, you’ll be prompted to import the TextMesh Pro core when you drag it into the Scene or open the Reflect Prefab (Figure 06).
7. If you haven’t assigned a license seat for Unity Reflect, or you’re not using Unity Pro, an error dialog will appear when you attempt to use it (Figure 08).
8. To assign a Unity Reflect seat, log in to https://id.unity.com/. Under My Account, click My Seats (Figure 09).
9. Click the gear icon on the right of Unity Reflect to assign or revoke seats (Figure 10).
10. Check the ID of each member of your organization to whom you wish to assign a seat and click Assign Seat(s) (Figure 11).
2. Conclusion
You’re now ready to begin using Reflect in Unity.