
Introduction to Sprite Animations
Tutorial
Beginner
+10XP
30m
(1282)
Unity Technologies
Sprite Animations are animation clips that are created for 2D assets. There are various ways to create Sprite Animations. One way is to create them from a Sprite Sheet, a collection of Sprites arranged in a grid. The Sprites are then compiled into an Animation Clip that will play each Sprite in order to create the animation, much like a flipbook. Sprite Animations can also be created by using keyframe animation in Unity, via the Animation window.
Resources
Languages available:
1. Introduction to Sprite Animations
This tutorial has been verified using Unity 2019.4.10f1 LTS.
Sprite Animations are animation clips that are created for 2D assets. There are various ways to create Sprite Animations. One way is to create them from a Sprite Sheet, a collection of Sprites arranged in a grid. The Sprites are then compiled into an Animation Clip that will play each Sprite in order to create the animation, much like a flipbook. Sprite Animations can also be created by using keyframe animation in Unity, via the Animation window.
2. Creating Sprite Animations Using Sprite Sheets
Sprite Sheets are images containing sequential Sprites typically used for animation, much like a flipbook, while Sprite Atlases are images containing a collection of non-sequential Sprites. Sprite Atlases are created to pack as many Sprites together in a single image in order to optimize 2D games. Sprites within a Sprite Atlas can be animated as well, but they are typically animated using keyframe animation. Because Sprite Sheets and Sprite Atlases are made up of multiple Sprites, it’s necessary to set the Sprite Mode to ‘Multiple’ to use the Sprite Editor and Slicing Tool to extract individual Sprites from the Sprite Sheet.
3. Import Settings
1. Download and import the file SpriteSheet.png into your project. Refer to Import individual assets from your computer for a review of the process.
2. In the Project window, select the Sprite image you imported into your project. This will bring up the Inspector of the Sprite Sheet.
3. Change the Sprite Mode from ‘Single’ to ‘Multiple’ (Figure 01).
4. Sprite Editor
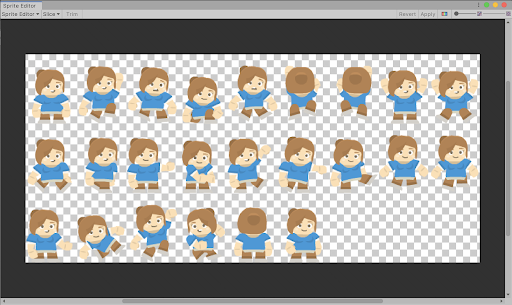
1. Click the Sprite Editor button to open a new window with the Sprite Editor (Figure 02).
5. Slicing Sprite Sheets
The Slice tool (Figure 03) allows users to slice Sprite Sheets into individual Sprites that can be used in Sprite Animations. Sprites that are meant to be used in animations are sometimes arranged in a grid-like manner and are better suited to be sliced using one of the manual slice operations. It is also worth noting that the artist will purposefully space Sprites evenly in a Sprite Sheet to allow the animation to playback smoothly. If Sprites are not spaced evenly, it could result in a wobbly animation.
1. Press the Slice button to reveal the Slice dropdown menu and choose Grid By Cell Count (Figure 04).
2. In the Grid By Cell Count options, change the value of Columns to 9 and the Rows to 3 (Figure 05) and then press Slice and close the Sprite Editor.
3. In the Project window, select the newly sliced Sprite Sheet and expand it to reveal the various Sprites that have been created within the asset (Figure 06).
6. Creating Sprite Animations from Selected Sprites
These newly sliced Sprites can now be used individually within the project by dragging and dropping them into the Scene. Multiple Sprites can also be selected from the Project window and then dropped into the Scene at the same time. By doing so, Unity will automatically begin the process of adding an Animator to the asset in the Scene and also create an Animation Clip from the selected Sprites.
1. Select the Sprites necessary for the Animation Clip and drag them into the Scene.
2. Browse to the desired folder to save the Animation Clip and rename the Animation Clip (Figure 07).
3. Save the Animation Clip.
By default, Unity will add an Animator component to the GameObject in the Scene. It also creates a new Animator Controller and assigns it to the Animator component. The Animation can be previewed in the Game view by pressing the Play In Editor button.
7. Creating Keyframe Animation
Sprites can also be animated just like any other GameObject in Unity. Keyframes are points on an Animation Clip timeline that contain data about the GameObject like its Transform data (Figure 08). These keyframes indicate some sort of change in that data to produce an animation. When the animation plays, Unity interpolates the data from one keyframe to the next to play the animation.
1. From the Window menu, select Animation. Dock the Animation window behind the Project window for ease of navigation.
2. Select the Sprite in the Hierarchy.
3. In the Animation window, click on the Animation Clip dropdown menu and choose Create New Clip (Figure 09).
4. Browse to the desired folder to save the Animation Clip and rename it.
5. Save the Animation Clip.
6. Unity uses Automatic Keyframing, meaning that once in Animation Mode, any movement applied to the GameObject in the Scene view will be recorded in the animation. In the Animation window, press the Record button to begin creating keyframes (Figure 10).
7. The white line in the Animation Timeline is called the Playhead and it indicates where a keyframe will be added. To move it, simply left-click and drag the Playhead to the desired frame.
8. In the Scene view, move the selected GameObject using the Move tool to change its current position. Doing so, a keyframe will be added where the Playhead is located and if it’s a new animation, it will create a keyframe at the beginning of the Animation Clip Timeline (Figure 11).
9. Click the Record button to deactivate it and press the Play button in the Animation Window to preview the Animation Clip.
8. Blending Animations
Only one Animation Clip can play at a time in the Editor. If there’s a need to have the keyframe animation blend with the Sprite Sheet animation, use the Layers feature in the Animator window (Figure 12).
1. Select the Animator window from the Window drop-down. Dock it behind the Project window for ease of use. The Animator workspace can be moved by holding ALT + left-clicking and dragging.
2. Notice that when the Sprite Sheet animation is selected, there are two States visible in the workspace (Figure 13).
Each state represents an Animation Clip associated with the selected Sprite. The orange state is known as the Default State. It will play automatically when the game is active. The Default State can be changed by right-clicking on another state and choosing ‘Set As Default Layer State.’
3. Click on the Layers tab on the upper-left corner of the Animator window. Above the Base Layer, press the + button to add a new Layer. Name it accordingly (Figure 14).
4. Select the new Layer and drag in the animation that you want to blend (Figure 15). Notice it has automatically been made the Default State of the Layer.
5. Click the gear icon on the new Layer to see its options. Set the Blending mode to Additive and the Weight to 1 (Figure 16). This allows the new Layer to combine its animation with the animation on the Base Layer.
6. Playtest the game to see the animations playing together.
9. Conclusion
Creating and configuring Sprite animations is an essential part of creating 2D experiences in Unity. Now that you know the basics, try creating Sprite animations for your characters and other elements in your own project.