
Modifying Gravity, Color, Size & Lifetime of Particle Systems
Tutorial
Beginner
+10XP
40 mins
(337)
Unity Technologies
When working with Unity’s Particle System, you are able to produce a wide range of visual special effects. You are able to create and configure visually dynamic and compelling effects such as fire, fog, and explosions, or smoke, sparks, and more. The Particle System effect involves particles, or sprites, to exhibit emissive properties as they appear to spray or drift from a source. Their behaviors are configured to spawn (appear), and repeat (or cycle) throughout a set interval. Additionally, they can be configured to dynamically change throughout the designated period of their lifetime. Learning how to use the Particle System will open up unique possibilities, as well as improve the quality of visual effects within your Scene.
Languages available:
1. Getting Set up
To begin with, our demonstration will take place within the ‘Construction Set’ included in the Example Assets, preloaded in the opening scene for Unity’s Universal Render Pipeline (URP) Project. You are able to work with the Particle System, however, in any of the 2D, 3D, HDRP, or URP Project templates. It is encouraged that you practice within your own saved Project, otherwise you can create a new URP project from the Unity Hub and follow along with the tutorial. We will begin by creating a new particle effect, and modifying its properties further.
1. Navigate to a view where you wish to place the Particle System in the Scene, and then from the Top Menu Dropdown, select GameObject > Effects > Particle System.
The newly created Particle System will appear as a GameObject in the Hierarchy window, displaying its animation within the Scene. The effect will only actively display its animated properties in the Scene window when the GameObject is selected in the Hierarchy. The particles themselves are each selected, outlined in orange. In the lower right corner of the Scene window, a new Particle Effect window will appear, enabling you to Pause, Restart, or Stop the animation.
2. With the Particle System GameObject selected in the Hierarchy, select the Pause button in the Particle Effect window, to temporarily freeze the animation.
3. Select the same button a second time, now labelled as Play, to again resume the animation. After a Playback Time of 5 seconds, you will notice that the number of Particles reaches a maximum of 50, and does not increase any further. By default, each particle has a lifetime set to 5 seconds before they disappear, so after 5 seconds, the rate of particles appearing and disappearing becomes the same. We will proceed to adjust the lifetime in the next step, however for now, select the Restart button to reset the Playback Time. The Particles counter restarts back to zero, restarting the animation.
2. Changing the Lifetime of each Particle’s existence
Let’s modify the lifetime of each particle’s existence. When increasing the Start Lifetime property in the Inspector window, not only will the particles last longer, the overall number of particles populated within a Scene will also increase.
1. In the Inspector window, change the Start Lifetime of the Particle System properties to 10. Notice that the number of particles existing in the Scene doubles to 100.
3. Using the Gravity Modifier
By default, the Particle System’s gravity is set to 0. This means that the particles travel upwards, unaffected by the project’s gravity settings as defined in the Physics Manager. Enabling the Project’s gravity influence on the Particle System is easily accomplished. Please note, however, that modifying a Project’s overall physics settings is not within the scope of this tutorial. Instead, we will simply adjust the Gravity Modifier within the Particle System properties.
1. In the Inspector window, set the Gravity Modifier to 1. You will see that the particles now initially travel upwards, however quickly lose their upward velocity, and begin falling back downward.
2. When reducing the Gravity Modifier value, we can adjust the initial velocity of the particles to initially travel higher. Set the Gravity Modifier to .4 in the Inspector to give the Particle System a fountain effect.
4. Modifying Velocity over Lifetime
We can further enable the Velocity over Lifetime properties to control aspects of a particle’s velocity including speed and even direction of travel. You are able to adjust the particles’ overall speed, for example, as well as their linear or rotational velocities.
1. In the Inspector window, first select the checkbox to enable Velocity over Lifetime, and then next select the Velocity over Lifetime field itself, to expand its properties.
2. To change the directional velocity of the particles in the X direction, set the Linear X field to a value of 3 in the Velocity over Lifetime properties, giving it a more wind-swept look.
3. Let’s remove the gravity effect by returning the Gravity Modifier value back to 0.
4. To slow down the velocity, reduce the Speed Modifier value to .2.
5. Creating a Smoke Effect - Adjusting Color
We can adjust the color of the particles to represent whichever visual effect you intend to simulate. For instance, changing the color to a greyish-white may represent smoke or fog quite well. Let’s first approximate the color of a smoke effect.
1. Select the Start Color field in the Inspector. Using either the color wheel or the color-picker eyedropper tool, select a specific color of your choosing. Here a lightish-grey color has been selected.
6. Fine-tuning the Smoke Effect
We will proceed to make further adjustments to the Particle System to best approximate a smoke effect. Now that the color is set to a light grey, we will apply additional adjustments to the particles’ Start Lifetime, Start Speed, and Start Size.
1. Reduce the Start Lifetime value back to 5, to reduce the overall amount of particles drawn in the Scene to its original number of 50. Reduce the Start Speed to 1. Increase the Start Size to 10, to give the smoke particles a bigger size. Adjust the Speed Modifier to .4.
Experiment with the Particle System to finely tune a custom smoke effect. You may wish to make the smoke more or less dense, by adjusting various combinations of the Start Size balanced with the Start Lifetime. You may also wish to cause the smoke effect to appear as if it were drifting upwards or perhaps flowing downwind. Modifying the Velocity over Lifetime in combination with the Gravity Modifier properties would accomplish this. Practice entering your own values to see how it affects the particles.
7. Creating a Spark Effect : Adjusting Color over Lifetime
Similar to creating and adjusting a Particle System’s color, size, and speed to approximate smoke or fog, we can create another Particle System GameObject, and fine-tune its properties to create and simulate a new spark effect.
1. Let’s keep our newly created smoke Particle System effect saved within our Scene. In order to keep it from obstructing our visibility while we create a new Particle System effect however, deselect it in the Inspector window to temporarily hide the smoke. Next, create a new Particle System effect by going to the Top Menu Dropdown, and then selecting GameObject > Effects > Particle System.
2. We will now modify its color to represent burning sparks. With the newly created Particle System GameObject selected in the Hierarchy window, select Start Color field in the Particle System properties in the Inspector, and then select a yellow color from the color wheel.
3. We can additionally set the color to evolve or change over the duration of a particle’s lifetime. To accomplish this, first select to enable the checkbox for Color over Lifetime, and then select the Color over Lifetime field itself to expand the selection. Finally, select the white color field to open up the Gradient Editor window.
4. In the Gradient Editor window, select the lower left color marker Cursor to select the first color for the gradient. Next, select within the Color field to choose a color, and lastly, select a color using the color wheel.
5. Next, select the lower-right Color Marker Cursor to choose the second color for the gradient, and again select a color from the color wheel.
The particles will begin their lifetime shown with the first yellow color selected, and then gradually transition to the second red color chosen from the Gradient Editor. Depending on your Scene view, however, the change in color may not be readily apparent. This can be because of certain features within the Scene that might prevent us from detecting subtle changes. Let’s now address this by calling attention to a certain default setting from within the Lighting window, as well as make adjustments to the gizmo editor, to control how the particles may be outlined.
6. If you are working on a new project within Unity’s Universal Render Pipeline (URP), Fog has been enabled by default. Let’s turn off the Fog setting by first opening up the Lighting Settings window. Select from the top menu dropdown:
Window > Rendering > Lighting Settings, and disable the checkbox next to Fog.
7. Next, in order to be able to see our Particles with more clarity, we may wish to turn off the selection outline gizmo. At the top of the Scene window, select the Gizmos button to open the dropdown menu, and then deselect the checkbox labelled Selection Outline to turn off the orange outline for each particle.
Now when you view the Particle System, you can more easily detect changes to the particles over time, especially the Color over Lifetime gradient.
8. Fine-Tuning the Spark Effect
Let’s further modify the Particle System to finely tune our sparks. We will make additional adjustments to the speed, size, and velocities to roughly emulate real-world sparks.
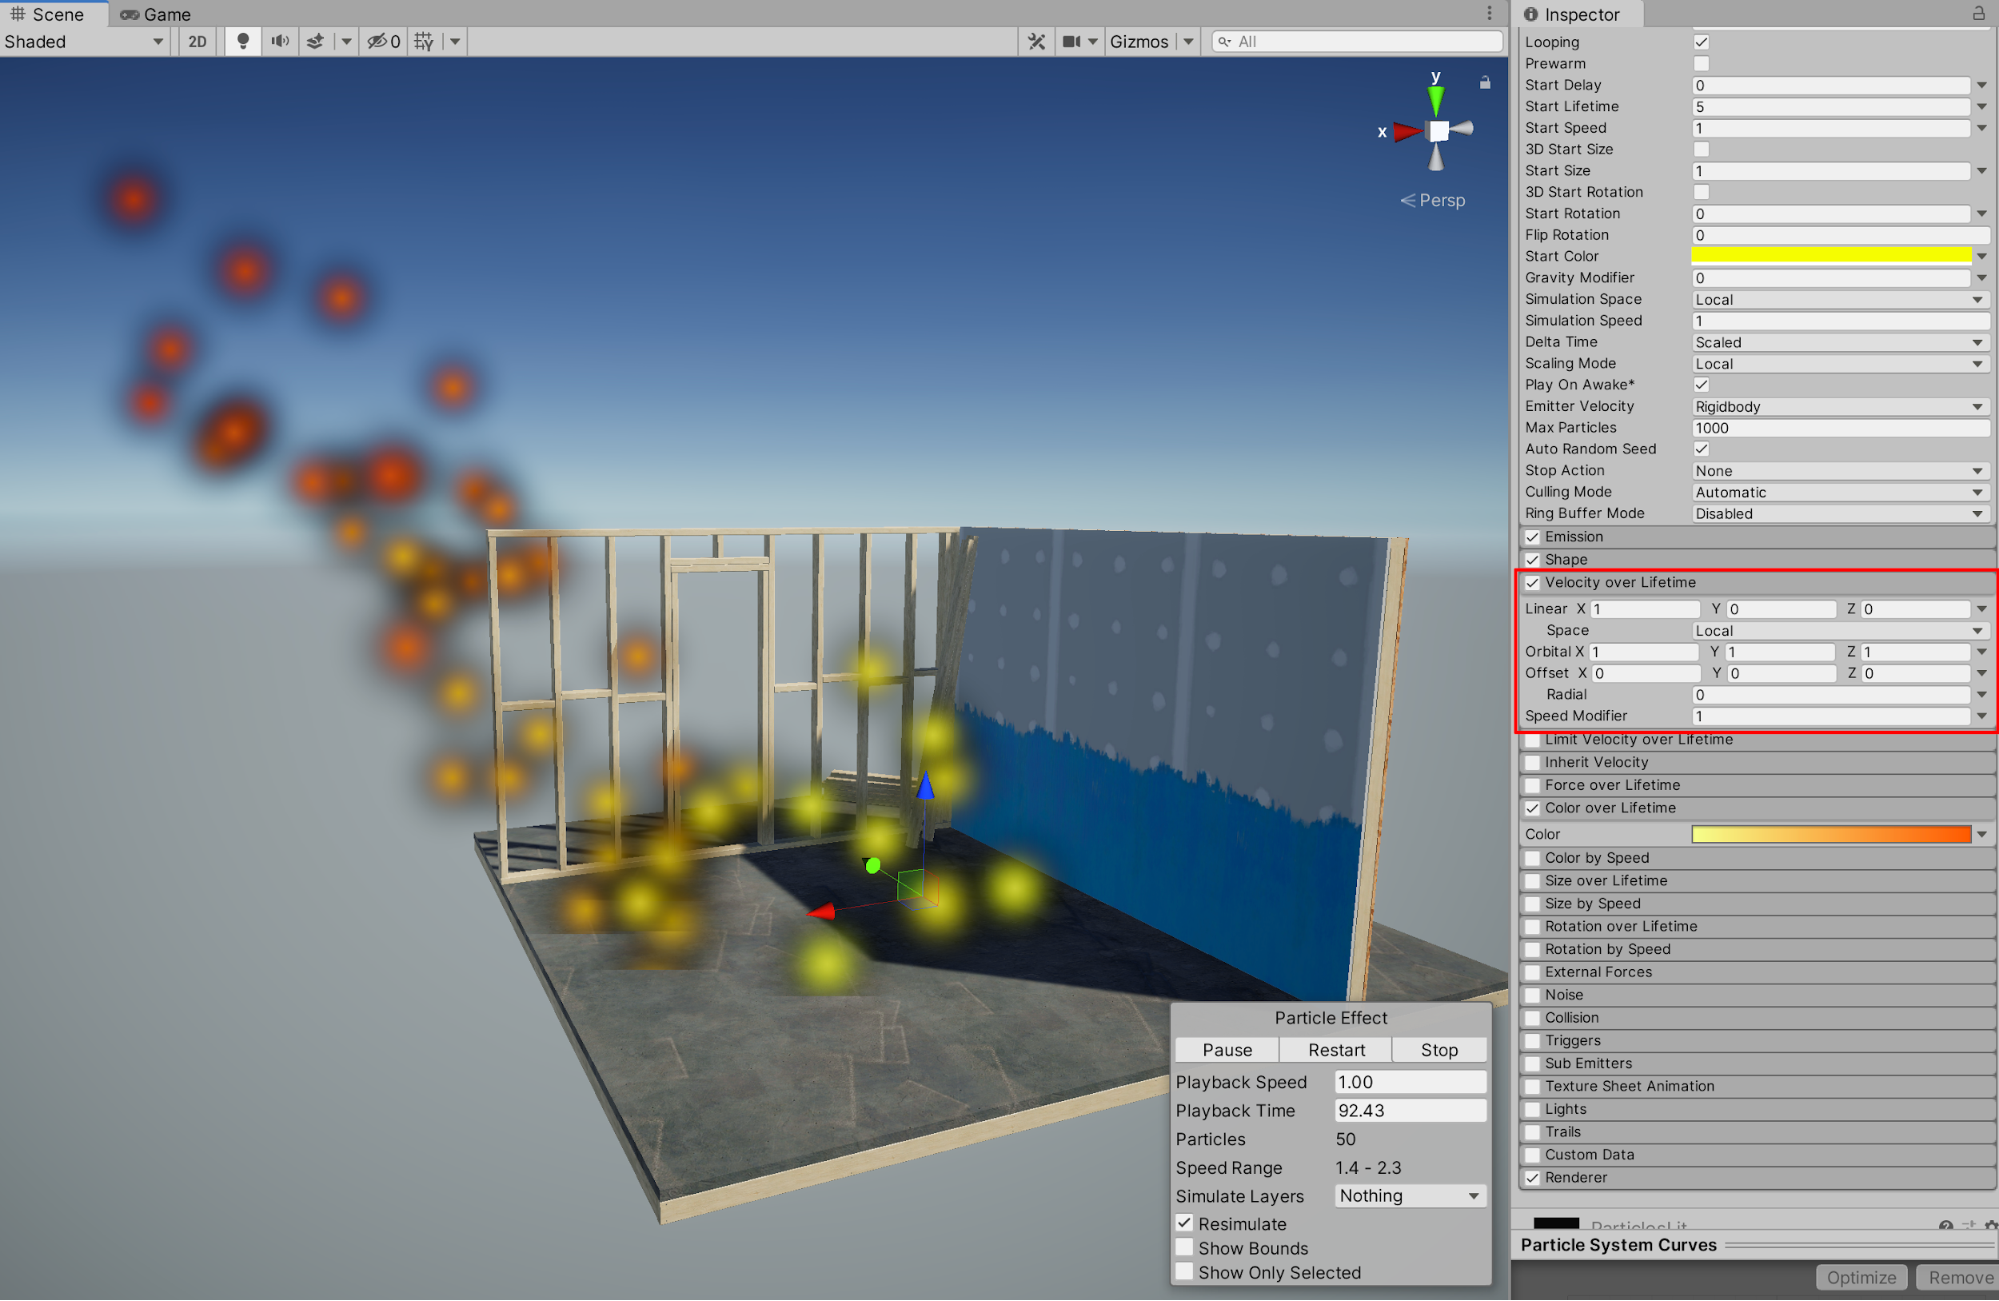
1. Reduce the Start Speed value to 1 in the Inspector.
2. Select to expand the Velocity over Lifetime properties, and enter a value of 1 for the Linear X property. Next, enter a value of 1 for the Orbital X, Y, and Z properties, to give the sparks a rotating whirlwind effect.
3. It is possible to add more than 2 colors to our gradient. In order to add a third color to the gradient, Select the Color over Lifetime field, and simply click below the gradient color strip in the Gradient Editor window. A third color marker cursor will appear.
4. In order to change the particles’ size, select the Size over Lifetime checkbox in the Inspector.
We’ll next add a trails effect to our sparks. Although there is a default material already set for the particles, there is currently no material yet attached for having the option of rendering trails. We will proceed to establish a material for trails before enabling the effect.
5. Select to expand the Renderer property in the Inspector, and next select the object loader circle button next to the Trail Material property.
6. From the Select Material popup window, type in “particle” to search for and then select “Default-Particle”.
7. Next, select to enable the Trails checkbox in the Inspector.
8. Experiment and practice further with the various properties and additional Particle System settings in the Inspector. Select to enable Noise in the Inspector to give your particles additional turbulence. Finally, re-enable the smoke effect, and preview your Scene’s combination of Particle System effects in the Game window, by selecting Play to enter Play Mode.
9. Next Steps
Unity’s Particle System offers a wide range of visual special effects. With practice, you can create and configure dynamic and compelling effects that can replicate many unique, interesting, and diverse behaviors.