
Optimizing Particle Effects for Mobile Applications
Tutorial
intermediate
+0XP
20m
(177)
Unity Technologies
Optimization is a broad topic and how you optimize depends heavily on your specific project. This tutorial should be read as an introduction to optimization tips and suggestions rather than a step-by-step guide that guarantees optimized particle effects for your mobile projects. The process of optimizing particle effects for mobile devices can change depending on the project and can be a complicated task. In this tutorial, we will talk about common pitfalls and optimization considerations that will help you begin the process of optimizing your particle effects for mobile applications.
Languages available:
1. Optimizing Particle Effects for Mobile Applications
This tutorial has been verified using Unity 2019.4.14f1 LTS
Optimization is a broad topic and how you optimize depends heavily on your specific project. This tutorial should be read as an introduction to optimization tips and suggestions rather than a step-by-step guide that guarantees optimized particle effects for your mobile projects. The process of optimizing particle effects for mobile devices can change depending on the project and can be a complicated task. In this tutorial, we will talk about common pitfalls and optimization considerations that will help you begin the process of optimizing your particle effects for mobile applications.
All the information here is assuming hardware specifications are at the level or higher of the Apple A4, iPhone 3GS, third generation iPod Touch, Nexus One, or most phones that run Android 2.3 Gingerbread. Performance and optimization will vary between devices, so be sure you’re able to test on a range of devices that most users will have.
It’s best to approach optimization as a design consideration and not a final step. Whenever you are developing a project for mobile devices, the best optimizations come from the start. If you wait until the end to begin optimizing your particle effects, you may run the risk of over-complicating the optimizations.
2. Things to look out for
Particle effects can be reasonably expected to run on current consumer mobile devices, but there are a few things you need to be aware of:
- Large particle effects with high density (a lot of particles being drawn on top of each other) can cause an overdraw situation that can negatively impact performance. An overdraw situation is when the system is drawing a pixel on the screen multiple times in a single frame of rendering. For example, if you have a bunch of stacked UI cards, each card hides a portion of the one below it, causing the previous pixel to be replaced by a different pixel. This can also cause overshading of the particle effect if you are using forward rendering. If you are, you will want to limit the number of lights that affect the particle emitter.
- An extremely large number of particles can cause computational lag and the device to have to render each individual particle. You will want to ensure that your particle effects are trimmed down to a manageable amount of particles to still achieve the effect. If a lower particle count ruins the effect, it may need a redesign. You can attempt to redesign the particle by changing the images used on the billboard or attempting to convert particle emitters to an animated tilemap. Sometimes you can improve the visual fidelity of a particle effect by switching to a tilemap or billboard to save on performance costs.
- An extremely large number of particle colliders. Each particle will cause the device to have to calculate the physics for every particle that is emitted. Having too many physics calculations can cause the device to slow down, causing frame rate drops, overheating problems, and, for the worst offenders, crashes due to using more of the device's resources.
With the power of modern PCs, particle effects can end up having quite a large amount of particles being emitted. This can lead to artists working toward high fidelity of the particle effect without taking optimization into consideration. A good method for beginning to optimize particle effects is to trim down the number of particles being emitted per second. By doing this, the once-complex particle effect may look sparse. You will want to begin to play with fade durations, grow, speed, and angular speeds to give each particle more variance. Use the other settings to help fill the gaps.
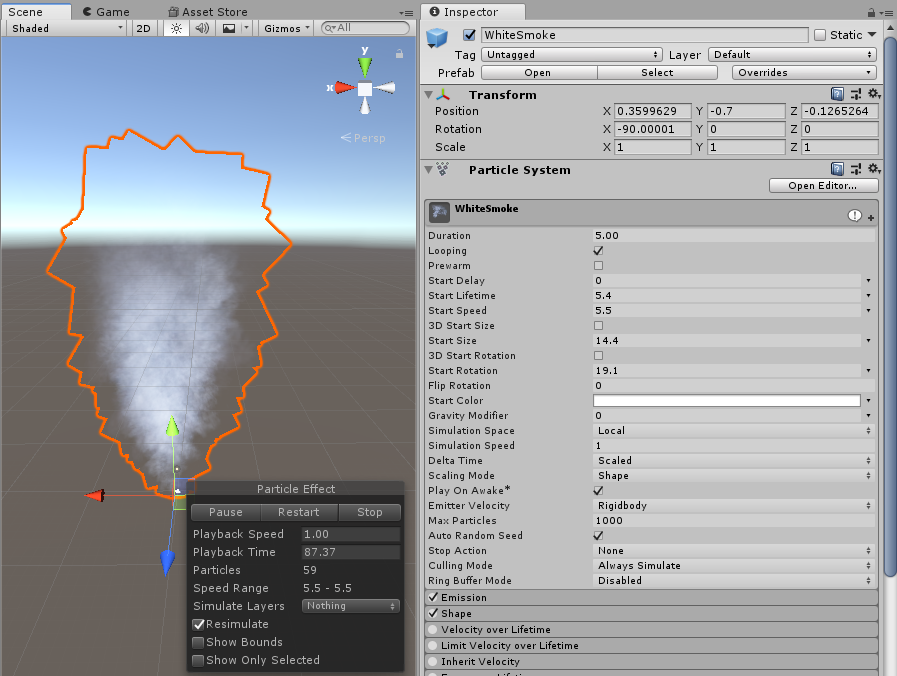
Following is an example of how to optimize a smoke particle effect by reducing the number of emissions and adjusting settings. This is a simple example to help get you started on your own particle effects (Figure 01).
1. The first thing you’ll notice is that the particle effect has a max particle count of 1000, with its max current being 59. We can reduce that significantly, down to a 35 max particle count without sacrificing the effect’s look (Figure 02).
2. With the lower particle count, we can push it further, but we have already lost some of the thickness of the smoke. Next, let’s change the angle in the shape. With particle effects that have lower particle counts, we want to add a bit more variance to make up for the lack of thickness. I changed it from 0.04 to 0.08, doubling the angle (Figure 03).
3. Restoring some of the depth with the larger angle decreased the particle count down to 30. Next let's take a look at the curves and make sure they are optimized. Typically you will want to make sure the curve is a smooth transition without any crazy hills or waves. This will lower the number of computations that need to be sampled from the curve for the particle effect (Figure 04).
4. Another thing we can do is ensure this particle effect doesn’t cast shadows. Go to the Render module and make sure the particle effect isn’t casting shadows (Figure 05).
Already, with those few changes, we have lowered the particle count and lowered performance hits by optimizing the curves and disabling the ability to cast shadows.
3. Performance Tips
Here are a few tips for improving the performance of your particle effects:
- Make a plan ahead of time for your particle effect budget and keep it in mind. On average, the budget for particle effects is 2ms. This can change depending on how particle effect-heavy your project will be.
- Use unlit effects when possible. This can prevent the particle effect from taxing performance. Additionally, taking this into consideration with Shader choice becomes important, especially when building custom Shaders for specific effects.
- Use dynamic batching with Sprite support. Dynamic batching is very efficient for particle systems as dynamic geometry can be built into shared vertex buffers. Dynamic batching helps performance by combining several of the particles from the effect — determined by the similarity of their vertices — and draws them in one go, reducing the number of draw calls needed to render the particle effect. (Figure 06)
- Pack your Textures into a single atlas and Material. Keep your frame animations the same size. And use Frame over Time for each system.
- Ensure that all of your particle systems are being culled off-screen. Some of your particle systems may still benefit from implementing custom culling. There are multiple ways to implement custom culling, such as setting up colliders that, when hit, delete the colliding particles or creating scripts in C# to check the positions of the particles and delete them as they move out of defined bounds.
- Try to keep your particle systems emissions to constant, or an optimized curve. Constant emission is the cheapest and simplest solution, whereas an optimized curve is the second most performant emission method due to the number of calculations sampled from the curve itself. If you must use a more costly emission type, ensure that the use is limited to specific particle effects (Figure 07).
4. Conclusion
There are no step-by-step instructions or guides for optimizing your particle effects for mobile devices that will lead to fully optimized particles. However, by understanding the cost of the particle effects, the impact they will have, and utilizing the tips discussed here, you should already be a couple of steps ahead in optimizing your particle effects for mobile devices.