
Rig Optimization for Mobile
Tutorial
Beginner
+10XP
10 mins
(59)
Unity Technologies
In real-time scenarios, the position of each joint in a rig must be recalculated on every frame. These recalculations aren’t of too much concern for desktop or console devices, but can cause performance issues on mobile devices. To remedy this, there are a few things we can do both in our Digital Content Creation (DCC) tool and upon import in Unity to optimize rigs for best performance.
In this tutorial, we will discuss rig design considerations for mobile and walk through the best settings for importing rigged characters into Unity.
Languages available:
1. Rig optimizations for mobile
This tutorial has been verified using Unity 2019.4 LTS
In real-time scenarios, the position of each joint in a rig must be recalculated on every frame. These recalculations aren’t of too much concern for desktop or console devices, but can cause performance issues on mobile devices. To remedy this, there are a few things we can do both in our Digital Content Creation (DCC) tool and upon import in Unity to optimize rigs for best performance.
In this workflow, we will discuss rig design considerations for mobile and walk through the best settings for importing rigged characters into Unity.
2. Design considerations for mobile rigs
Fluid-looking animations require only a few bones and vertex influences. Before importing your rigged character into Unity, try to reduce the number of bones and skin weights in your DCC.
For stylistic or less detailed humanoid characters, ahead or hand can be rigged with only one bone, respectively, for instance. Another consideration is whether your character will be a “hero” Asset or relegated to the background. As you might expect, background characters don’t need to animate as realistically or smoothly as those in the foreground.
3. Successfully importing mobile rigs into Unity
This workflow covers how to import a custom mobile rig into Unity using the Eva character model.
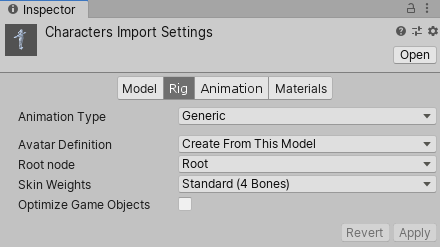
1. Select your imported character rig and navigate to the Inspector.
Pay attention to the Import Settings in the Inspector, specifically the Rig tab (Figure 01).
2. In the Rig tab, set Animation Type to Generic.
While Eva is more or less a humanoid (biped) character, Generic is the best option due to her relatively simple bone Hierarchy. If your model resembles more of a human or biped rig, select Humanoid instead.
3. Set your character’s Root node to Root.
This means the character’s motion will be derived from its center of mass, enabling Unity to properly blend between animation clips.
4. Set Skin Weights to Standard (4 Bones)
This tells Unity that only up to four bones can be used to influence a vertex. This is standard practice for mobile rigs to keep characters’ animation as performant as possible.
5. Turn off the Import Constraints and Animation checkbox under the Animation tab.
Unless there are defined constraints in your custom model, leaving this checked can inadvertently import unwanted data into the Scene, interfering with animations (Figure 02).
6. Lastly, turn off the Optimize Game Objects checkbox under the Rig tab.
This option is best for mechanically rigged objects or characters that lack clearly defined joints. In most scenarios, it’s a last resort for optimization. For mobile-ready models, Unity operates under the assumption that the models are already optimized.
Now your character should be ready for animating within Unity.