Lab: Deploying to HoloLens
Tutorial
Beginner
+0XP
30 mins
Unity Technologies

By the end of this module, you’ll be able to set up your computer properly for HoloLens development, and deploy your scene to the HoloLens headset as a Mixed Reality application.
Languages available:
1. Overview
By the end of this module, you’ll be able to set up your computer properly for HoloLens development, and deploy your scene to the HoloLens headset as a Mixed Reality application.

What is MRTK?
MixedRealityToolKit (MRTK) is a collection of scripts and component intended to accelerate development of applications targeting Microsoft HoloLens and Windows Mixed Reality headsets. This toolkit reduces barriers to entry to create mixed reality application.
What is Github?
Github is a development platform that allows developers to host and review code, manage projects, and build software. It allows developers to open source their code for community collaboration and as such it is great resource for Unity developers ranging in skill from novice to professional.
2. What Will You Do?
In this Streaming Lab, you will setup your development environment for hololens and then build and deploy your first hololens project. You’ll need to:
- Check your Windows 10 version
- Set up your development environment
- Download and add the MixedRealityToolkit Unity package to your project
- Prepare your project for Mixed Reality Content
- Prepare a Scene for Mixed Reality Content
- Build your project
- Deploy your project to the HoloLens headset
- (optional) Deploy your project to the Emulator
Getting Started
Follow this link to get the most up to date deployment instructions.
3. Lab: How to deploy your Unity project to the HoloLens.
To do so, you’ll need to:
- Check your Windows 10 version
- Set up your development environment
- Download and add the MixedRealityToolkit Unity package to your project
- Prepare your project for Mixed Reality Content
- Prepare a Scene for Mixed Reality Content
- Build your project
- Deploy your project to the HoloLens headset
- (optional) Deploy your project to the Emulator
4. 1. Check your Windows 10 version
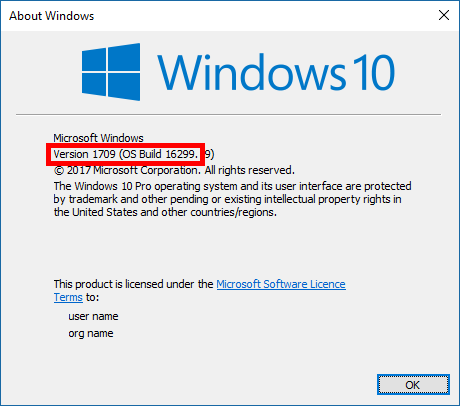
Ensure that you are running the latest version of Windows 10. It is recommended to be running the Windows 10 Fall Creators update.
Step by Step:
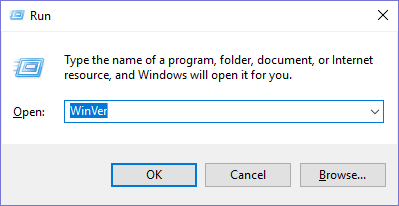
- Run the “WinVer” application from the Windows Run command by pressing ( Windows Key + R )
- In the Windows Run windows type “WinVer” and press enter
- Check to make sure the version is 1709 or greater
- If you are not running the Windows 10 Fall Creators update (or newer), then you will need to update your version of Windows
5. 2. Setting up your development environment
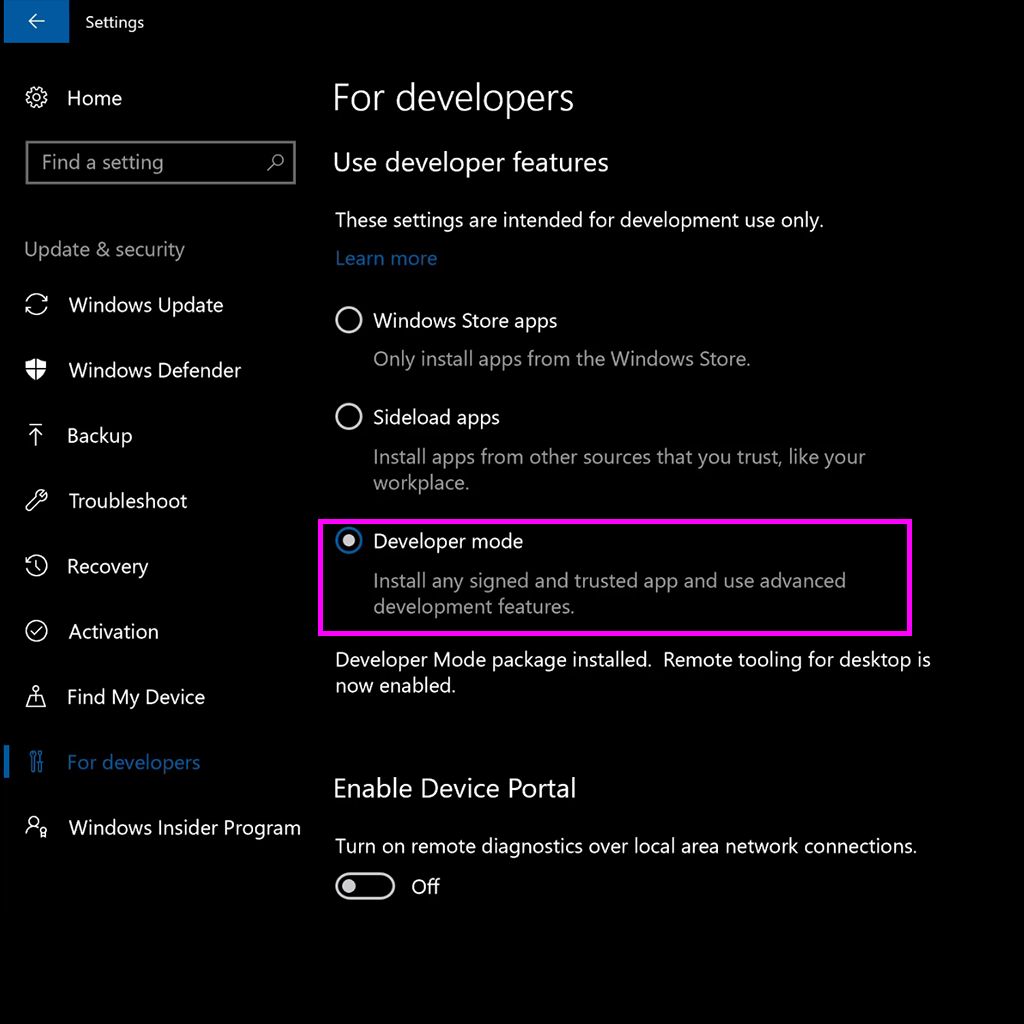
Be sure to enable Developer mode for Windows 10 (Action Center > All Settings > Update & Security > For Developers > Enable Developer mode)
What is Developer Mode?
This mode allows users to sideload (load custom applications onto devices) applications, and also run applications from Visual studio. When this mode is enabled Windows installs a package of features helpful for development.
What is Visual Studio?
Visual Studio is an integrated development environment (IDE) which provides tools to developers for quickly writing and debugging code.
Step by Step:
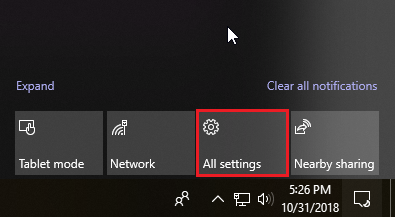
- Open the Action Center by clicking the Action Center icon the bottom right corner.

- Select “All Settings”.Note: You can type “settings” into the search bar (bottom left) as well to pull up the Settings window.
- Select “Update and Security”
- Select “For Developers”
- Enable “Developer Mode”
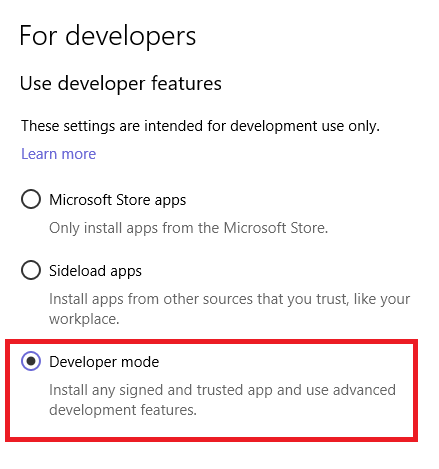
- Turn on Device Discovery so your headset is visible to USB connections and your local network.
6. 3. Turn on developer mode and Pair your your HoloLens in Settings
Repeat the above step by putting on your HoloLens, turning on Developer mode in your HoloLens’ Settings, and pairing the device so we can deploy to your headset.
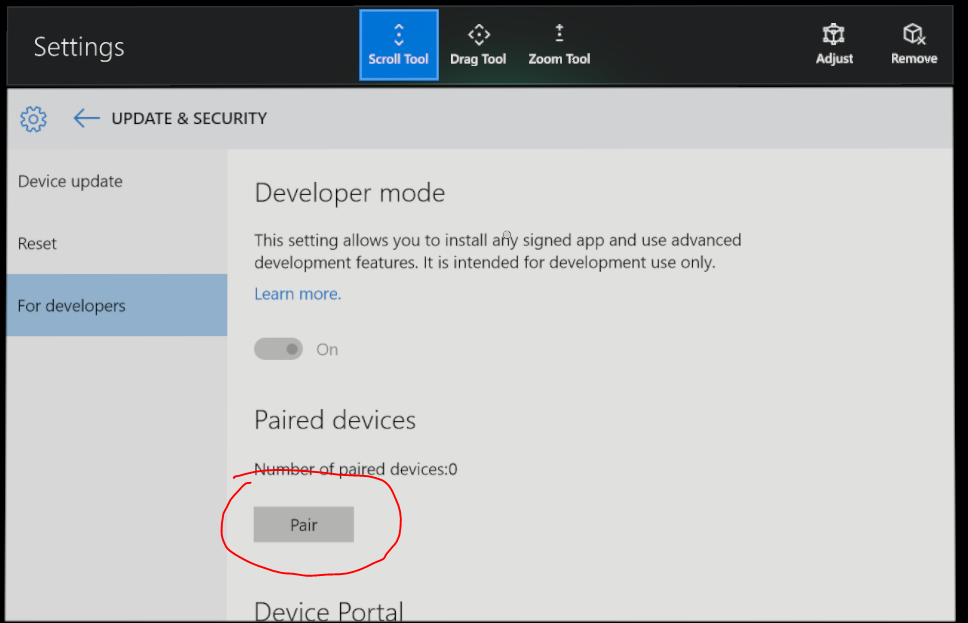
Step by Step:
- Turn on the HoloLens and put on the device
- Launch the Main Menu by performing the “Bloom” gesture

- Open the Settings by selecting the Settings Tile
- Select Update menu item
- Select the For Developers menu item
- Enable Developer Mode. This will allow you to deploy apps from Visual Studio to your Hololens.
- Select Pair, and write down your pin! We will need to enter this number when we deploy through Visual Studio later for the first time.
7. 4. Download and Setup Visual Studio
Download Visual Studio with the necessary components to use the Hololens.
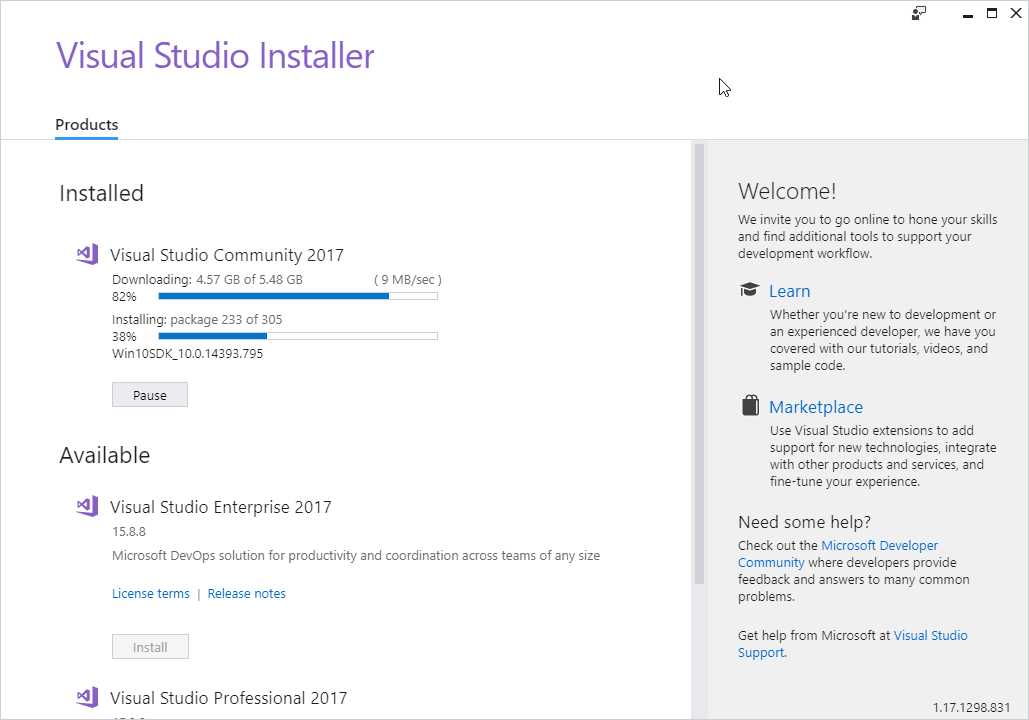
Step by Step:
- Follow this link to download Visual Studio 2017.
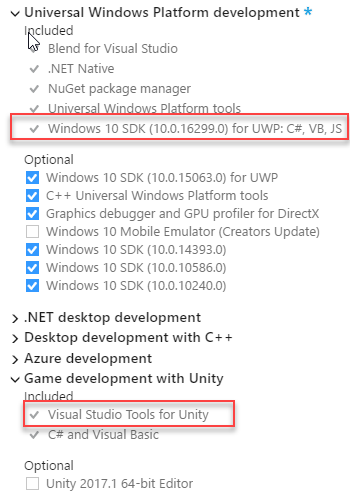
- In the Visual Studio installer ensure to select the following:
What is Windows Store .NET Scripting Backend?
The scripting backend is a framework that powers scripting in Unity. Read here to learn more.
Pro Tip: Already installed Visual Studio 2017?
You can open the installer and add missing components, just search for the installer on your machine.
- Click “Modify,” with the Installer open
- Select any Workloads or missing components, as per the image above.
- When ready, click “Modify”
8. 5. Download and Setup the correct version of Unity
Make sure you are running the appropriate version of Unity 3D on your machine. You should download and install the latest Unity 3d version, and the latest MRTK supported version (found here). Include the Windows Store .NET scripting backend components.
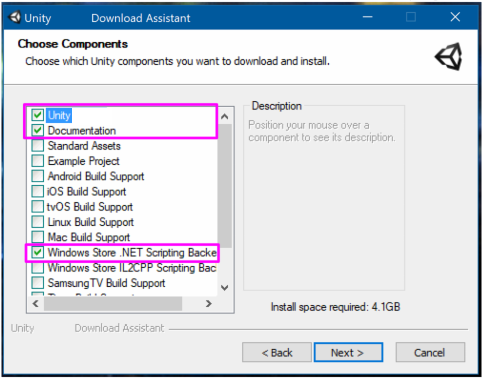
Step by Step:
- Follow this link to download the appropriate version of Unity.
- In the Unity Installer ensure to select the following:
9. 6. Download the MixedRealityToolkit-Unity asset packages
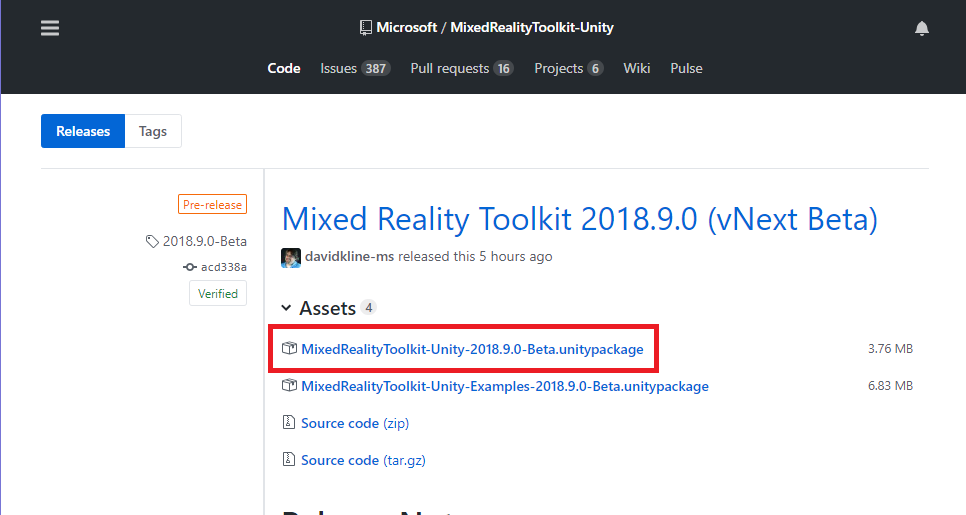
Download the latest unity package from the Github Releases folder.
What is Mixed Reality Toolkit (MRTK)?
The MRTK is a collection of scripts and components intended to accelerate development of applications targeting Microsoft HoloLens and Windows MIxed Reality headsets. The project is intended to reduce the barriers of entry to mixed reality application development. Learn more here.
Step by Step:
- Follow this link to the Github page
- Download the package directly from Github (MixedRealityToolkit-Unity-2018.9.0-Beta.unitypackage). See image above for reference.
10. 7. Import the MixedRealityToolkit-Unity asset packages
Create a new Unity project and import the MixedRealityToolkit package into Unity
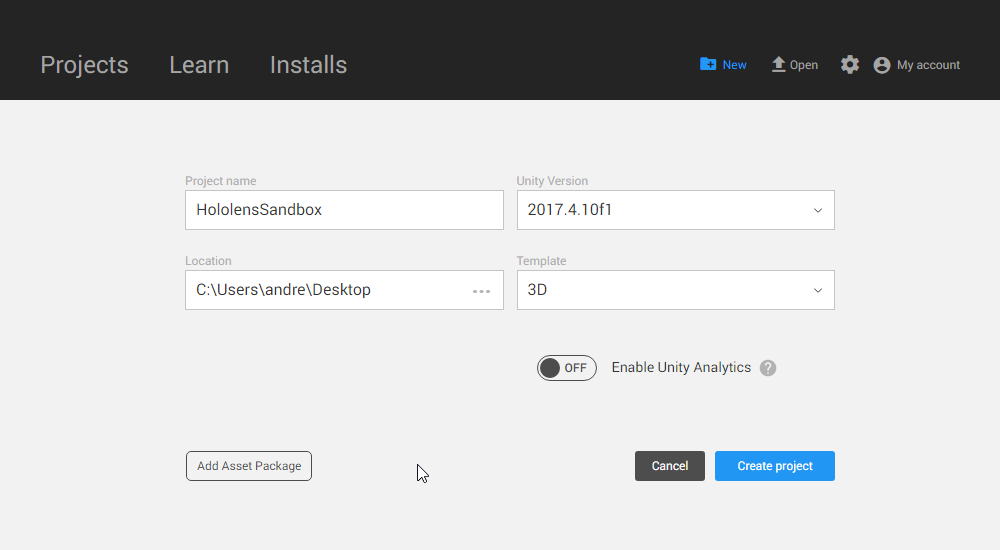
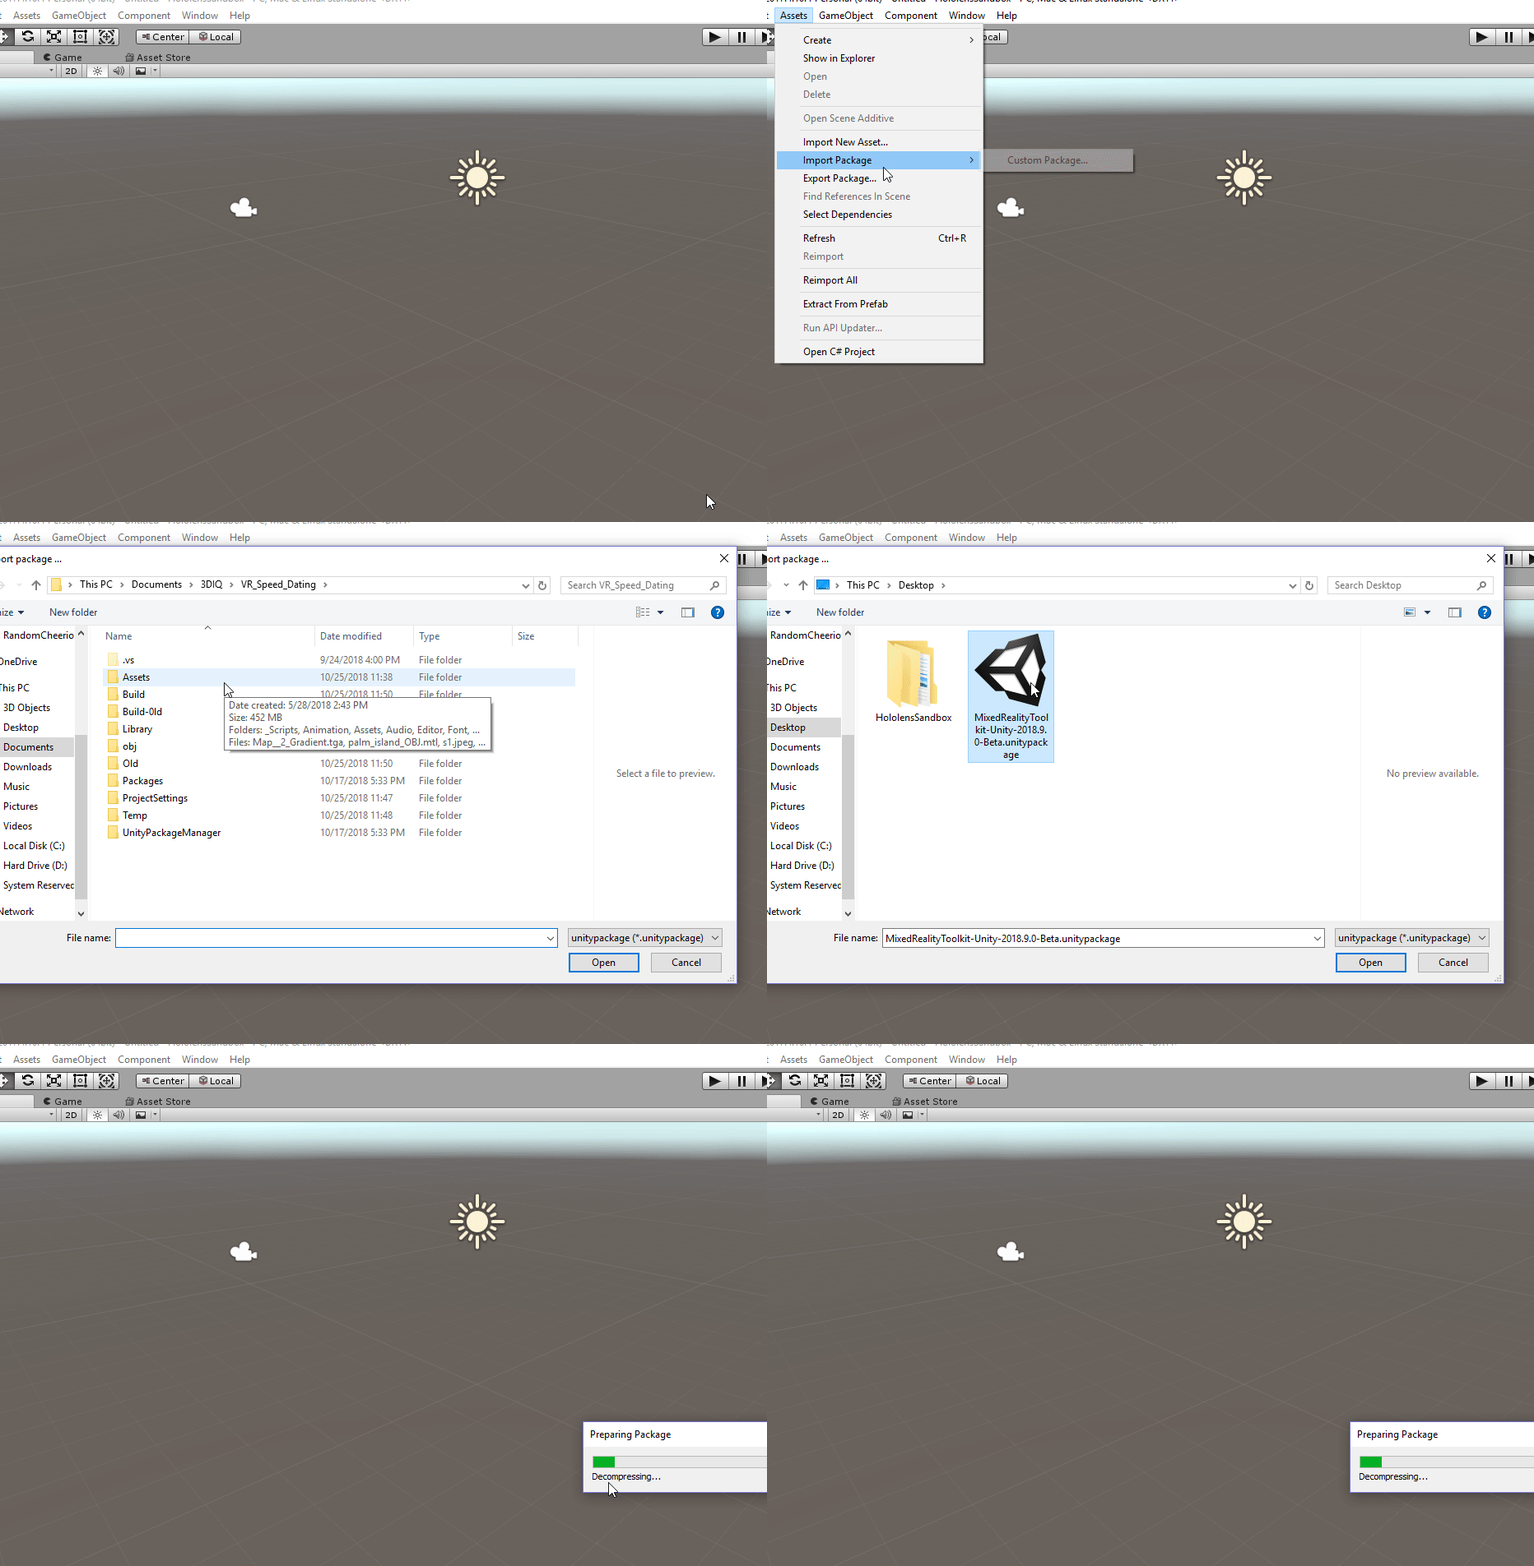
Step by Step:
- Create a new Unity Project using the MRTK supported version of Unity
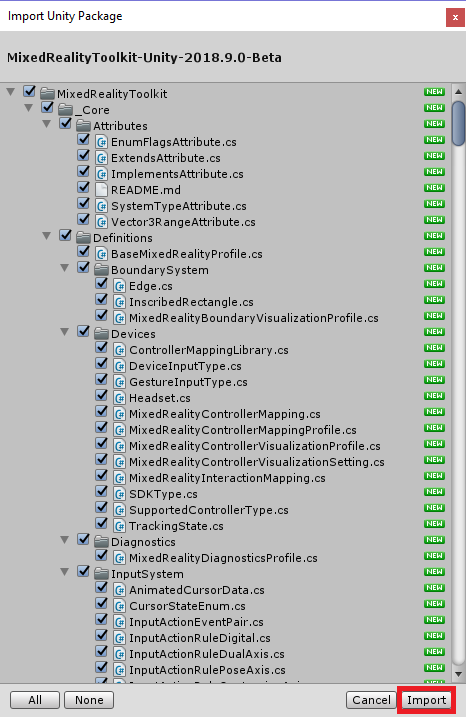
- Import the MRTK package (Assets > Import Package > Custom Package)
- Select the MRTK Package you downloaded previously
- When prompted select Import in the Import Unity Package window
11. 8. Preparing your Project and Scene for Mixed Reality Content
Prepare your project and scene for Mixed Reality development
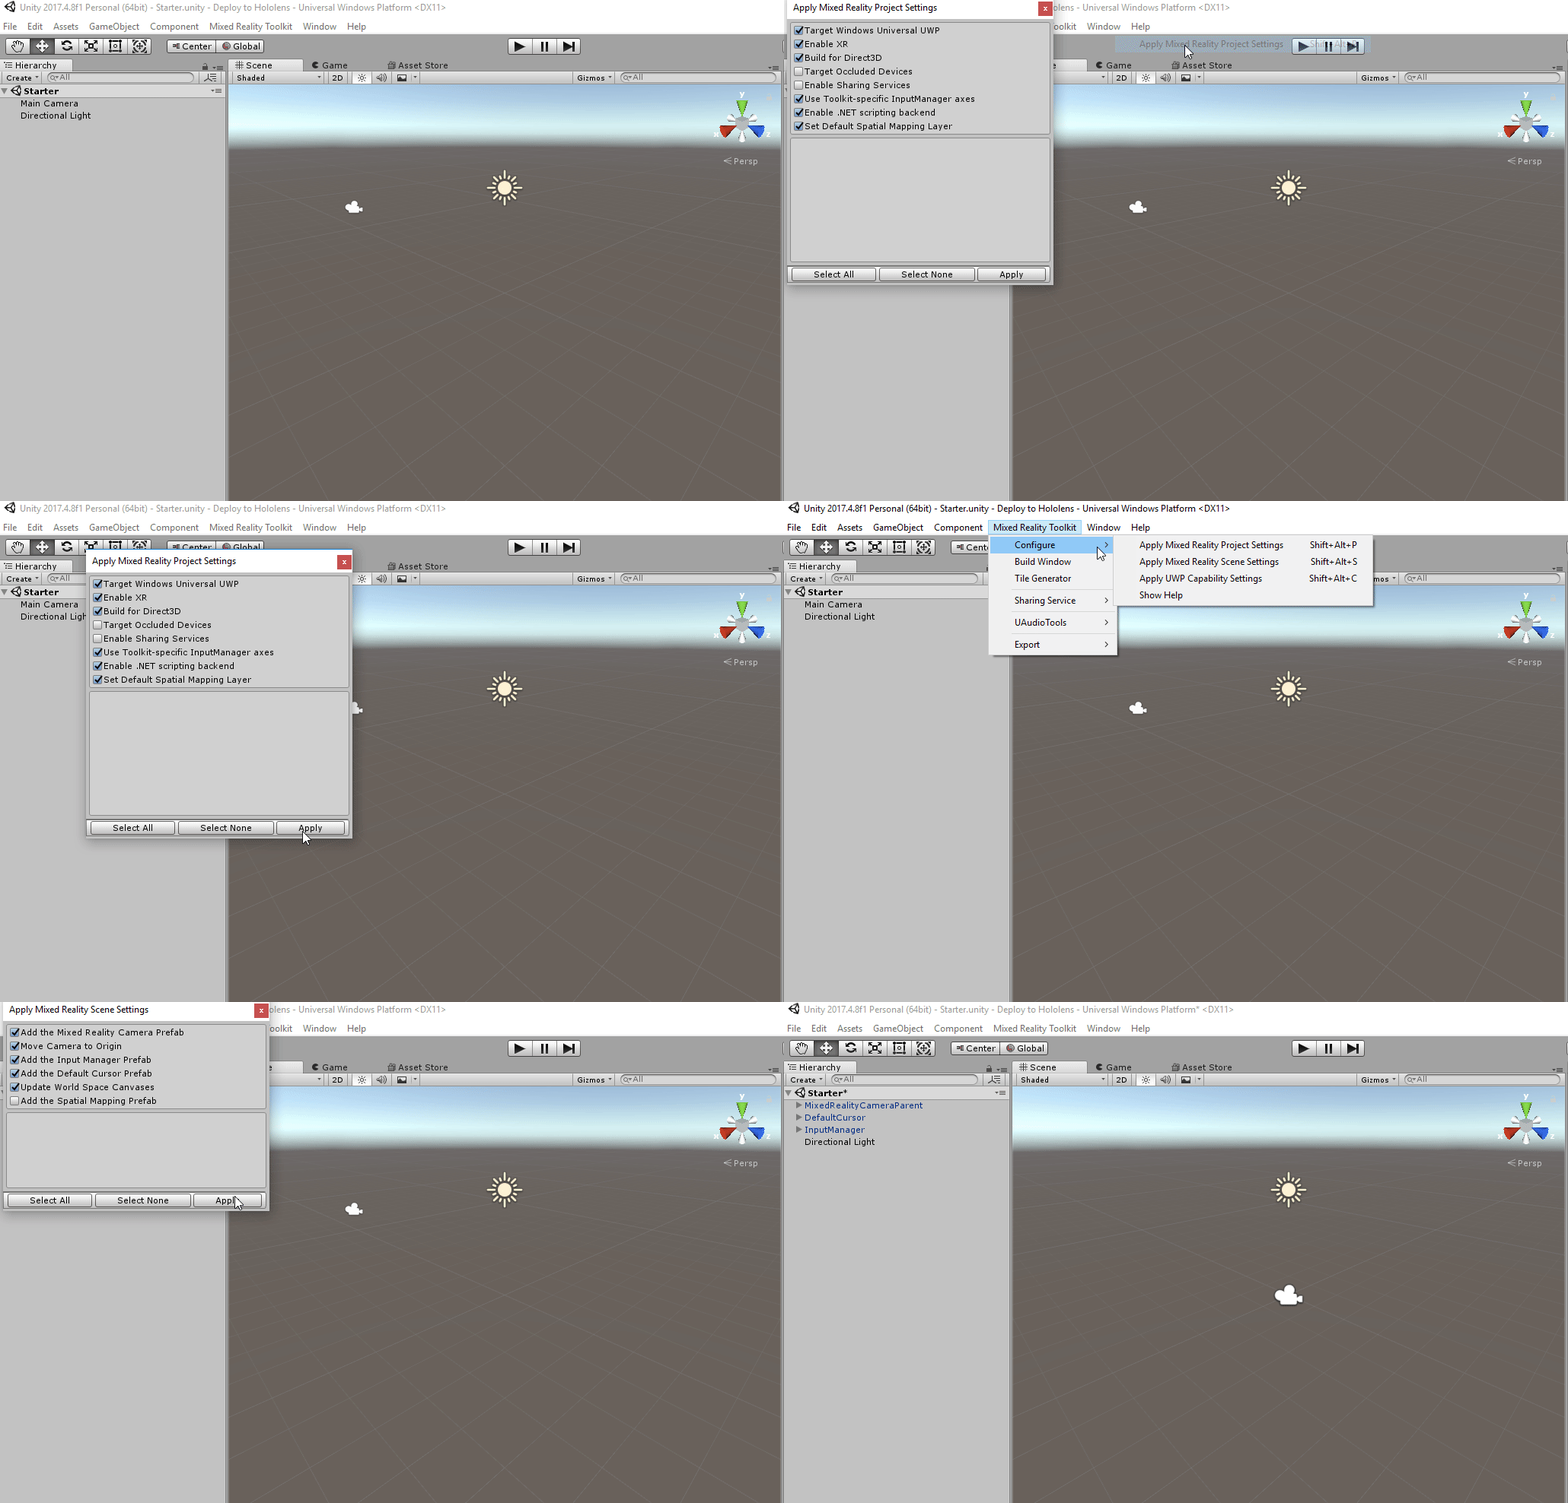
What are Mixed Reality Project Settings?
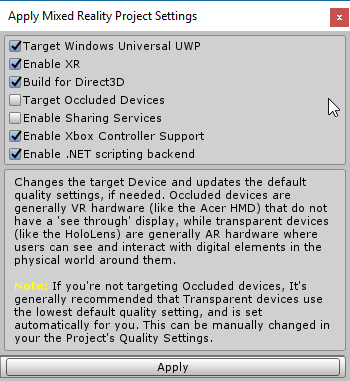
The Project Settings provide a quick solution to setting your Unity project up for Hololens development. These settings ensure your project has appropriate quality settings and the build target is set correctly.
What are Mixed Reality Scene Settings?
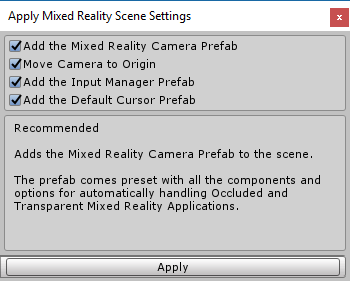
The Scene Settings change the default camera to the Mixed Reality Camera Prefab, move the Camera to the Origin (0,0,0), add the Input Manager and Default Cursor Prefabs for quick access Unity’s UI system via HoloLens.
Step by Step:
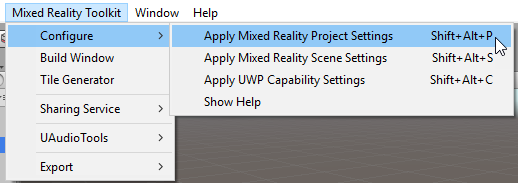
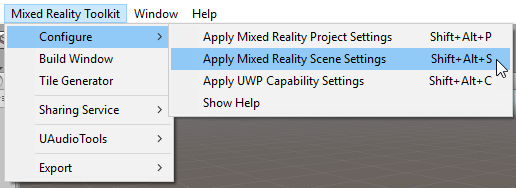
- Prepare the project for Mixed Reality development by selecting the “Apply Mixed Reality Project Settings” option in the Unity Editor.
Open the window and select all the required options for your project type and click “Apply”
Prepare the scene for Mixed Reality development by selecting all the required options for your Scene type and click “Apply”
12. 9. Build your project
Use the custom MRTK window to build your project for Hololens
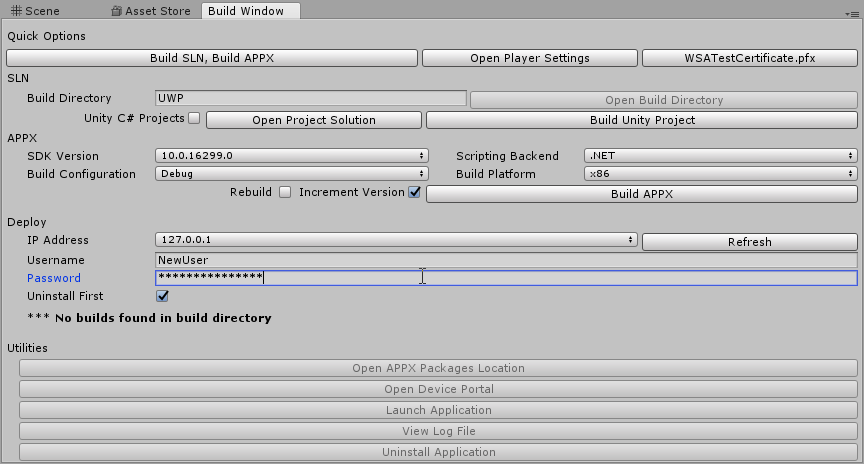
What is the Build Window?
The MRTK build window is one stop shop for building and deploying your Hololens project to the HoloLens device. It has a number of settings that you can adjust for advanced development. For our situation we will focus on a simple build and deploy sequence.
Step by Step:
1. Be sure to plug your HoloLens device into the computer via USB
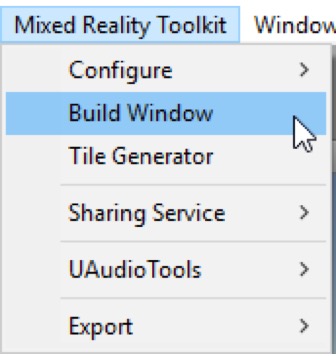
2. Navigate to the Build Window: (Mixed Reality Toolkit -> Build Window.)

13. 10. Deploy your project for Hololens
Use Visual Studio to select the HoloLens device that you’re using and run the app using the debug toolbar.

What is x86?
This is a specific architecture series for computer processors. This defines how a processor handles and executes different instruction is passed from the operating system and software
Step by Step:
- Navigate to the Build Window: (Mixed Reality Toolkit -> Build Window.)
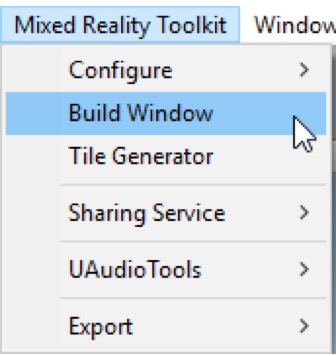
- Press Open in Visual Studio to open the project in Visual Studio.

- Once the project opens in Visual Studio, Select x86 in your build configuration options.
- In the debug toolbar, select the device that you're using.
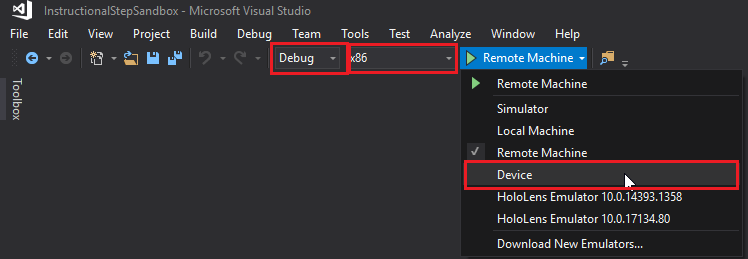
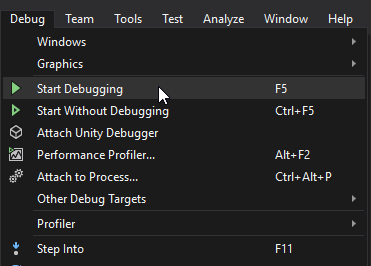
- Run the app using the debug toolbar.
14. 11. (Optional) Enable Hyper-V
Ensure Hyper-V is enabled for the Emulator installation to be successful
What is Hyper-V?
Hyper V allows your machine to run multiple operating systems as virtual machines allowing you to create a virtual machine to simulate the HoloLens headset. Learn more here.
Step by Step:
- Open the control panel
- Select Programs
- Select Programs and Features
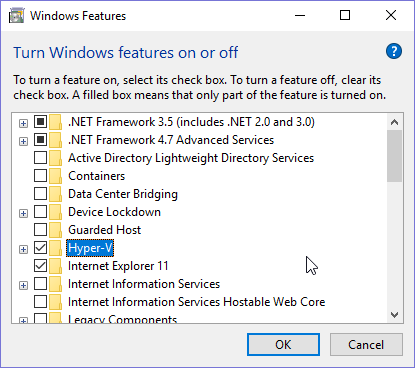
- Turn on Windows Features on or off
- Ensure Hyper-V is elected for the Emulator installation to be successful
15. 12. Install the Emulator
Download and install the emulator from this link.
What is the Emulator?
The Emulator allows you to test holographic apps on your PC without a physical HoloLens and comes with the HoloLens development toolset. You can use the keyboard, mouse, or an Xbox controller to simulate the HoloLens interactions with the Emulator.
Step by Step:
- Open the control panel
- Select Programs
- Select Programs and Features
- Turn on Windows Features on or off
- Ensure Hyper-V is elected for the Emulator installation to be successful
16. 13. Run your application on the Emulator
Follow the Deploy to HoloLens module to properly setup your Unity Application for HoloLens deployment. Once you open the project in Visual Studio 2017 (Step 10 above) select the HoloLens Emulator as the target device and start debugging.
Step by Step:
- Load you application solution in Visual Studio 2017
- Ensure the Platform is set to x86
- Select the HoloLens Emulator as the target device for debugging
- Go to Debug > Start Debugging or press F5 to launch the emulator and deploy your app for rapid iteration
The Emulator may take a minute or more to boot when you first start it. It is recommended that you keep the emulator open during your debugging session so you can quickly deploy apps to the running emulator.
17. Key Takeaways
You have now built and deployed your first HoloLens project!
By completing this module, you’re now able to:
- Setup your computer for HoloLens deployment
- Download and import the MRTK and prepare your Unity Project for HoloLens
- Build and Deploy your project using Unity and Visual Studio.
- Use the Emulator for rapid development without a Hololens headset