Set your default script editor (IDE)
Tutorial
foundational
+0XP
10 mins
1586
Unity Technologies

In this tutorial, you’ll set the default script editor (IDE) to use with scripts in Unity Editor.
Languages available:
1. Overview
When you work with scripts in Unity, you’ll need to set up script editing software to support this process. The script editing software that you need to use is called an Integrated Development Environment (IDE). IDEs usually contain a text-based code editor, a code debugger and some other useful tools for programming.
In this tutorial, you’ll connect Visual Studio Community (which you can choose to install when you install Unity) to the Unity Editor. You can also follow this process to connect your IDE of choice to the Unity Editor instead.
Note: If you want to use Visual Studio Community and do not have it installed, you can install it as a module via the Unity Hub.
2. Before you begin
To change the default IDE, an instance of the Unity Editor must be open. Open a pre-existing Unity project or create a new one via the Hub. Changing the IDE will apply to all other Unity projects which use that Unity version automatically.
Check that none of the scripts within the project are currently open.
3. Set your IDE
The Preferences window is home to most of the Unity Editor-specific settings. Changes made here will not modify any parts of your Unity project, but rather how Unity itself interacts with your projects and with you as the user. This is where you can set your chosen IDE.
To set Visual Studio Community as your IDE:
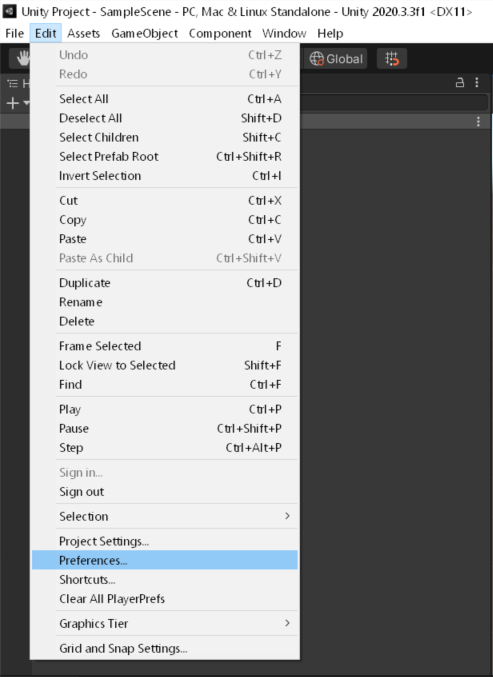
1. From the top menu, select Edit > Preferences to open the window.

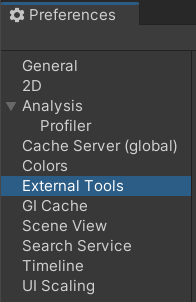
2. In the Preferences window navigation panel, select External Tools.

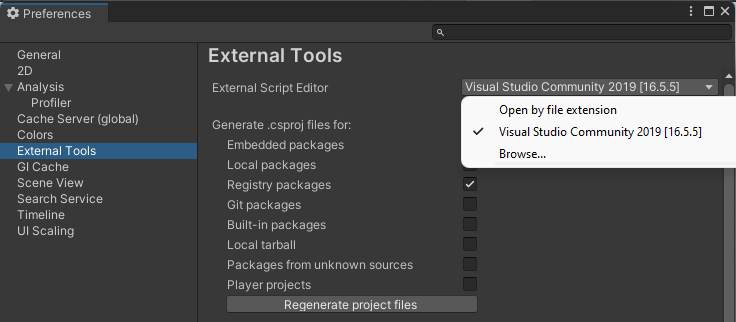
3. Find the External Script Editor setting (at the top of the External Tools tab). By default this is set to Open by file extension.
4. If you downloaded and installed Visual Studio Community alongside your editor installation, use the dropdown to select it now. This will set Visual Studio as your default IDE for script editing.

Note: If you want to set alternative software as your default IDE, you might need to select Browse… to locate and add your IDE to the list from your computer’s file explorer. After you locate the software, you can select it using the dropdown.
5. Close the Preferences window — when you open a script from Unity, it will now open for editing in your chosen IDE.
4. Set up intelligent code completion
One of the tools that most modern IDEs provide is intelligent code completion. In Visual Studio this feature is called IntelliSense. This means that your IDE will make suggestions to address typos and common mistakes — you can think of this like autocorrect for code.
To check that this is set up for your IDE, type some code and see if your IDE makes completion suggestions. For further details and to troubleshoot this feature, consult the documentation for your chosen IDE.
5. Next steps
In this tutorial, you set your chosen IDE for working in Unity Editor. Before you start scripting with it, take some time to get familiar with it and review the customization settings — you might find options like dark mode useful!