[Android] Setting up Unity for ARCore development
Tutorial
·
Beginner
·
+10XP
·
30 mins
·
(720)
Unity Technologies
![[Android] Setting up Unity for ARCore development](https://connect-mediagw.unity.com/h1/20201103/learn/images/fbca0d67-f67a-4975-aa2a-e99f06c78239_99.png)
In this tutorial, you will learn how to set up your Unity Project for ARCore development on an Android device: from downloading the correct version of Unity to enabling the AR specific packages.
Languages available:
1. Overview
In this tutorial, you will learn how to set up your Unity Project for AR development and add core AR components in your Scene. This includes how to install the latest LTS version of Unity and appropriate build targets, add required AR packages, set up your Scene hierarchy for AR development, and configure player settings optimized for handheld AR apps.
Note: This tutorial is for Android development only. For the iOS tutorials, skip forward to this tutorial in the AR Hello World project.
2. Downloading Unity with Mobile Requirements
Install the correct version of Unity with the proper mobile build tools using the Unity Hub. Make sure you are using an Android device with a Windows 10 computer. Minimum Android version of 7.0. Check supported devices.
1. Download the Unity Hub. For more information, please click here for documentation or here for a video.
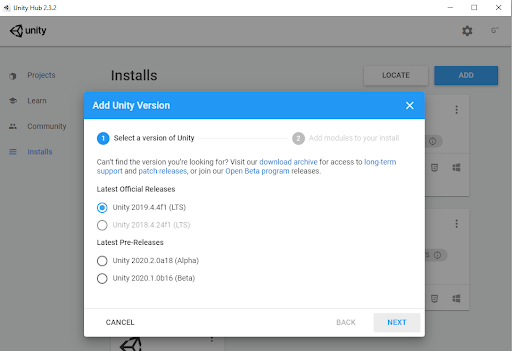
2. Install the Unity Version 2019.4.4f1 (LTS) (Figure 1)
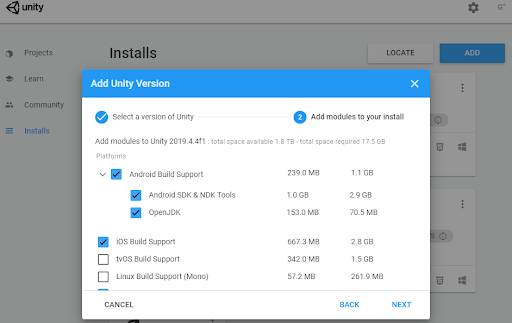
3. Install the correct mobile development packages (Figure 2)
3. Creating a new 3D project
Use the Unity Hub to create a new project
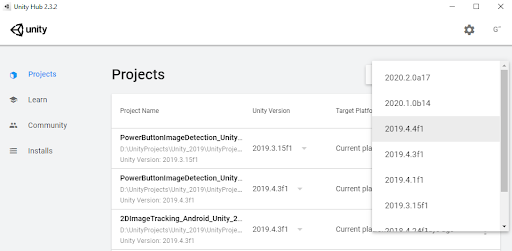
1. Inside Unity Hub, click on Projects > New. If you have multiple Unity versions installed, make sure to click on the drop down arrow and click on 2019.4.4f1 (Figure 3)
2. Select the 3D template.
3. Enter a name for the Unity Project.
a. In this case, we will enter “Hello AR World”.
4. Select a location to save the Unity Project.
5. Click Create to launch your new project.
4. Change Build Settings
Configure build settings for your project to build your project for mobile devices
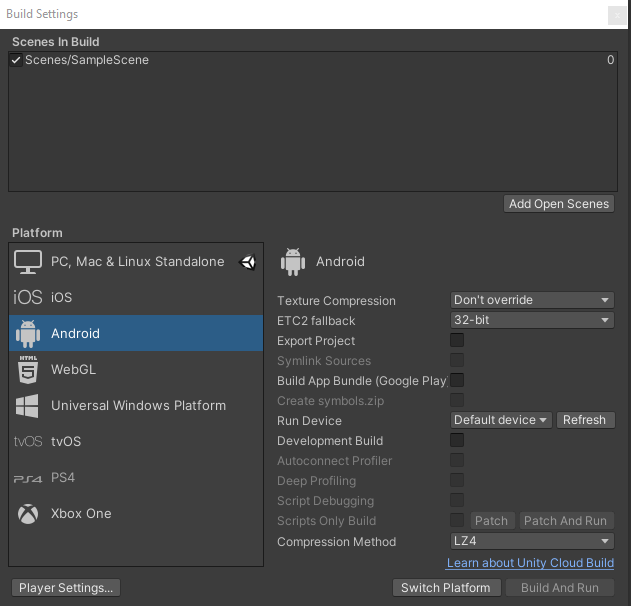
1. Inside your newly created project, let’s modify the build settings to target the ARCore platform.
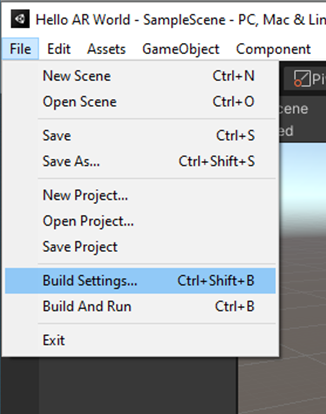
2. Click on File > Build Settings (Figure 4)
3. Click on Add Open Scenes button
4. Click on the Android platform option
5. Click on the Switch Platform button (Figure 5)
6. You can close the Build Settings window and start installing the respective Unity Packages for our Hello AR World application.
5. Install XR Plugin Management and the ARFoundation package
Install XR Plugin Management to download the correct packages to enable AR development for your platform
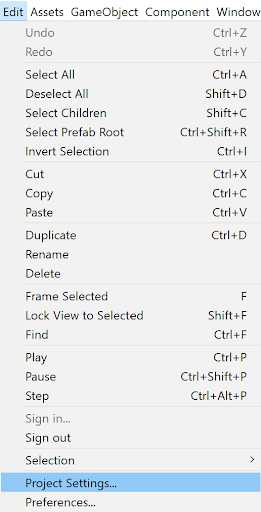
1. Click on Edit > Project Settings (Figure 6)
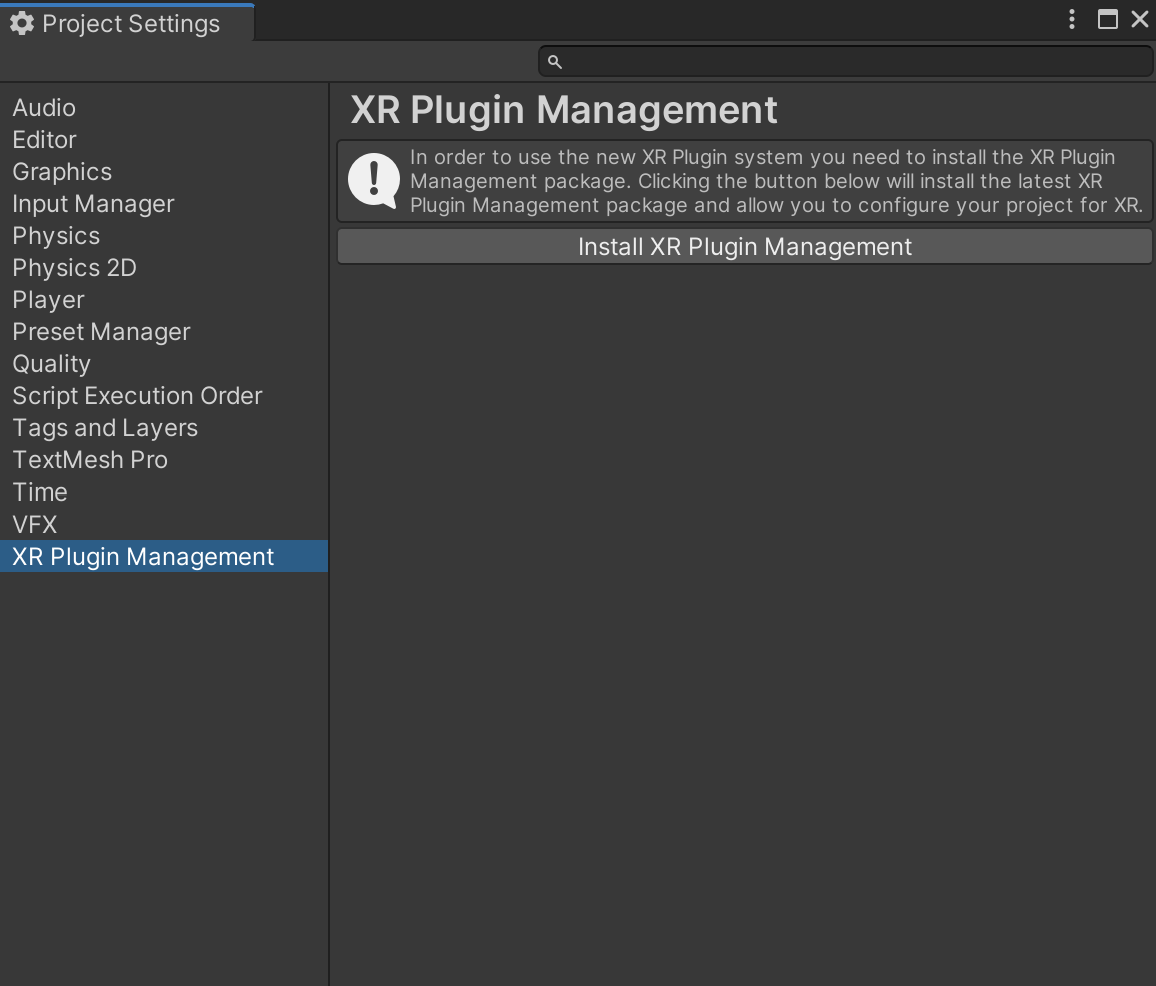
2. Inside the Project Settings window, find and select the XR Plugin Management tab
3. Click on the Install XR Plugin Management button (Figure 7)
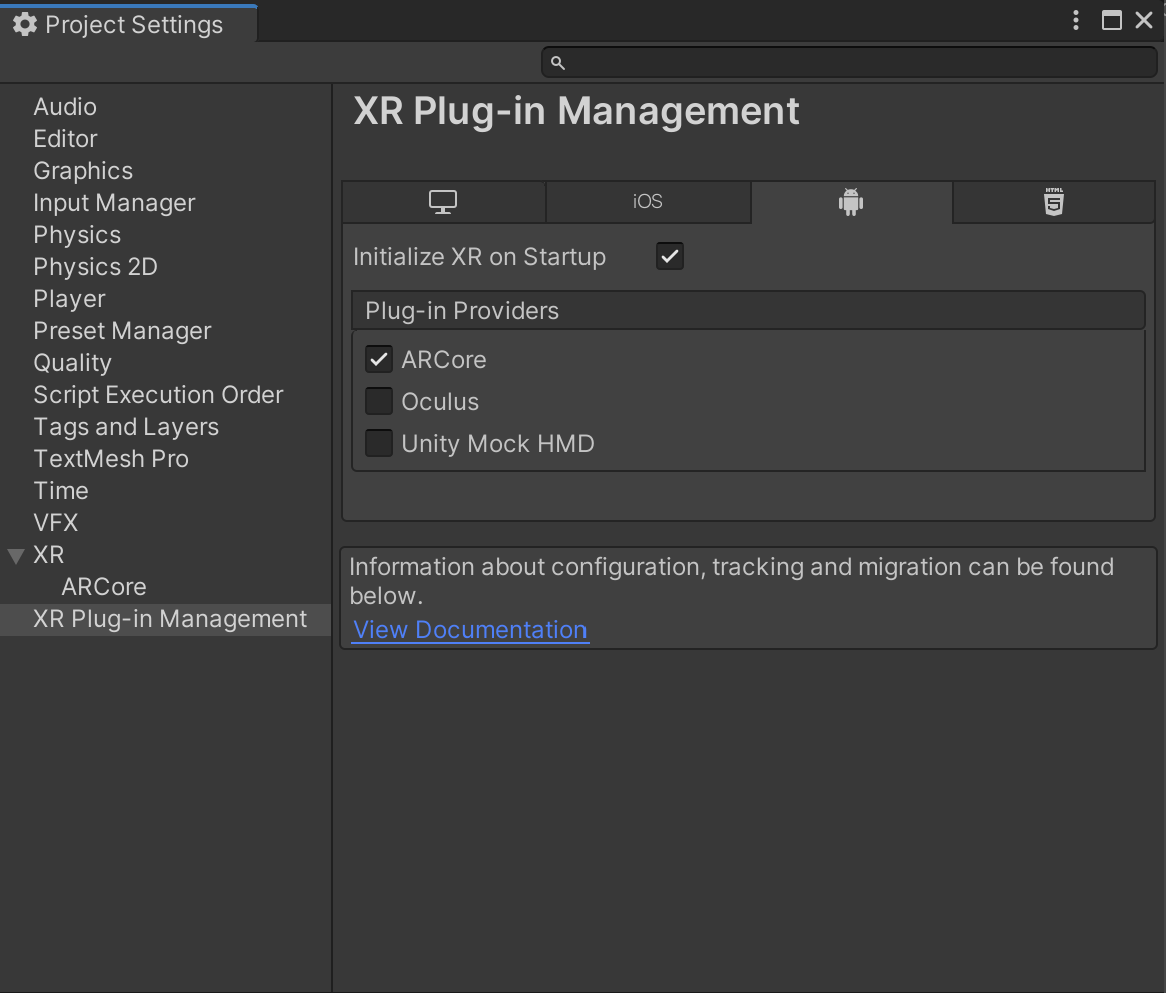
4. Once you have installed the XR Plug-in Management, you can download packages to enable AR in various operating systems and providers(Figure 8)
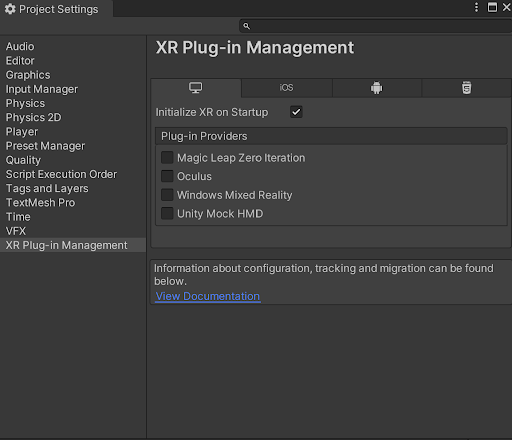
5. Click the tab for Android and check the box for ARCore (Figure 9)
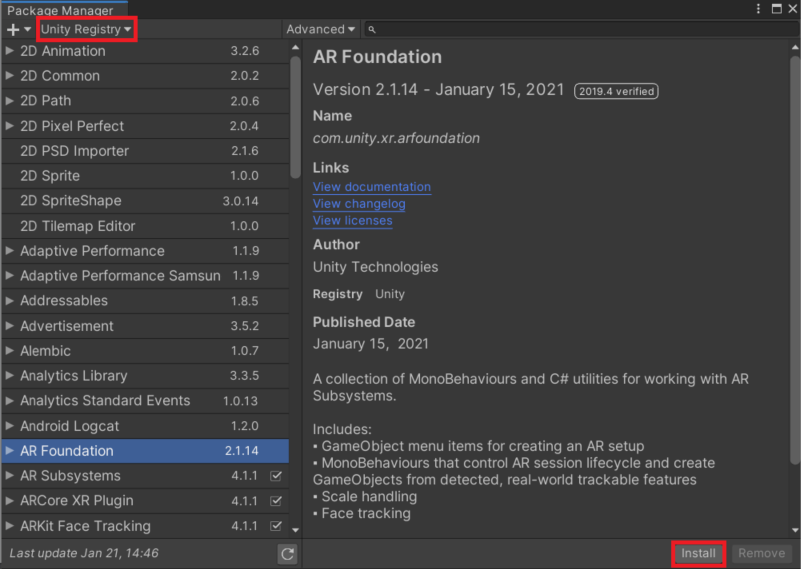
6. Click on Window > Package Manager
7. In the Unity Registry, find the AR Foundation package and click Install (Figure 10)
8. Now, the correct packages should be installed.
6. Configure project settings
Change Project settings to maximize AR performance
1. Click on Edit > Project Settings
2. Inside the Project settings window, click on the Player option. Most of the player settings will not be changed (Figure 10)
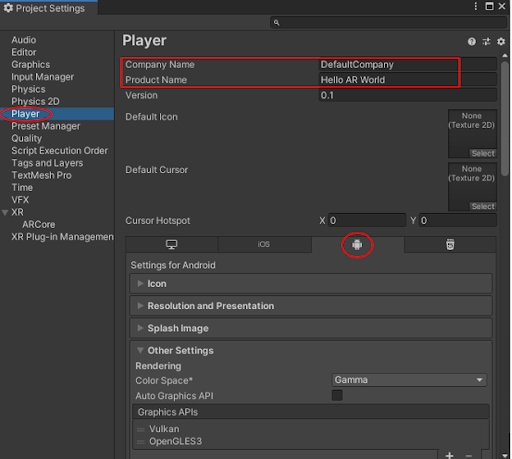
3. Change the Company Name to a different name or leave it as is
4. The Product Name should already be named “Hello AR World”, but if it is not, you can change it to a different name.
5. Make sure you are in the Android settings (Android icon circled in red in the image above)
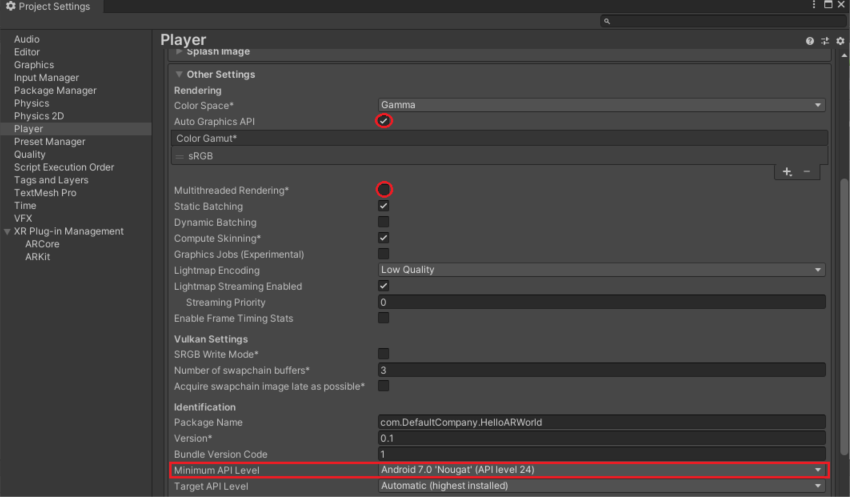
6. Click on the Other Settings section
7. Make sure the Auto Graphics API checkbox is checked
8. Uncheck the Multithreaded Rendering checkbox.
9. Set the Minimum API Level to Android 7.0 ‘Nougat’ (API Level 24) (Figure 11)
10. You can leave the rest of the settings as is
11. On the left side of the Project Settings window, click on XR
12. Click on the Create button (Figure 12)
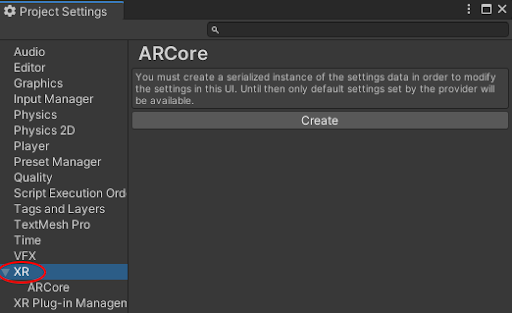
13. As soon as you click on the create button, you will be prompted to save the ARCore Settings, click on the Save button.
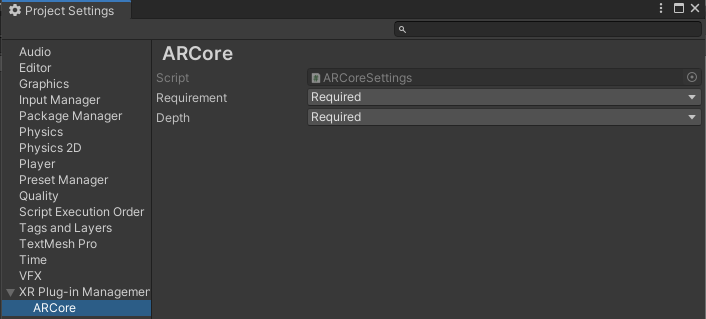
14. Lastly, change the requirement option from required to optional (Figure 13)
7. Create AR Objects
Use AR packages to create AR objects for AR functionality in your project Scene
- Note: These objects are not visible in the App Scene
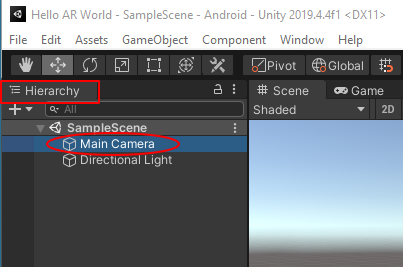
1. In the Hierarchy, delete the Main Camera by right-clicking on the Main Camera > Delete (Figure 14)
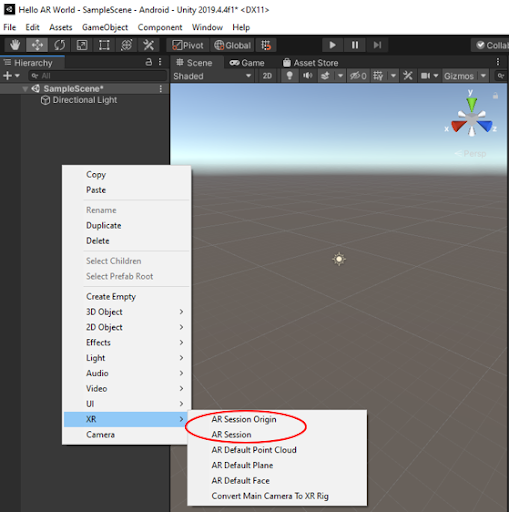
2. Next, create an AR Session Origin object (Figure 15)
- Right-click in the Hierarchy > XR > AR Session Origin
3. Create an AR Session object (Figure 15)
- Right-click in the Hierarchy > XR > AR Session
4. In the Hierarchy, click on the drop-down arrow next to the AR Session Origin object
5. Click on AR Camera (Figure 16)
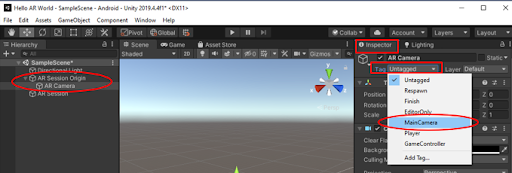
6. Under the Inspector, there is a Tag section. Click on the drop down menu and select Main Camera.
8. Conclusion
In this tutorial, you have learned to set up a new Unity Project with specific packages and settings that is configured for AR development. Next, you will need to configure your IDE such as Android Studio to deploy to your device.