Transitioning from Unreal to Unity
Tutorial
·
intermediate
·
+10XP
·
30 mins
·
(117)
Unity Technologies

This guide is meant to assist Unreal Engine developers in familiarizing themselves with the Unity engine, its Editor, and its various workflows.
Languages available:
1. Getting Started
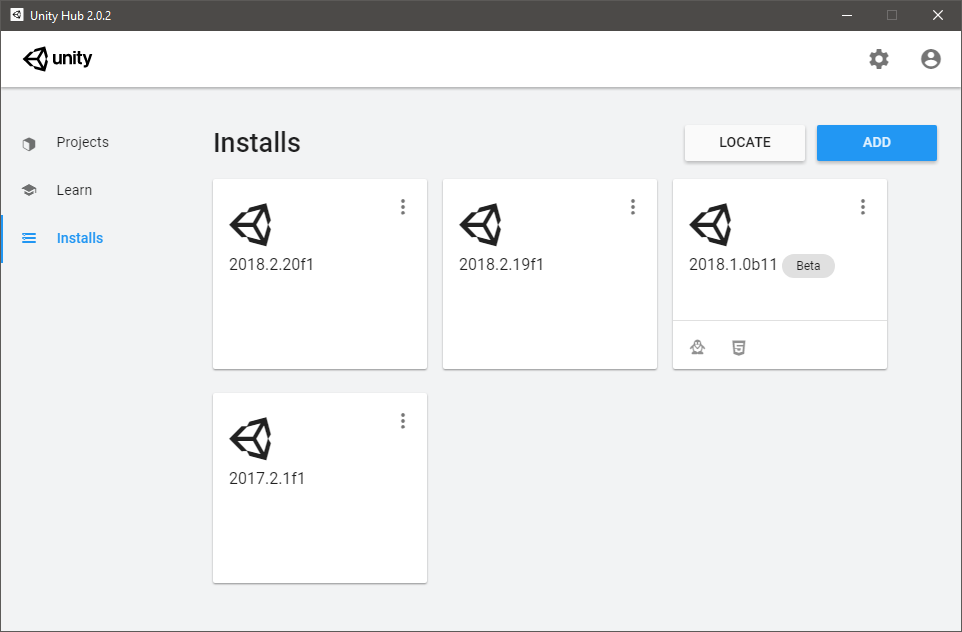
Before getting started in Unity, you need to install the right version of the engine for your needs. This can be accomplished via the Unity Hub, a standalone application that streamlines the way you find, download, and manage your Unity Projects and installations. The latest version of Unity can be accessed from the “Installs” page by clicking the “Add” button.
Setting up your Programming Environment
The recommended IDE (integrated development environment) for programming in Unity is Visual Studio, and the latest versions of Unity come packaged with Visual Studio Professional 2019. However, there is no strict requirement for what IDE needs to be used because Unity compiles all your scripts via the Unity Editor. This means that you can use whichever code editor you prefer, and many tools have existing Unity integrations.
We install and recommend Visual Studio, because it gives you benefits like Intellisense and Auto-Completion, along with debugging tools like break and watch points.Visual Studio comes pre-installed, so there’s no need to configure anything. However, if you’re curious to learn more, you can check out the official guide and explore some tips.
2. The Editor
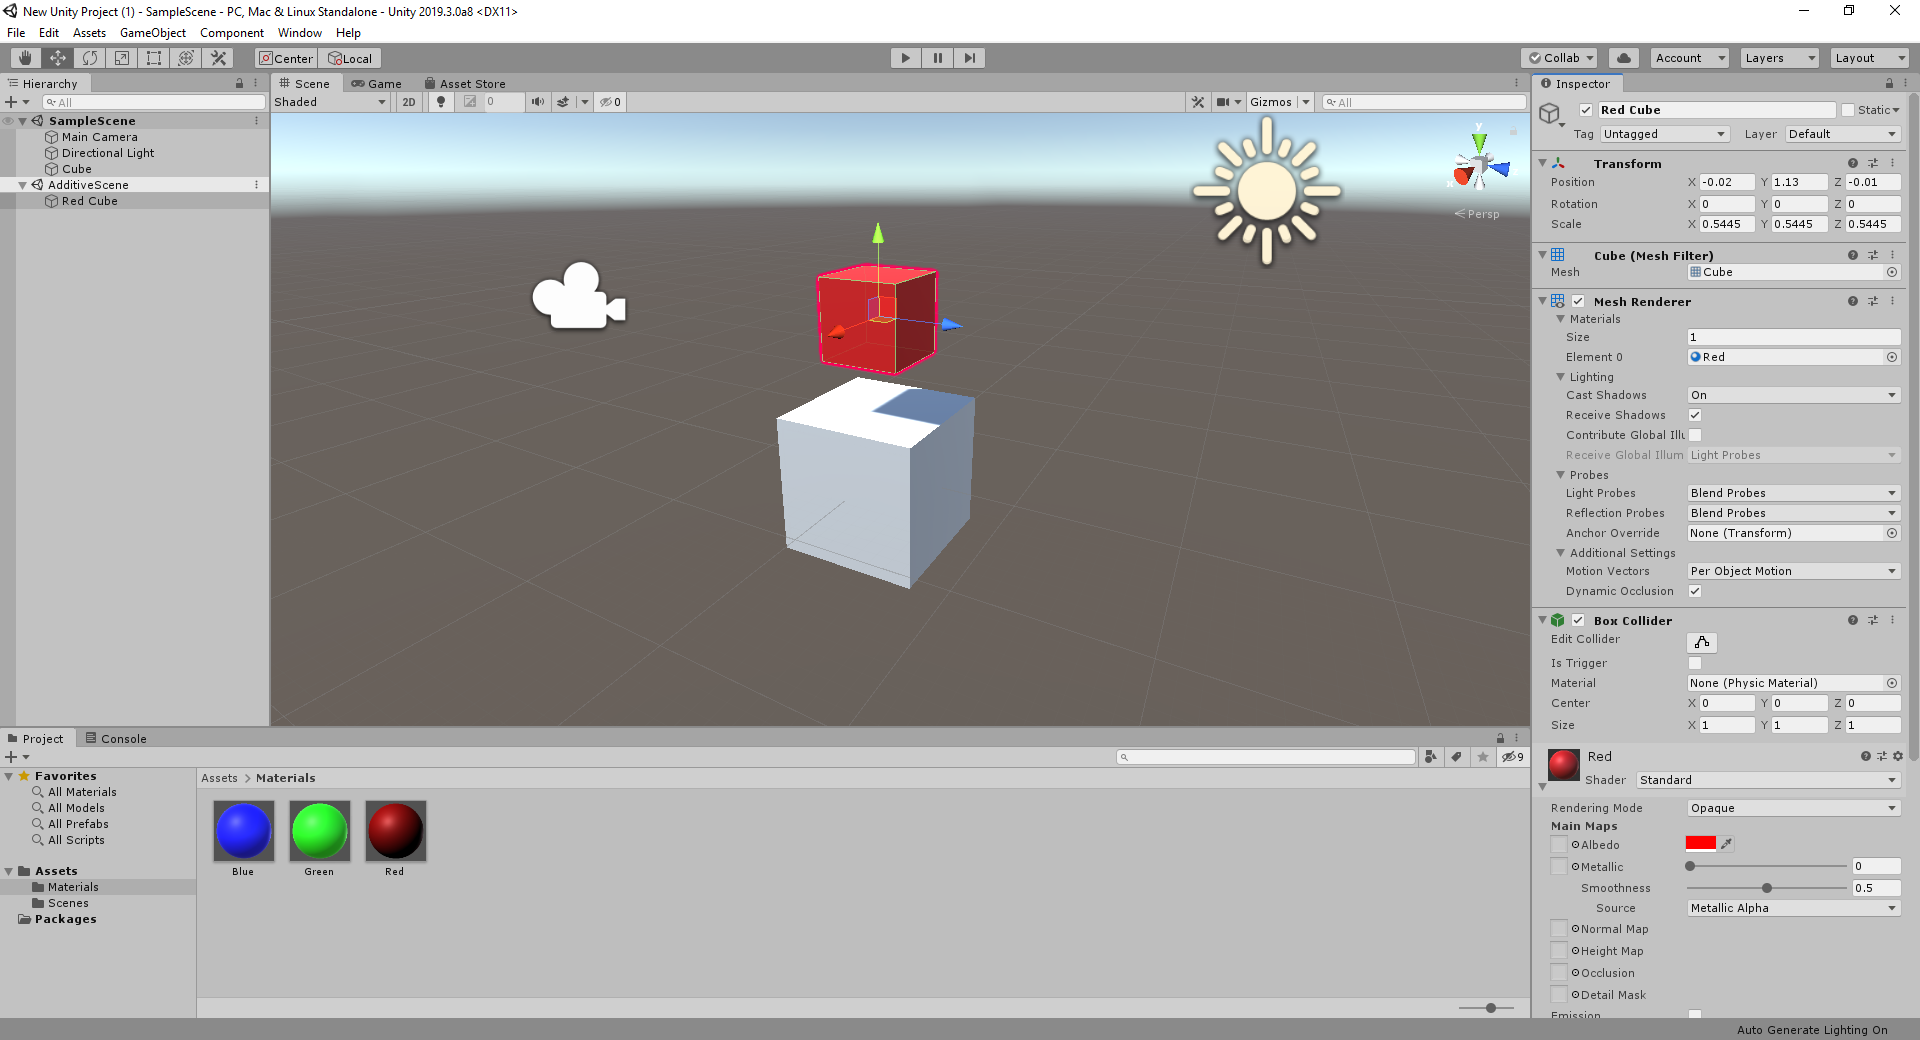
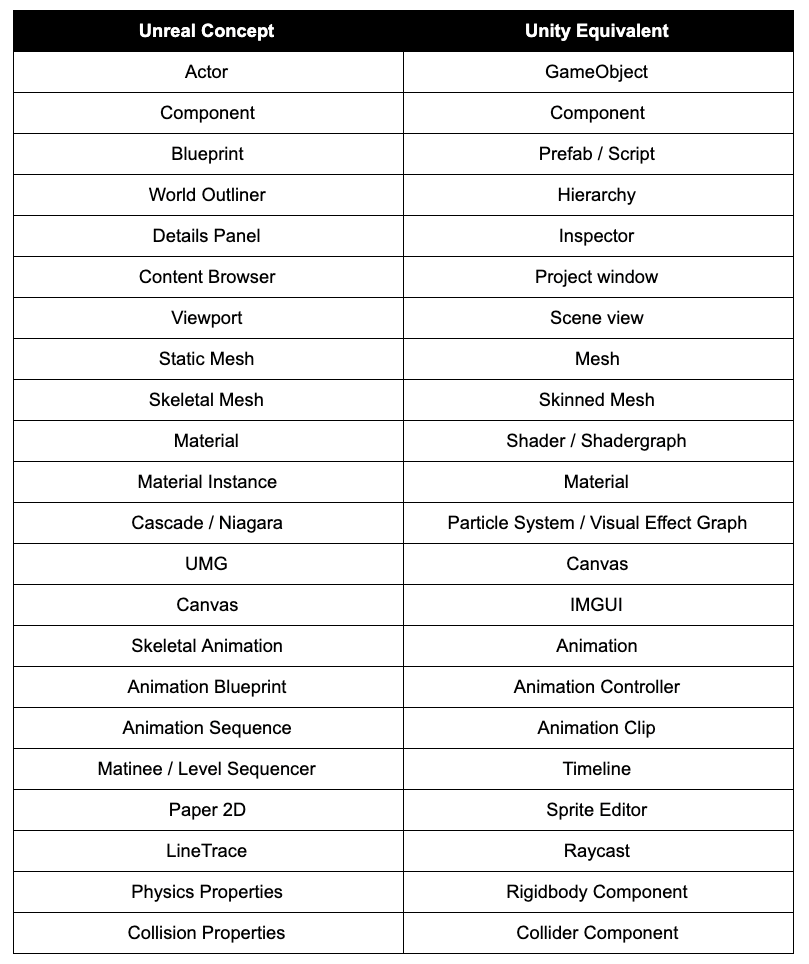
Opening Unity for the first time, you should see a layout that is similar to Unreal. Both Editors have a fully modular, customizable window system. This allows you to move, resize, and replace tabs and panels within the interface. Below are highlights of the important views in Unity and their equivalent in the Unreal Editor.
The Scene View (Viewport)
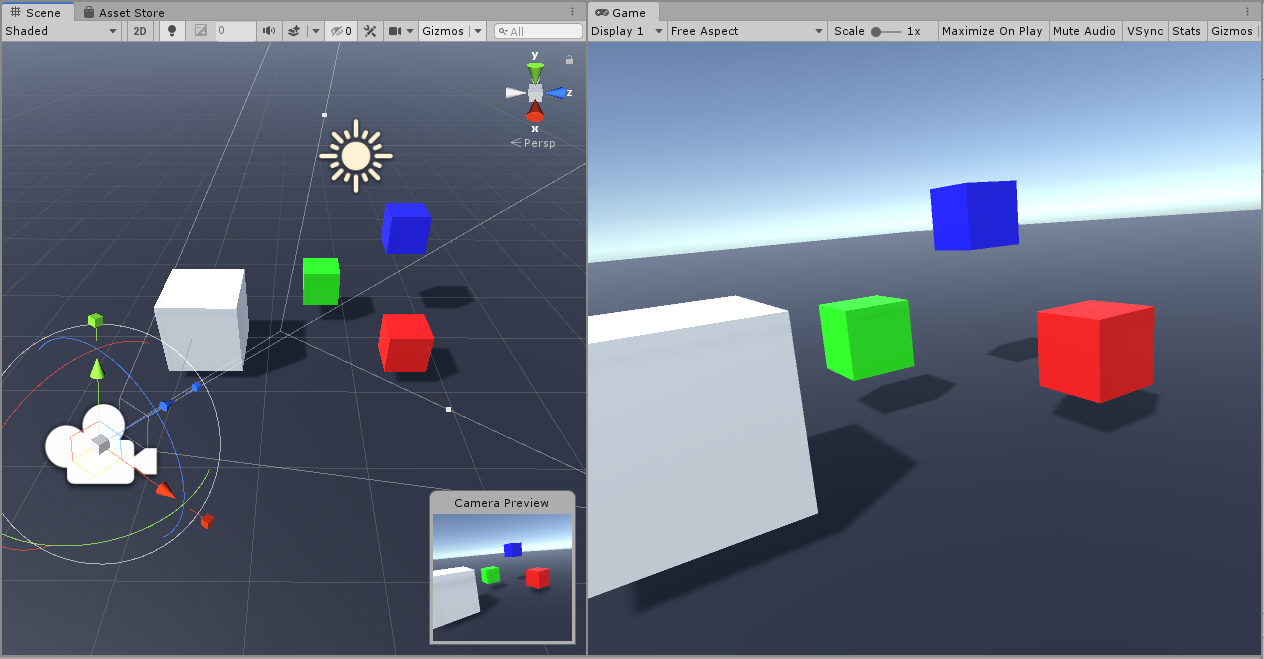
The Scene view is Unity’s Viewport, which allows you to visually navigate and edit your Scene. Selecting a GameObject brings up a familiar 3D transformation handle, the type of which can be chosen with the buttons to the top left in the toolbar (which also allows you to select pivot options and switch between world/local orientation). In the center of the toolbar are the play, pause, and frame skip buttons, which allow you to test the game directly in the editor.
The Scene Gizmo, located in the upper right of the Scene view, represents the view’s orientation. Clicking an axis aligns the view to that axis, and clicking the cube in the center swaps between orthographic and perspective views.
The Game View (Play in Editor)
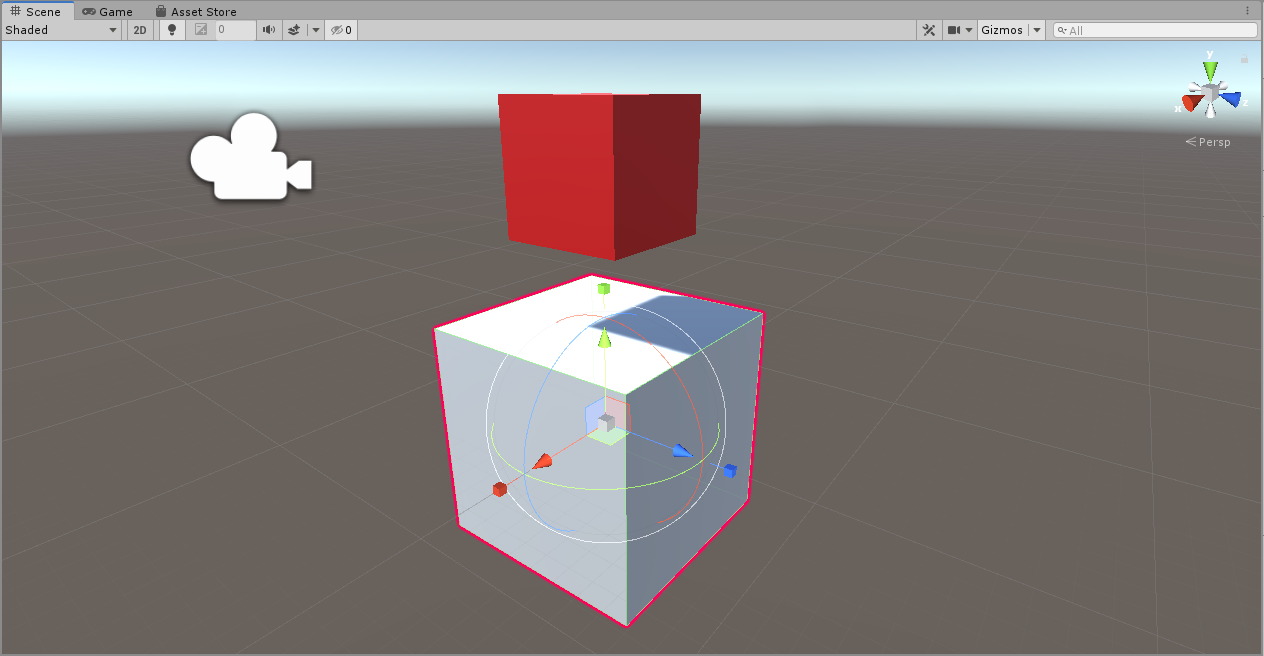
Tabbed behind the Scene view by default, the Game view provides the “Play in Editor” functionality of Unity.
In Unreal, when the game is launched in the Editor, it is played in the active Viewport. Unreal possess the player pawn and the Viewport acts as an actual game view. Unpossessing allows you to edit the level while the game is running.
Unity separates these two “modes” into the Scene and Game views respectively. The Game view captures the cursor and responds to inputs just like a game build. Switching to the Scene view allows for updates at runtime, and it’s common to lay them out side-by-side to allow for rapid iteration.
The Hierarchy Window (World Outliner)
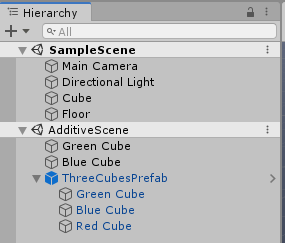
In Unreal, all the Actors in your active sublevels are listed in the World Outliner. This provides a way for you to organize, filter, and set the visibility of Actors.
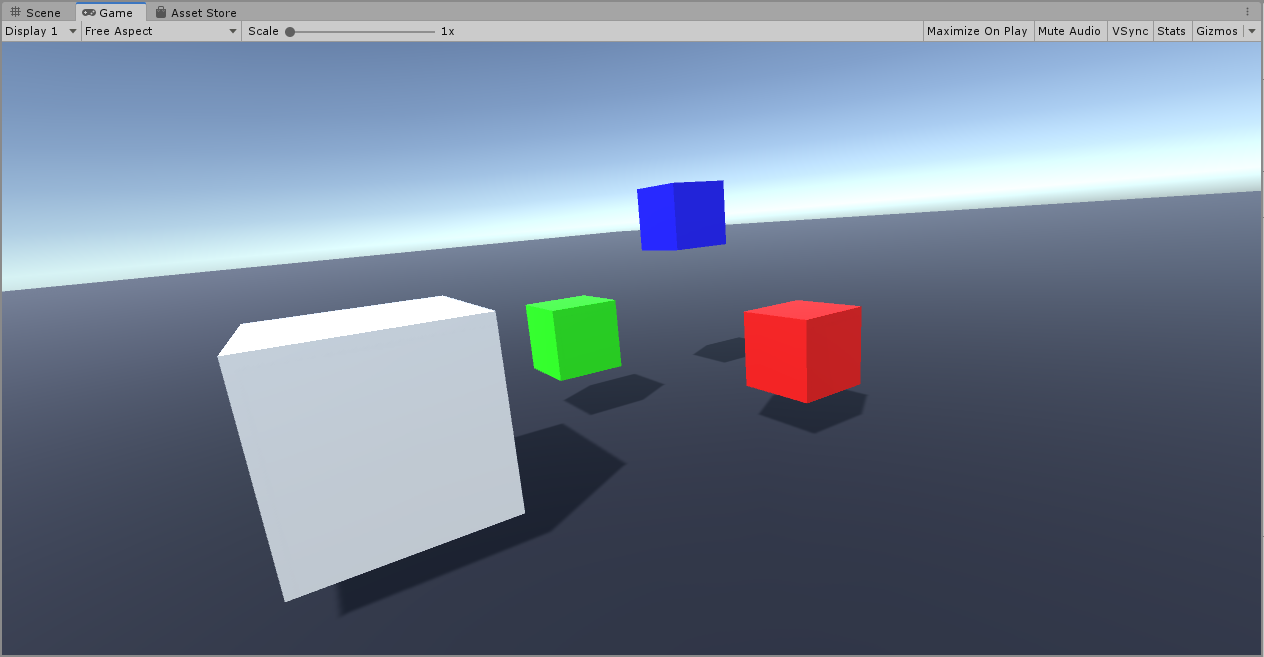
The Hierarchy Window is Unity’s equivalent, providing the same search and visibility functionality, while also providing a way to manage active scenes and add new GameObjects.
The Project Window (Content Browser)
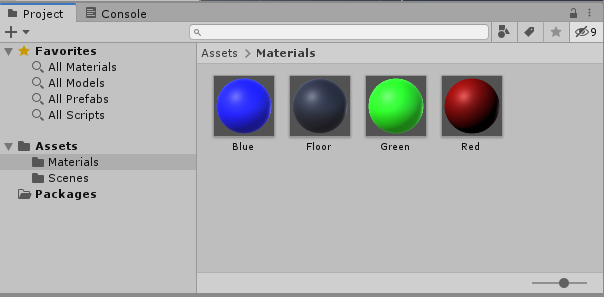
The Project window is the Unity equivalent of the Content Browser, and it shows all available Assets in the Project. There is a search functionality, and you can filter and save searches to make finding Assets easier. Additionally, any external packages used by the project show their assets in a separate folder below the Project Assets.
The Inspector (Details)
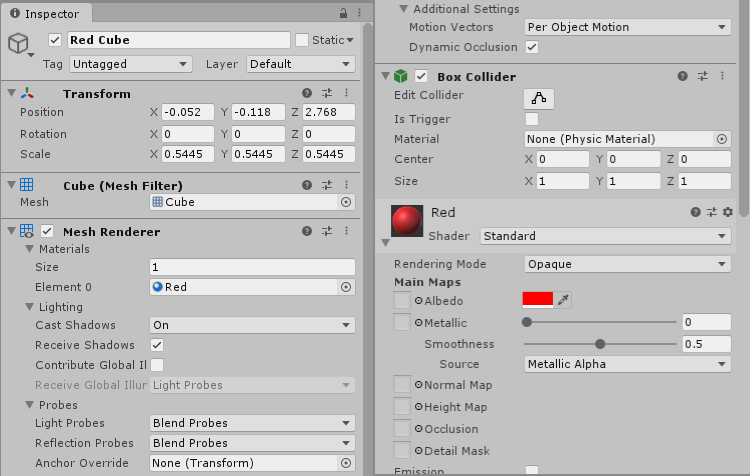
The Inspector serves the same function as the Details panel in Unreal. It allows you to view and edit component properties when clicking on a GameObject or Prefab.
Unlike the way that Unreal opens new windows to edit Asset settings, Unity shows relevant information and settings for Assets in the Inspector when they are selected in the Project window.
The Console (Message View / Output Log)
The Console appears tabbed behind the Project window, and serves as the debug output for the game and Editor. Using the “Debug” class in C#, you can output a range of messages using the following functions:
- Log()
- LogWarning()
- LogError()
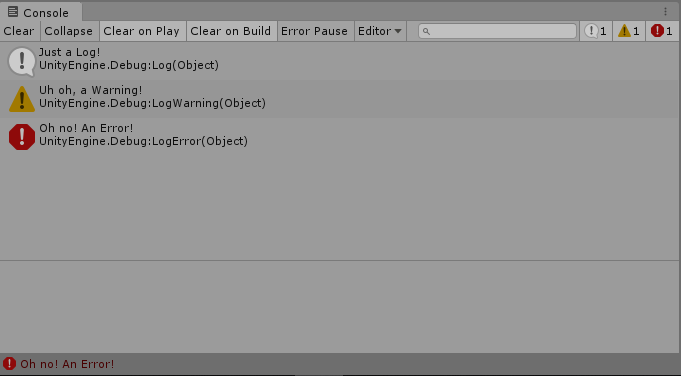
In the top menu bar of the Console, you can clear or filter these messages, and enable “Pause on Error” functionality. The debug functions also have a Context argument, which allows you to associate a GameObject to the message. When a message with a Context is double clicked, the GameObject is focused in the scene view and hierarchy.
Debug.Log("Just a Log!");
Debug.LogWarning("Uh oh, a Warning!");
Debug.LogError("Oh no! An Error!");
Where is the Modes panel?
Unreal's Modes tab is absent from Unity. Most Object placement is done directly from the Project window. Special interactions such as foliage painting or landscape sculpting are usually done either from a separate tool window, or contextually after selecting a relevant Object in the Scene.
Additional Notes
- You can access Project Settings via the toolbar, by selecting Edit > Project Settings.... This is where you edit can things like Input, Physics, Collision Layers and Editor behavior.
- Editor Preferences can be set by selecting Edit > Preferences.This enables you to change External Tools, Hotkeys, and Colors.
- The Window menu option is where you can find all available tool windows in your Unity project. This includes default engine windows (Scene, Inspector, Hierarchy) and any windows added by plugins or project code. If you want to restore a closed tab, this is where you can find it.
3. Project and Assets
A Unity Project is set up in a similar manner as an Unreal project, but there is a major difference in the way that Assets are managed.
Where Assets are stored
Instead of separating “Content” and “Source”, in Unity all Assets including source code are stored in the “Assets” folder.
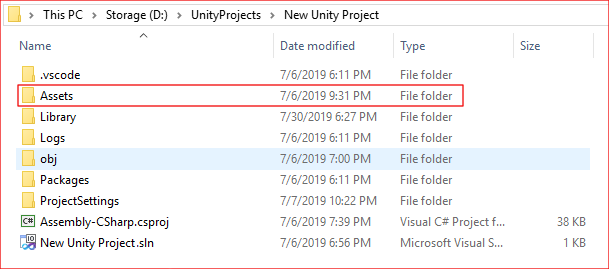
The only exception is the “Package” folder, which is used by Unity’s Package Manager to store installed packages (similar to Unreal’s Plugins folder).
How Assets are stored
Assets in Unreal are stored as UAssets, which are Unreal specific Assets that allow Assets from various sources and file types to be imported as a single uniform type. UAssets store both the required data from the asset, as well as any engine related data like texture filtering or mesh collision. This also means that Unreal doesn’t actually store the original asset in its project structure.
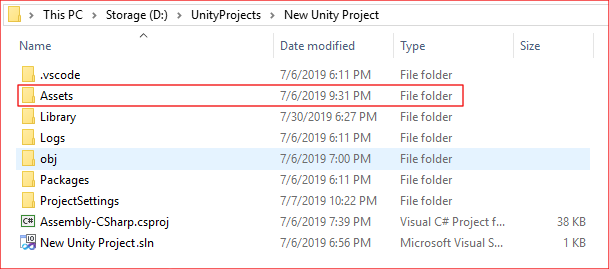
Unity stores the source files directly in the project, alongside individual “.meta” files that contains the engine and Editor-specific data for the associated Asset. Behind the scenes, Unity processes an imported asset into an optimized, game-ready format which is what the engine actually uses at runtime. These processed assets are stored in the Library folder, which serves as a cache and does not need to be added to source control.
Supported Asset Formats
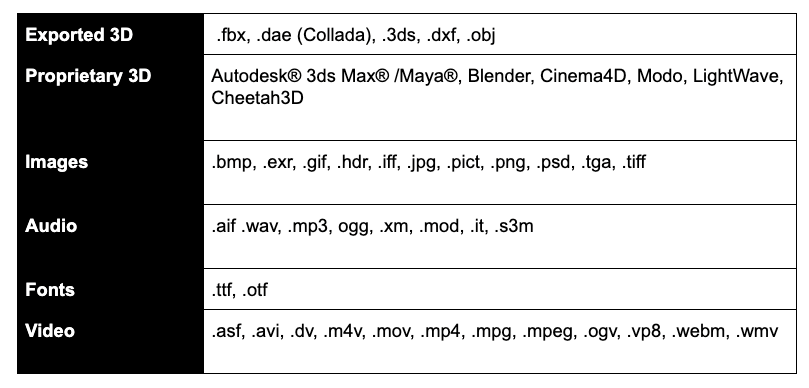
Unity supports a broad array of file formats:
Scenes (Maps)
Unity’s Scenes are the equivalent of Map files in Unreal, and contain all the data for a specific level.
When you are working in the Editor, you are most often actively editing some kind of .scene file (unless you are editing an individual Prefab in Prefab Mode, which is explained in the Using Prefab Mode section). Just like Unreal, you can have multiple Scenes loaded at the same time.
A convenient bonus of Scene files is that they are, by default, registered as Unity Assets on your computer. This allows you to open the Unity Editor directly when clicking on them in your computer’s file browser.
4. Actors to GameObjects, Components to Components
GameObjects and Actors
In Unreal, the basic entity that exists in your game world is an Actor. Unity’s equivalent is a GameObject. Actors and GameObjects are similar in that they both receive components and can be moved, rotated, and scaled in the world using their transforms (Or in Unity’s case, the Transform component).
However, there’s an important difference between Unity and Unreal.
Actors in Unreal
Unreal has specialized Actors, such as Pawns and Characters. Actors in Unreal can be extended and specialized in code to have special functionality that’s built right into the Actor itself.
GameObjects in Unity
Unity’s GameObjects, on the other hand, are a sealed class and cannot be extended or specialized; the behavior of a GameObject is entirely defined by its components. Instead of having a Player Character Pawn, you have a GameObject with a Player Character component.
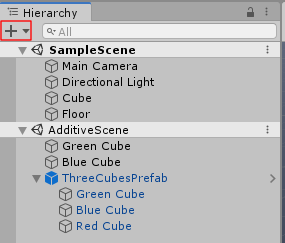
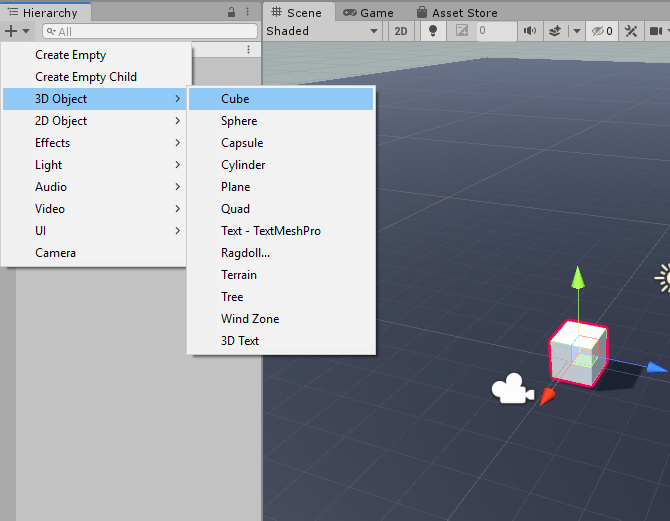
GameObjects can be created via the “GameObject” menu in the menu bar, or by clicking the plus button (+) at the top of the Hierarchy window. This instantiates the selected GameObject into the Scene. It can then be moved around or attached to other GameObjects.
What about components?
Both Unity and Unreal use components, but due to the way GameObjects work, the implementation is slightly different.
Components in Unreal
Unreal has two types of components: Actor Components and Scene Components. While Actor Components simply add behavior to the actor, Scene Components also have a transform and exist in the world as a child of the Actor.
Static Mesh Components are a common type of Scene Component, and one Actor can have several Static Mesh Components attached to them to create a more complex shape in the world.
Components in Unity
Unity components function like Actor Components, meaning that they don’t have any physical presence in the world. Generally, the only entity with a Transform in Unity is a GameObject. In order to get functionality like Scene Components, you can make a hierarchy of GameObjects by dragging one onto another in the Hierarchy window.
Example: Creating a house in both engines
One useful example to highlight this difference is creating a house in both engines:
- In Unreal, you would make a “House” Actor with several static mesh components for the floor, walls, and roof.
- In Unity, you would have a “House” parent GameObject. Under this you would add additional child GameObjects for the floor, walls, and roof — each with its own Mesh Renderer component.
Adding components in Unity
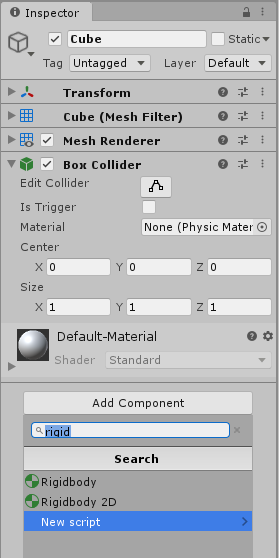
Components can be added to GameObjects either via the Component menu in the menu bar or by selecting the Add Component button in the Inspector.
Clicking the Add Component button brings up a search widget which you can use to find the component you want to add. You can also select the New Script button from here to immediately create a new component script and add it to the GameObject.
Components can also be added at run time. To do this, use the AddComponent<T>() function, where “T” is the component type you want to add.
5. Blueprints to Prefabs
Introduction
One of the functions of Unreal Blueprints is to allow you to create instances of Actors with unique components and properties for use in your project. The Blueprints you create are stored as Assets that you can place and spawn at will.
Prefabs in Unity
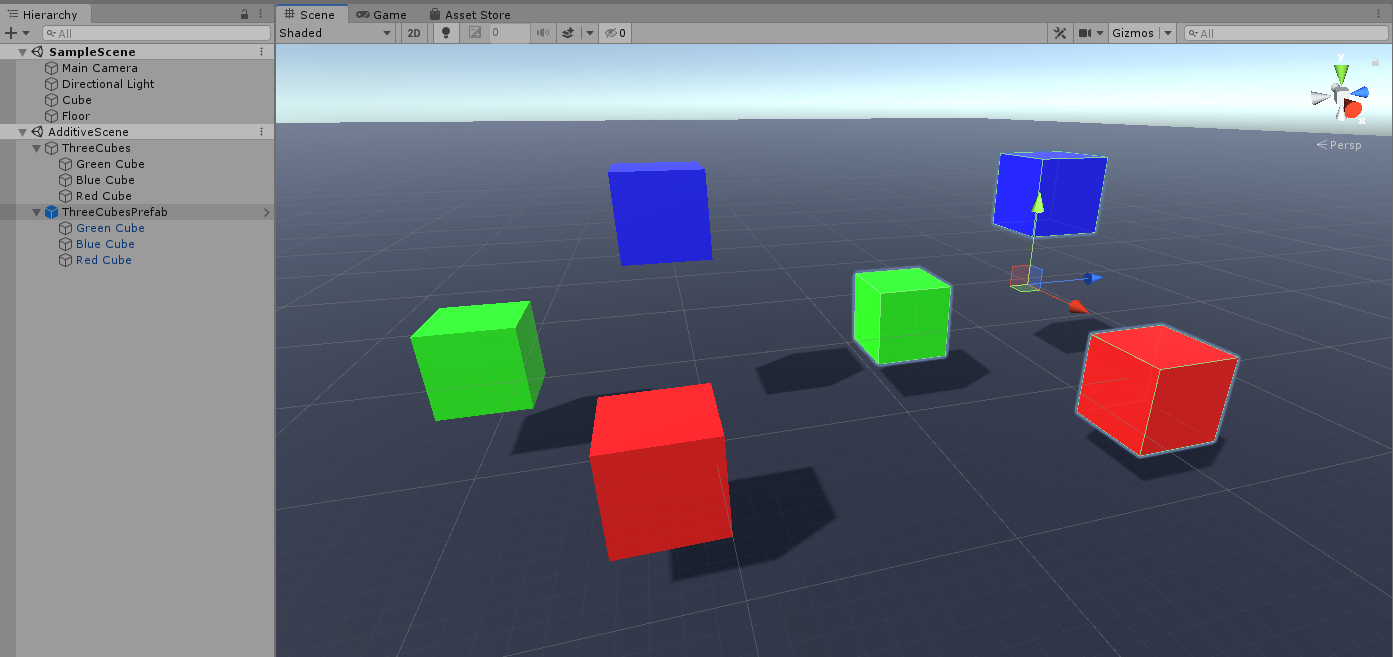
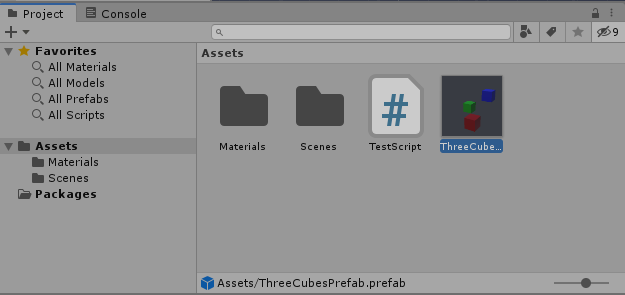
This is accomplished in Unity using Prefabs. A Prefab is a hierarchy of GameObjects that are saved as an Asset. Prefabs can either be dragged and dropped directly into the Scene View from the Project window or spawned via reference in a script.
If the Prefab Asset is updated, all instances of that Prefab in all Scenes are updated. However, if property changes are made to a Prefab instance in a scene, it keeps those modified properties.
Using Prefab Mode to Edit Prefabs
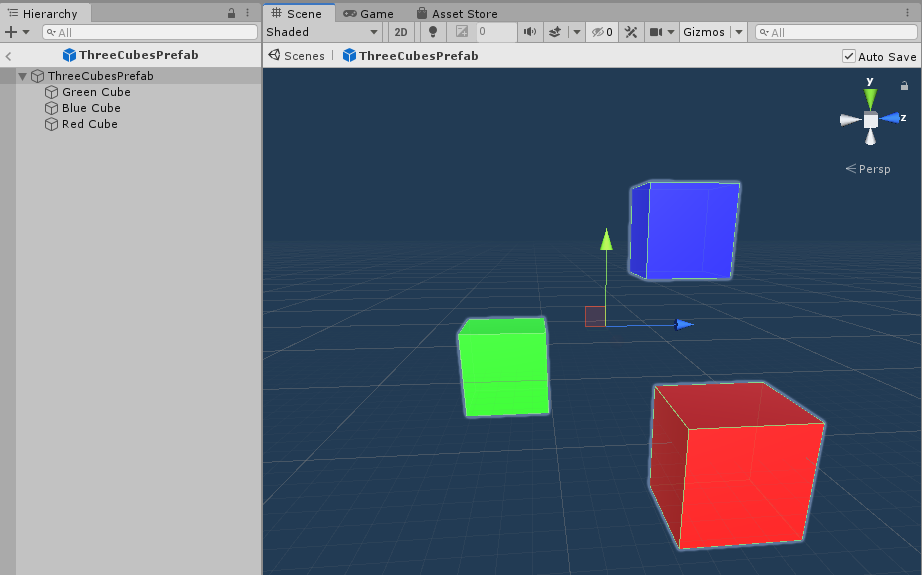
Similarly to how Blueprints have their own Asset window for editing them, Unity gives you the ability to view Prefab Assets outside of a Scene in Prefab Mode. This allows you to make local adjustments and add child GameObjects. Prefab Mode can be accessed by double-clicking the Prefab in the Project window, or by clicking the right-facing arrow next to the Prefab Instance in the Hierarchy.
What about Nodes?
Unlike Blueprints, which have an embedded visual scripting system, Prefabs do not have any scripting capabilities or features.
All the behavior of a Prefab come from the components of the GameObjects it contains. Custom behavior is created by writing C# scripts.
Nested Prefabs (Child Actors)
A useful component in Unreal Blueprints is the Child Actor Component, which allows you to use one Actor as a component of another. This allows for situations where two Blueprints must exist separately but are intrinsically linked — for example, a Player Character holding a Sword Prop.
This is similar to Unity’s Nested Prefabs functionality, which allows you to place Prefabs into other Prefabs while still maintaining a link to the original. This means that if you update the child Prefab, it automatically updates in every other Prefab it is nested within.
6. Scripting in Unity
Similarities with scripting for Unreal
Unlike Unreal, which uses C++ for low level behavior and Blueprints for scripting, all Unity scripting is done in C#. However, just like Unreal, Unity scripting is mostly based around handling game events like frame updates and overlaps.
You can find some examples below:

For more information on how and when Unity’s Events get executed, see Order of Execution for Event Functions in the Unity Manual.
Scripting Components Using Monobehaviours
As previously mentioned, GameObjects do not support custom behavior like Actors do, as they are a sealed class. Instead, all of their behavior comes from their components. You can create component classes by extending Unity’s MonoBehaviour class. MonoBehaviour is the base class for all component scripts, and is what allows your code to be attached to GameObjects.
Example: Review a component script for Unity
Let’s review the following script for a component that logs various messages based on events it receives:
using System.Collections;
using System.Collections.Generic;
using UnityEngine;

public class HelloWorldComponent : MonoBehaviour
{
    public string customStartMessage;

    [SerializeField]
    private string customHitMessage;

    [SerializeField]
    private int hitLimit = 5;

    private int hitCount = 0;

    // Start is called before the first frame update
    void Start()
    {
        Debug.Log(customStartMessage);
    }

    //On Collision Enter is called when a Collider on this GameObject is hit.
    void OnCollisionEnter(Collision c)
    {
        Debug.Log(customHitMessage);

        if(++hitCount > hitLimit)
        {
            Destroy(this.gameObject);
        }
    }
}
The script is setup as a fairly generic C# class that extends Monobehaviour, but there are a few important things to note:
Serialized fields
At the top of the class body, the script defines two string variables for the component to log when it starts and when it is hit. However, the two string variables are not defined anywhere in the code. This is because these variables are serialized, and will be available as properties to be configured in the Editor using the Inspector.
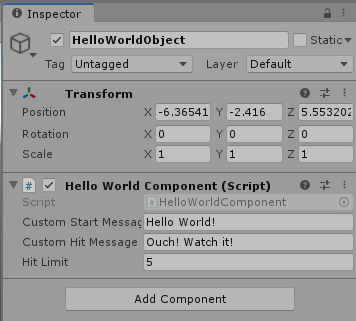
This is very similar to the use of UProperties in Unreal. In Unity, you can make a variable appear in the Inspector by adding the “[Serialize Field]” attribute above the variable declaration. By default, public variables are serialized and private variables are not, so using the attribute is unnecessary for public variables.
You can still initialize the variable even when it’s serialized, as you can see with the hitLimit variable. This will act as the default value when the variable is shown in the Inspector.
Event Methods
Below those declarations are functions that Unity will call in response to specific events:
- Start() is called as soon as the component’s GameObject is active in the Scene.
- OnCollisionEnter() is called whenever a collider on the GameObject is hit by something with a Rigidbody component attached.
- Update() is called every frame.
NOTE: If the Update() function is unnecessary, it’s good practice to remove the function from the script. This helps prevent unneeded calls each frame, similar to setting CanActorEverTick to false in Unreal.
Where is the UObject equivalent?
Unreal’s base object class is the UObject class, which you can extend to create objects outside of the normal Actor/Component pattern. These objects don’t get spawned into the world but can still be referenced by other objects/Actors, and are useful for containing data without polluting your level.
Unity’s Object class
Unity’s base object class is the UnityEngine.Object class (Not to be confused with the C# Object class, System.Object). This provides a lot of the base functionality for GameObjects and Monobehaviours, but it’s not intended to be extended in the same way as UObjects. As a general rule, it doesn’t get extended directly.
Using ScriptableObjects
The ability to create data objects without spawning them in the Scene is supported by Unity’s ScriptableObjects. Like UObjects, they store data and reduce dependencies across GameObjects.
However, ScriptableObjects can also be instantiated as Assets within Unity. This is similar to Data Assets in Unreal.. This is a powerful feature that allows you to completely decouple static data from GameObjects.
Example: In-game Potion Shop
Imagine that you wanted to create a shop that sells potions in your game. Each potion is a prefab that stores the appearance of the potion and the scripts that control the potion’s behavior when used. When the player accesses the shop, they might see a menu that lists 30 potions for sale, listing the name, price, and description of each one. If you store this UI data on the prefab, that means that Unity will need to load all 30 potion prefabs into memory in order to get the names and prices the UI needs. However this means that all the visuals and script data of the potions are loaded as well, which are not required by the UI at all.
In order to avoid loading all this unnecessary data, we can decouple the UI data from the gameplay data, using a ScriptableObject that contains a name, price, description, and a reference to the prefab containing the visuals and behavior of the potion. By doing this, the lightweight description data can be quickly loaded and shared across the UI, while the more complex Prefab only gets loaded when the player actually equips it in game.
Common Scripting Use Cases
Below are some common use cases and patterns in Unreal and their Unity counterparts:
Creating Object Instances
In Unreal, this is done with the CreateActor Blueprint node or the UWorld::SpawnActor() C++ function. In both cases, you pass in a Class reference and initialization data like name and position.
In Unity, GameObject instantiation is done with the Instantiate() function, which takes a Prefab reference and a starting position/rotation. If all you need is an empty GameObject, you can also simply instantiate a new GameObject Instance with “new GameObject()”.
Casting between types
In Unreal, Typecasting is mostly done with generated Blueprint casting nodes or the Cast<Type>() function in C++.
In Unity, you can cast with the "as" keyword or use c-style casting. In both cases, if the cast fails the result is null.
CastedType asCast = obj as CastedType;
CastedType cStyleCast = (CastedType)obj;
Destroying and Disabling Objects
Both engines have garbage collection, which enables unused references to be cleaned up.
In Unreal, several object types also have explicit Destroy functions, which mark the object for deletion.
In Unity, the base UnityEngine.Object class has a static Destroy function which, when passed an object reference, will destroy the object. This can be used by GameObjects and Components, or any object that inherits from the base UnityEngine.Object class. GameObjects can also be disabled with SetActive(false).
Components can be individually disabled as well, which will still allow for code execution but will prevent Unity event methods like Update and OnCollisionEnter from being called.
Accessing Components
In order to find a component that is attached to an Actor in Unreal, you can use the GetComponentByClass node in Blueprints, or FindComponentByClass function in C++. Both methods take a class type which they will use to find a matching component. However, since it is possible to define components by name in both C++ and Blueprints, you can simply access the components by name if you know the Actor’s type.
In Unity, you can do this using the generic function GetComponent<T>(), which returns the first component of a type that it finds on a GameObject. Unlike Unreal, you don’t get access to a GameObject’s components by name automatically. To get around this, you can simply call GetComponent once (often in the Start method) and store the result in a variable. Calling GetComponent frequently can affect performance since it needs to iterate through every component on the GameObject, so storing a reference when possible is an easy way to optimize your code.
Working with Tags
Unreal has the GameplayTag system, which can be used to compare tags between Objects for quick identification.
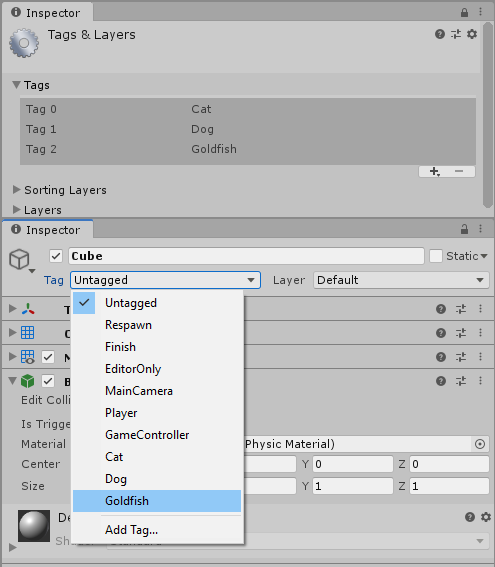
Unity has its own tag system for GameObjects. You can select or create a new tag using the drop-down Tag menu in the Inspector. That data can then be accessed using GameObject.tag or GameObject.CompareTag().
Tags can be edited in the Project Settings, by going to Edit > Project Settings... > Tags and Layers.
Finding GameObjects and Components
In Unreal, you can search the world for an Actor type with a GetAllActorsOfClass, and then filter the results.
In Unity, you can find a GameObject by name using GameObject.Find( string name ). You can also search by tag using GameObject.FindWithTag(string tag).
To find an object by component type, you can use the generic function FindObjectsOfType<T>(), where T is the component class you want to find. This returns an array with the results of the search.
In both engines, calls for finding objects in the world can have a high performance cost if they are called frequently, and should not be used in code that gets called every frame.
Raycasting (Tracing)
In Unreal, Raycasts and Shapecasts are completed using Trace functions. Tracing by Channel or Object type is supported for both shape and ray tracing. A cast outputs a Hit Result struct with all the relevant information about a hit.
Unity has several functions for Raycasting:

Additionally, you can use RaycastAll() or SpherecastAll() to return all hits, instead of just the first. For performance sensitive contexts, there are also versions of these functions that don’t allocate garbage (for example: Physics.OverlapSphereNonAlloc).
Input and Input Management
In Unreal, you can create actions using the Input Actions/Axis settings. These settings enable you to define various bindings for player actions (for example, "Jump" or "Throttle"). The Input actions can then be bound to functions, to enable your code to react to the inputs.
Unity uses a similar system, where the code can read from defined Axes using the Input.GetAxis() function. You can find these settings in Edit > Project Settings... > Input Manager > Axes.
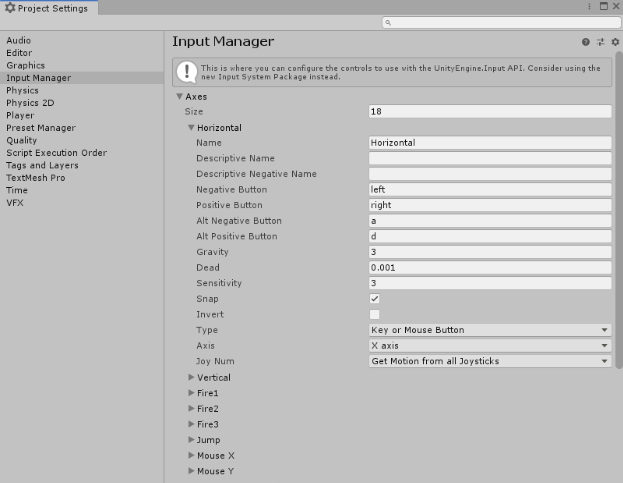
Input.GetAxis("Horizontal") is by default bound to the A/S keys and the left/right analog axis on controller.
Options like deadzone, sensitivity, and inversion can be set per Axis. Although it’s called an Axis, it supports digital inputs as well, using the Input.GetButtonDown() function. You can also query explicit keys using Input.GetKeyDown().
Asynchronous Code (Delay/Timeline)
In Unreal, the delay and timeline nodes provide simple ways to control event timing and to modify properties over time.
In Unity, these kinds of delayed executions can be handled using Coroutines. Coroutines are special functions that run independently of regular code execution, and they can be delayed or paused at will using the "yield" instruction. All Coroutines are required to return an IEnumerator, which enables you to use yield to return some kind of pause or delay.
The example below prints a log after a five second delay:
void Start()
{
StartCoroutine(DelayedLog(5.0f));
}

IEnumerator DelayedLog(float delay)
{
	Debug.Log("Starting Delay.");

//Wait for "delay" seconds before continuing
	yield return new WaitForSeconds(delay);

Debug.Log("Delay complete!");
}
Event System
In Unreal, you can utilize Blueprint’s Event Dispatcher system or C++ Delegates to create and bind custom events for your classes.
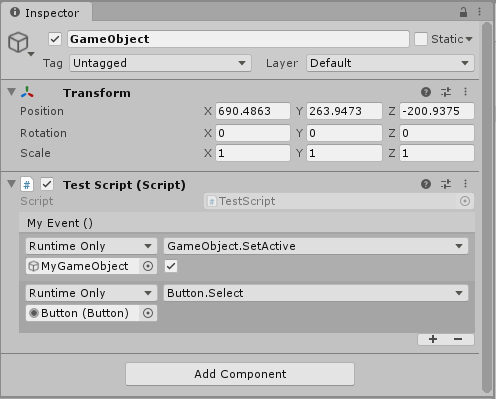
In Unity, you have several methods for creating and binding events. The most up-to-date example is the UnityEvents system, which gives you a powerful way to bind handlers to your event using the Inspector.
When you define serialized events in code, you will see exposed fields in the Inspector (as outlined in Serialized Fields) . You can drag and drop the GameObjects you want to react to the event into the field(s) in the Inspector.
Unity also supports Delegates, along with generic C# events, if you want a more lightweight event system.
7. Other Engine Properties
Physics and Collision
Unreal has simulation and collision properties built directly into Primitive Components, which manage the channels with which the component interacts and any data like physics materials and mass. The collision bounds are defined by the visual mesh used by the component.
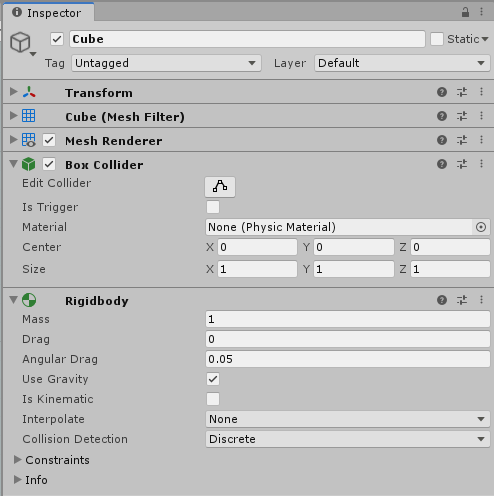
Unity’s built-in physics engines control physical simulation using the Rigidbody component and Collider component. There are specialized Colliders depending on the GameObject shape, including:
- Box
- Sphere
- Capsule
- Mesh
The Rigidbody is responsible for managing the dynamics of the GameObject’s simulation, while the Collider provides the shape properties. The physical layers that interact are defined at the Project level.
Basic Animation
In Unreal, you use Animation Sequences/Montages to create skeletal animation, usually controlling this animation using an Animation Blueprint and state machine.
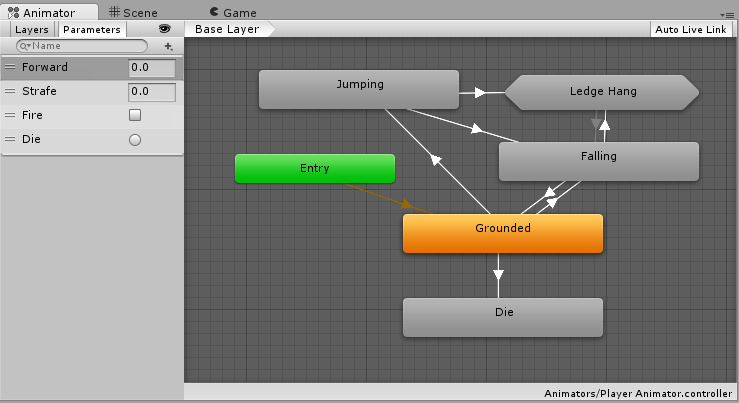
Unity’s Mecanim animation system functions in a similar way. It allows you to import various animation clips and control their playback using a state machine that can be controlled by script.
Multi-Object Animation and Cinematics

Unreal’s main tool to control cinematics and multi-Object animation is the Level Sequencer.
In Unity, Timeline is the appropriate tool. Similar to Level Sequencer assets, Timeline assets are a collection of property animations. The Timeline can work with a wide variety of systems, including:
- Animations
- Particle Effects
- Sounds
- Cameras
- Transforms
- Materials
User Interface (UI)
In Unreal, most User Interface (UI) is controlled using Unreal Motion Graphics UI Designer (UMG). UMG is a retained UI system which has you creating UI objects in a hierarchy, with each object handling its own data and events. UMG utilizes special Blueprints called Widgets that enable you to lay out and script your UI in a single asset.
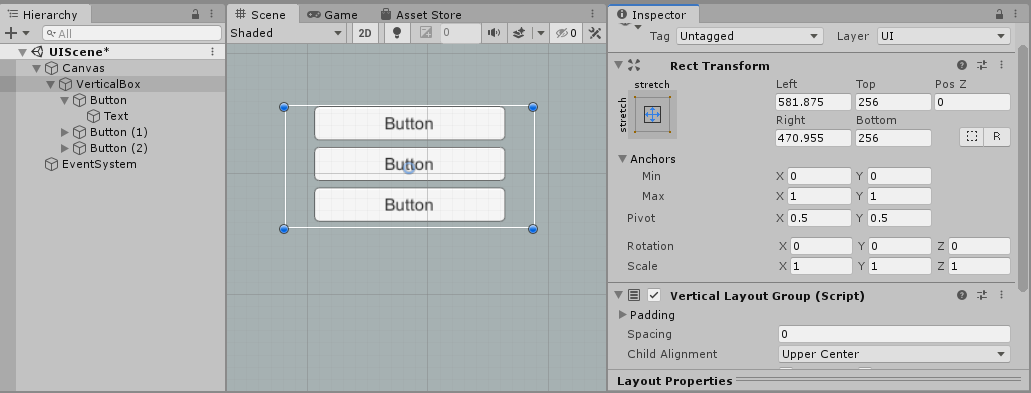
Unity also has a retained UI system called Unity User Interface (Unity UI), based around its Canvas component. Unlike UMG, this system doesn’t require separate Assets: you simply use GameObjects with UI specific components to control rendering, interaction, and layout. All UI GameObjects are placed under another GameObject with the Canvas component in the Hierarchy, which manages how the UI is rendered and how it can be interacted with.
Adding behavior to this UI is accomplished with C# scripting, or by dragging and dropping UnityEvents in the Inspector (for components like Button).
8. FAQ
I'm not a traditional programmer — is there an equivalent to Blueprint Visual Scripting in Unity?
At the moment, there is no built-in Blueprint style visual programming in Unity. However, if you know how to do blueprints, then learning Unity's C# scripting is not as difficult as it may seem at first. There are plenty of tutorials and example projects that can help you get up to speed with basic scripting in Unity.
However, if you really prefer visual scripting, there is some good news. In Unity's massive plug-in ecosystem, there are several very powerful and well-supported Visual Scripting systems like Bolt. Using these, you can recreate a Blueprint style workflow.
9. Learn More
This tutorial has hopefully helped bridge the gap between some of the core concepts in Unreal Engine and Unity.
However, Unity has even more resources to help you learn and understand the engine further:
- The Unity User Manual — Everything about Unity down to the nuts and bolts. All functionality in the engine and editor can be found here.
- Unity Script Reference — Comprehensive documentation for Unity C# scripting and all the built in Unity libraries.
- Unity Learn — Official learning content from Unity, ranging from full guided courses to bite-sized tutorials.
- Unity’s YouTube Channel — The latest video content showing off Unity features, with many video tutorials.