Unity Essentials in-Editor: Install Unity 6
Tutorial
foundational
+10XP
10 mins
9278
Unity Technologies

In this tutorial, you’ll:
- Select the appropriate Unity plan.
- Get a Unity ID.
- Launch the Unity Editor from the Unity Hub.
Languages available:
1. Pathway overview
The video below provides an overview of what you can expect to learn and accomplish throughout the Unity Essentials pathway.
2. What is an in-Editor Pathway?
You are currently in the in-Editor version of the Unity Essentials pathway. In this new experimental version of the Pathway, rather than following along with instructions on this Unity Learn website, you will follow along with instructions shown within the Unity Editor, as shown in the image below.
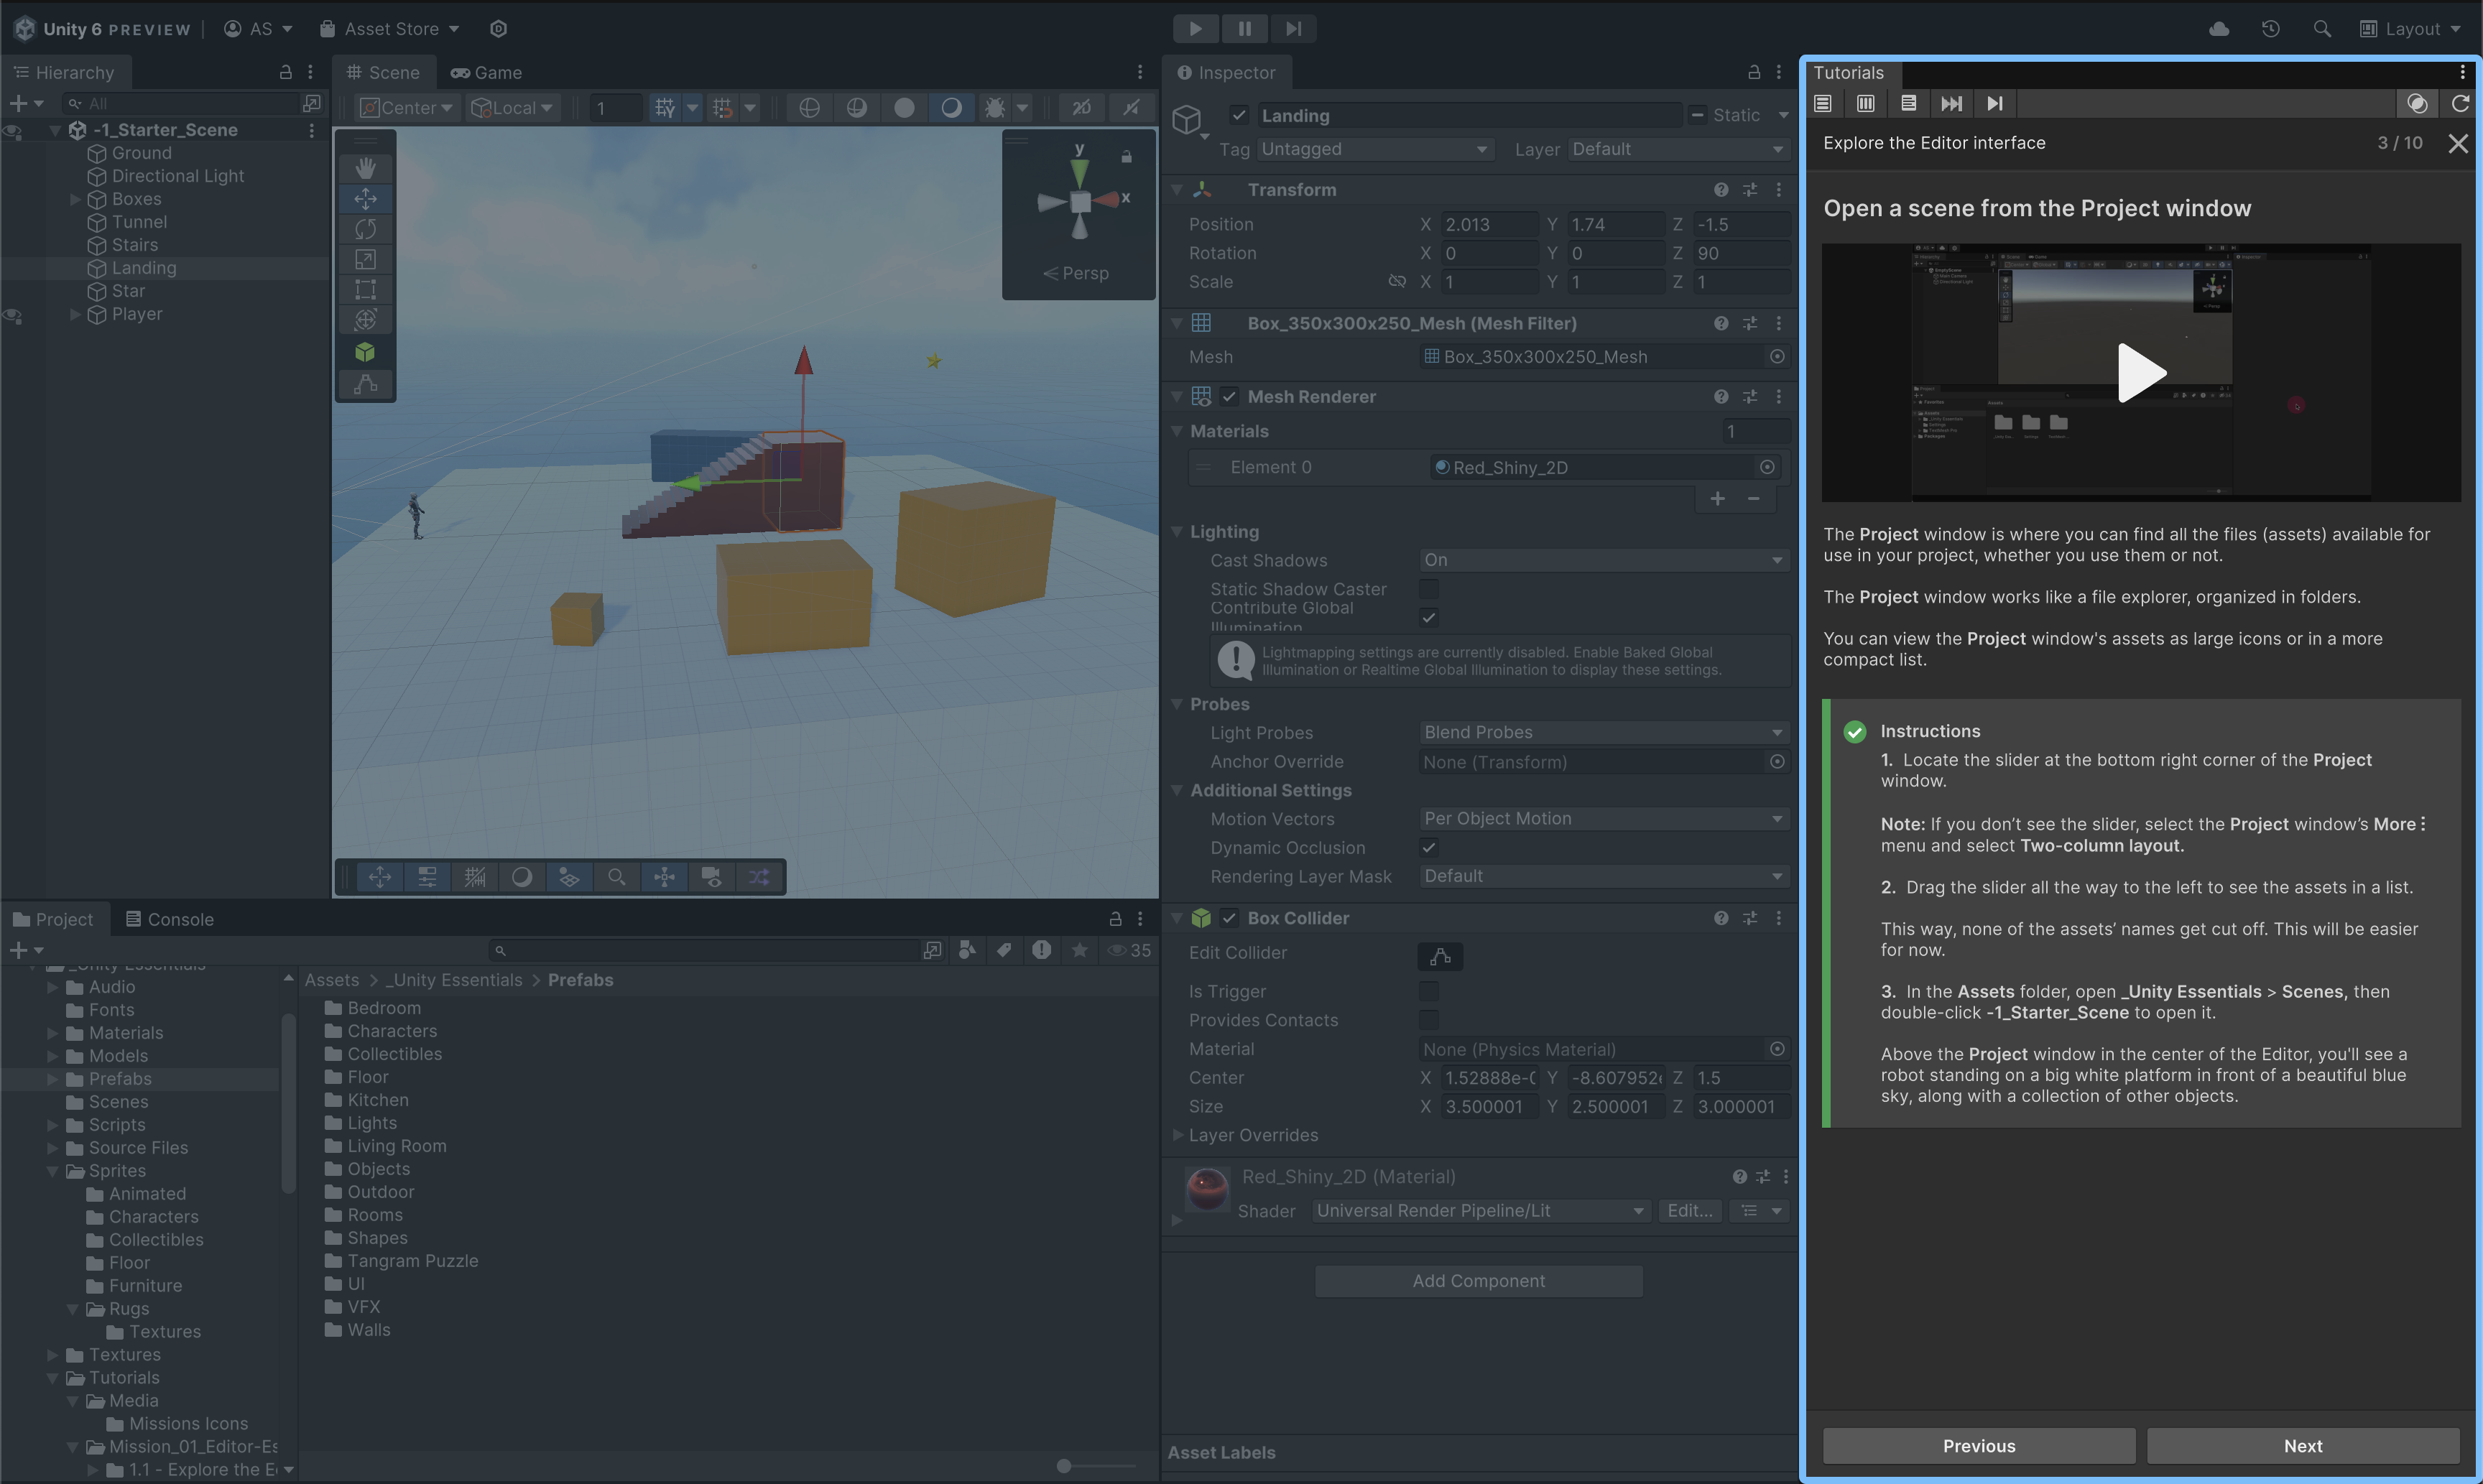
In this in-Editor format, you can both learn and work inside the Unity Editor rather than switching back and forth with a browser. If you’d prefer to use the Unity Learn website instead, you can switch over to the Unity Learn version of the pathway.
If you are ready to proceed to the in-Editor version of the Pathway, continue on to the next step!
3. What are the Unity Hub and Unity Editor?
To work with Unity, you'll start with the Unity Hub. The Unity Hub is a standalone application that streamlines the way you navigate, download, and manage your Unity projects and installations.
From the Hub, you'll download and manage various versions of the Unity Editor. The Unity Editor is the application where you'll build 3D or 2D worlds and create your interactive applications.
4. System requirements
Make sure the computer you're using meets the minimum hardware requirements to run Unity. Generally, if you have a PC running Windows or a Mac running macOS that was purchased in the last few years, your computer is probably ready for Unity. Unity also runs on Linux.
Unity will not run on a Chromebook or tablet.
For details about the latest verified system requirements, refer to the System Requirements page in the Unity Manual.
Note: While you can use Unity to build applications that run on many platforms, the Unity Editor requires Windows, macOS, or Linux.
5. Your Unity plan
If you'll use Unity as an individual, you'll be enrolled in a Unity Personal plan by default. Unity Personal is Unity's standard free plan. Individuals, hobbyists, and small businesses using Unity to provide services to others are eligible to use Unity Personal if their respective clients, in the aggregate, have less than $200K of revenue or funds raised in the prior 12 months.
Important options for students and educators
- If you are a student, enroll in the Unity Student plan and qualify for discounts and free resources.
- If you are an educator and need a license for your own use, get the Unity Educator plan.
- If you're an educator that needs a batch of licenses for your classroom or lab, apply for the Education Grant License to manage multiple Unity installations on school-issued computers or servers, and protect data privacy.
For information on all Unity plans, including Unity Pro, Unity Enterprise, and Unity Industry, consult the Plans and Pricing page on the Unity website.
6. Your Unity account and organization
When you first run the Unity Hub, you'll be prompted to log in or create a Unity account.
You can use your Unity account to access other services, including:
- Unity Play
- Unity Discussions
- Unity Asset Store
- Unity Cloud
- this site, Unity Learn
Individual accounts
If you use Unity as an individual, then when you create a Unity account, you will be automatically assigned an organization that has the same name as your username and consists only of yourself.
Later, use this default organization to purchase plan subscriptions, such as Muse (Unity's generative AI) or Unity Cloud services for your personal use only.
In this case, be ready to specify a username and password to create your Unity account.
Organizational accounts
If you use Unity at work, then you'll be associated with their Unity organization. They can then assign you access rights to particular features and subscriptions, such as Muse (Unity's generative AI) or Unity Cloud services.
In this case, get your Unity login credentials from your employer.
7. Download the setup wizard
If you already have Unity Hub installed, skip to the step where you’ll install the latest version of the Unity Editor.
To download the setup wizard for the Unity Hub, follow these instructions:
Note: If you're a more experienced user looking for guidance for your specific installation needs, review the documentation guidance on installing Unity.
1. Go to the Unity download page.
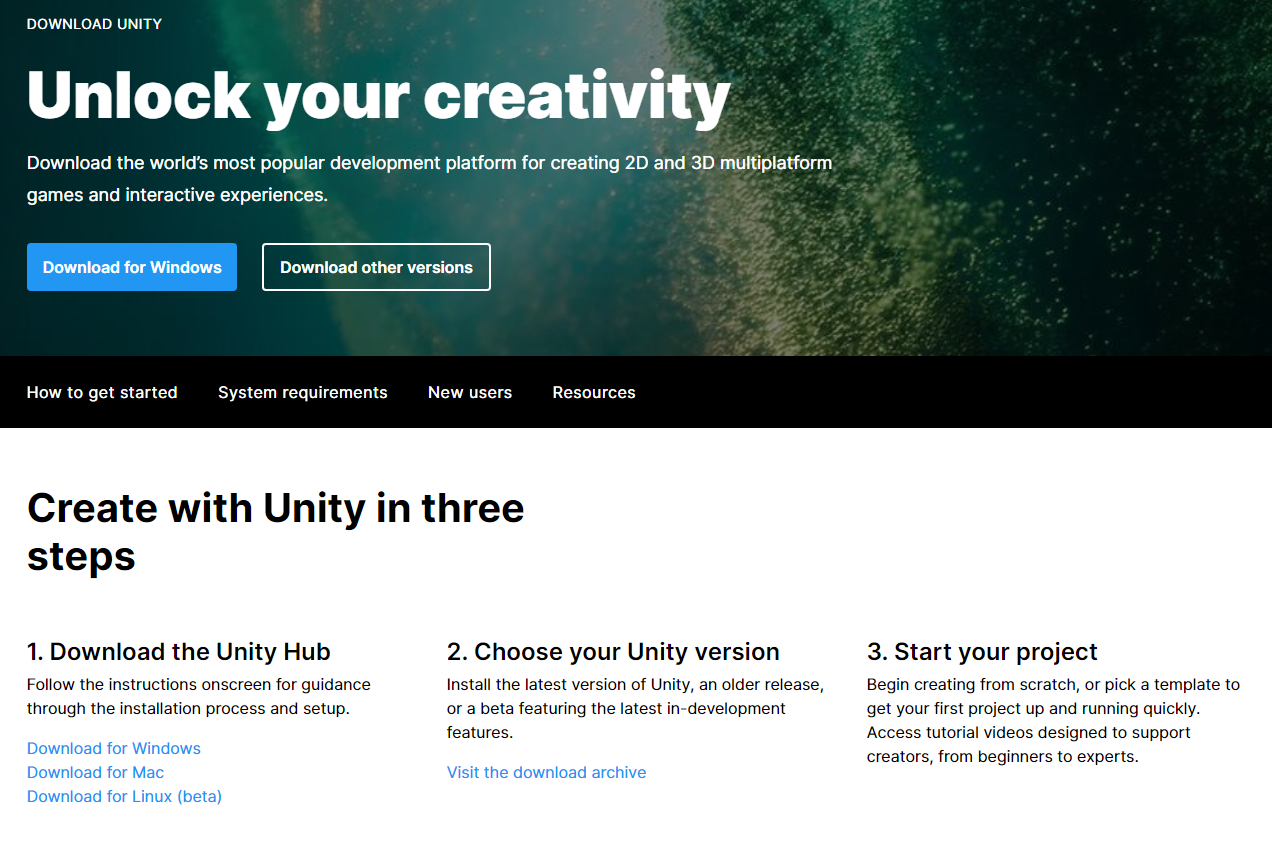
2. Under 1. Download the Unity Hub, select the option for your operating system. A file will download named UnityHubSetup. This file name might vary depending on the Hub version and your operating system.
8. Install and launch the Unity Hub
Next, follow these instructions to install and launch the Unity Hub:
1. Locate the UnityHubSetup file you downloaded previously.
2. Launch the UnityHubSetup installer.
3. Follow your platform instructions to install the Unity Hub.
If you haven't already set up your Unity account, you'll be prompted to do so during this process.
Proceed until you see the window that prompts you to install the Unity Editor, which we'll walk you through in the next step.
9. Skip the recommended installation
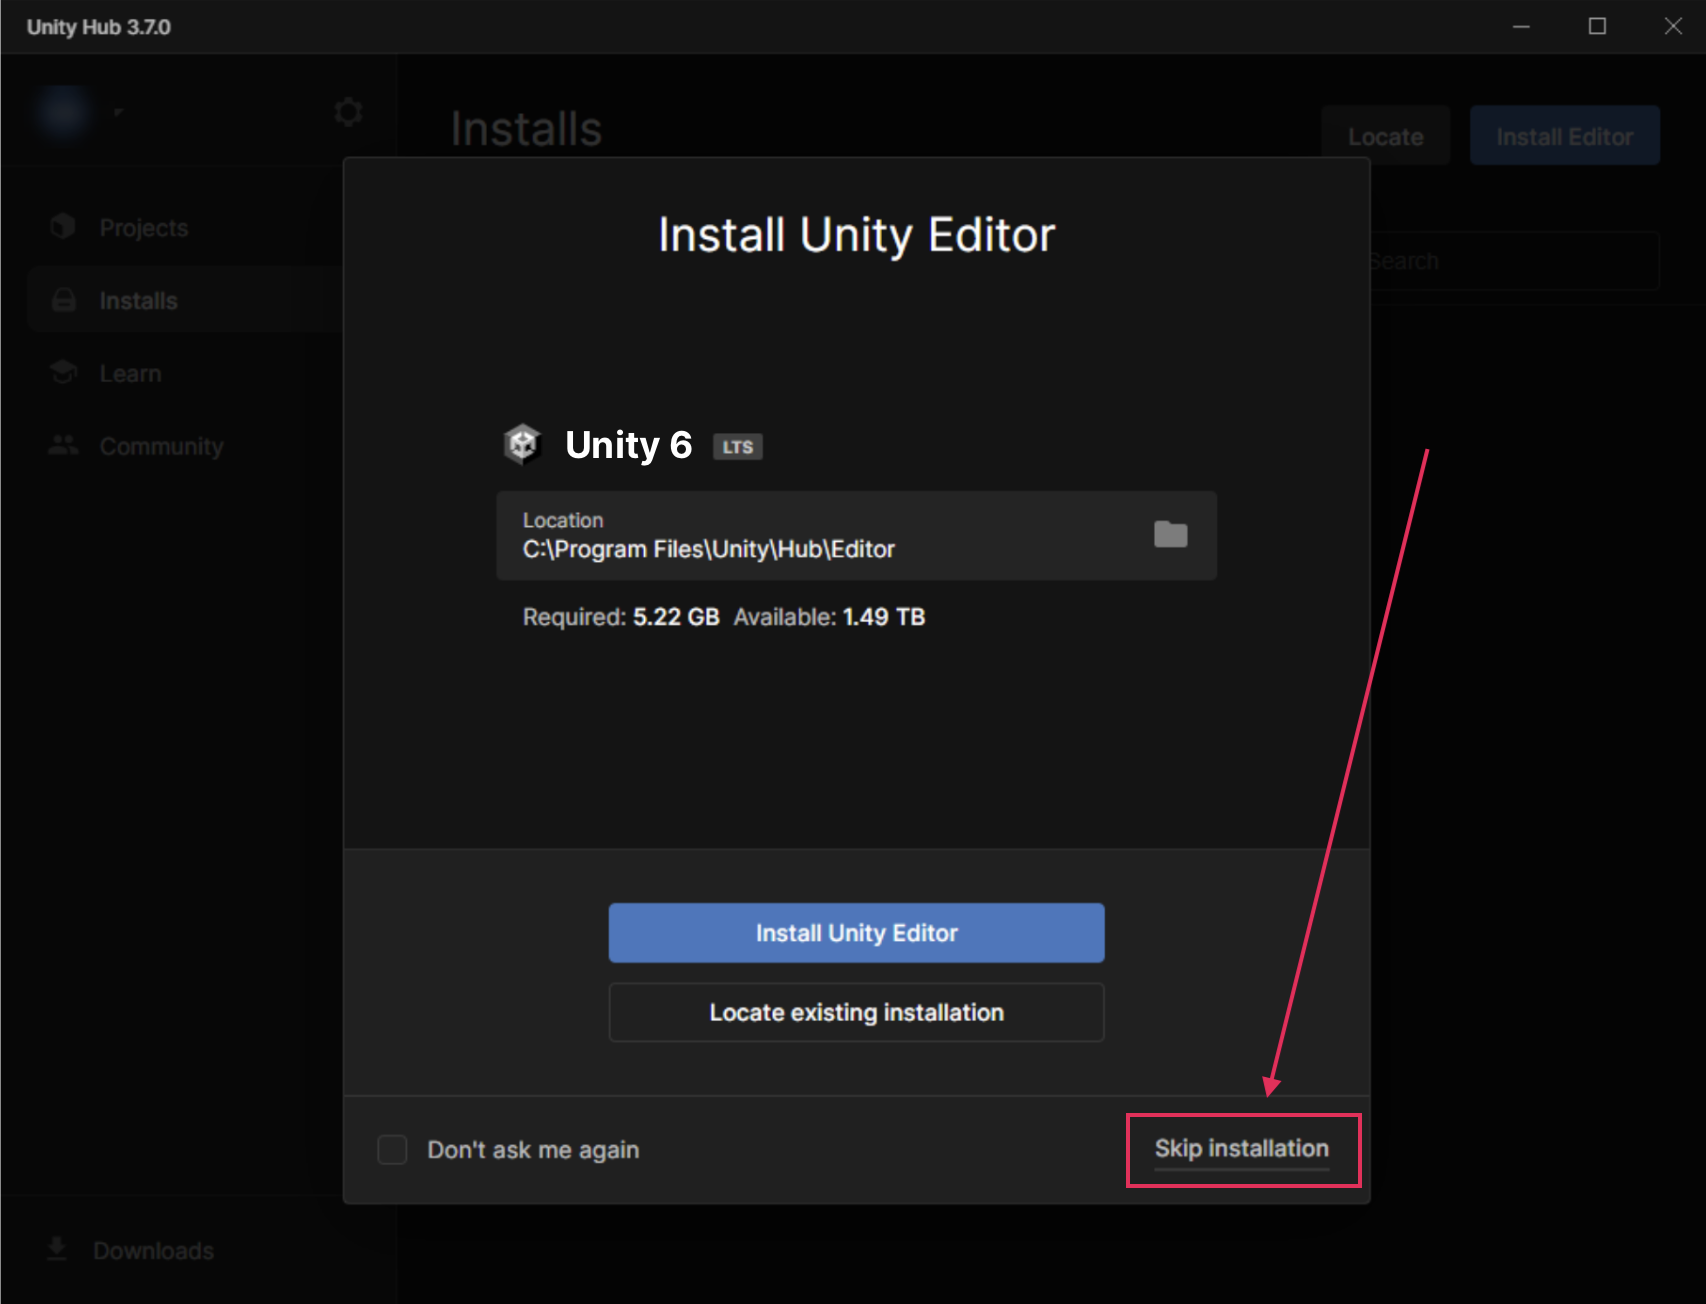
Select Skip installation and proceed to the next step where you’ll install Unity 6.
Usually, you'd install the latest long-term support (LTS) version of the Unity Editor here. But for this Pathway, we'll walk you through manually installing a new Unity Editor version from the Hub.
10. Install Unity 6
To install a new version of Unity 6:
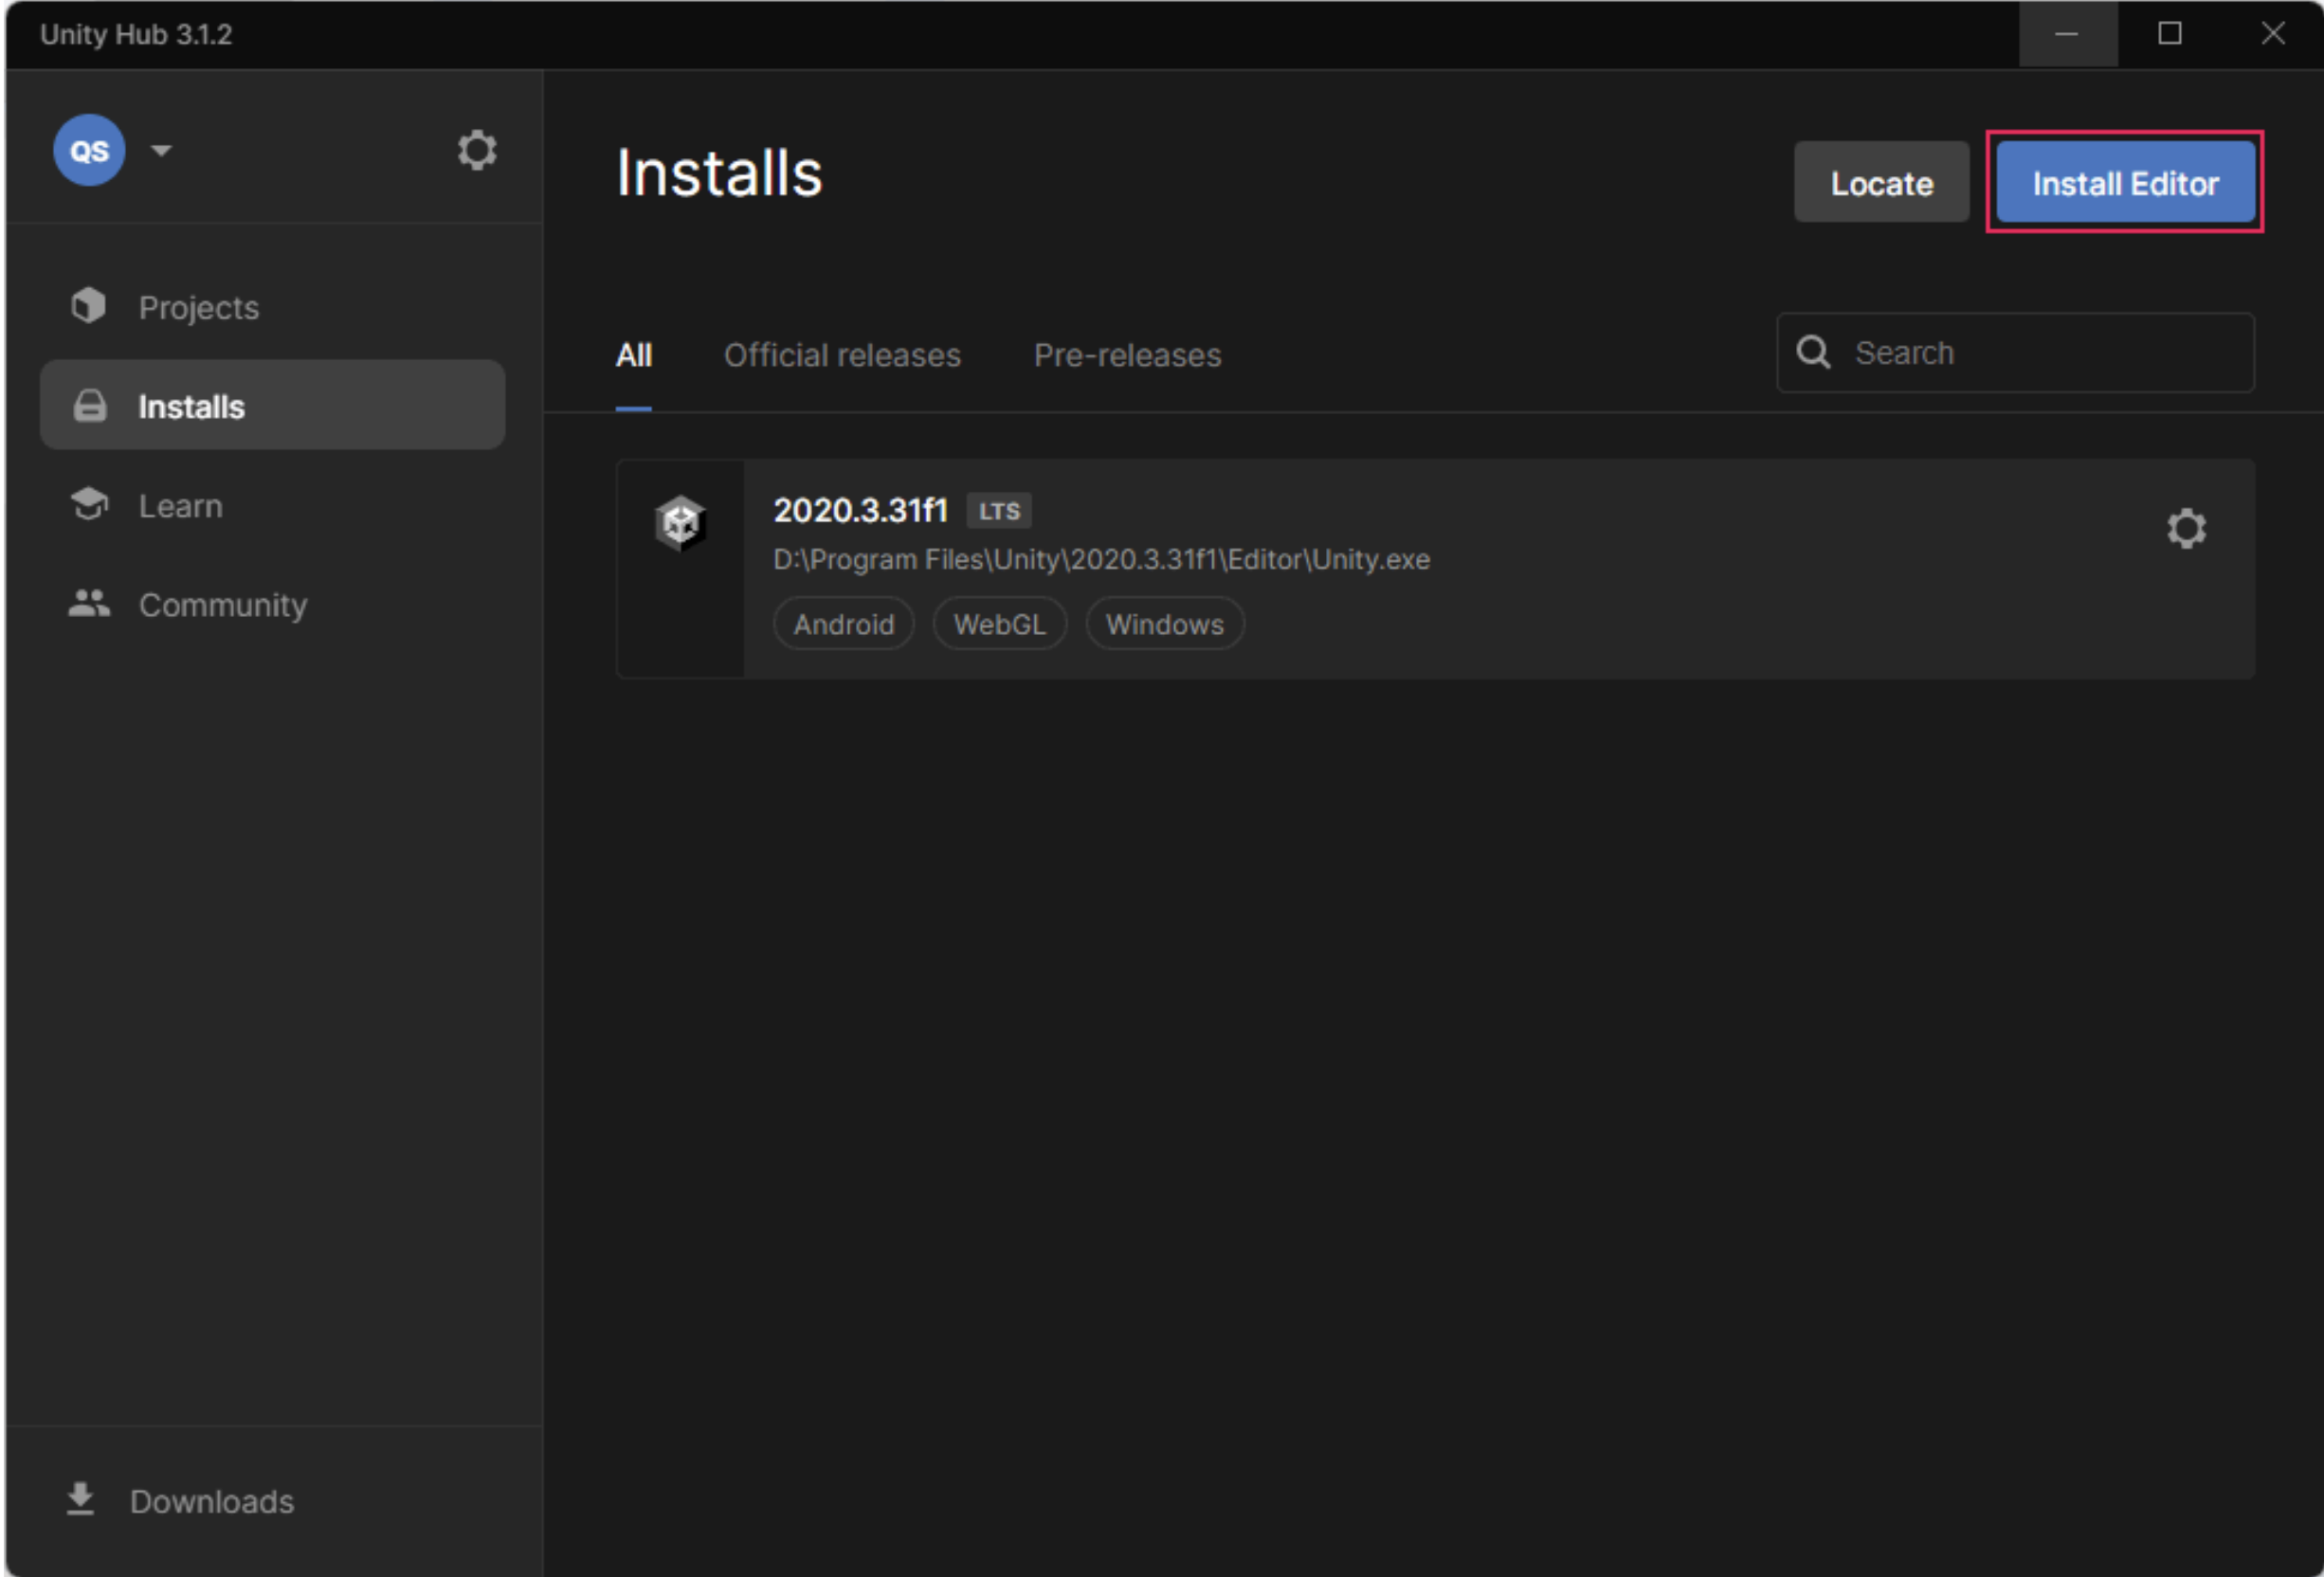
1. From the Unity Hub, select the Installs tab.
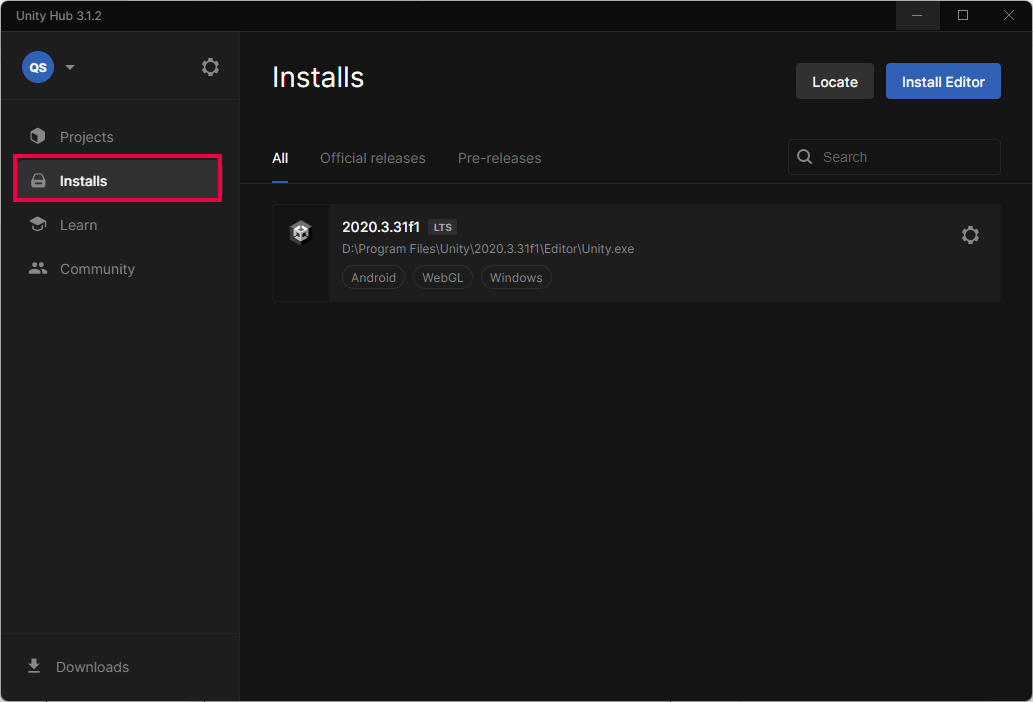
2. Select Install Editor to install a new version.
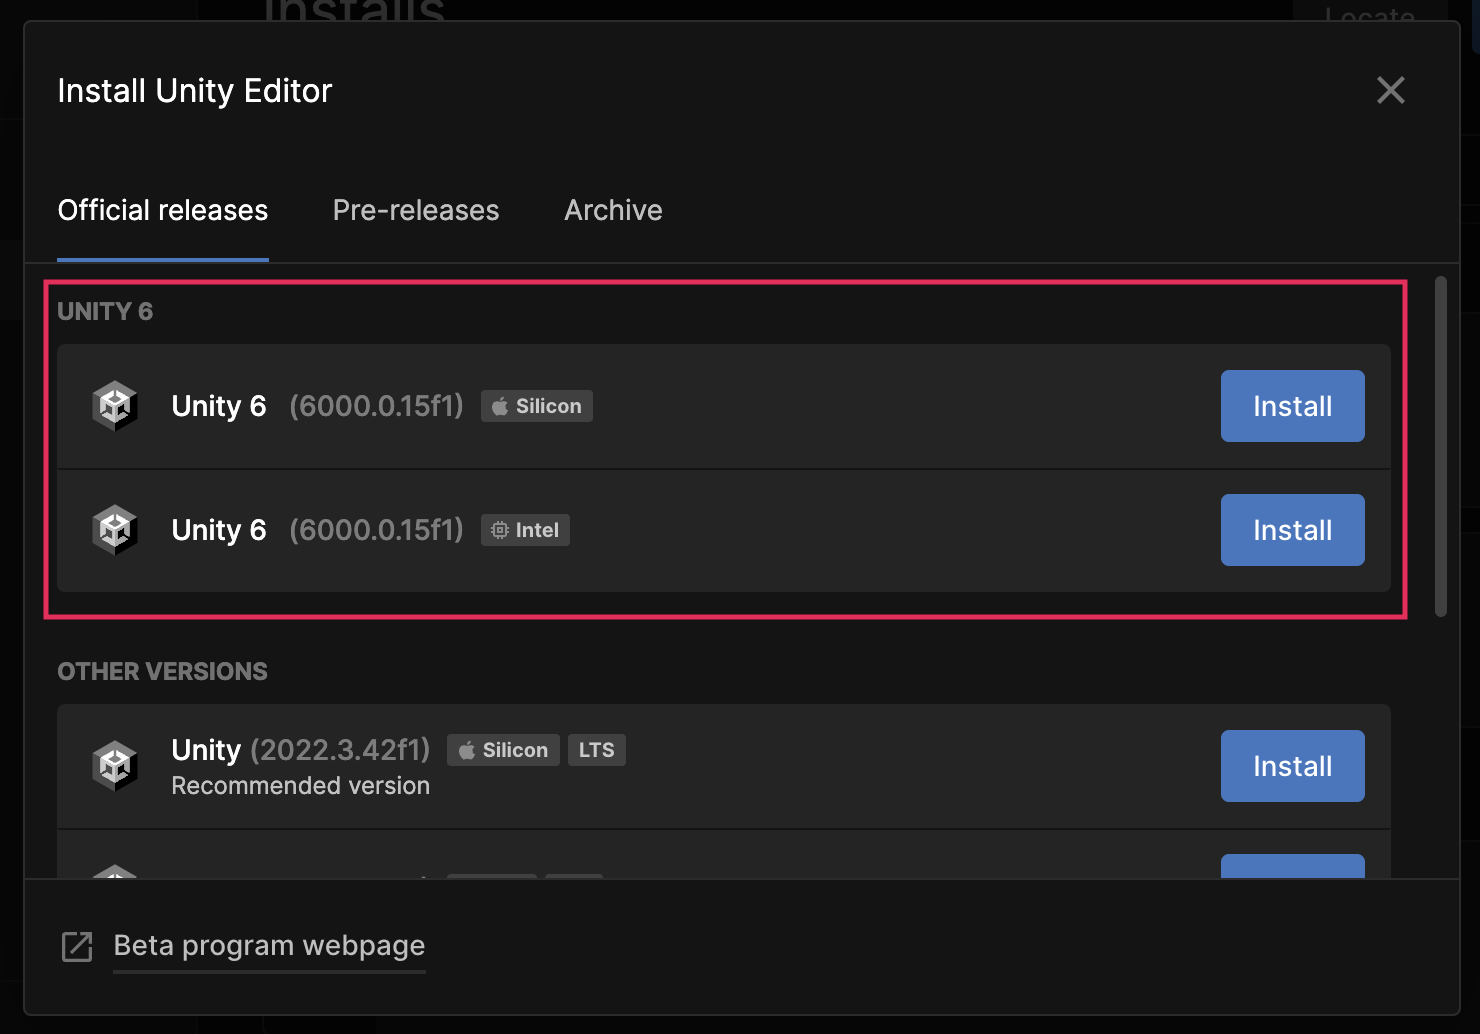
3. In the Unity 6 releases section, select Install for your platform.
Note: On macOS, you’ll need to select whether you’re using a Silicon or Intel processor. If you’re not sure what type of Mac processor you have, read this support article from Apple.
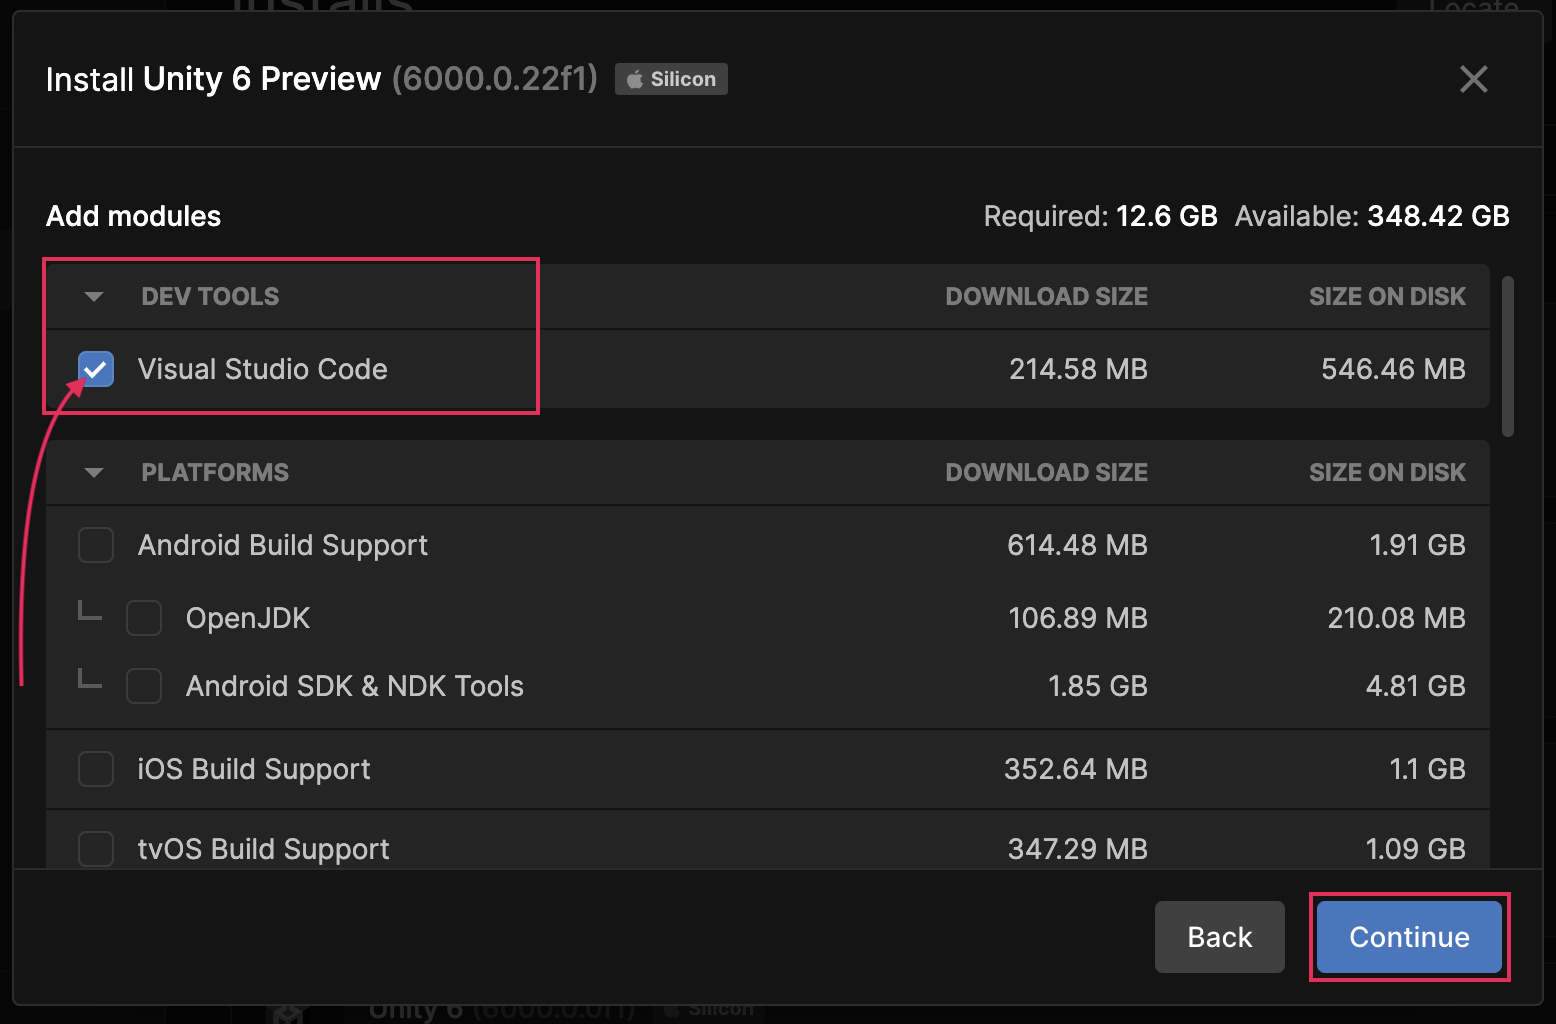
4. On the Add modules page, select the available option under DEV TOOLS to install a compatible coding application.
- On Windows, select Visual Studio.
- On Mac, select Visual Studio Code.
Installing one of these tools will allow you to write and debug code for your Unity projects more efficiently.
Select Continue to proceed with the installation.
Note: The Unity Editor is a large and powerful application! The download and installation process will take some time.
When the process is complete, this version of the Unity Editor will appear on the Installs tab of the Unity Hub.
Troubleshoot your download
If you have any issues downloading this version of the Unity Editor, follow the troubleshooting instructions at the bottom of this step.
11. Next steps
You're probably eager to try out the Unity Editor! To get started, proceed to the next tutorial in Unity Essentials.