
ShaderLab: Using Surface Normals to Create Custom Lighting Effects
Tutorial
intermediate
+10XP
25 mins
(34)
Unity Technologies
In this tutorial, you will learn how to write a Shader that generates rim lighting using the surface normals of an object.
Languages available:
1. Introduction
In the world of Shaders, the amount of light received by a surface (the Lambertian Coefficient) can be modeled by the dot product NdotL, in which N is the surface normal and L is the direction of the incoming light. Variances between different surfaces, such as wood, metal, and plastic, can all be tied to how light interacts with them as defined by this coefficient.
By extension, the Lambertian Coefficient is largely responsible for defining the appearance of surfaces and is used extensively when creating Shaders.
Rim lighting is a technique used in photography and cinematography to create highlights around a subject. It happens anytime someone or something is backlit. In Unity, this effect can be created via Shaders.
In this tutorial, we will substitute the direction of incoming light in the Lambertian Coefficient for the viewing direction of the camera to create a rim lighting effect like the one seen above.
The larger the angle between the camera and surface normal, the more intense the rim highlight will appear. This means the parts of a surface furthest from the camera will appear brighter (Figure 01).
This effect can be used as a part of a larger toon Shader, or to add simple highlights to objects in your Scene.
2. Project Setup
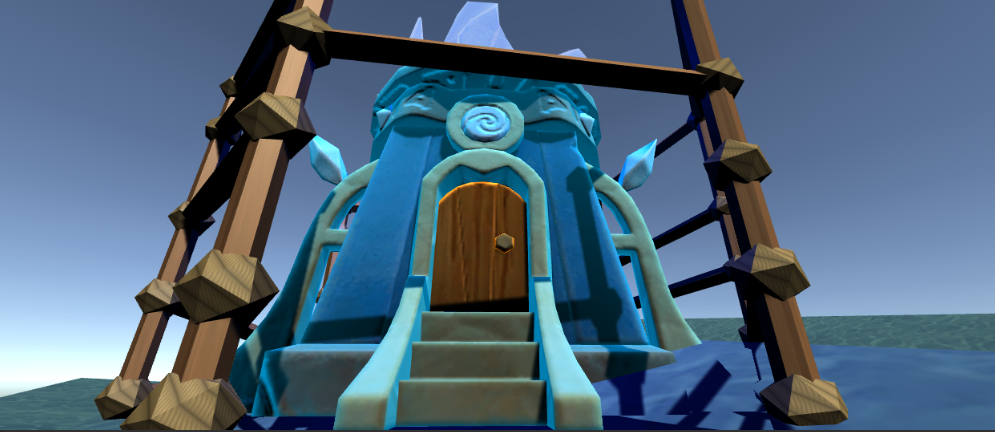
We will be applying our effect onto an object within our Scene. In the example above, perhaps the tower becomes enchanted with a blue glow when its owner comes home.
- To begin, create a new text document in your Shader editor of choice, and save it in your Assets > Shaders directory.
- Name the Shader “RimExtended”.
3. Defining Shader properties
We’ll start with a simple Shader setup that takes a diffuse map and normal map as input, then combines the output onto the selected Material using the default Lambertian lighting model.
Shader "RimExtended"
{
	Properties
	{
		_MainTex("Diffuse (RGB)", 2D) = "white" {}
		_NormalMap("Normal Map (RGB)", 2D) = "bump" {}
	}
	SubShader
	{
		Tags { "RenderType" = "Opaque" }

		CGPROGRAM
		#pragma surface surf Lambert

		sampler2D _MainTex;
		sampler2D _NormalMap;

		struct Input
		{
			float2 uv_MainTex;
			float2 uv_NormalMap;
		};

		void surf(Input In, inout SurfaceOutput o)
		{
			fixed4 c = tex2D(_MainTex, In.uv_MainTex);
			o.Albedo = c.rgb;
			o.Normal = UnpackNormal(tex2D(_NormalMap, In.uv_NormalMap));
			o.Alpha = c.a;
		}

		ENDCG
	}
	FallBack "Diffuse"
}
Be sure to take note of the #pragma surface surf Lambert line. This directive is needed to tell Unity which surface Shader definition we are extending to implement our rim highlights.
3. Right-click under the Project tab and create a new Material by navigating to
Create > Material.
4. Click on the new Material and in the Inspector change the Shader to the RimExtended
Shader we just created.
5. Set the diffuse and normal maps to their respective textures (Figure 02).
Currently,,is our Shader only textures our model using the diffuse and normal maps we provided (Figure 03).
Now it’s time to add the rim highlights to our Shader.
6. Return to your text editor and add the following changes (which are bold and italic):
Shader "RimExtended"
{
    Properties
    {
        _MainTex (" Diffuse (RGB)", 2D) = "white" {}
        _NormalMap ("Normal Map", 2D) = "bump" {}
        _RimColor ("Rim Color", Color) = (1.0, 1.0, 1.0, 0.0)
        _RimConcentration ("Rim Concentration", Range(0.5, 5.0)) = 0.9

    }

    SubShader
    {
        Tags { "RenderType"="Opaque" }

        CGPROGRAM
        #pragma surface surf Lambert

        sampler2D _MainTex;
        sampler2D _NormalMap;
  float4 _RimColor;
        float _RimConcentration;

        struct Input
        {
            float2 uv_MainTex;
            float2 uv_NormalMap;
        };

        void surf (Input In, inout SurfaceOutput o)
        {
            fixed4 c = tex2D (_MainTex, In.uv_MainTex);
            o.Normal = UnpackNormal (tex2D (_NormalMap, In.uv_NormalMap));
            o.Alpha = c.a;
     		o.Albedo = c.rgb;
        }

        ENDCG
    }
    FallBack "Diffuse"
}
The _RimColor and _RimConcentration properties are needed to describe the color of the rim highlight and how dispersed or “concentrated” the effect is. A rim highlight with a higher intensity will be dispersed more evenly across the surface, whereas a low intensity will be dispersed more so along the edges of the surface.
If we compile our Shader we will notice that these new properties appear in our Inspector but do not yet change the appearance of the tower (Figure 04).
This is because we have not actually defined how to calculate our rim highlight.
7. Let’s do this now by modifying our Input struct and surf function like so:
struct Input
        {
            float2 uv_MainTex;
            float2 uv_NormalMap;
 		float3 viewDir;
        };

  void surf (Input In, inout SurfaceOutput o)
        {
            fixed4 c = tex2D (_MainTex, In.uv_MainTex);
float Lc = saturate(dot(normalize(In.viewDir), o.Normal));
            half rim = 1.0 - Lc;

            o.Normal = UnpackNormal (tex2D (_NormalMap, In.uv_NormalMap));
            o.Alpha = c.a;
     		o.Albedo = c.rgb;
o.Emission = _RimColor.rgb * pow(rim, _RimConcentration);
        }
viewDir is a built-in surface Shader variable that represents the current direction the camera is facing. To calculate the Lambertian Coefficient (Lc), we subtract the amount of incoming light from 1.0 to obtain our rim value.
Lastly, our surface Shader has an Emission property to describe how the surfaces it’s applied to will generate light. This last line tells our Shader to emit light from the edges (as defined by the rim).
4. Creating a smoother falloff
While our Shader is functional as-is, it does look a bit cartoon-like. This is primarily due to our emission function — we are applying the rim highlight onto both the edges of the tower and its faces.
We can make a few additions to our Shader properties and surf function to have finer control over the distribution of the rim highlight, making it more subtle and confined to the edges of the tower. We will accomplish this by using the smoothstep function within our Shader instead of pow to describe how the rim highlight will be applied to the surface.
8. Make the following changes to your Shader, paying special note to comment on your
existing code instead of removing it if you preferred the previous “cartoon-like” look.
...
    Properties
    {
        _MainTex (" Diffuse (RGB)", 2D) = "white" {}
        _NormalMap ("Normal Map", 2D) = "bump" {}
        _RimColor ("Rim Color", Color) = (1.0, 1.0, 1.0, 0.0)
      //_RimConcentration ("Rim Concentration", Range(0.5, 5.0)) = 0.9
  _RimStrength ("Rim Strength", Range(1.0, 4.0)) = 1.45
    }

    SubShader
    {
        Tags { "RenderType"="Opaque" }

        CGPROGRAM
        #pragma surface surf Lambert

        sampler2D _MainTex;
        sampler2D _NormalMap;
  float4 _RimColor;
        float _RimConcentration;
  float _RimStrength;

        struct Input
        {
            float2 uv_MainTex;
            float2 uv_NormalMap;
        };

  	  void surf (Input In, inout SurfaceOutput o)
        {
            fixed4 c = tex2D (_MainTex, In.uv_MainTex);
float Lc = saturate(dot(normalize(In.viewDir), o.Normal));
            half rim = 1.0 - Lc;

            o.Normal = UnpackNormal (tex2D (_NormalMap, In.uv_NormalMap));
            o.Alpha = c.a;
     		o.Albedo = c.rgb;
//o.Emission = _RimColor.rgb * pow(rim, _RimConcentration);
o.Emission = _RimStrength * (_RimColor.rgb * smoothstep(0.2, 0.6, rim));
        }
...
The call to smoothstep limits the rim highlight to the areas of the surface where it has the most impact. Our new _RimStrength property scales this value to produce the final rim highlight seen in the image below (Figure 05).
5. Conclusion
In addition to learning basic ShaderLab syntax, you’ve learned that the Lambertian coefficient forms the basis for various lighting models. By modifying the coefficient, we can create a variety of Shader effects beyond rim lighting, such as a toon shading (cel-shading) model. Lastly, the normals of a surface provide valuable information to the shader on how light should be reflected and displaced. Subsequently, they are essential for performing light-based effects via shaders.