
Volume Overrides: Screen Space Reflections
Tutorial
intermediate
+10XP
20m
Unity Technologies
Screen Space Reflections (SSR) are a high-quality, controllable, method of generating reflections using screen space data. They are more accurate than Reflection Probes and, while expensive, can be optimized. In this tutorial, you enable and configure SSR.
Languages available:
1. Screen Space Reflection Volume Override
This tutorial has been verified using Unity 2022 LTS.
The Screen Space Reflection Volume Override feature uses the depth and color buffer of the screen to calculate reflections. This produces a high-quality visual rendering of subtle reflections in surfaces, ranging from shiny floors to wet puddles. When you work on a project using the High Definition Render Pipeline (HDRP), the Screen Space Reflection Volume Override renders more accurate reflections than using Reflection Probes alone. While the Screen Space Reflection Volume Override is performance intensive, it can be optimized. In this tutorial, you will enable and configure Screen Space Reflections.
The Screen Space Reflection feature is available as a Volume Override to the Post Process Volume, which is present in the default scene and any new scenes created in a HDRP project.
2. Configure your project for Screen Space Reflections
To configure your project for Screen Space Reflections, follow these instructions:
1. From the main menu, select Edit > Project Settings.
2. Select Graphics in the left column to show the HDRenderPipelineAsset (Figure 01).
3. Select the HDRenderPipelineAsset in the Scriptable Render Pipeline Settings field, by double-clicking to reveal its properties in the Inspector window.
4. In the Inspector window, select to expand the settings for Lighting and then Reflections.
5. Enable Screen Space Reflections (Figure 02).
6. Your Project is now ready for the Screen Space Reflections Volume Override.
3. Activating Screen Space Reflections
1. Load or create a scene using the recently configured High Definition Render Pipeline Project.
2. With the Post Process Volume selected in the Hierarchy Window, add a Volume Override by selecting the Add Override button in the Inspector Window, and selecting Lighting > Screen Space Reflection (Figure 03).
3. In the Project view, right-click to select Create > Material. Name it “SmoothMetal”. By default, Materials created in an HDRP Project use the HDRP/Lit Shader.
4. In the Surface Options settings, make sure the Receive SSR checkbox is selected (Figure 04).
5. In the Surface Inputs settings, set Metallic and Smoothness to 1 (Figure 05). This gives our Material a mirror-like finish and will make the Screen Space Reflection feature easier to see for this exercise.
6. Create a Quad GameObject in your scene by selecting from the top dropdown menu GameObject > 3D Object > Quad. Rename the GameObject to “Mirror.”
7. Assign the newly created “SmoothMetal” Material to “Mirror” by dragging and dropping the “SmoothMetal” Material from the Project window onto the “Mirror” GameObject in the Hierarchy window.
8. Rotate “Mirror” 90° in the X Orientation so that it becomes horizontal, and position it into place within your scene so that it reflects the sky.
9. Screen Space Reflections are now active and visible in the reflective “Mirror” Quad GameObject. You can view the reflections in the sample scene “Workshop Set” (Figure 06).
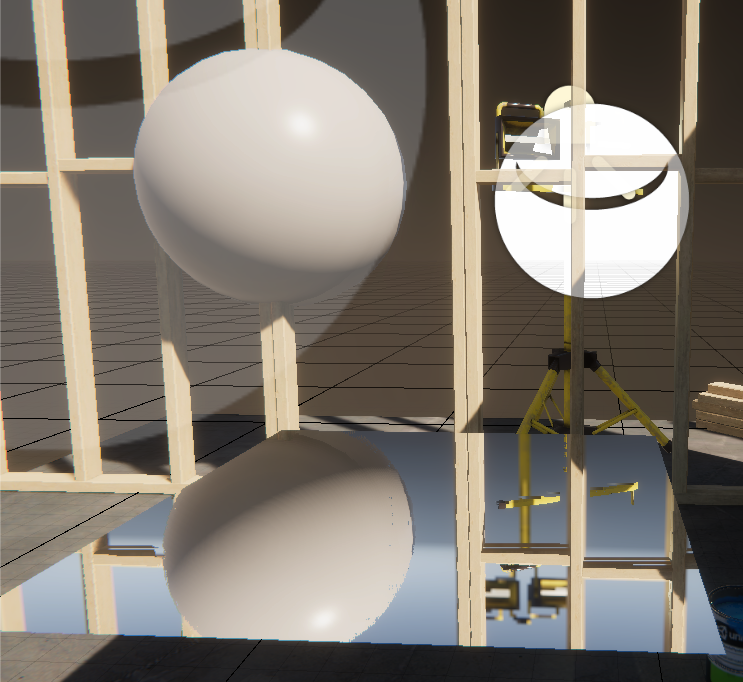
10. With Screen Space Reflections active, Create another 3D Object such as a Sphere, and position it above the Mirror. Leave the Sphere’s Material as default (Figure 07).
4. Configuring the Screen Space Reflections Override
Screen Space Reflections can be further refined and optimized by adjusting the Screen Space Reflections Volume Override Settings in the Inspector Window
Minimum Smoothness - This controls the smoothness value at which the HDRP activates SSR and the smoothness-controlled fade out stops.
Smoothness Fade Start - This controls the smoothness value at which the smoothness-controlled fade-out starts. The fade is in the range [Min Smoothness, Smoothness Fade Start].
Reflect Sky - When enabled, the SSR handles sky reflection.
Screen Edge Fade Distance - This controls the distance at which the HDRP fades out the SSR near the edge of the screen.
Object Thickness - This controls the typical thickness of objects the reflection rays may pass behind.
Quality - This specifies the quality level to be used for performance relevant parameters.
Max Ray Steps - This sets the maximum number of steps the HDRP uses for Ray tracing. This affects both accuracy and performance.
1. Select the checkbox to enable Screen Edge Fade Distance. Move the slider from 0 to 1 and back. At a value of 0 (Figure 08), the Screen Space Reflections have a hard-clipping edge. As the value increases (Figure 09), the transition widens for a smooth transparent fade. For now, uncheck or lower the Screen Edge Fade Distance.
2. Next, we will adjust the Max Ray Steps value. Screen Space Reflections are calculated via Ray Marching. Lowering the number of steps speeds up performance at the cost of accuracy. Setting this value too low will cause objects to not be reflected, or the reflection will appear for some rays and not others. You will need to change the Quality setting to Custom, in order to change the Max Ray Steps amount. The ideal setting will vary based on the construction of your scene (Figure 10).
3. Next we will adjust the Object Thickness settings. This will adjust the thickness of objects that rays may pass behind. In effect, this setting offsets the Screen Space Reflections. Select the Object Thickness checkbox and adjust the slider. Note how the vertical offset of the reflection changes (Figure 11).
5. Conclusion
Screen Space Reflections is an effective way to enhance the visual quality of any scene with reflective, shiny, or wet surfaces.