
XR Interaction Toolkit: Working with the Socket Interactor
Tutorial
intermediate
+0XP
15 mins
(35)
Unity Technologies
In this tutorial, we’ll take a closer look at the Socket Interactor. Unlike the Direct and Ray Interactors, which function as part of an XR Rig, the Socket Interactor exists as part of the virtual world. It holds an Interactable GameObject and raises an event when an Interactable is placed into, or removed from, the Socket.
Languages available:
1. XR Interaction Toolkit: Working with the Socket Interactor
This tutorial has been verified using Unity 2019.4.12f1 LTS and XR Interaction Toolkit 0.9.3-preview
In this tutorial, we’ll take a closer look at the Socket Interactor. Unlike the Direct and Ray Interactors, which function as part of an XR Rig, the Socket Interactor exists as part of the virtual world. It holds an Interactable GameObject and raises an event when an Interactable is placed into, or removed from, the Socket.
When creating a Socket Interactor, it’s important to remember that any Interactable that snaps into it will align its rotation with the Socket Interactor’s Transform (Figures 01-03).
2. Socket Interactor Events
The Socket Interactor raises two events: OnSelectEnter, when an Interactable GameObject is snapped into the socket, and OnSelectExit, when one is removed. These events should be in a script that’s attached to the same GameObject as the Socket Interactor.
We’ll create a Socket Interactor that controls a light. When nothing is in the Socket, or an Interactable is in the Socket but doesn’t have the Color Change component, the light stays its default color. If the Interactable placed into the Socket has the Color Change component attached, the light’s color changes to match the Interactable’s.
1. Create a new C# script. Call it SocketEvents and open it in the Script Editor.
2. Add the following data members:
public Light light;
private Color defaultLightColor;
3. Delete Update, as we won't be using it.
4. Inside Awake, add:
defaultLightColor = light.color;
    XRSocketInteractor socket = gameObject.GetComponent<XRSocketInteractor>();
    socket.onSelectEnter.AddListener(ColorChange);
    socket.onSelectExit.AddListener(LightsOut);
5. After Start, create two new methods: ColorChange and LightsOut. Both should have a single parameter: XRBaseInteractable obj.
public void ColorChange(XRBaseInteractable obj)
    {
        light.gameObject.SetActive(true);
        ColorChange colorChange = obj.gameObject.GetComponent<ColorChange>();
        if (colorChange != null)
            light.color = colorChange.color;
        else
            light.color = defaultLightColor;
    }

    public void LightsOut(XRBaseInteractable obj)
    {
        light.color = defaultLightColor;
    }
6. Save changes and return to the Unity Editor.
7. Create another C# script called ColorChange and open it in the Script Editor.
8. This script acts upon the Interactable’s Mesh Renderer. Just before the class definition, add:
[RequireComponent(typeof(MeshRenderer))]9. Delete Update, and add the following data member:
public Color color = Color.white;10. Inside Start, add:
MeshRenderer mr = gameObject.GetComponent<MeshRenderer>();
    mr.material = new Material(Shader.Find("Standard"));
    mr.material.SetColor("_Color", color);
11. Save changes, and return to the Unity Editor.
3. Setting Our Scene
We’ll create a Socket Interactor with the Socket Events component and a Grab Interactable with the Color Change component. We’ll duplicate the Interactable a few times, each time changing the color.
1. Create a new Scene.
2. Add a plane by selecting 3D Object > Plane from the GameObject drop-down. Name it Ground, and scale it 50 units along the X and Z axes.
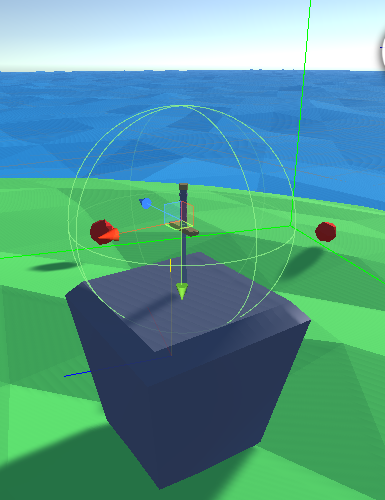
3. Create a Cube by selecting 3D Object > Cube from the GameObject drop-down. Name it Pedestal. Scale it to 0.5 in the X and Z axes, leaving the Y scale at 1. To set it on the ground, set its Y position to 0.5.
4. Create an empty GameObject by selecting Create Empty from the GameObject drop-down. Name it Socket.
5. In the Hierarchy view, drag and drop Socket onto Pedestal so that it’s a child Transform. Set its Position so that it sits 1 unit (in Y) above the pedestal.
6. To Socket, add a Sphere Collider of Radius 1, set to Is Trigger.
7. Add the XR Socket Interactor and Socket Events components.
8. Create a Sphere by selecting 3D Object > Sphere from the GameObject drop-down. Name it Color Cell. Scale it to 0.5 in X, Y, and Z.
9. Add RigidBody, XR Grab Interactable, and Color Change components.
10. Set the color in Color Change to red (or whatever color you prefer).
11. Duplicate Color Cell and distribute it around the Scene, changing the color each time. You can also try removing the Color Change component altogether from some Interactables.
12. Create an XR Rig and place it near the pedestal if you don’t have a headset capable of Room-Scale XR (or if you’re using Room-Scale within a restricted space).
13. Click to select Socket.
14. In the XR Socket Interactor section of the Inspector, set Starting Selected Interactable to one of the Color Cells.
15. In the Socket Events section of the Inspector, drag and drop in the default Directional Light from the Scene.
16. Save the Scene and build and launch the project on your chosen device.
17. Remove the default Interactable from the Socket, replacing it with one of the others. The color of the Directional Light, and thus the entire Scene (save for the Skybox), should change with each new Interactable that’s placed in the Socket.
4. Conclusion
The Socket Interactor is a great way to add puzzles and in-world interfaces to your virtual experience.