Create decorative objects using sprites
Tutorial
·
Beginner
·
+10XP
·
20 mins
·
(1574)
Unity Technologies
In this tutorial, you’ll work with sprites to decorate your game environment.
By the end of this tutorial, you’ll be able to do the following:
- Customize the way that Unity renders sprites.
- Create a prefab asset.
- Add decorative objects to your game scene.
1. Overview
Your game has a tilemap environment, but it’s currently empty. Before you set up the physics for your game, it will be helpful to have at least a few things in the world of your game as well as the player character.
By the end of this tutorial, you’ll be able to do the following:
- Customize the way that Unity renders sprites.
- Create a prefab asset.
- Add decorative objects to your game scene.
Working on your own project?
This tutorial is part of Beginner 2D: Adventure Game and refers to the game project for that course, but this information will be helpful for any beginner creator who wants to work with sprites in their own 2D game.
Note: For the purposes of this tutorial, we chose to use the Ruby’s Adventure asset set, and the file paths used in instructions will reflect this. If you chose another asset set, the file names will be the same, but in your corresponding theme folder.
2. Create a decoration for your game environment
Your tilemap does a lot of work to establish a sense of place for your game, but you can also add decorative objects to the scene to develop this further. These decorations can be part of the environment itself (like trees or rocks) or objects that have been placed within the environment (such as statues or mysterious boxes).
As you work through this course, you’ll give some decorative objects practical functions, such as collectible objects to increase the player character’s health and objects that can damage the player character.
To create a first decoration for your game, follow these instructions:
1. In the Project window, navigate to Assets > Art > [Your Chosen Project] > Environment
2. Select one of the decoration sprites, then drag it from the Project window and release it over the Hierarchy window to create a new GameObject.
3. In the Scene view, position the decoration using the Move Tool. If you want to, you can also resize the decoration using the Rect Tool.
4. Save your changes.
5. Select Play to enter Play mode and test your game. Try to move over and around the decoration.
At the moment, the player character will move right through the decoration’s GameObject and will either be on top of it or beneath it, depending on which GameObject Unity drew first when you launched the game as both of them are in the same Order in Layer.
Important: Remember to exit Play mode when you have finished testing — changes that you make in this mode will not be saved.
3. Draw sprites based on their y-axis position
You previously fixed an ordering problem by changing the Tilemap’s Order in Layer property so that it is always drawn before the PlayerCharacter GameObject and anything else in the scene. The same solution won’t work here — you don’t need to have the player character always drawn on top of decorations; instead, you need to simulate the top-down perspective of the game. Players will expect the character to be drawn first when it is in front of another object and last when it is behind an object.
You can achieve this effect by instructing Unity to draw GameObjects in order of n their y-coordinate (on the vertical axis): a GameObject that is lower on the screen (with a small y-coordinate) should be drawn after a GameObject higher on the screen (with a larger y-coordinate). This approach means that the correct GameObject will always be drawn on top to maintain the game’s scene of perspective.
To change the order in which Unity draws GameObjects, follow these instructions:
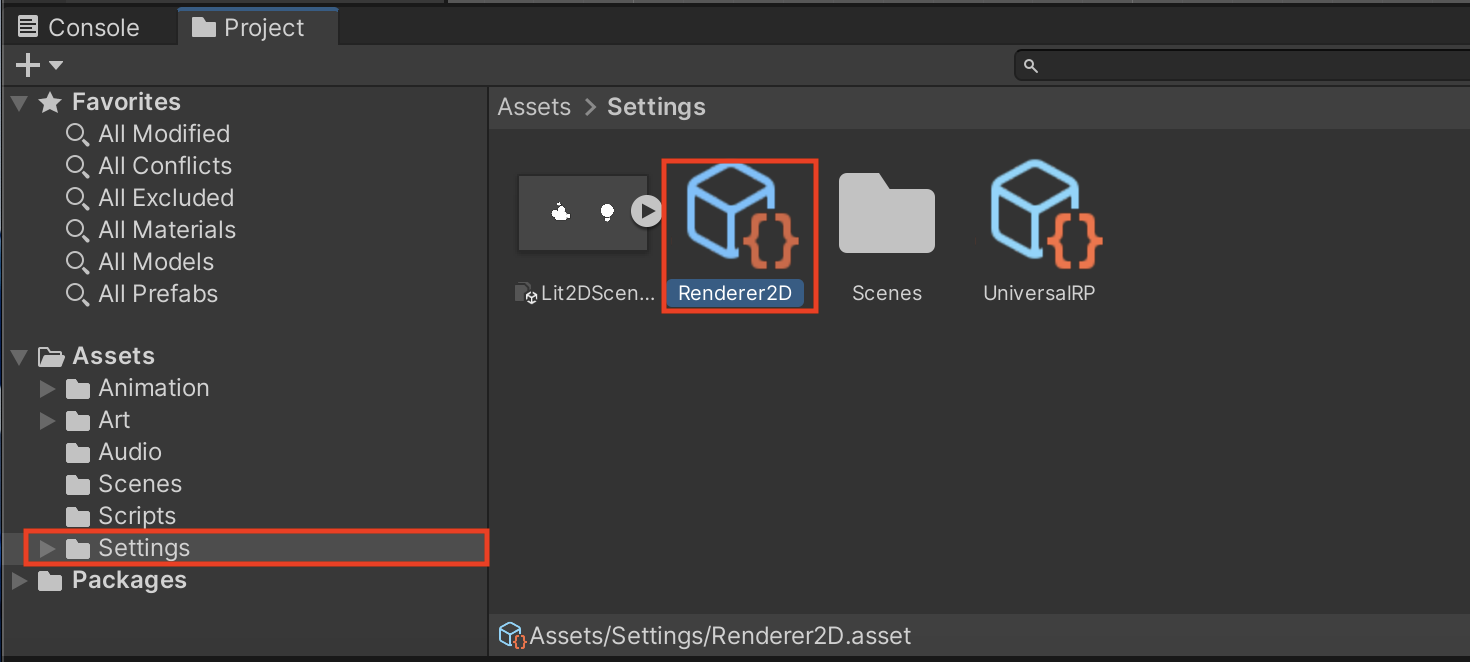
1. In the Project window, navigate to the Settings folder and select the Renderer2D asset.
2. In the Inspector window, use the foldout (triangle) to expand the General section and set the Transparency Sort Mode to Custom Axis.
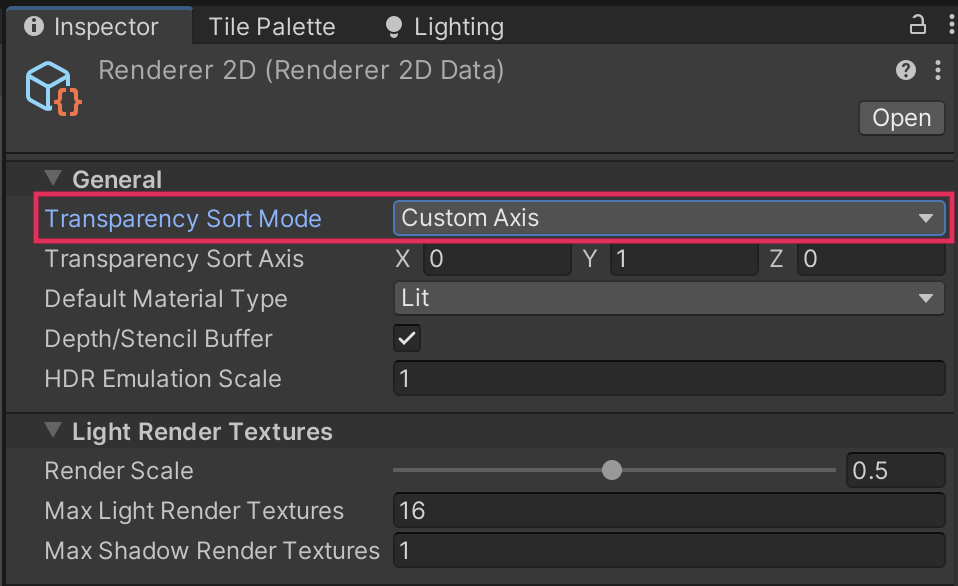
3. Set the following Transparency Sort Axis values:
- X = 0
- Y = 1
- Z = 0
Unity will now draw GameObjects and their sprites based on their position on the y-axis.
4. Test your changes again. Now the player character will be drawn behind the decoration when the player character is higher on the y-axis, and in front of the decoration when it is lower on the axis.
Your fix is good, but it’s not perfect — the moment where the character is drawn behind the decoration instead of in front looks like it is happening too early. To fix this, you’ll need to adjust the Sprite Renderer component.
4. Configure the player character’s Sprite Renderer
To configure the player character’s Sprite Renderer component, follow these instructions:
1. In the Hierarchy window, select the PlayerCharacter GameObject.
2. In the Inspector window, find the Sprite Renderer component and expand it if necessary.
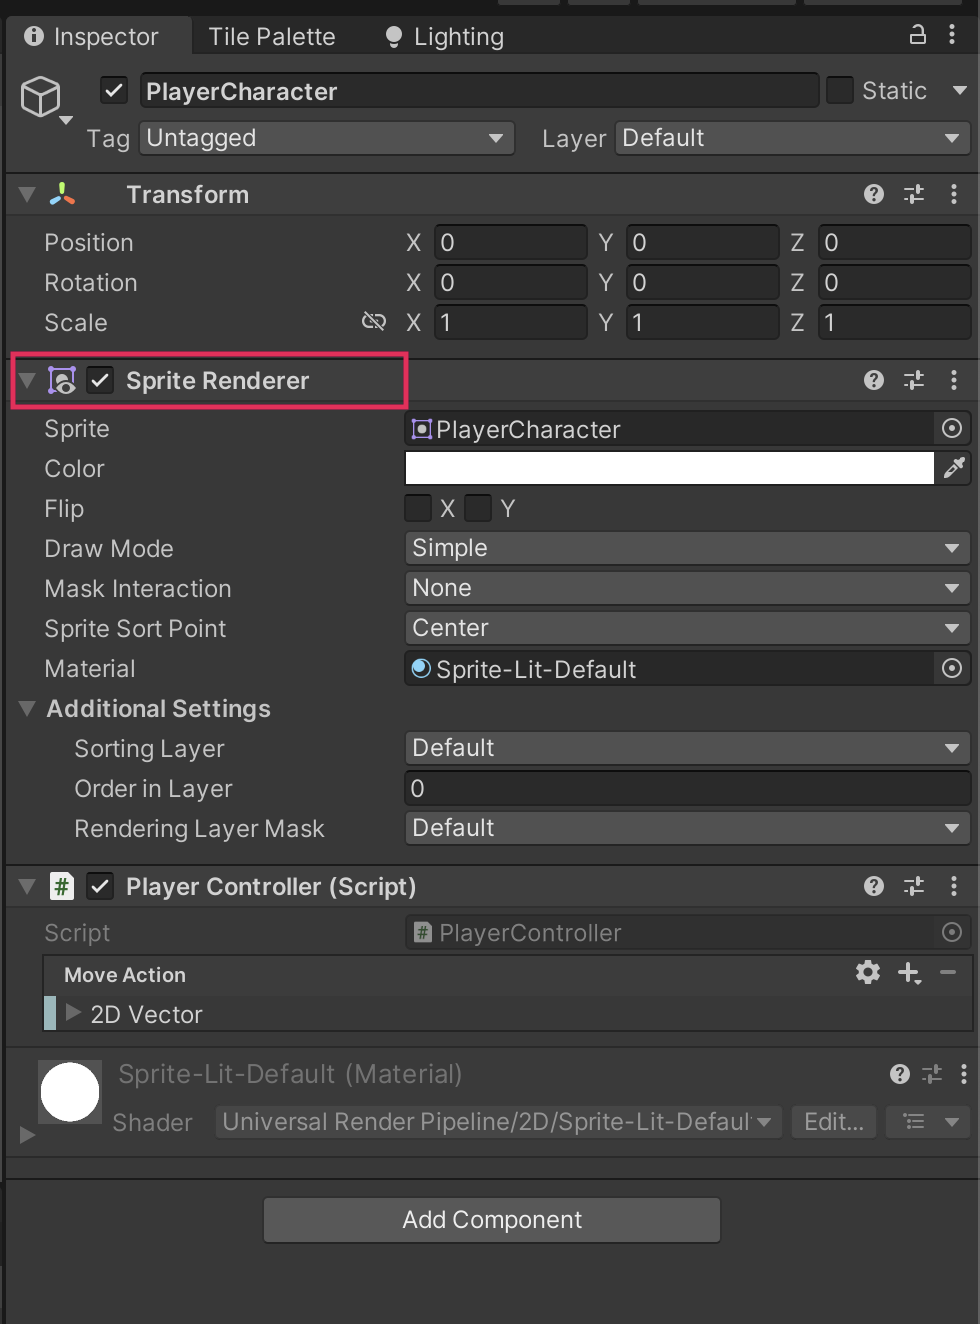
Currently, the Sprite Sort Point property is set to Center, which means that the center point of the PlayerCharacter GameObject’s sprite is used to determine whether it should be drawn in front or behind another GameObject.
3. Set the property to Pivot.

5. Adjust a single sprite pivot
A pivot is a special point, which you can manually define, that acts as the anchor for a sprite. The pivot affects the following 2D GameObject properties:
- Rotation: When you rotate a sprite, it rotates around its pivot.
- Position: The pivot is the point of the sprite that is drawn at the position set by the GameObject’s Transform component. For example, you set the player character’s position to (0,0) and its feet are the pivot, the feet will be drawn at (0,0). If you set the character’s head as the pivot, the head will be drawn at (0,0) instead.
To further improve the sprite’s axis sorting appearance, you need to adjust the pivots of both the player character and the decoration, and you’ll learn two different ways to set the pivot for a sprite.
To change the pivot for a single sprite, follow these instructions:
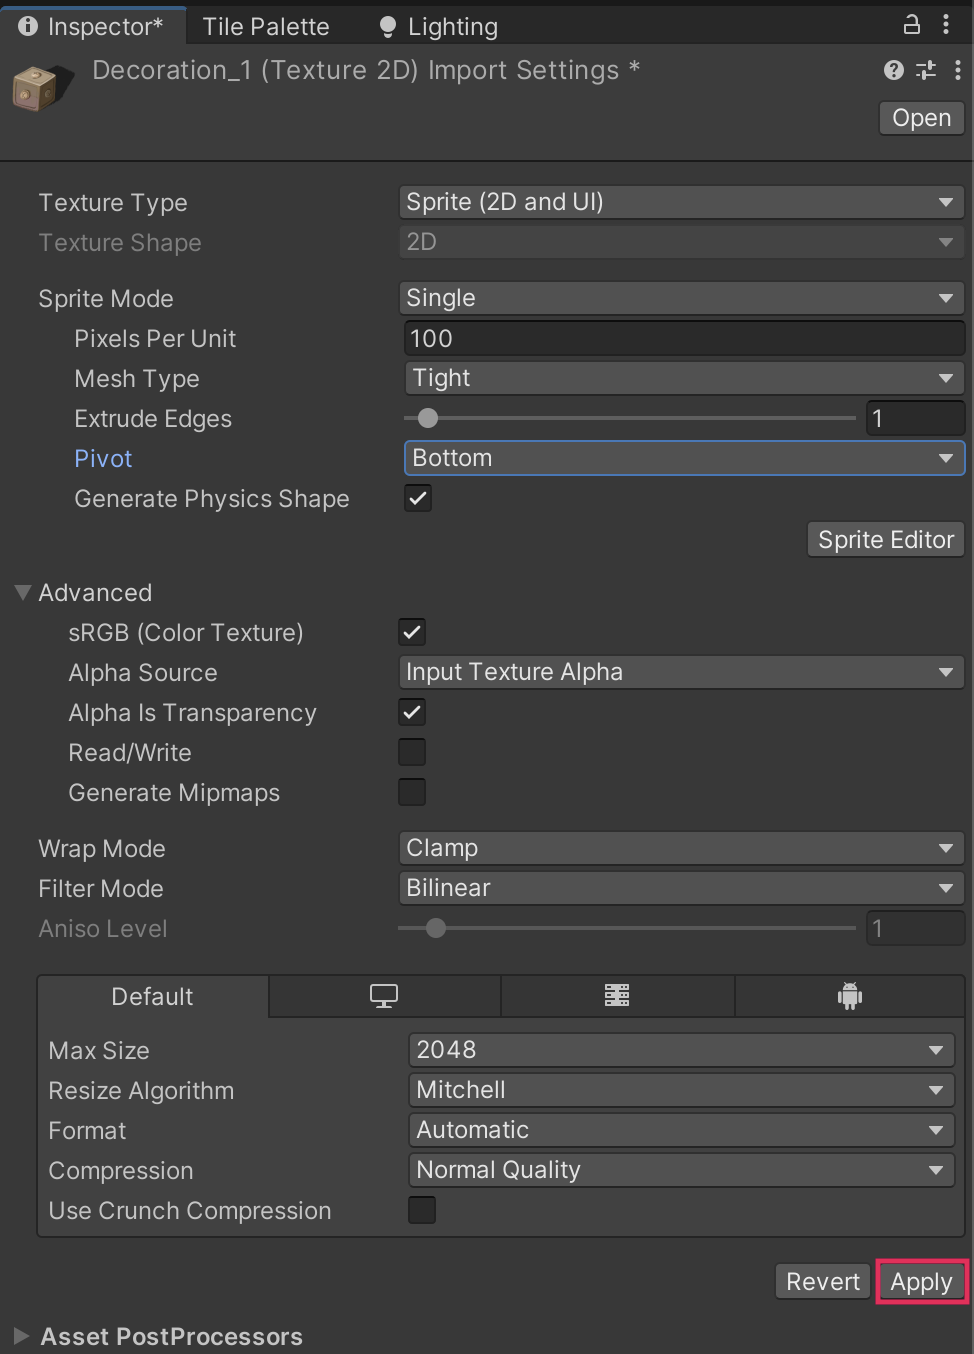
1. In the Project window, select the Decoration_1 sprite.
2. In the Inspector window, set the Pivot to Bottom.
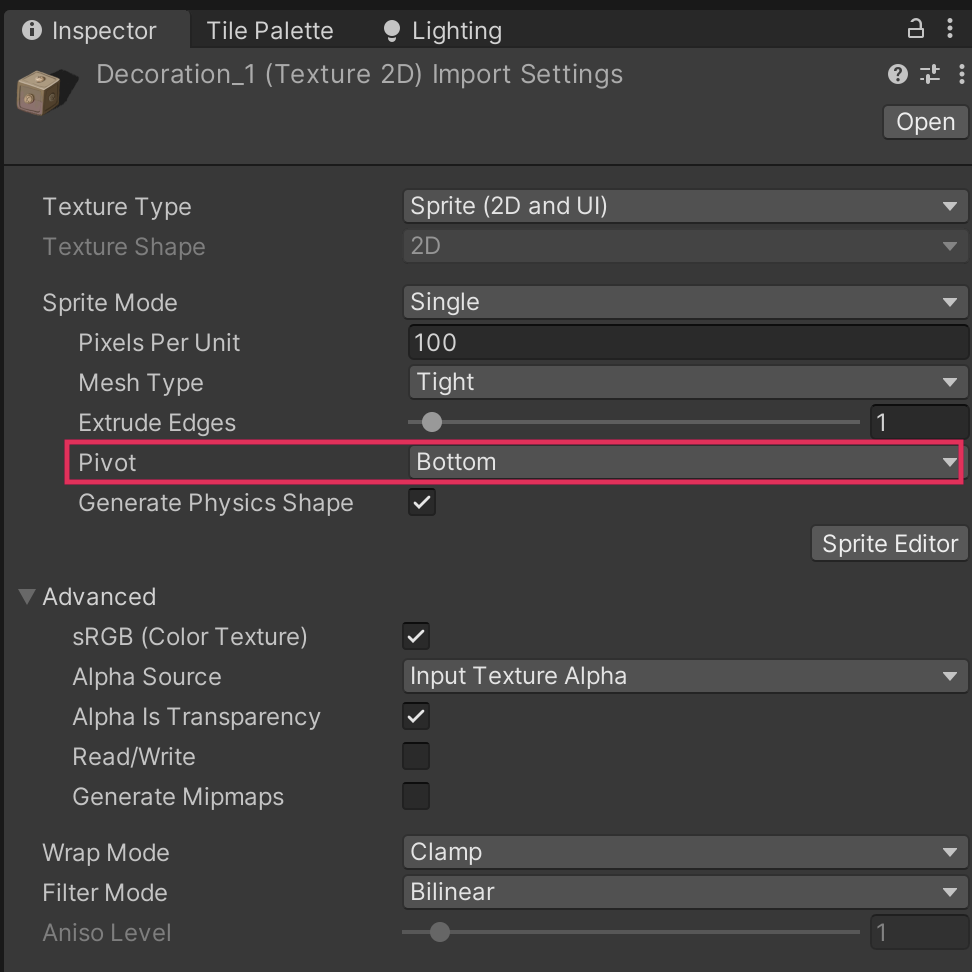
This change places the pivot at the bottom of the sprite instead of at its center. The bottom of the decoration will now be the first thing that is drawn.
3. Select Apply.
6. Change pivots using the Sprite Editor
The process you just followed only works for a single sprite. However, there is an alternative approach that can change multiple pivots at once — though you’re just going to use it for the PlayerCharacter sprite now. For example, you could also use this approach if you needed to set the pivot for multiple sprites from a tileset.
Follow these instructions to use the Sprite Editor to change pivots:
1. In the Project window, go to Assets > Art > Ruby. Select the PlayerCharacter sprite.
2. In the Inspector window, select Sprite Editor.
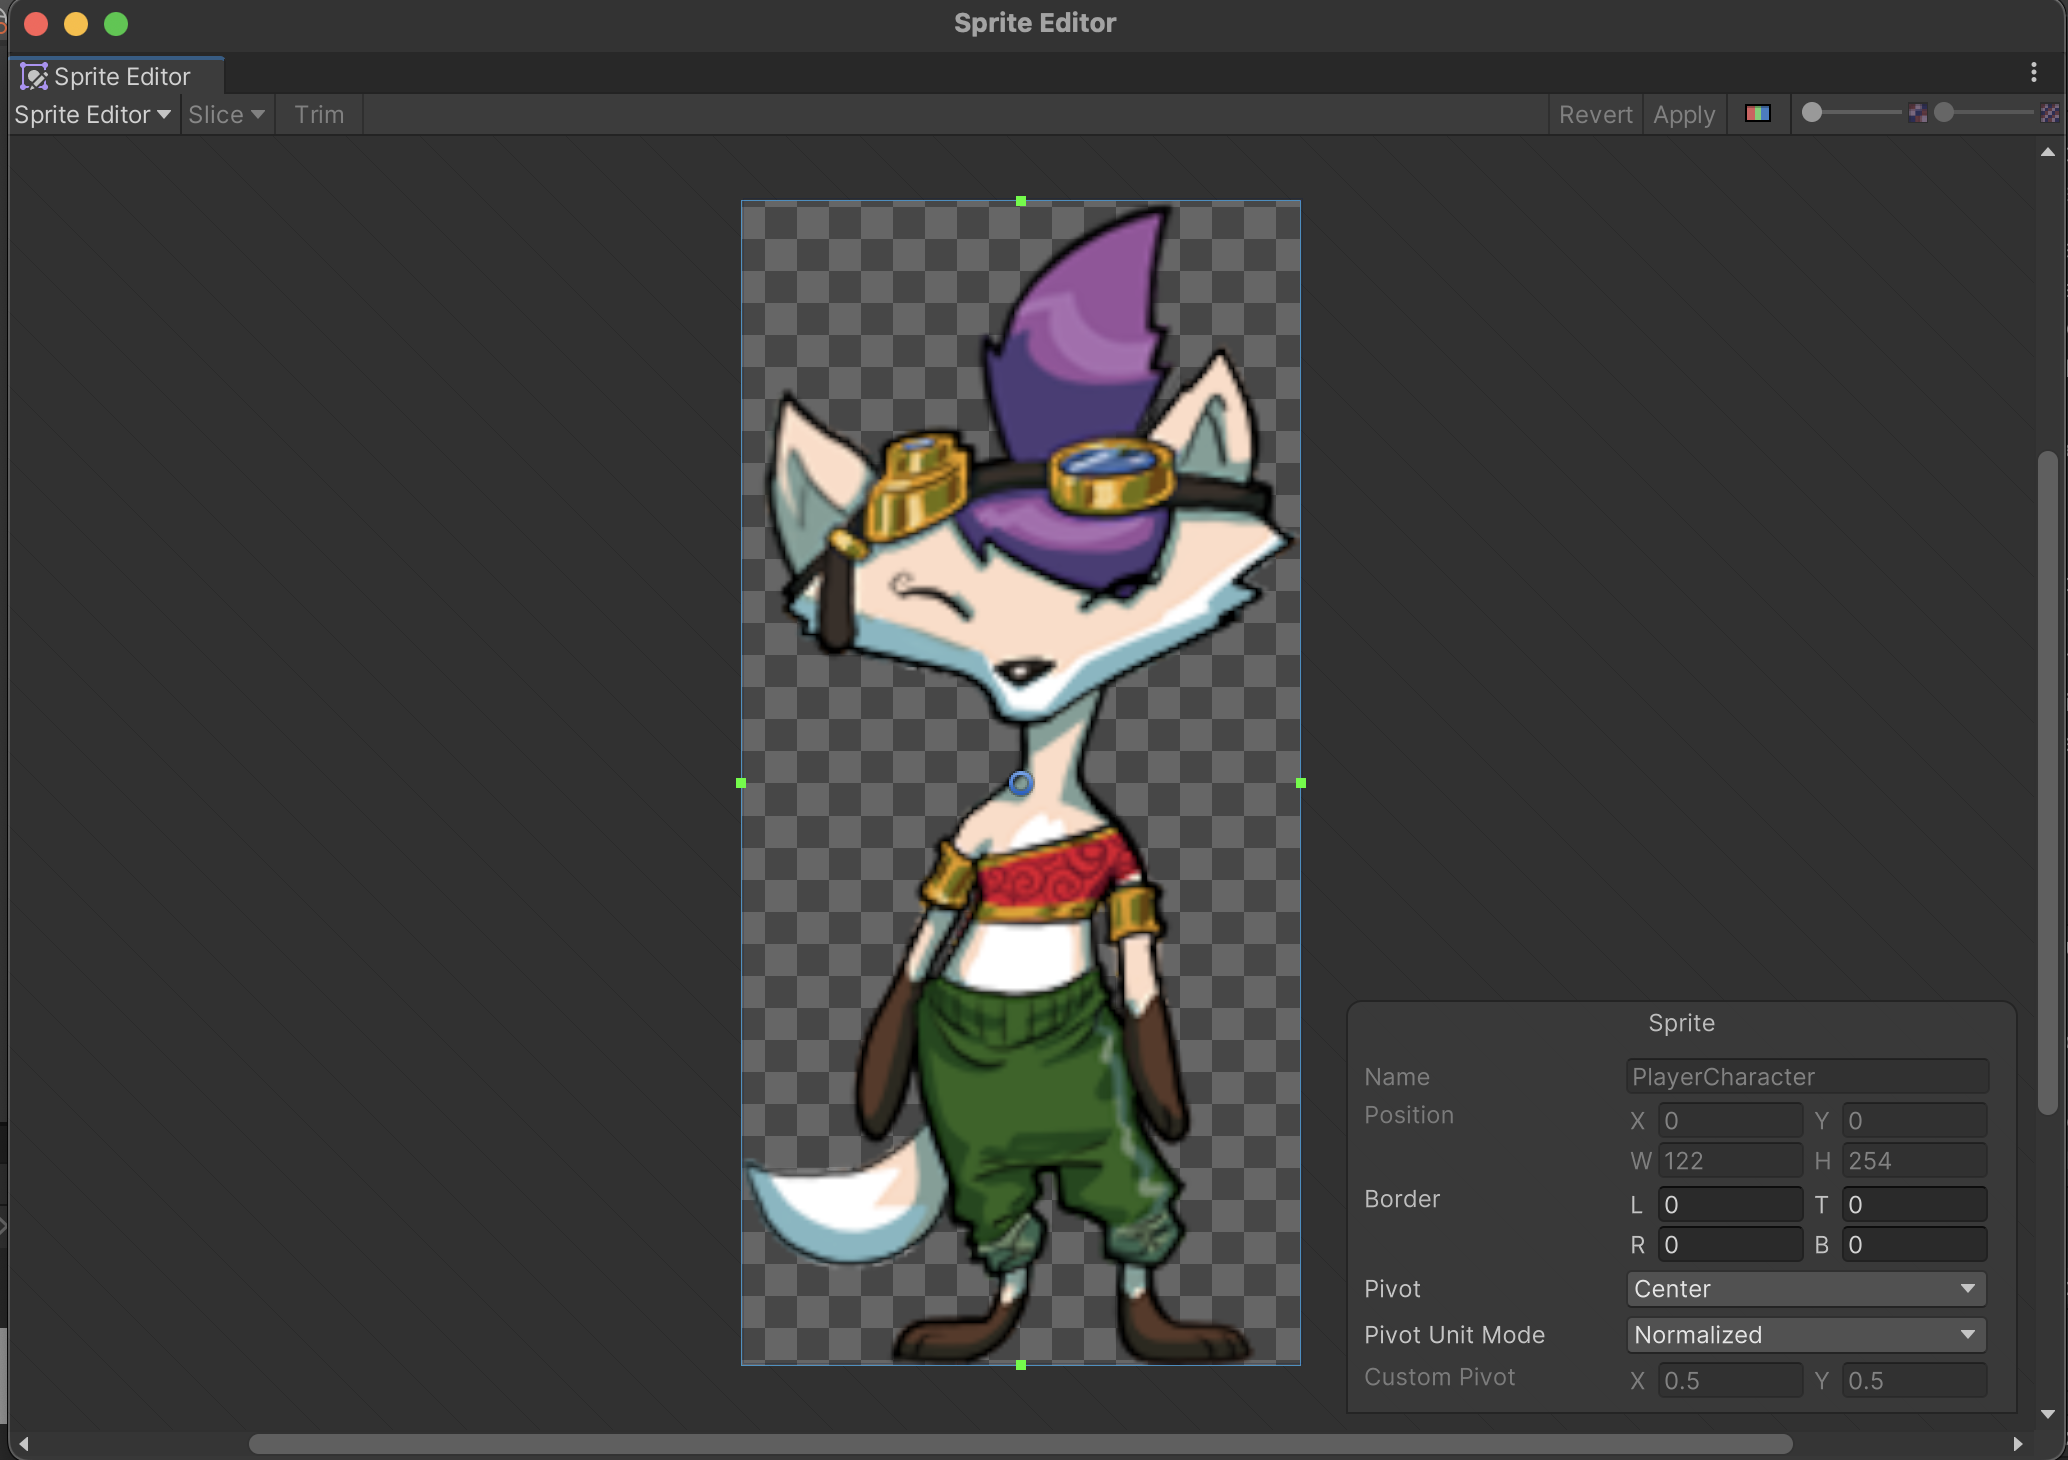
3. In the Sprite Editor window, find the blue circle icon in the center of the sprite. This icon represents the current pivot position.

4. Select the blue circle icon. You can either drag that circle icon manually to change the pivot or use the Sprite settings overlay to make more precise adjustments.
5. Set the Custom Pivot to the following values:
- X = 0.5
- Y = 0
6. In the Project window, create a new folder as a child folder of the main Assets folder and name it “Prefabs”, then turn your decoration into a prefab.
If you need to refresh your memory of this process, review the guidance in Manage GameObjects with prefabs tutorial.

As the Pivot Unit Mode is set to Normalized, 0 is the minimum value (left for the x-axis and bottom for the y-axis), 1 is maximum value (right for x-axis, top for y-axis), and 0.5 is the middle value.
7. Select Apply then close the Sprite Editor window.
8. Test your changes — everything should now be displayed as expected.
7. Tile sprites to avoid stretching
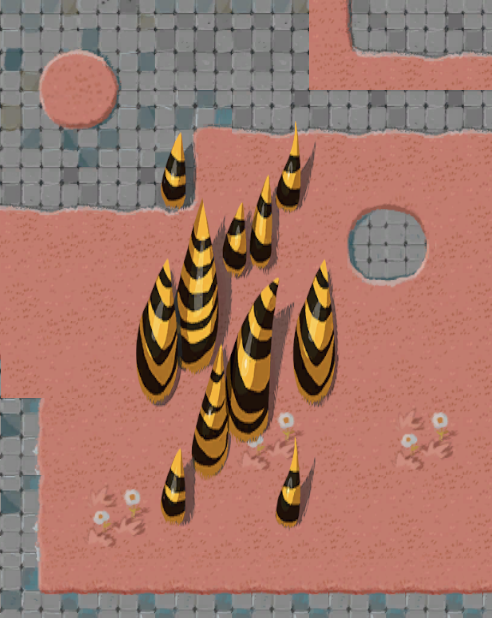
Most sprites in the 2D Beginner asset packs work as single sprites, but some of them can actually be used to cover a larger area of the environment rather than adding multiple decoration GameObjects. The DamageZone sprite for the Ruby asset pack is a good example
You can use the Rect Transform tool on the Scene view Tools Overlay to position and scale GameObjects that render sprites. However, if you try to resize the DamageZone GameObject then the sprite just stretches. Distorted sprites don’t make a great player experience!
Follow these instructions to set the sprite to tile when you resize the GameObject instead:
1. Create a new GameObject using the DamageZone sprite. Then turn the DamageZone GameObject into a prefab.
2. In the Hierarchy window, select the DamageZone GameObject.
3. In the Inspector window, go to the Transform component and confirm that the GameObject Scale is set to (1,1,1).
4. In the Sprite Renderer component, set the Draw Mode to Tiled.
You’ll get a warning dialog that says the sprite is not appropriately configured for this draw mode. You’ll fix this in a moment.
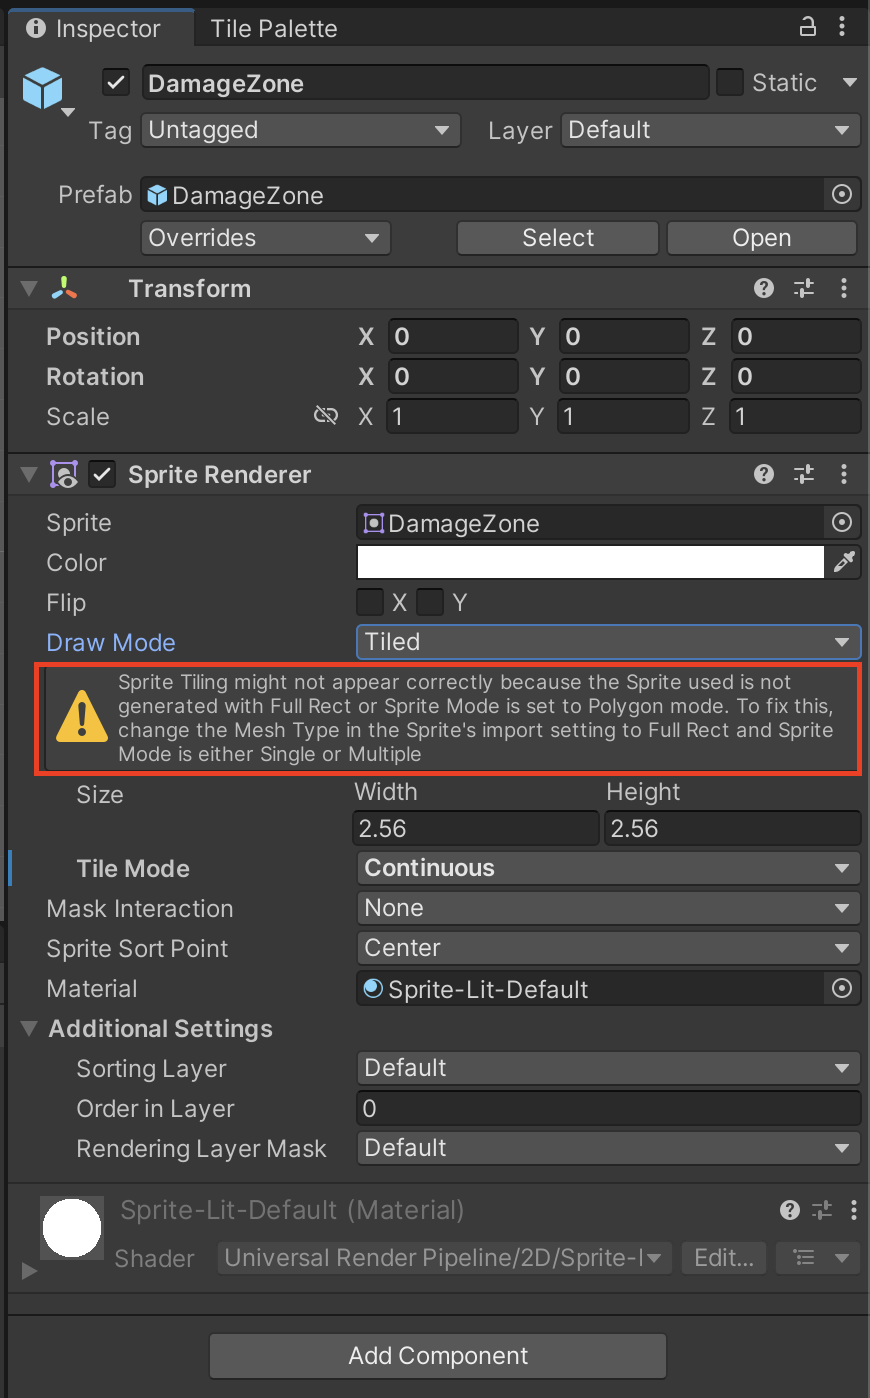
5. Set the Tile Mode to Adaptive.
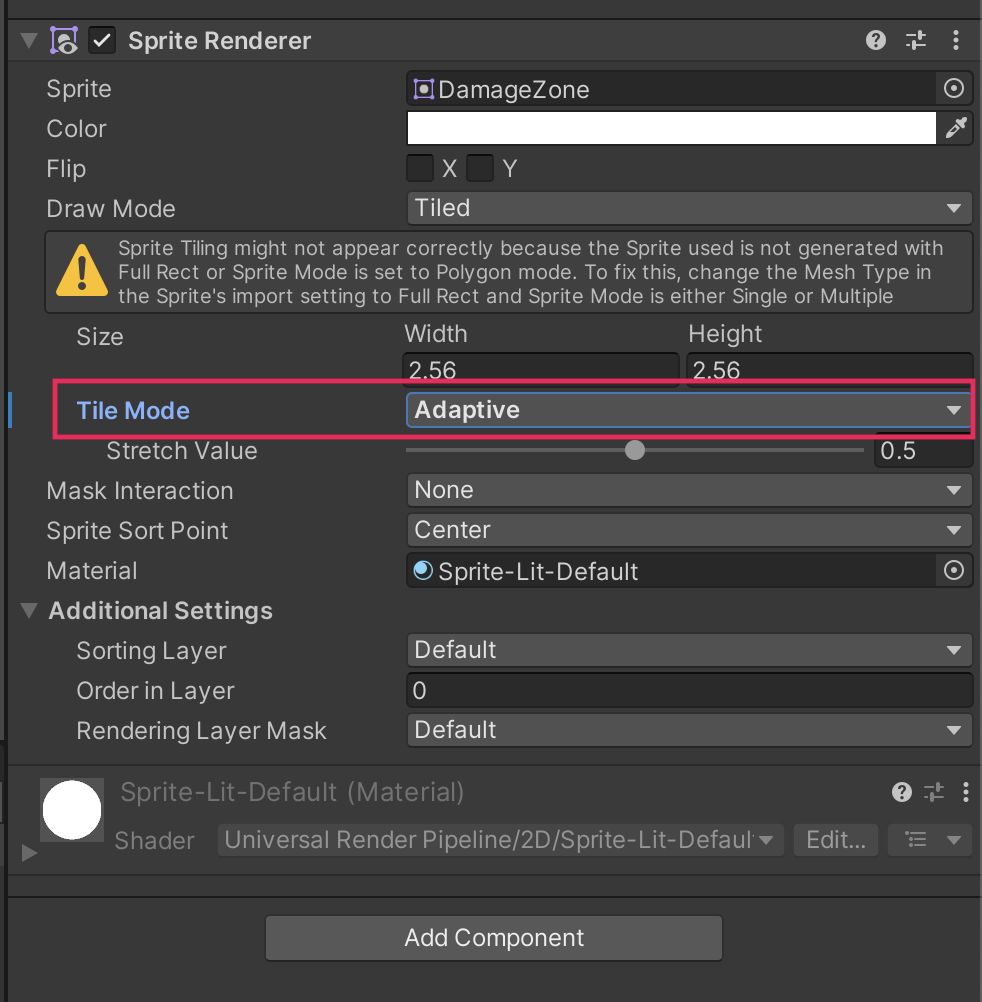
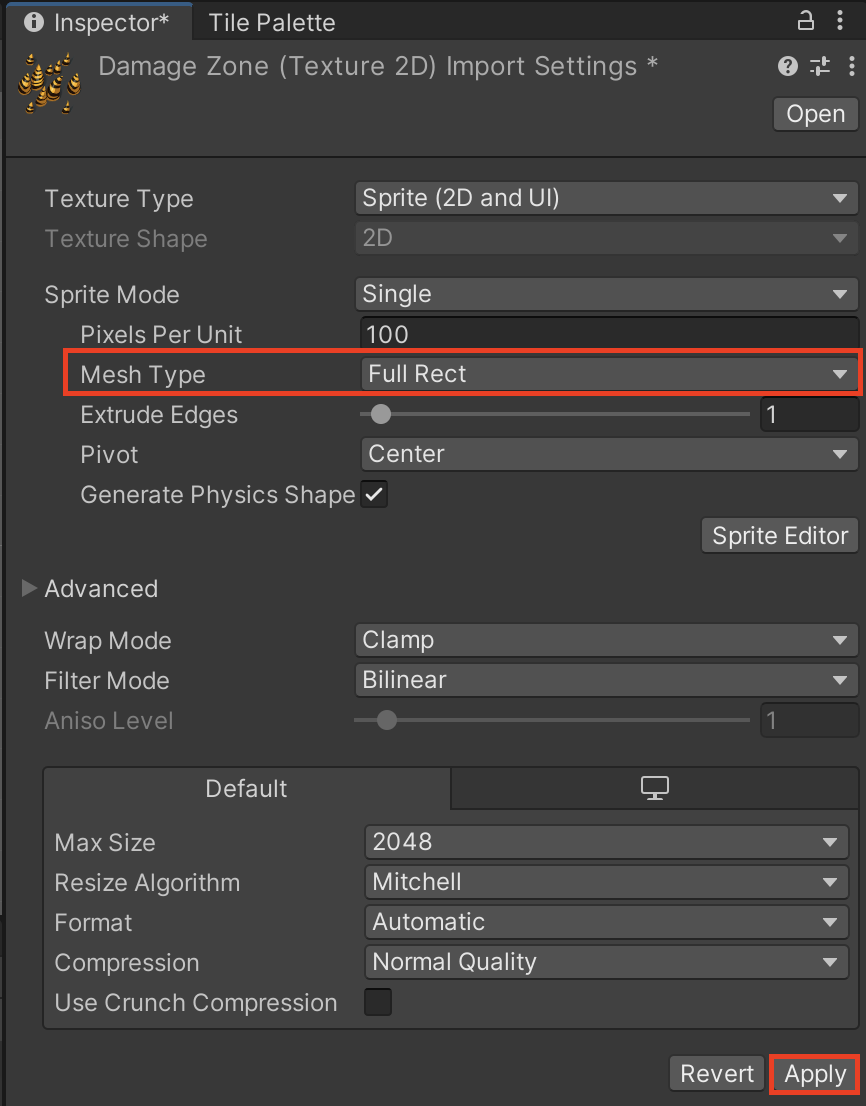
6. In the Project window, navigate to Assets > Art > [Your Chosen Project] > Environment and select the DamageZone sprite.
7. In the Inspector window, set the Mesh Type to Full Rect, then select Apply.
8. In the Hierarchy window, select the DamageZone GameObject. The warning will no longer be displayed in the Sprite Renderer component.
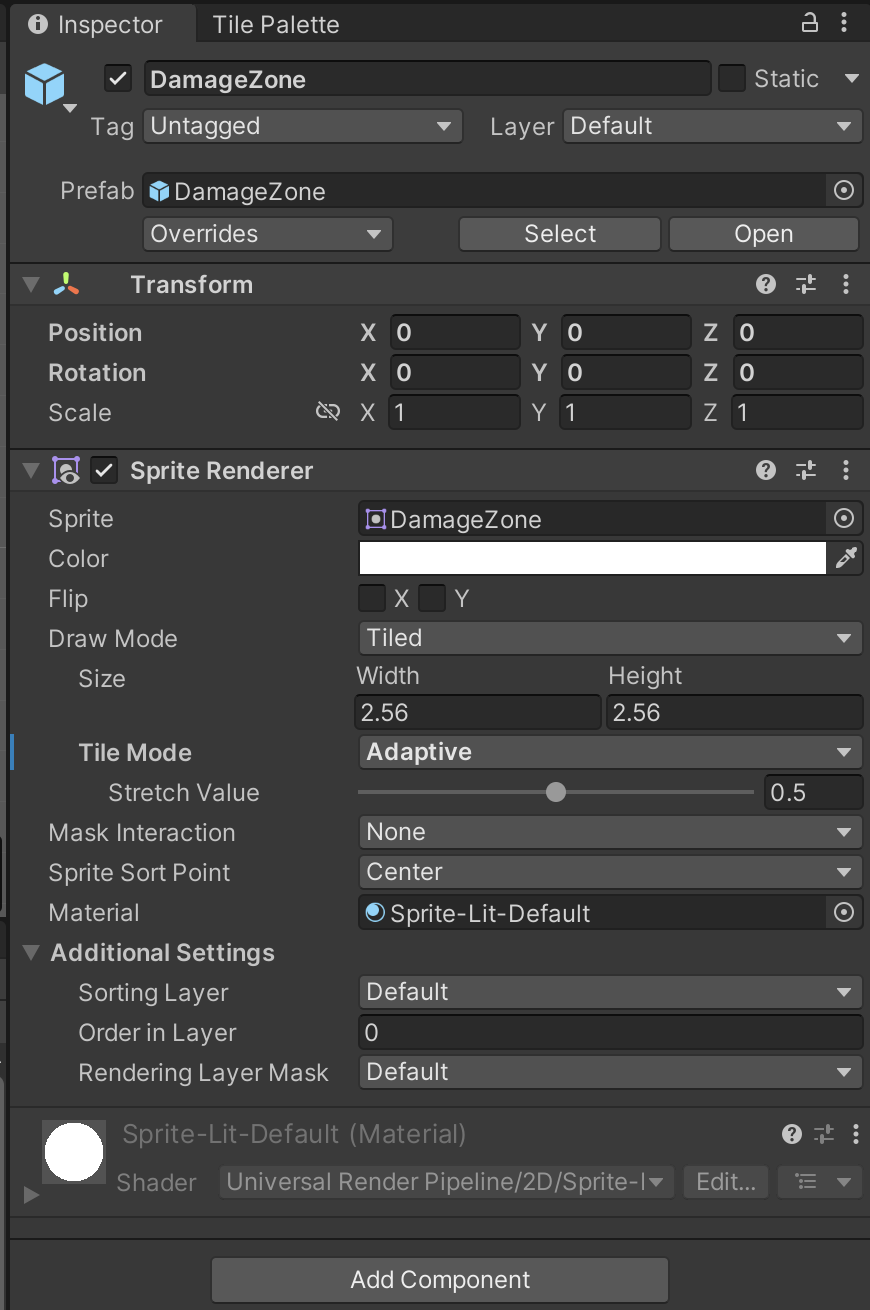
Now when you resize the GameObject with the Rect Transform tool, it will stretch until it can fit another sprite, and then multiple sprites will be tiled to fit the size that you choose.
Important: This solution to over-stretching will only work when you use the Rect Transform tool; the Scale tool changes the scale of the GameObject and does not impact sprite tiling.
8. More things to try
If you want to further develop your skills, explore new concepts, or improve your project, check out some of the optional activities below. Each one is tagged as either Easy, Medium, or Difficult, so you can choose the level of challenge.
These activities are entirely optional, so if you’re not interested, no problem — just skip this step. We do recommend attempting at least one of them in order to get the most out of this learning experience. Good luck!
Easy: Populate your game world with decorations
Now you’ve set up a decoration object for your game, have fun and use the assets we’ve provided or other ones that you find yourself to make your game world feel engaging for players.
Remember, you can also override the default prefab configuration or create prefab variants, which might help you to take an efficient and iterative approach to customizing your game world.
Medium: Create a resizable a picnic rug decoration
The tilesets that you’re working with from the 2D Beginner: Adventure Game asset packs don’t need to remain in proportion, but sometimes you will want to rescale a sprite and preserve a pattern rather than stretch the sprite — a patterned rug is a good example of this.
You can preserve the proportions of a sprite by using 9-slicing, a 2D technique that splits an image asset into nine sections that work as tiles and remain in proportion.
Important: 9-slicing is not the same as the tileset slicing that you completed in this tutorial.
As you continue your journey as a creator, you’ll need to develop your comfort at reviewing documentation and trying new things independently. You have a great opportunity to do that here.
If you’d like to try working with 9-sliced assets, follow these high level instructions:
1. Find or create a patterned rug sprite asset, or another alternative where you’d need to constrain the proportions for it to display correctly in your game.
2. Review the documentation on 9-slicing sprites and configure your assets appropriately.
3. Try out resizing the 9-sliced rug or other decoration in your game!
9. Next steps
Now there are decorations in your world, you can set up the basic physics for your game. In the next tutorial, you’ll configure your player character and decorations so they collide.