
Exploring the Editor Layout
Tutorial
foundational
+10XP
10 mins
(456)
Unity Technologies
Unity is a robust development engine with many features, and as a result, it has a large number of Editor windows. In this tutorial, you'll explore the windows in Unity's Default Layout and learn how to use them.
1. Exploring the Main Editor Video
This tutorial has been verified using Unity 2019 LTS
2. Exploring the Editor Layout
Unity is a robust development engine with many features, and as a result, it has a large number of Editor windows. To help make the work environment more approachable, the Default Layout features only major windows most commonly used during typical development. Additional windows can be found under the Windows dropdown at the top of the work area.
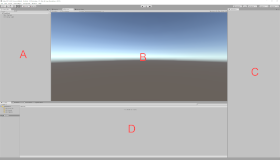
The main Editor features are as follows. (Figure 01)
A. Hierarchy window: Lists all GameObjects that exist in the current Scene.
B. Scene view: Main work area.
C. Inspector window: Lists the properties of a selected GameObject or asset.
D. Project window: Lists all the assets, scenes, and scripts contained in your created project.
All Unity windows can be “torn off” by clicking and dragging on a window’s tab, and can then be docked elsewhere in the Editor or left free-floating on the main or alternate monitors. (Figure 02)
In addition to the Default Layout, Unity offers several other layout options that may be useful for your specific project. To access them, click on the Layout dropdown in the upper right corner of the Editor (Figure 03).
Different layouts lend themselves to different types or stages of production. For example, the Tall Layout gives more dedicated screen space to the Scene tab, giving more room to work when creating a scene (Figure 04).
If windows ever become lost or the layout becomes problematic, return to the Default Layout by clicking on the Layout dropdown and selecting Default (Figure 05).
3. Docking and Undocking Windows
All Unity windows can be “torn off” by clicking and dragging on a window’s tab, and can then be docked elsewhere in the Editor or left free-floating on the main or alternate monitors. (Figure 02)
4. Exploring Other Layout Options
In addition to the Default Layout, Unity offers several other layout options that may be useful for your specific project. To access them, click on the Layout dropdown in the upper right corner of the Editor (Figure 03).
Different layouts lend themselves to different types or stages of production. For example, the Tall Layout gives more dedicated screen space to the Scene tab, giving more room to work when creating a scene (Figure 04).
5. Returning to the Default Layout
If windows ever become lost or the layout becomes problematic, return to the Default Layout by clicking on the Layout dropdown and selecting Default (Figure 05).