
Lesson 6.2 - Additional Lighting Techniques
Tutorial
·
Beginner
·
+10XP
·
35 mins
·
(176)
Unity Technologies
In this unit, you’ll continue refining the visual fidelity of your Scene by adding street lighting through Prefabs, working with the Light Explorer, controlling lighting with activation tracks, and adding fog.
1. Lesson Overview
2. Adding Street Lighting and Creating Prefabs
In this lesson, we will continue to add lighting to the Unit6 with illumination from streetlight lamp posts. We will also learn more about creating Prefabs. Prefabs are very useful when saving specially customized GameObjects. Supposing you will use repeating elements — such as a street light — occurring in multiple locations throughout a Scene, it would be considered best practice to use a Prefab. It is advantageous to combine Assets, such as a lamp post with a Spotlight, and then pair them into a Prefab. This will save time from having to build up repeating elements redundantly.
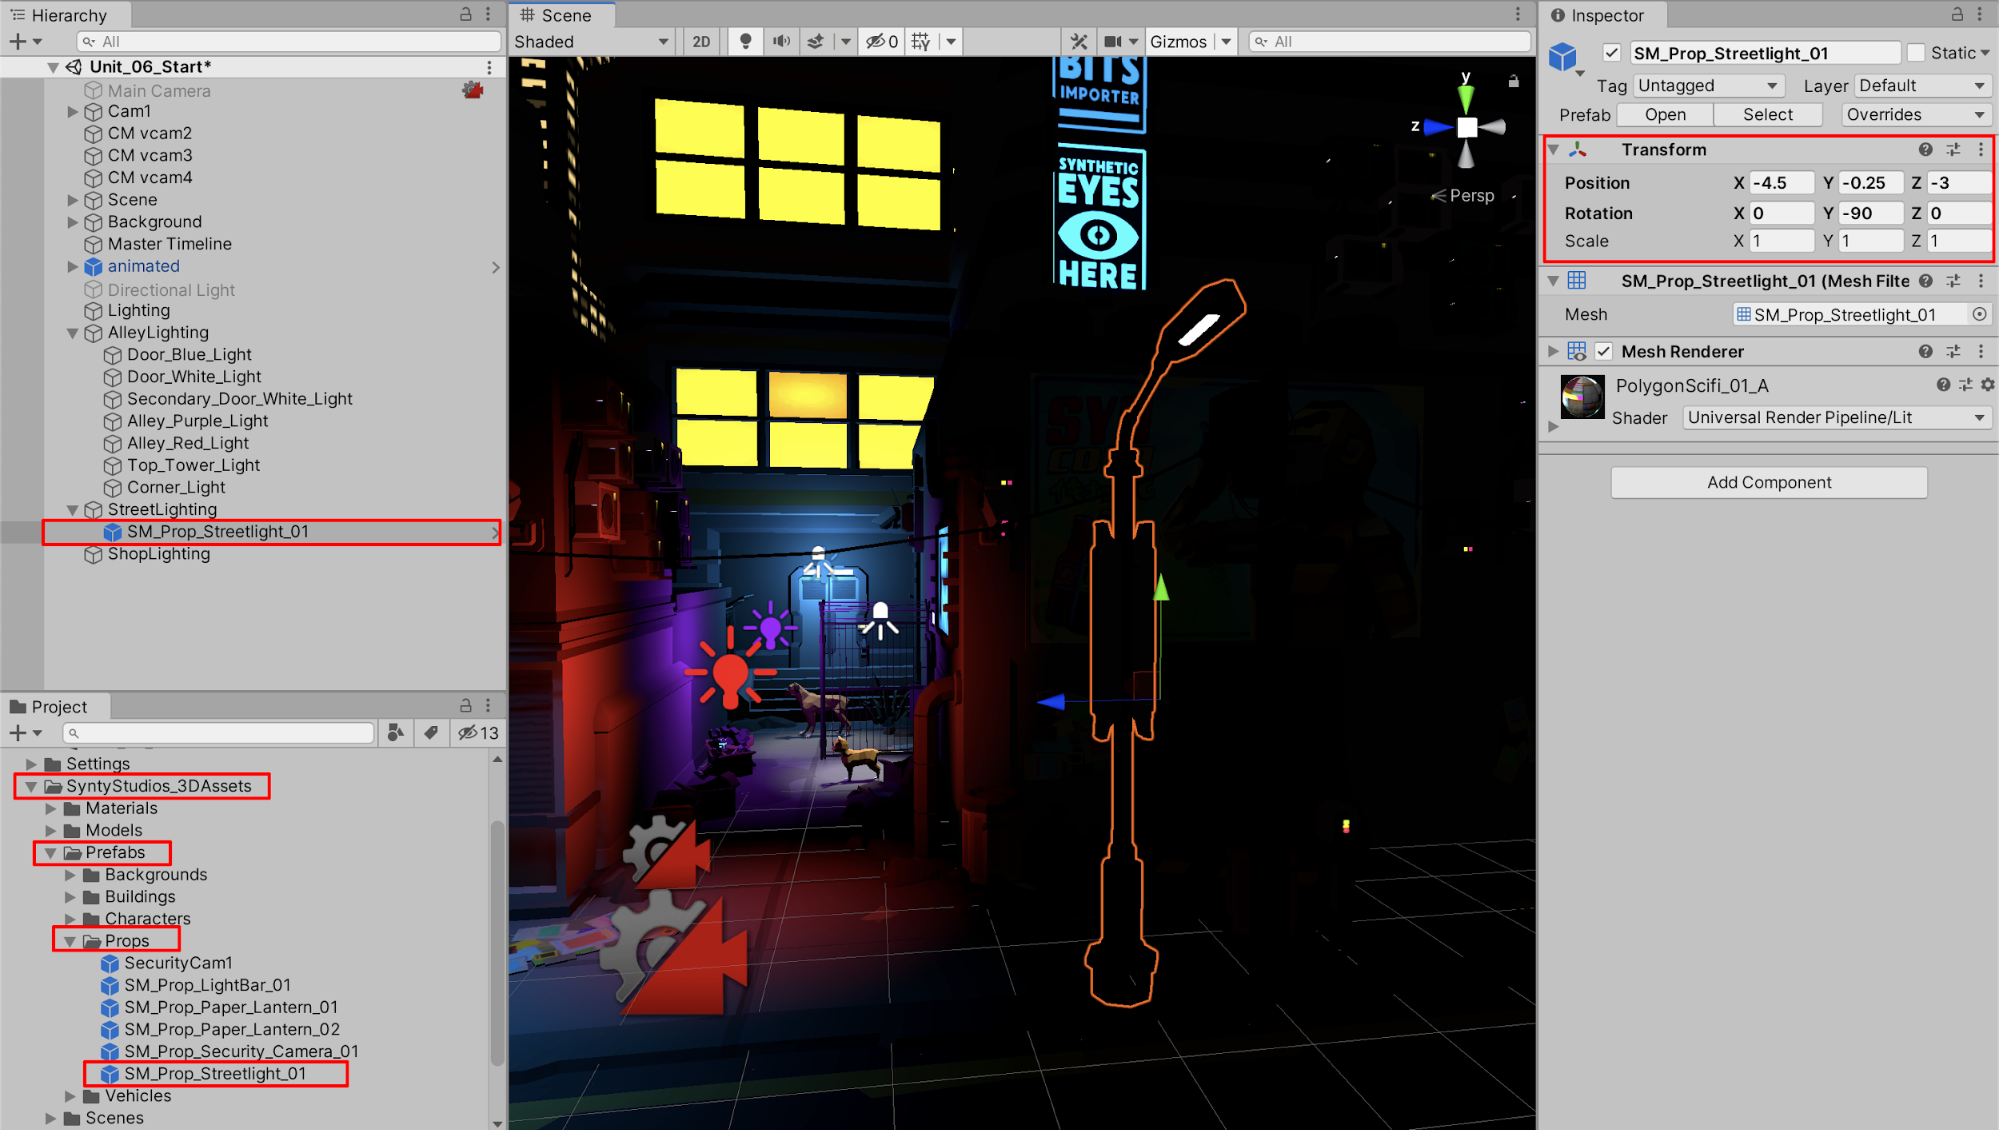
1. Locate the Streetlight Asset in the Project window named SM_Prop_Streetlight_01, contained in the Assets folder: SyntyStudios_3DAssets > Prefabs > Props. Add this Streetlight prop to the Scene by selecting and dragging it into the Scene or Hierarchy window. Organize the Streetlight’s Hierarchy to be placed as a child within the StreetLighting GameObject. Set the Streetlight’s Position coordinates to X=-4.5, Y=-0.25, and Z=-3. Set the Streetlight’s Y Rotation axis to Y=-90 (Figure 01).
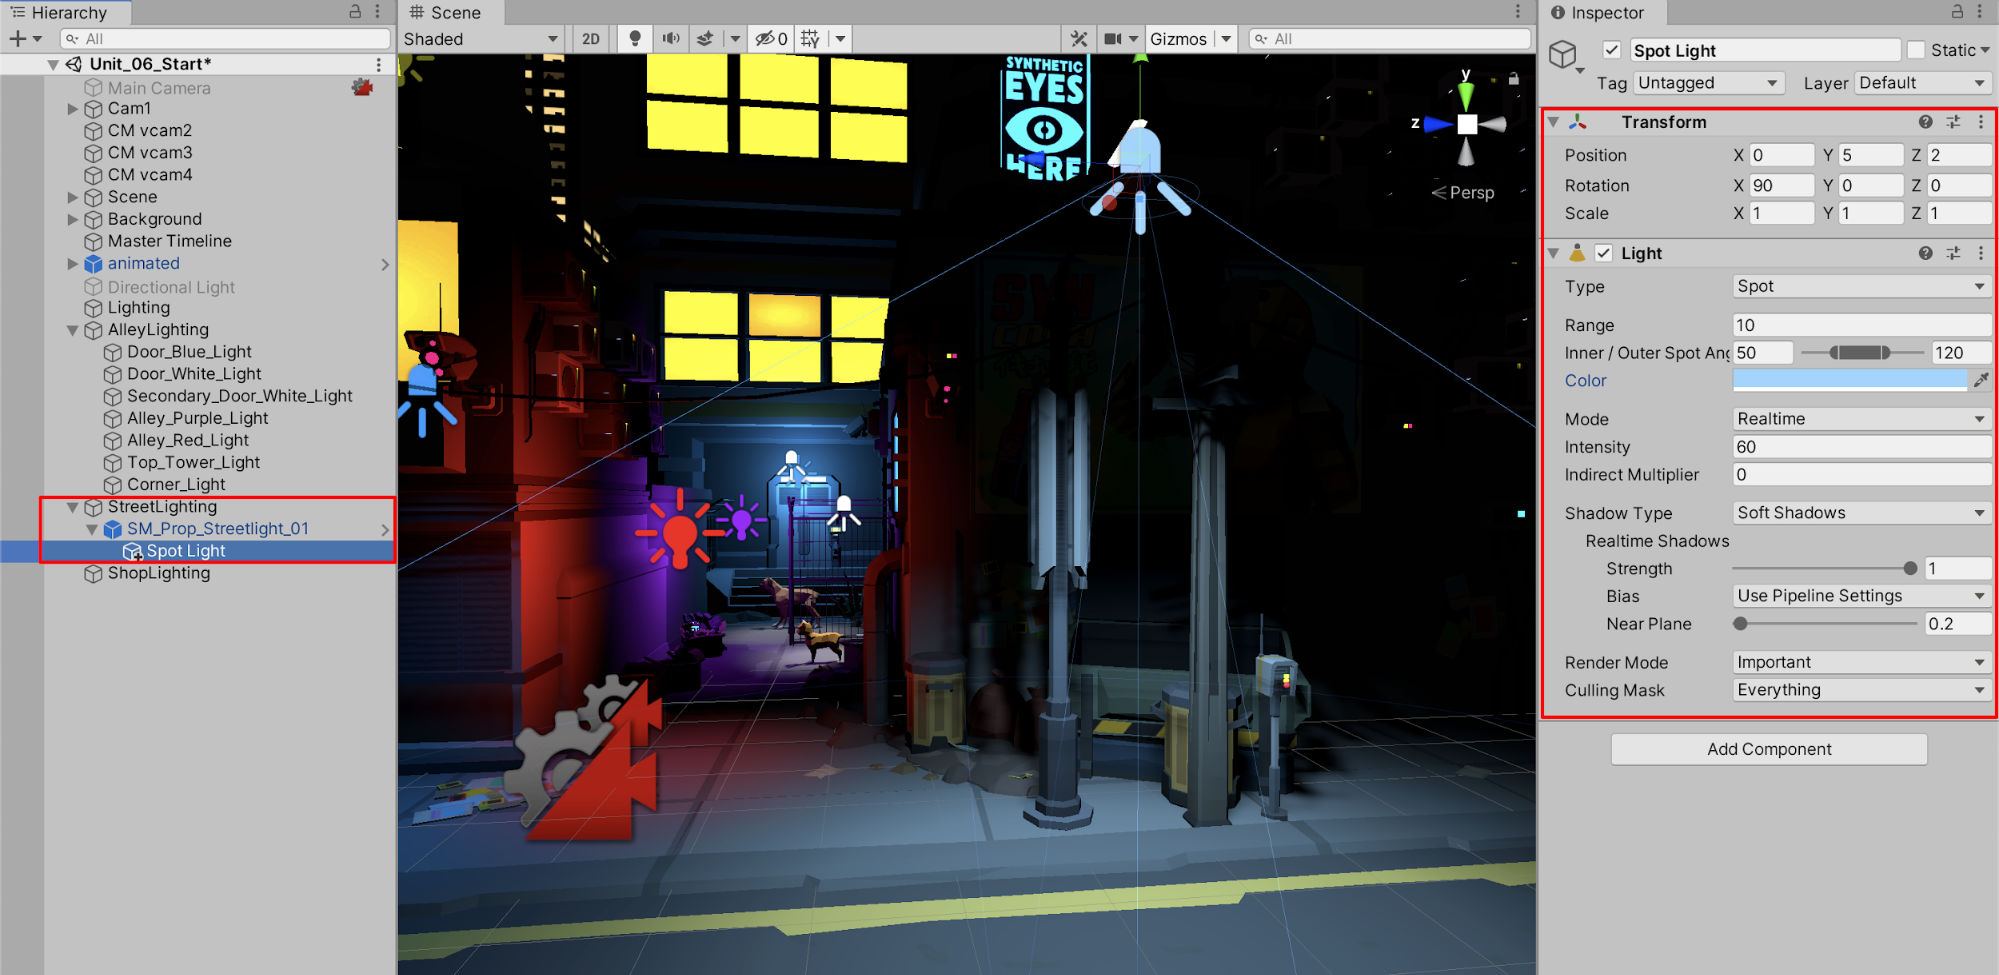
2. Because the Streetlight prop doesn’t have a light source attached to it yet, we will add a Spotlight GameObject by selecting from the top menu drop-down: GameObject > Light > Spotlight. Drag the Spotlight onto the Streetlight prop in the Hierarchy to make it a child object of the Streetlight. Set the Spotlight’s Position coordinates to X=0, Y=5, and Z=2. Set the Spotlight’s X Rotation axis to X=90. Adjust the lighting properties in the Inspector window to match the example below (Figure 02).
We can now duplicate the Streetlight GameObject in our Scene if we wanted to by simply right-clicking the Streetlight and then selecting Duplicate. Duplicate GameObjects, however, become hard to manage if there are numerous duplicates, or they may be cumbersome if you need to adjust certain properties in each instance of their lighting. We’ll instead save the Streetlight as a Prefab so that any future adjustments can be made uniformly throughout the Scene.
3. To save the specially prepared Streetlight as a custom Prefab, first select the Streetlight GameObject in the Hierarchy window by clicking, holding, and then dragging it into the Props folder in the Project window. A dialogue box will ask if you want to create a Prefab Variant or an Original Prefab. Select Original Prefab. Rename the Prefab to Streetlight_with_Spotlight in the Project window (Figure 03).
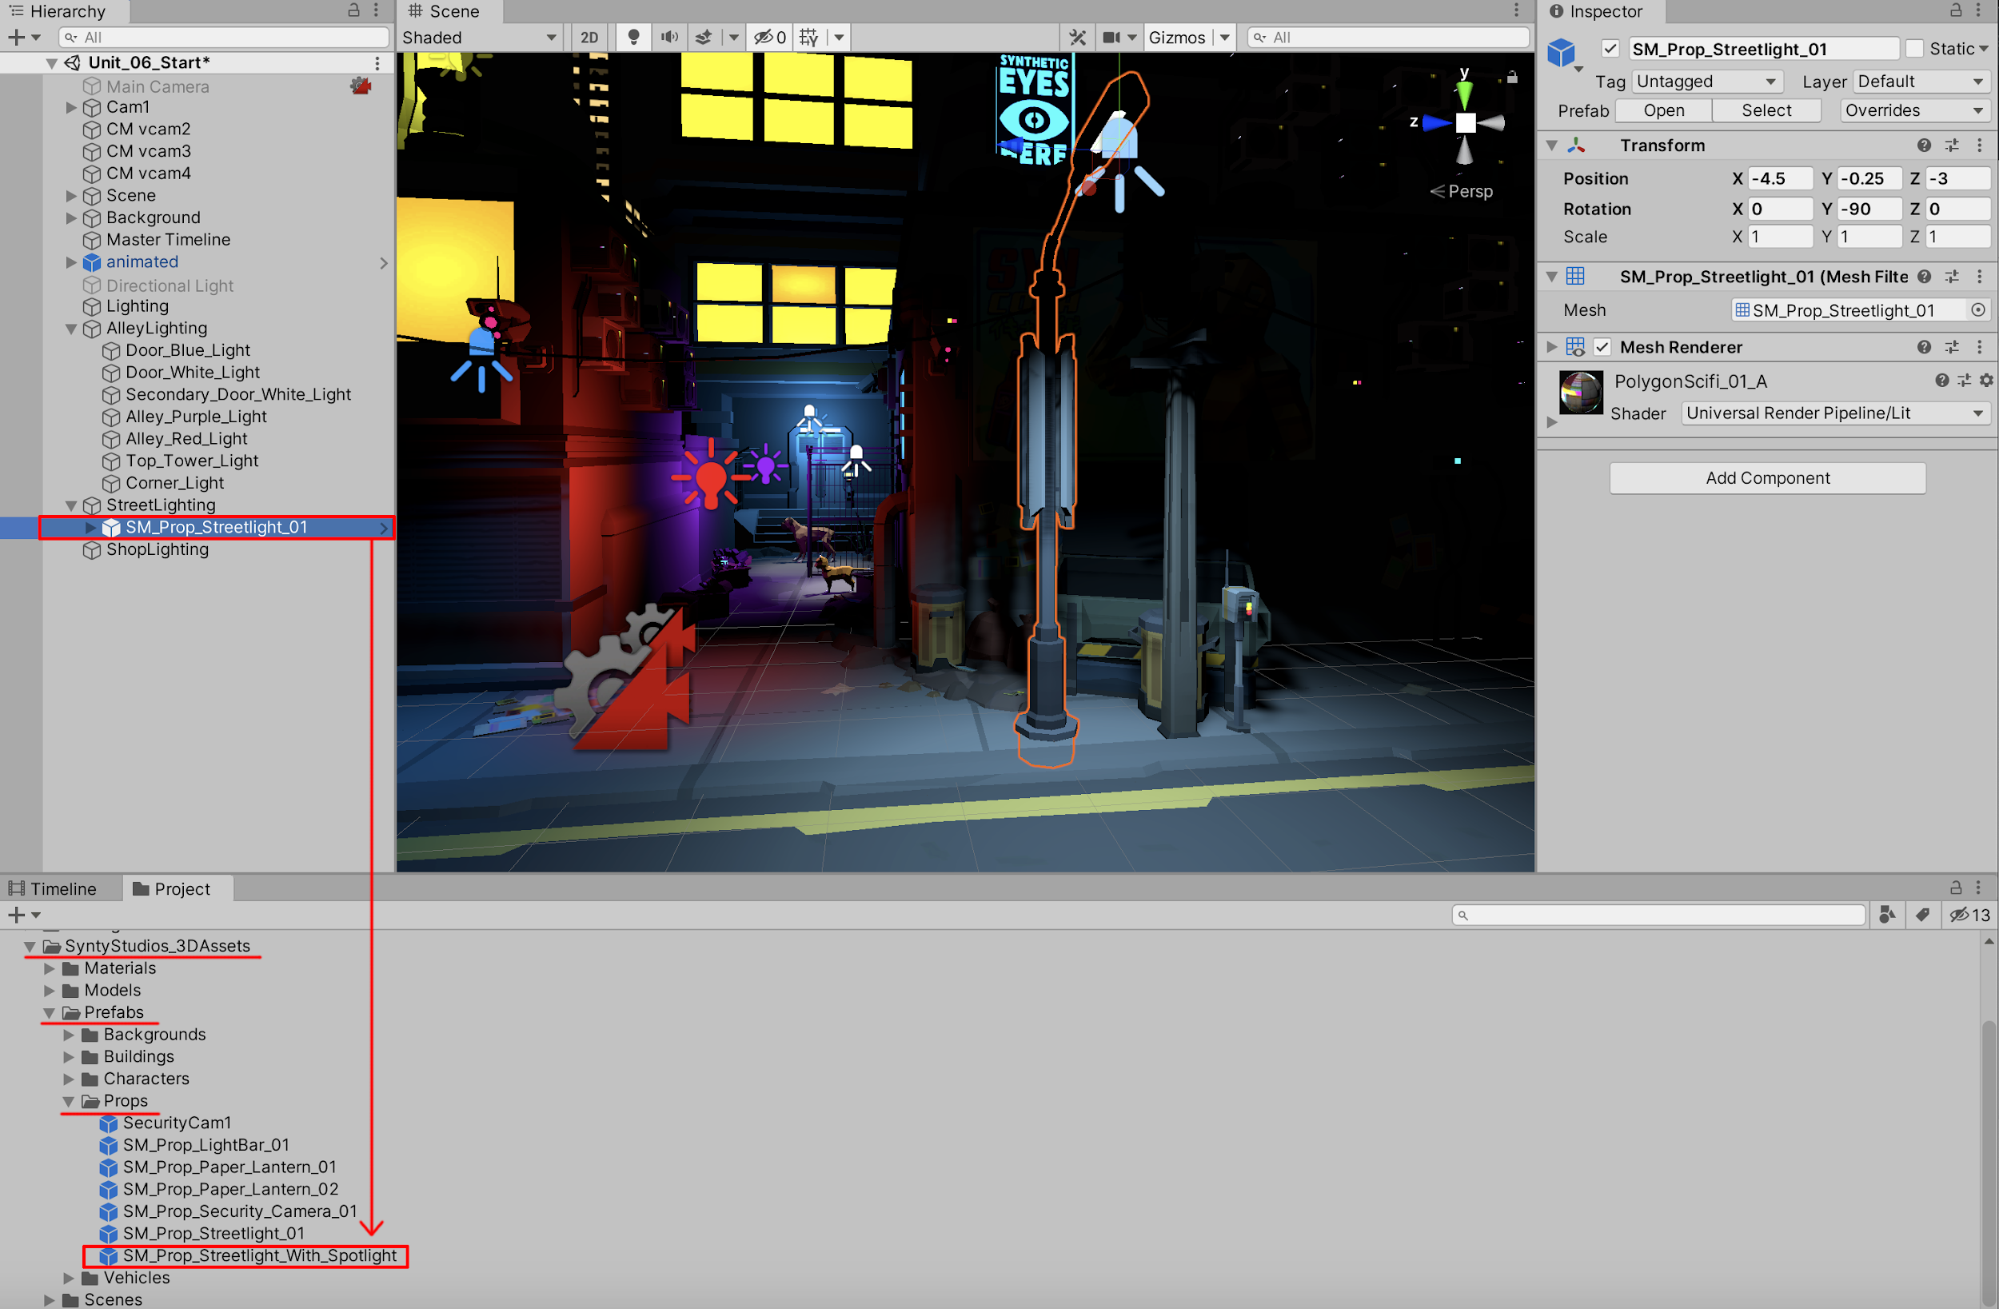
4. Drag the newly created Prefab titled SM_Prop_Streetlight_With_Spotlight from the Project window into the Scene. Place the Prefab inside the StreetLighting GameObject in the Hierarchy window. Set the Streetlight’s Position coordinates to X=-4.5, Y=-0.25, and Z=6.5. Ensure its Y Rotation axis remains at Y=-90. (Figure 04).
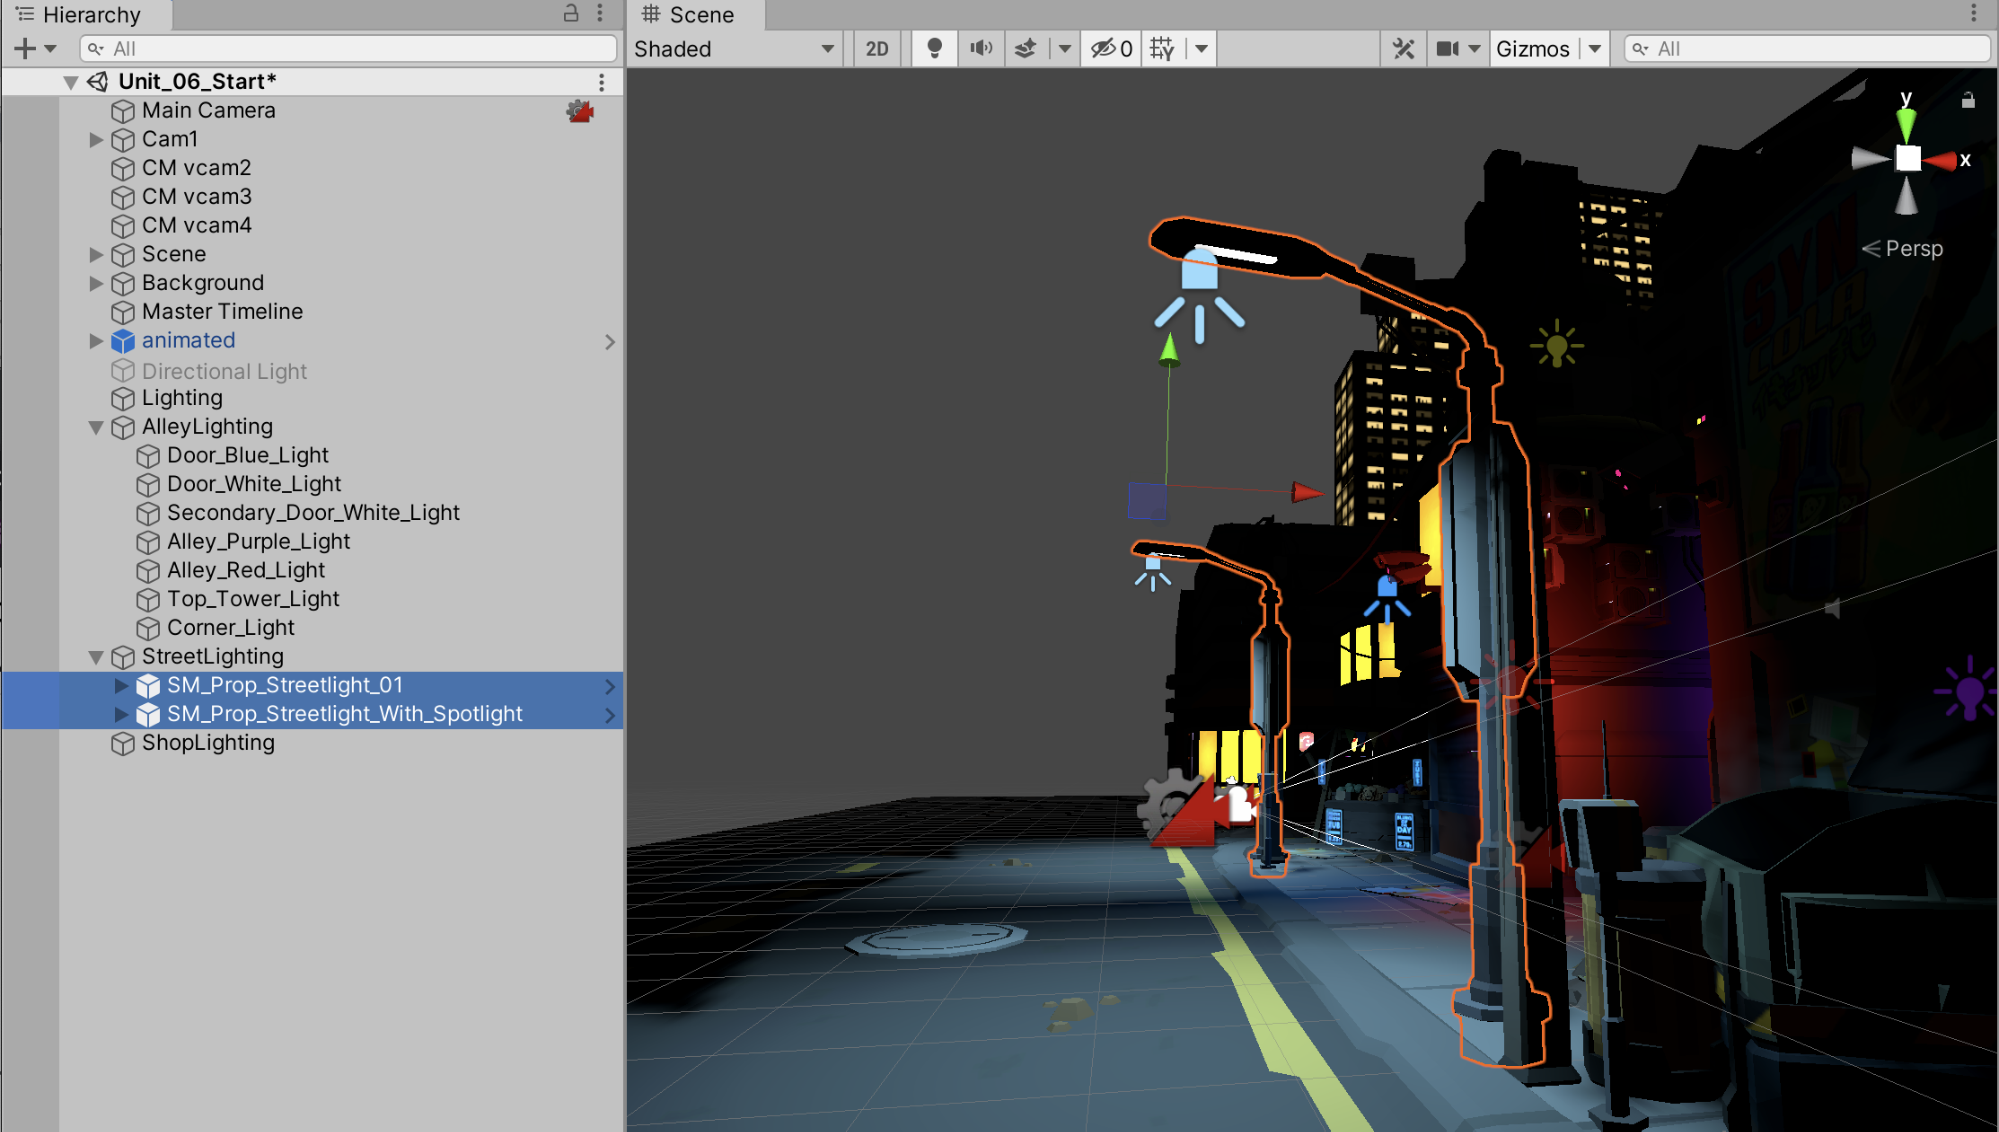
Now let’s modify the properties of the lighting in a single adjustment by modifying the newly created Prefab.
5. To modify the contents of the Prefab, first select the Prefab in the Project window, and then select the Open Prefab button in the Inspector window. Alternatively, select the > marker to the right of the Prefab in the Hierarchy window (Figure 05).
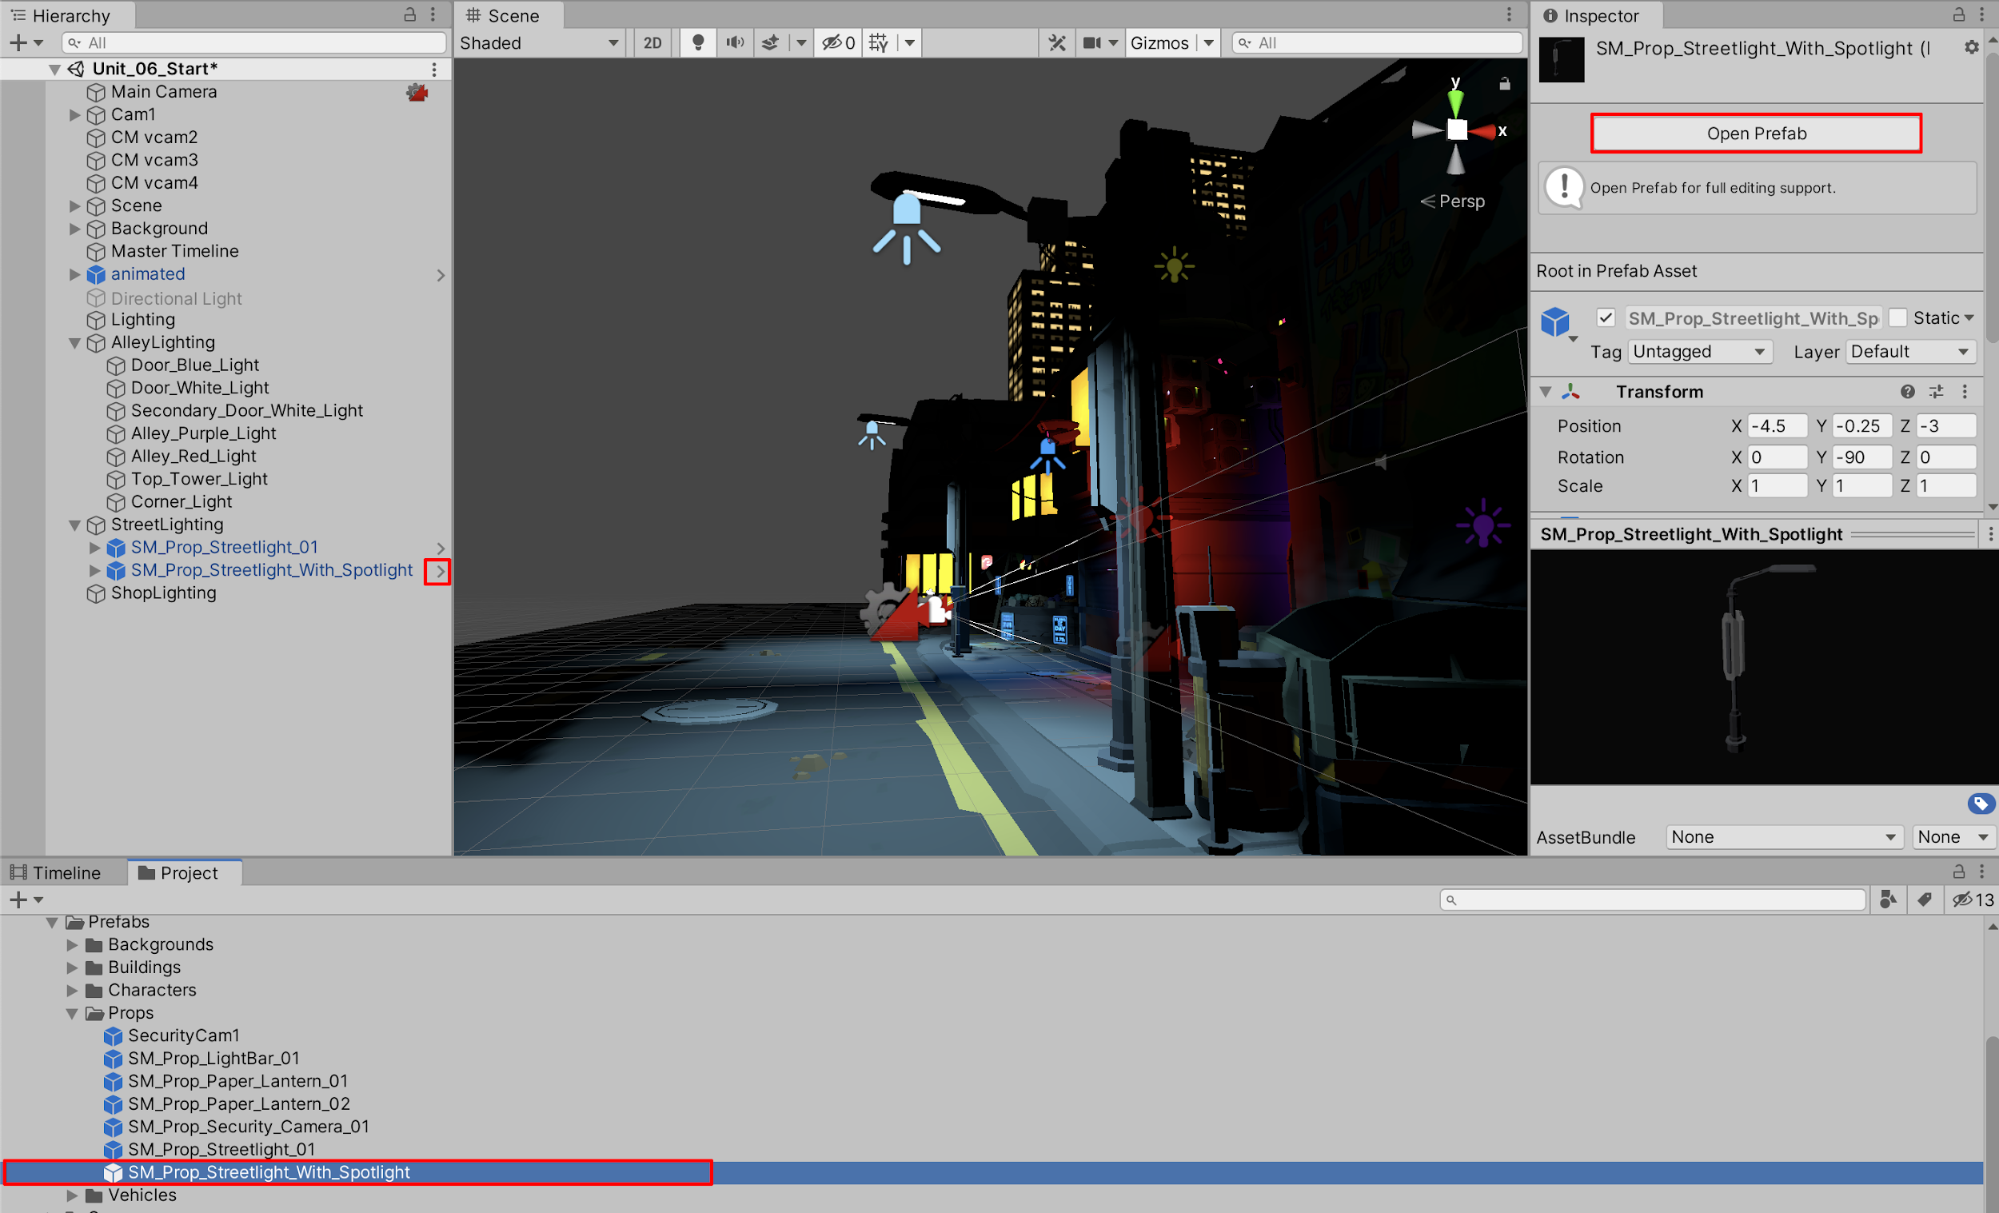
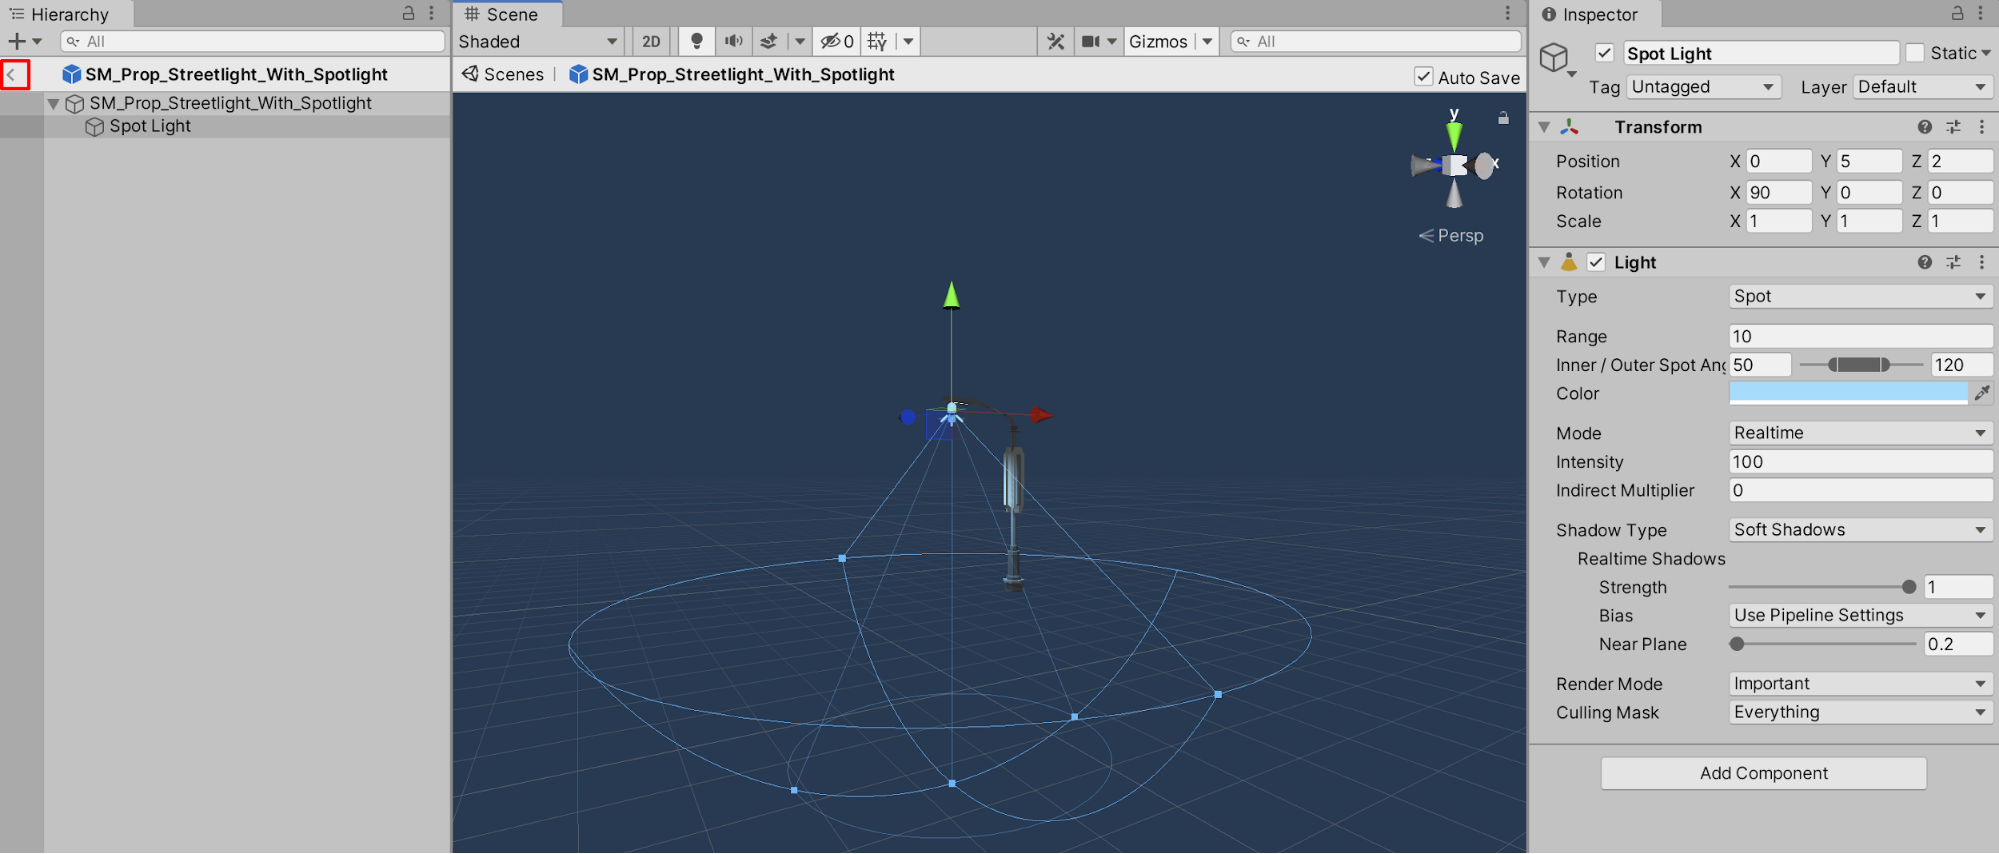
6. Inside the Prefab Editor, make an adjustment to the Spotlight. For example, increase the Spotlight’s Intensity to 100.
7. Apply the changes to the Prefab by selecting the < marker to the left of the Prefab title in the Hierarchy window (Figure 06). You will automatically see the changes to the Spotlight occur in both instances of the Streetlight in the Scene (Figure 07).
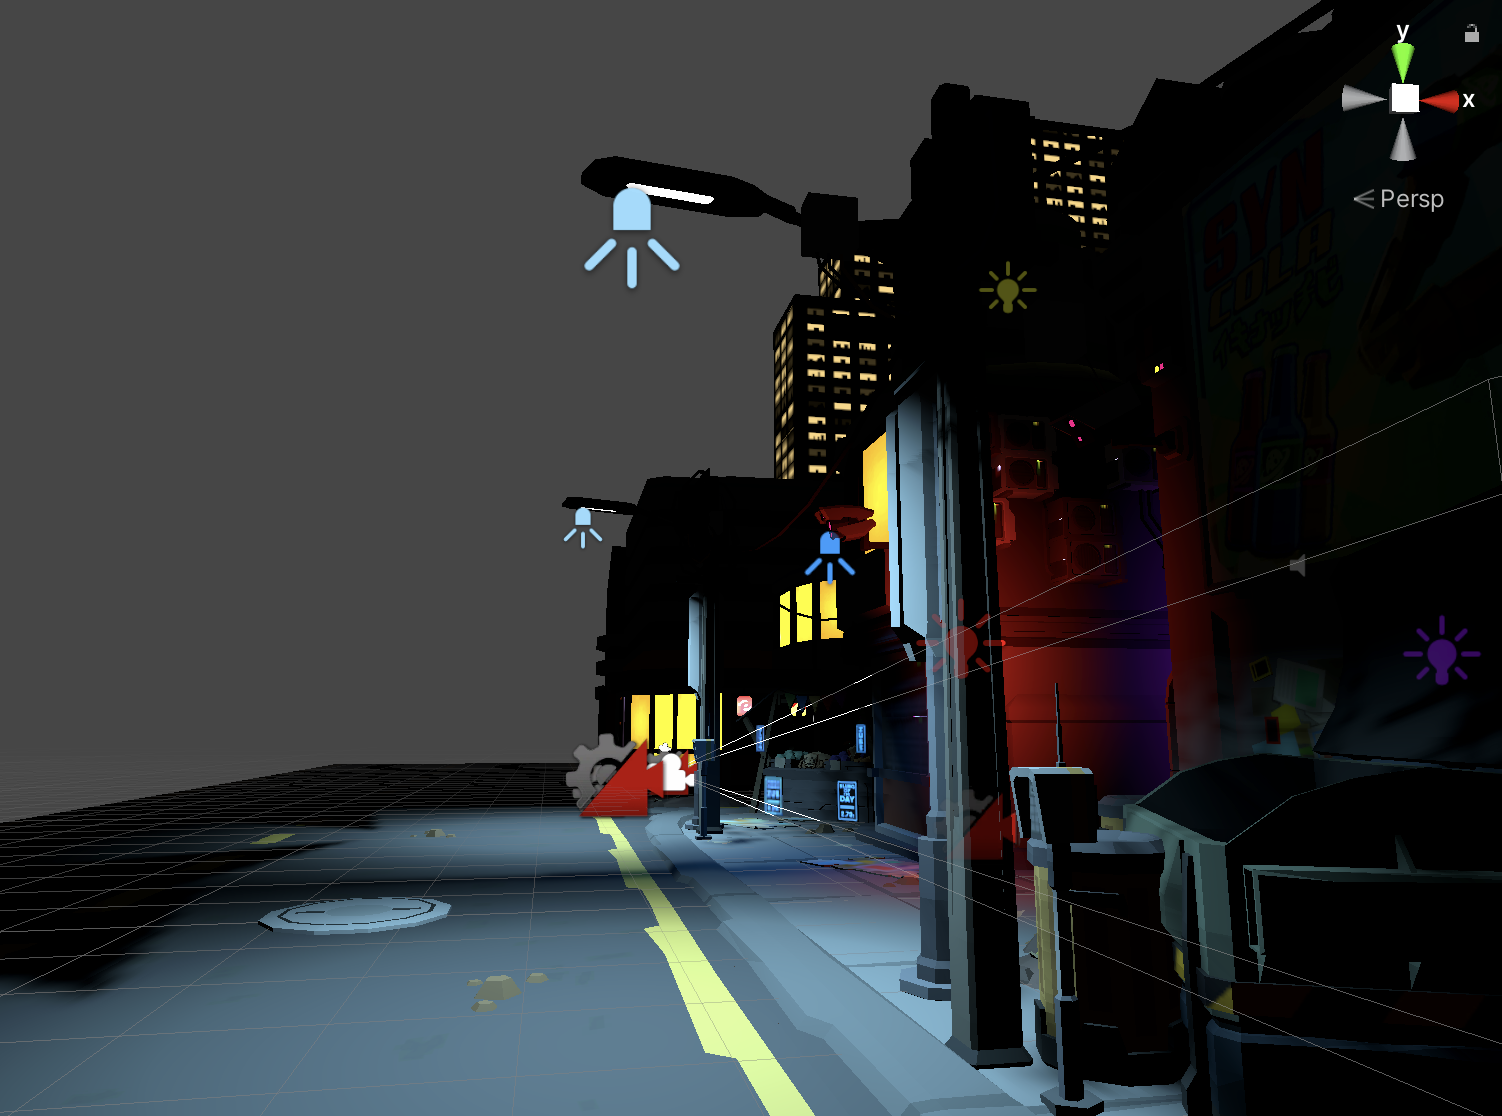
The Scene’s lighting may or may not appear to “improve” with a higher intensity setting. Keep in mind that the lighting will be dramatically enhanced with post-processing effects covered later in the next Unit (Unit 6.3). If the lighting appears to be dull or flat with a lower intensity setting at this stage, resist the temptation to over-increase the lighting intensity.
8. Return the Prefab’s lighting intensity back to its original setting by opening the Prefab Editor and setting the Spotlight’s Intensity to 60. Apply the changes to the Prefab by selecting the < marker to the left of the Prefab title in the Hierarchy window. The lighting intensity will be reduced for both of the Streetlights in the Scene.
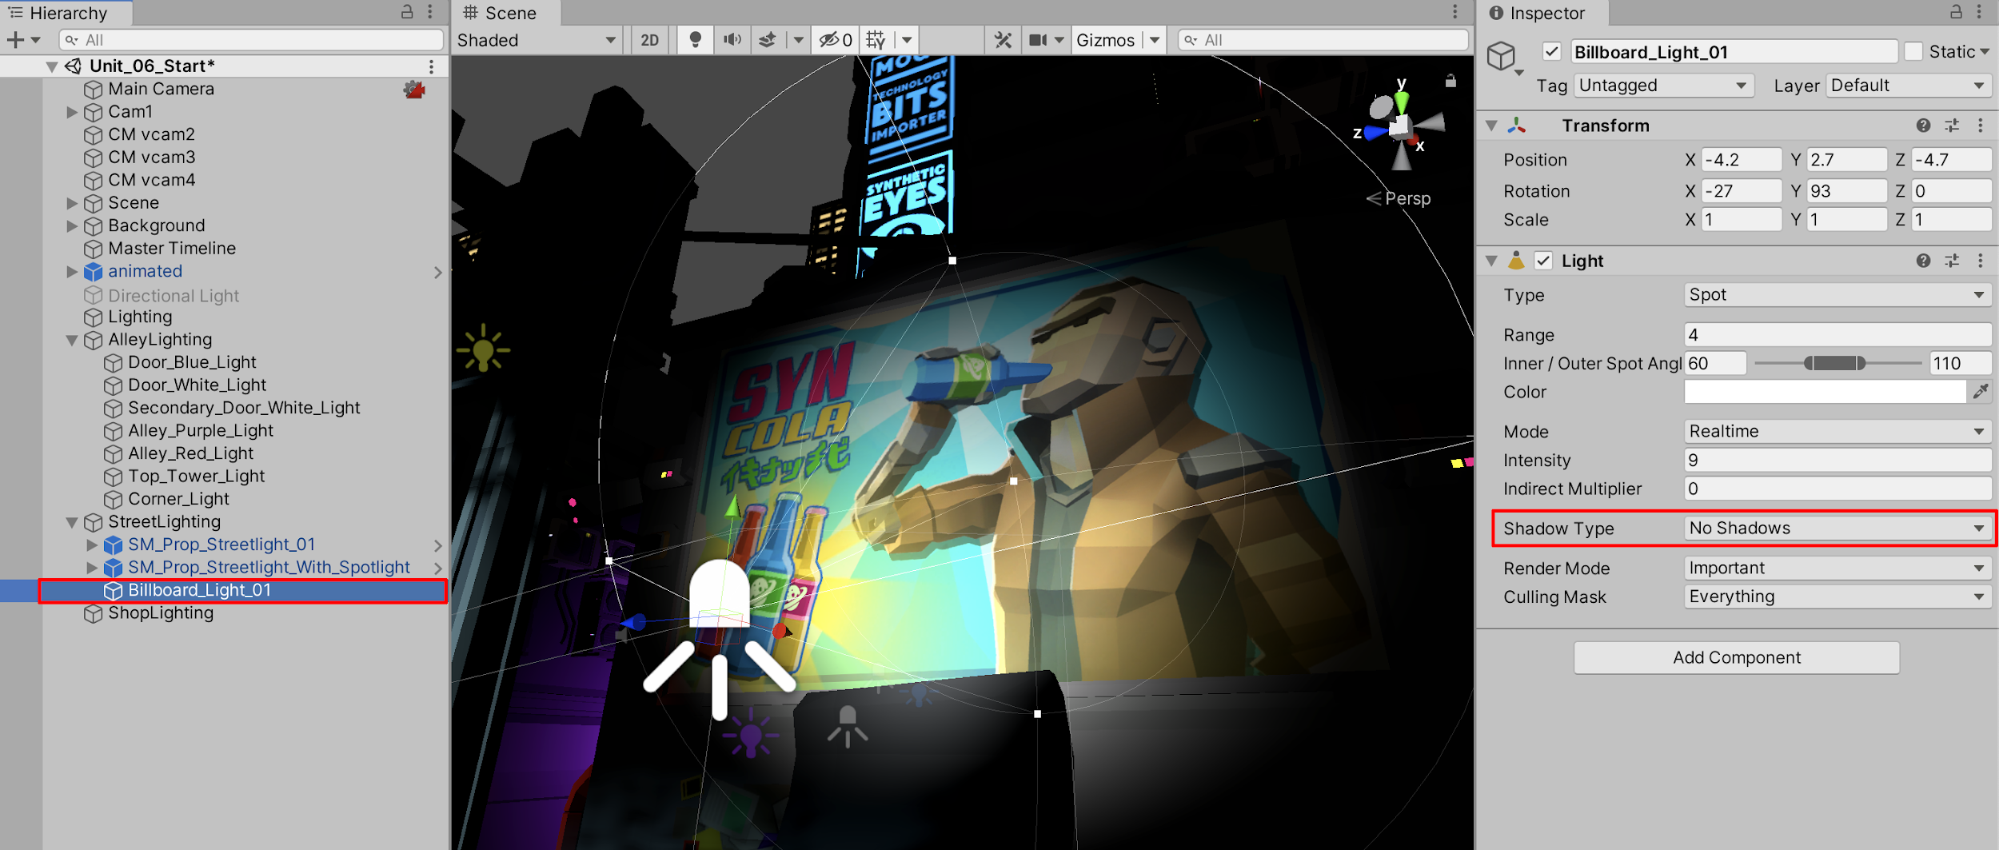
9. Lastly, add a new Spotlight to illuminate the billboard sign by selecting from the top menu drop-down: GameObject > Light > Spotlight. Rename it to Billboard_Light_01 and place it inside the StreetLighting GameObject in the Hierarchy. Set the position and angle of the Spotlight by first zooming in on the billboard and establishing your view in the Scene window. Next, with Billboard_Light_01 selected in the Hierarchy, select from the top menu drop-down: GameObject > Align With View. The Spotlight now projects light onto the image of the billboard. Set the Shadow Type to No Shadows, since casting a shadow in this case is not necessary. Lower the Range to 4, and set the Intensity value to 9 (Figure 08).
3. Working with the Light Explorer
You are able to see a list of lights populating your Scene with the Light Explorer window.
1. To open the Light Explorer window, select from the top menu drop-down: Window > Rendering > Light Explorer (Figure 09).
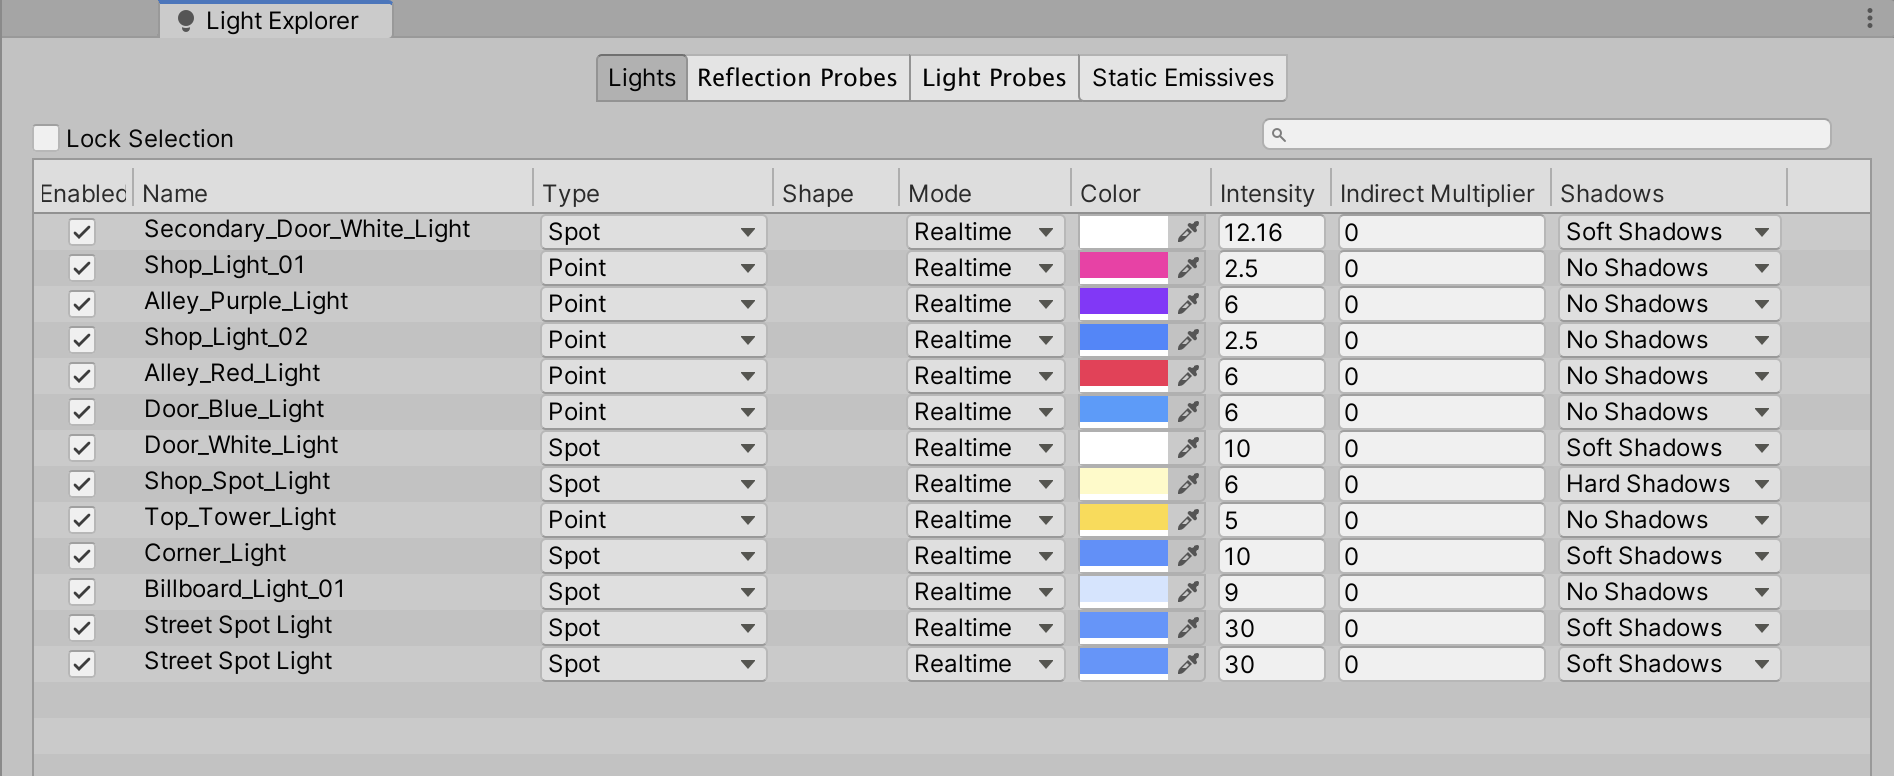
You may need to widen this window to be able to see its multiple columns. With the Light Explorer window, you are able to change any of the light’s types or parameters quickly at a glance, or select the Enabled column checkbox to enable or disable any of the selected lights within your Scene.
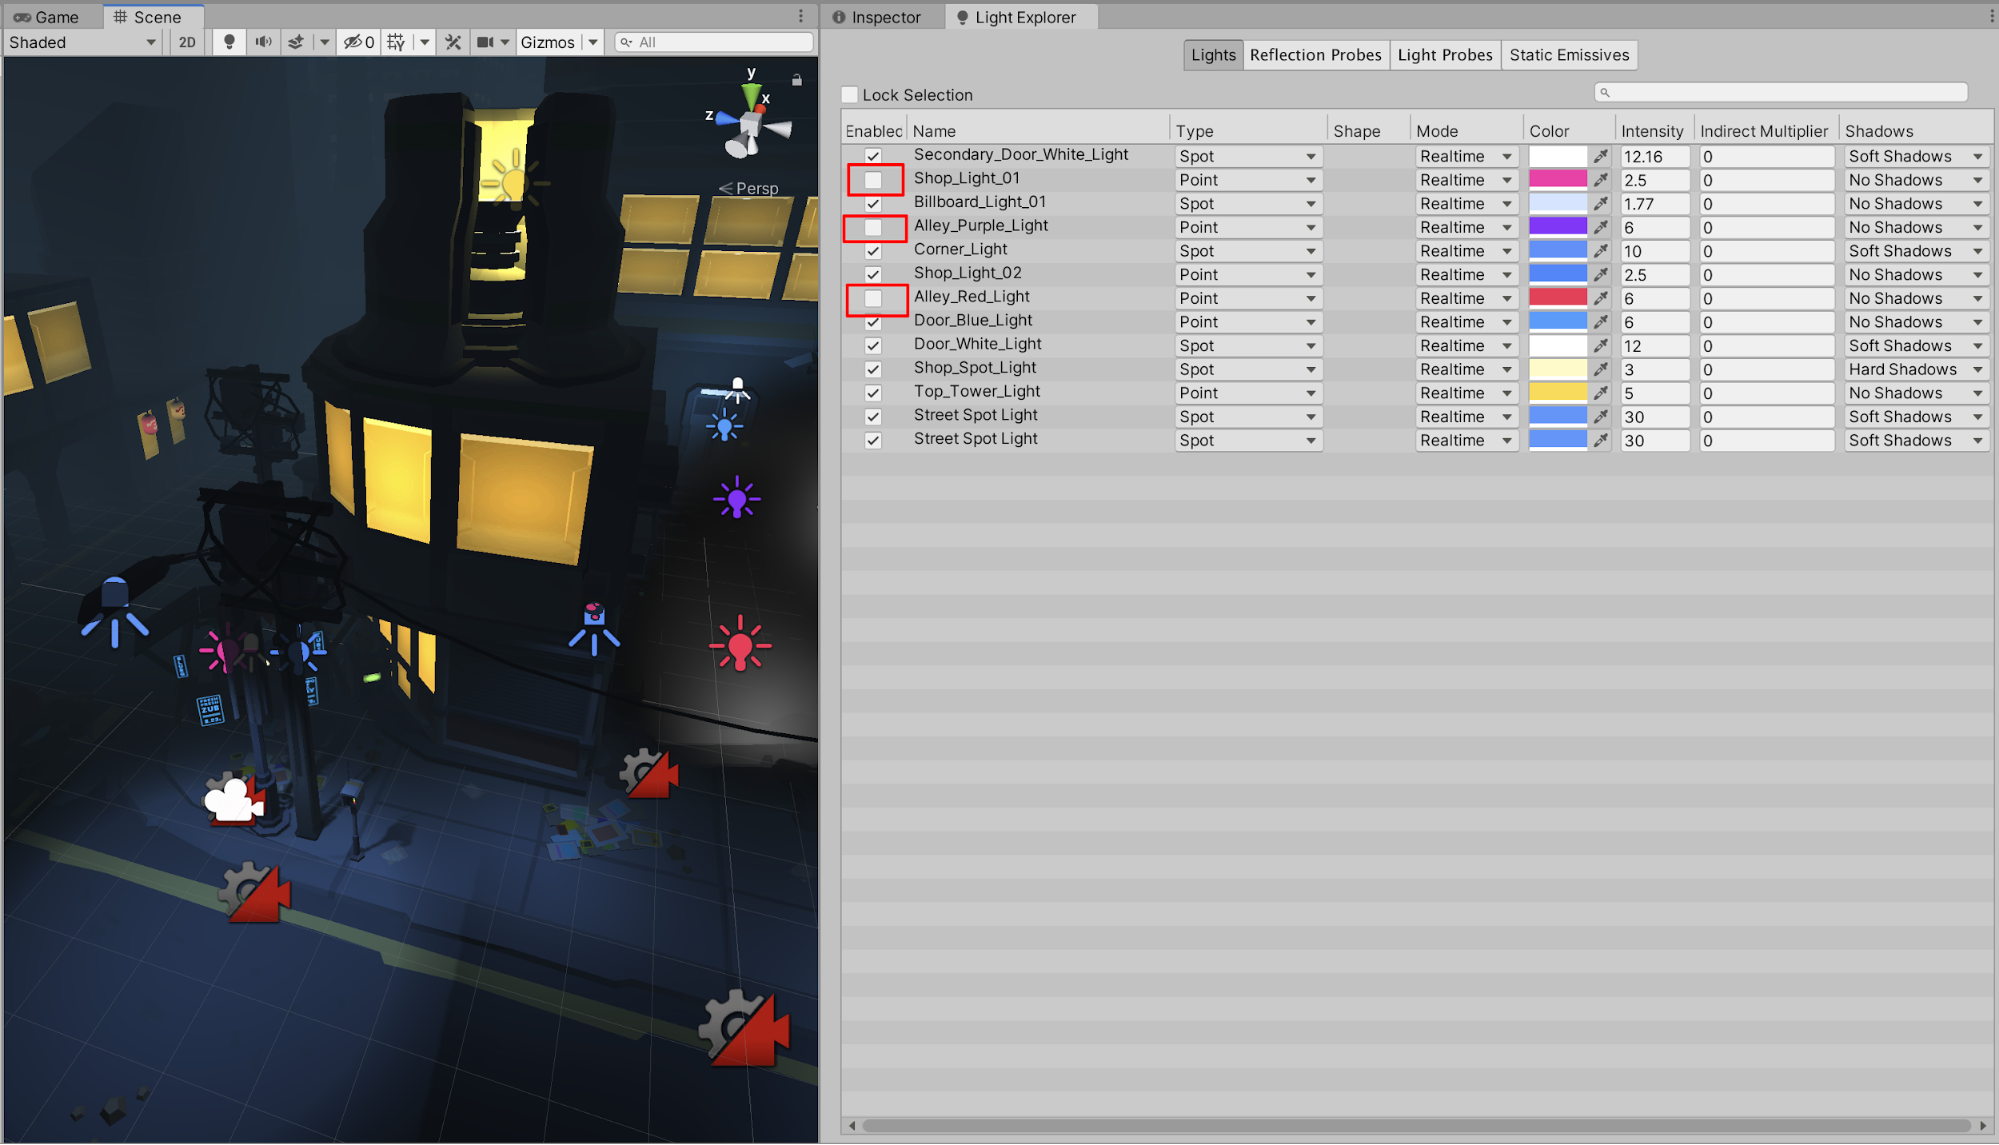
2. With the Light Explorer and Scene windows both visible, select the checkboxes to disable certain lights. Here the lights that have the colors red, pink, and purple are disabled (Figure 10).
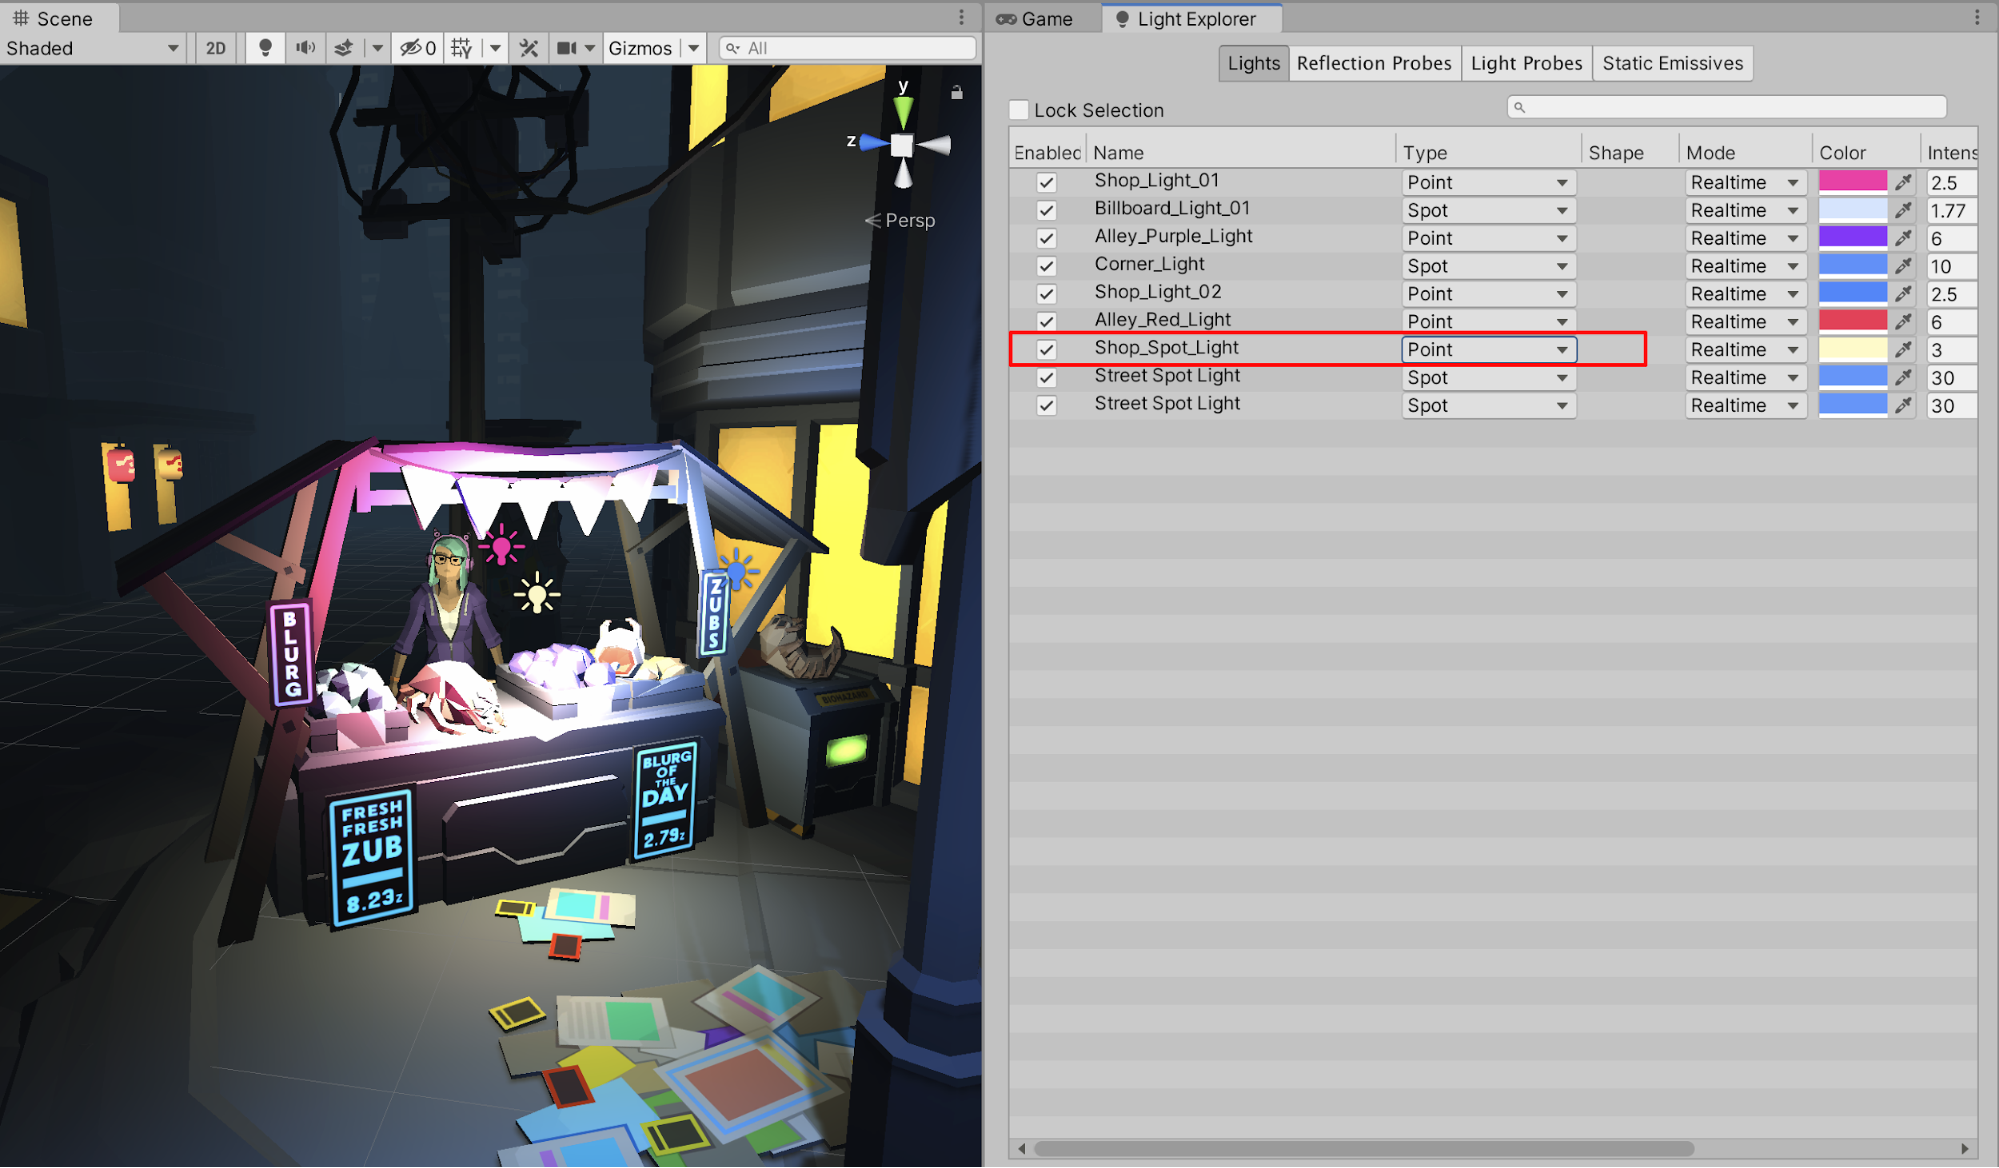
3. With all of the checkboxes re-enabled, now practice changing the Type of a light. Directly change the Shop’s Spot Light from a Spotlight to a Point Light in the Type column and preview its change (Figure 11). Be sure to return it back to a Spotlight.
4. Controlling Lights using Activation Tracks
In this step, we will use Activation Tracks in the Timeline to turn on (activate) specific lights for certain Cinemachine Camera angles and turn off any of the lights that aren’t in the Cinemachine Camera’s field of view. We may do this for purposes of artistic cinematography — for instance, certain lights turning on or off at various intervals throughout a Scene.
1. With the Master Timeline selected in the Hierarchy window, make sure the Timeline window is visible. If not, open the Timeline window by selecting from the top menu drop-down: Window > Sequencing > Timeline.
For our purpose of learning how to work with Activation Tracks, we will build upon the previous unit’s Master Timeline, which contains two Track Groups: a Character Group and a Camera Group. Then we will next practice developing a Lighting Group with the individual Lighting Activation schemes.
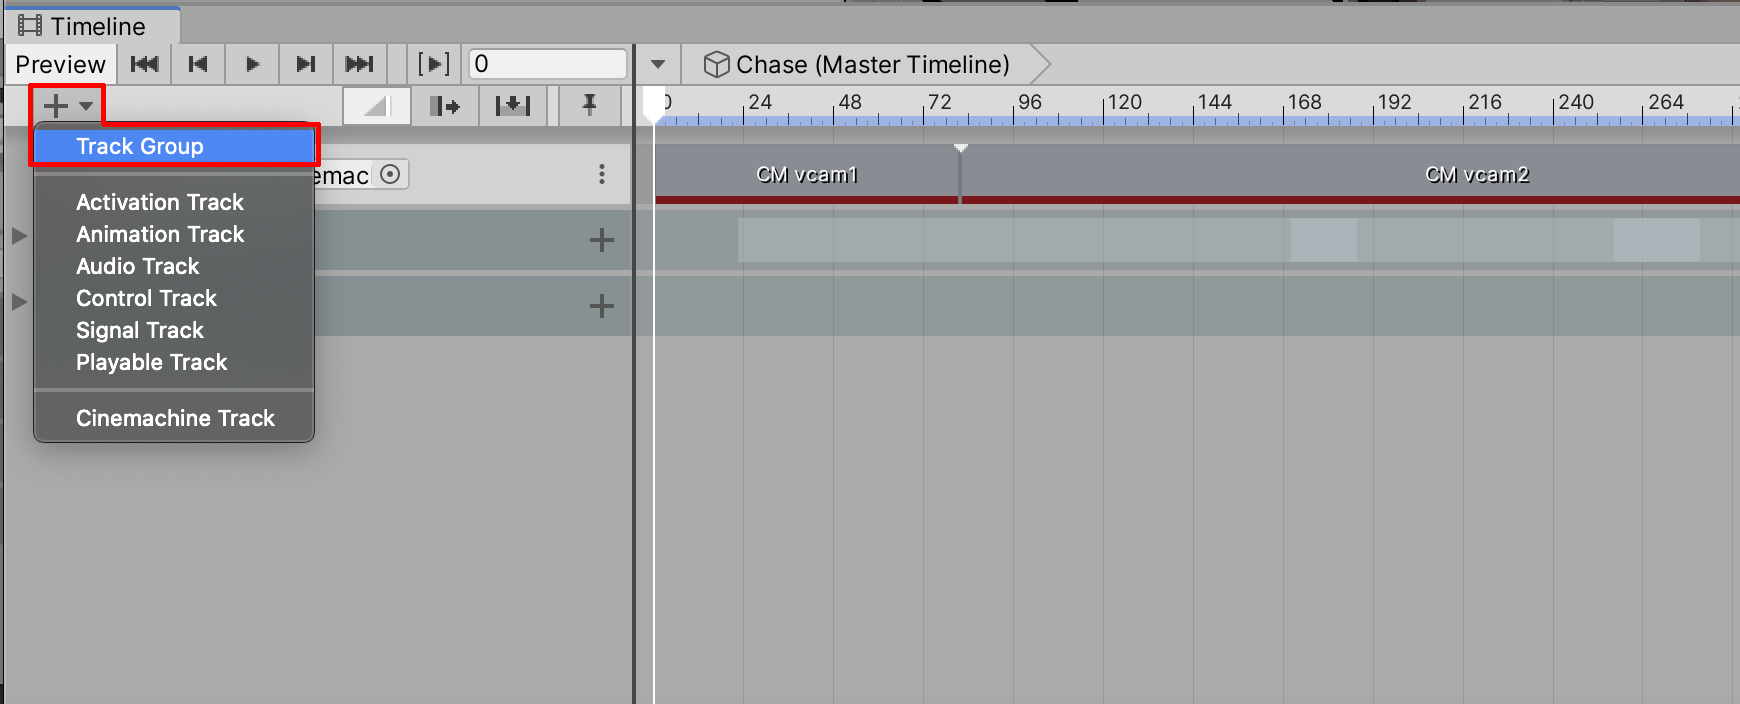
2. Select the + button and then select Track Group (Figure 12). Rename the new Track Group to Lighting Group.
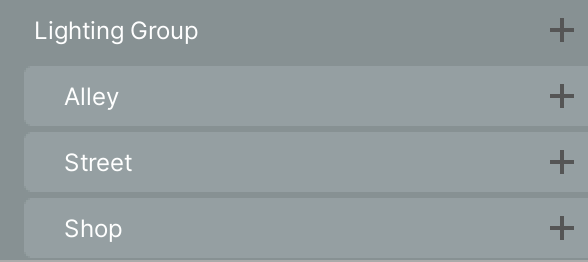
3. To the right of the new Lighting Group, select the + button again and then select Track Sub-Group (Figure 13). Rename the new Track Sub-Group to Alley. Repeat this process to add two more Sub-Groups to the Lighting Group, renaming them to Street and Shop (Figure 14).

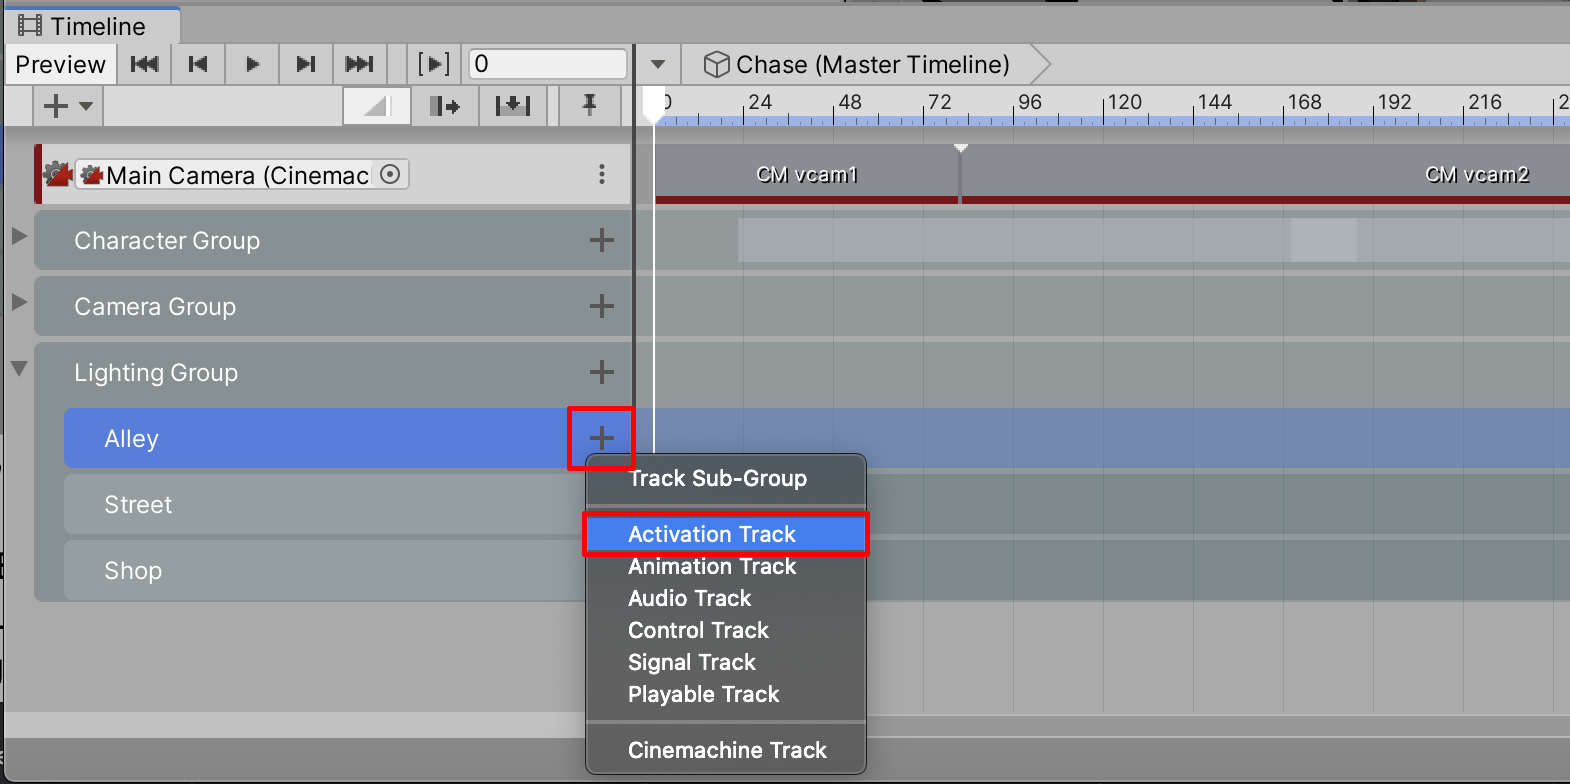
4. Position the Timeline’s frame playhead to 0. To the right of the Alley Sub-Group, Select the + button and then select Activation Track (Figure 15).
5. Continue to select the + button to add six more Activation Tracks to the Alley Subgroup for a total of seven empty Activation Tracks on the Timeline (Figure 16).
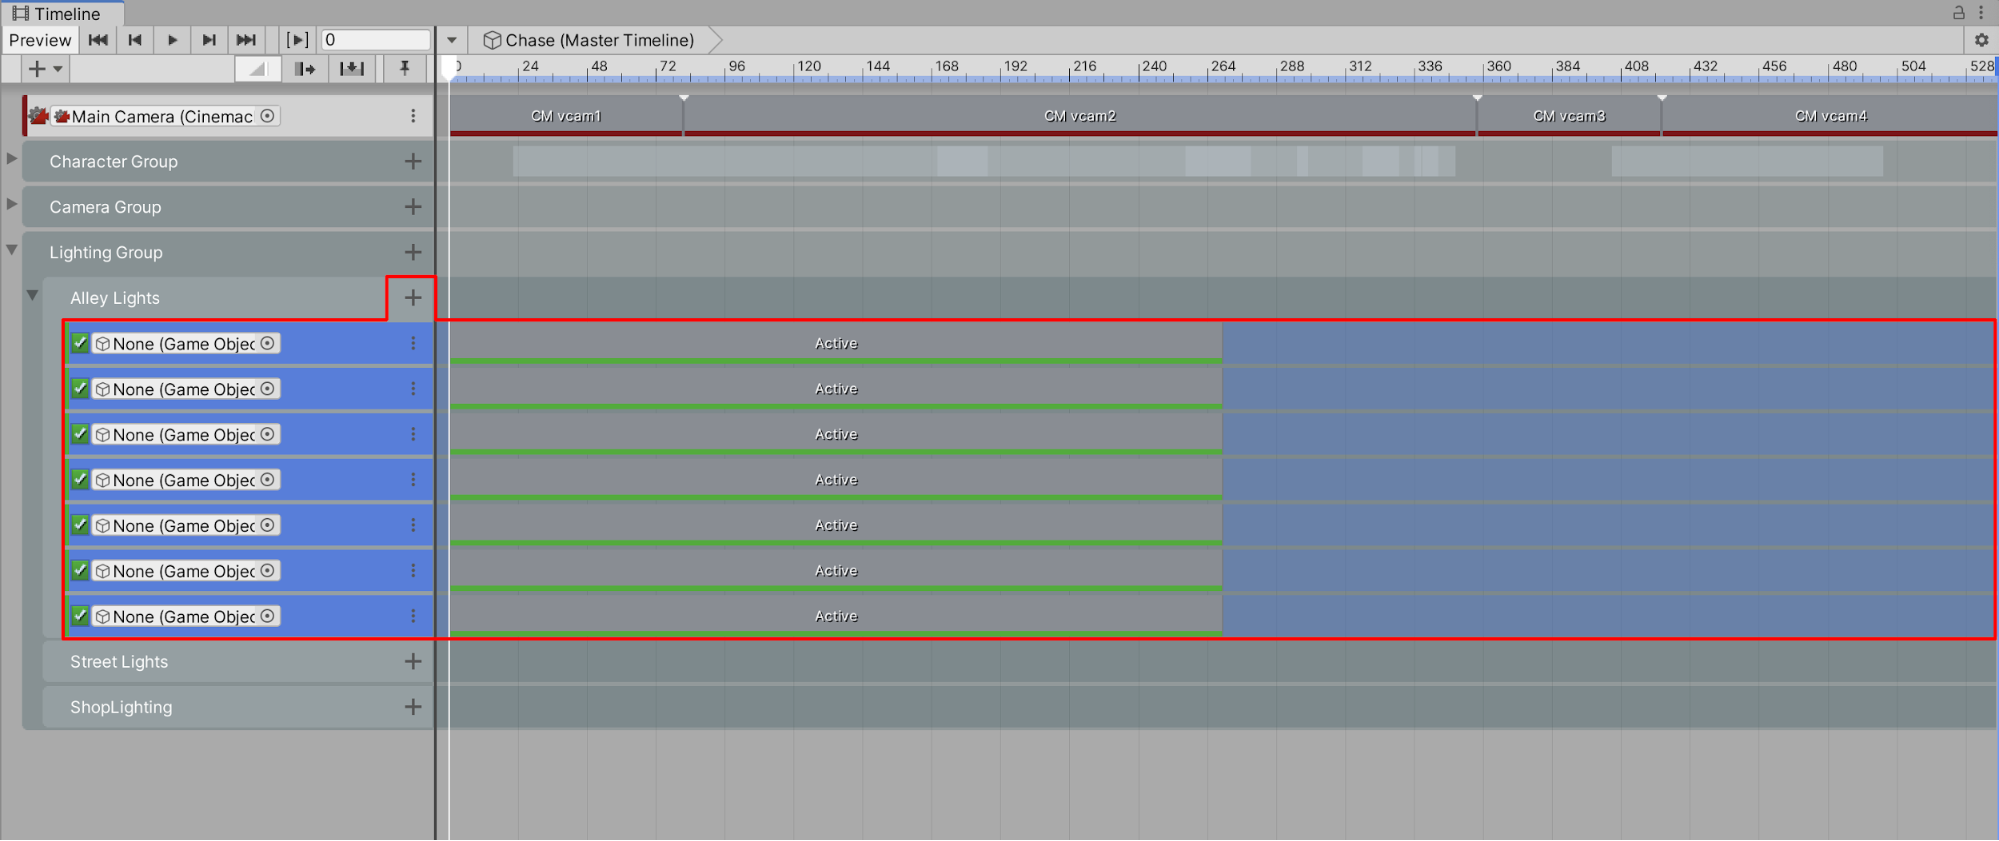
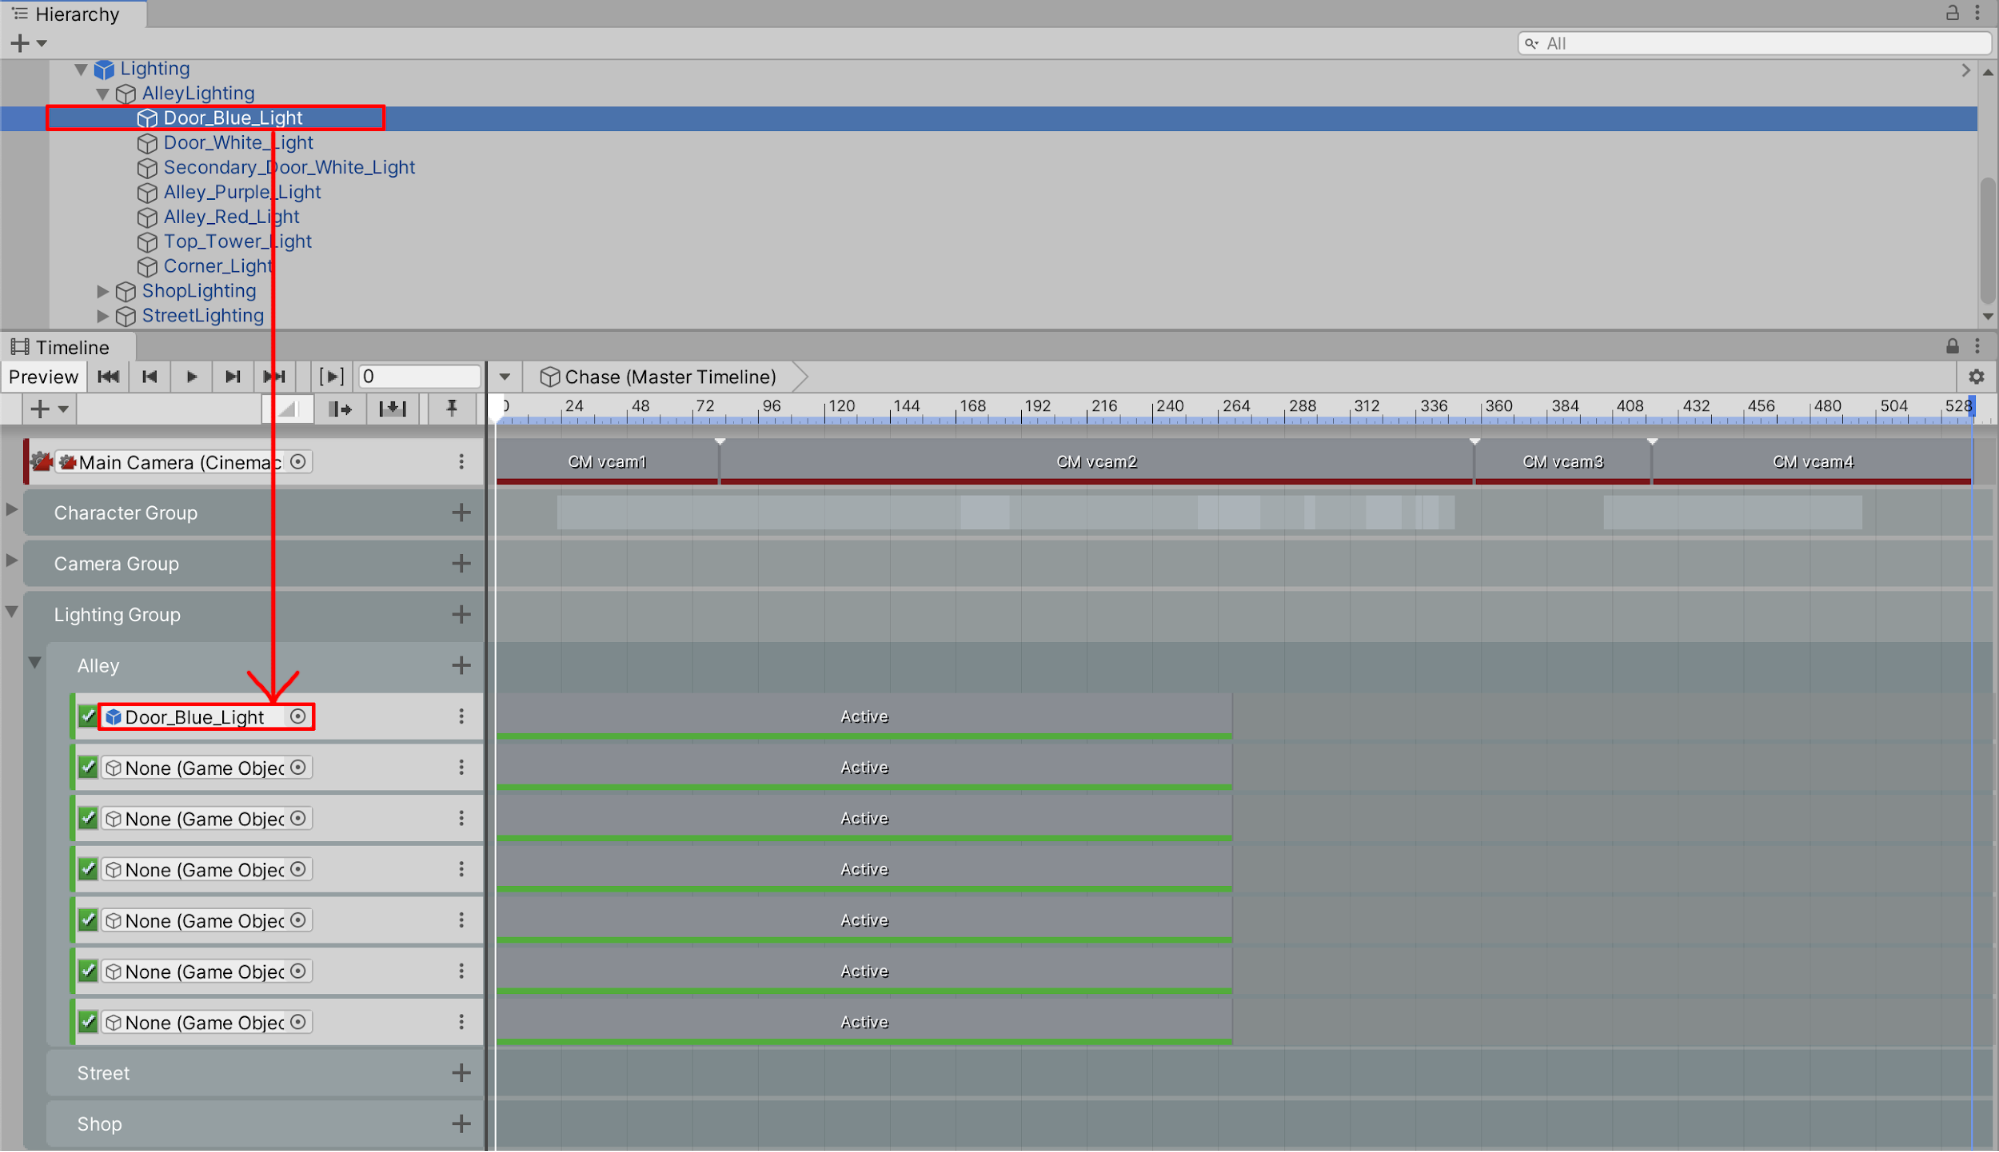
6. We’ll link the seven alley lights into the Activation Track’s placeholder field labelled “None (Game Object),” but first you must lock the Timeline by selecting the lock icon in the upper-right corner of the Timeline window to freeze it in view. Next, select the first Door_Blue_Light in the Hierarchy window and then drag it into the first empty placeholder in the Timeline (Figure 17). Repeat for each light, dragging it into the remaining placeholders (Figure 18).

We’ll start along the Timeline with the alley lights on and activated. When the Timeline reaches a specific frame number, we will then deactivate the light (or turn it off).
7. Position the Timeline’s frame playhead to where you observe the Cinemachine’s Camera changing angles. In the example Scene, the camera changes at around Frame 358. Let’s set some lights to deactivate at Frame 358.
8. Position your cursor to the right side of the Door_Blue_Light’s Activation Track and then lengthen the Activation Track by selecting the right edge, clicking and holding, and then dragging it to the right until it snaps to the playhead’s frame location of 358 (Figure 19). Alternatively, you can specify the Starting Point, Ending Point, and Duration of the Activation Track by entering these values in the Clip Trimming section of the Inspector window.

9. Lengthen the next two Activation Tracks for Door_White_Light and Secondary_Door_White_Light to Frame 358.
10. Let’s keep the purple and red lights on for a little bit longer. Advance the Timeline’s Frame Playhead to Frame 415. Lengthen the Activation Tracks for the Alley_Purple_Light and Alley_Red_Light so that they snap to Frame 415. You will now see the Activation Tracks adjusted for the first five alley lights (Figure 20).
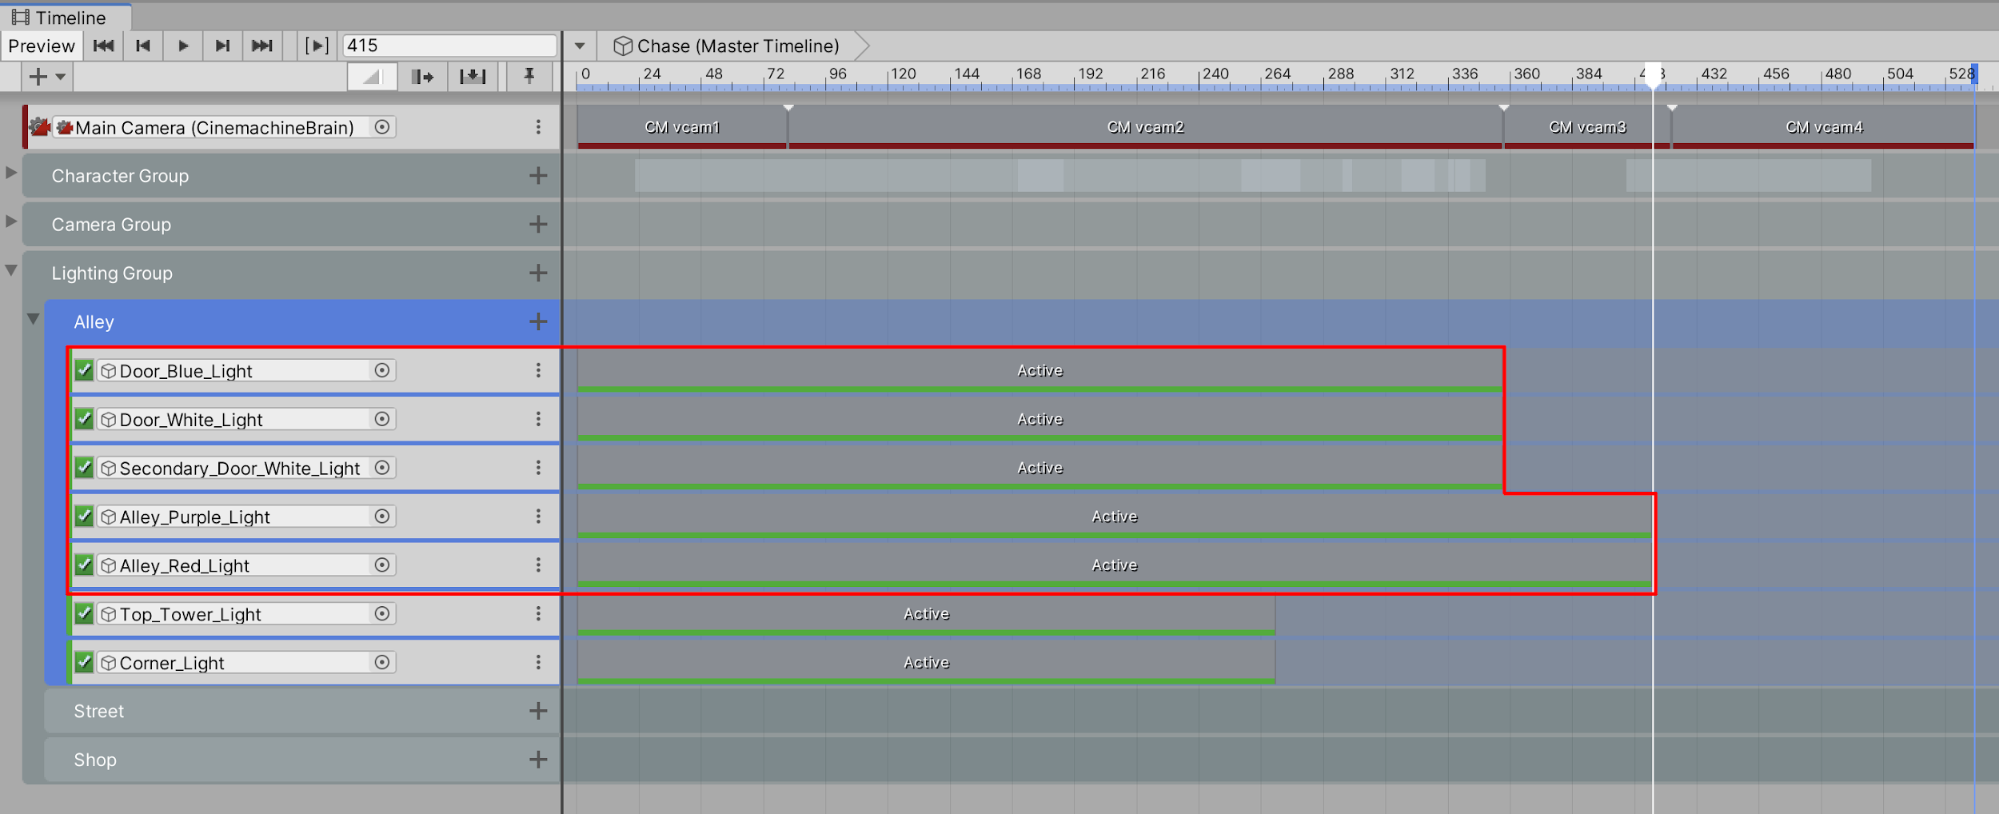
11. Scrub backwards a little bit along the Timeline. Now, when you position the frame playhead cursor within the bounds of the Activation Track for the lights so far, you can see that the lights are visible in both the Scene and Game windows. When you scrub ahead and position the frame playhead cursor outside the bounds of each light’s Activation Track, it’s turned off and deactivated. Of course, any light not yet assigned to an Activation Track remains on and active throughout the Scene.
12. Let’s make the Top_Tower_Light blink on and off. With the light’s Activation Track reduced to a shorter length, select the track to highlight it and then select by right-clicking: Copy. Advance the Frame Playhead cursor to a later frame in the Timeline, and then select by right-clicking: Paste (or use your keyboard shortcuts to copy and paste). The light blinking will look like the example below (Figure 21).

13. As a fun challenge, practice activating and deactivating the lights for the subgroups Street and Shop to approximate the conditions in the example shown in Figure 22. Again, you will first add individual Activation Tracks in the proper Lighting Subgroups by selecting the + button. Next with the Timeline window still locked, you will drag and drop each light from the Hierarchy into its specific Activation Track placeholder. Lastly, you will practice moving the lights’ track bounds by shortening or lengthening them, possibly repeating them, and setting their positions along the Timeline.
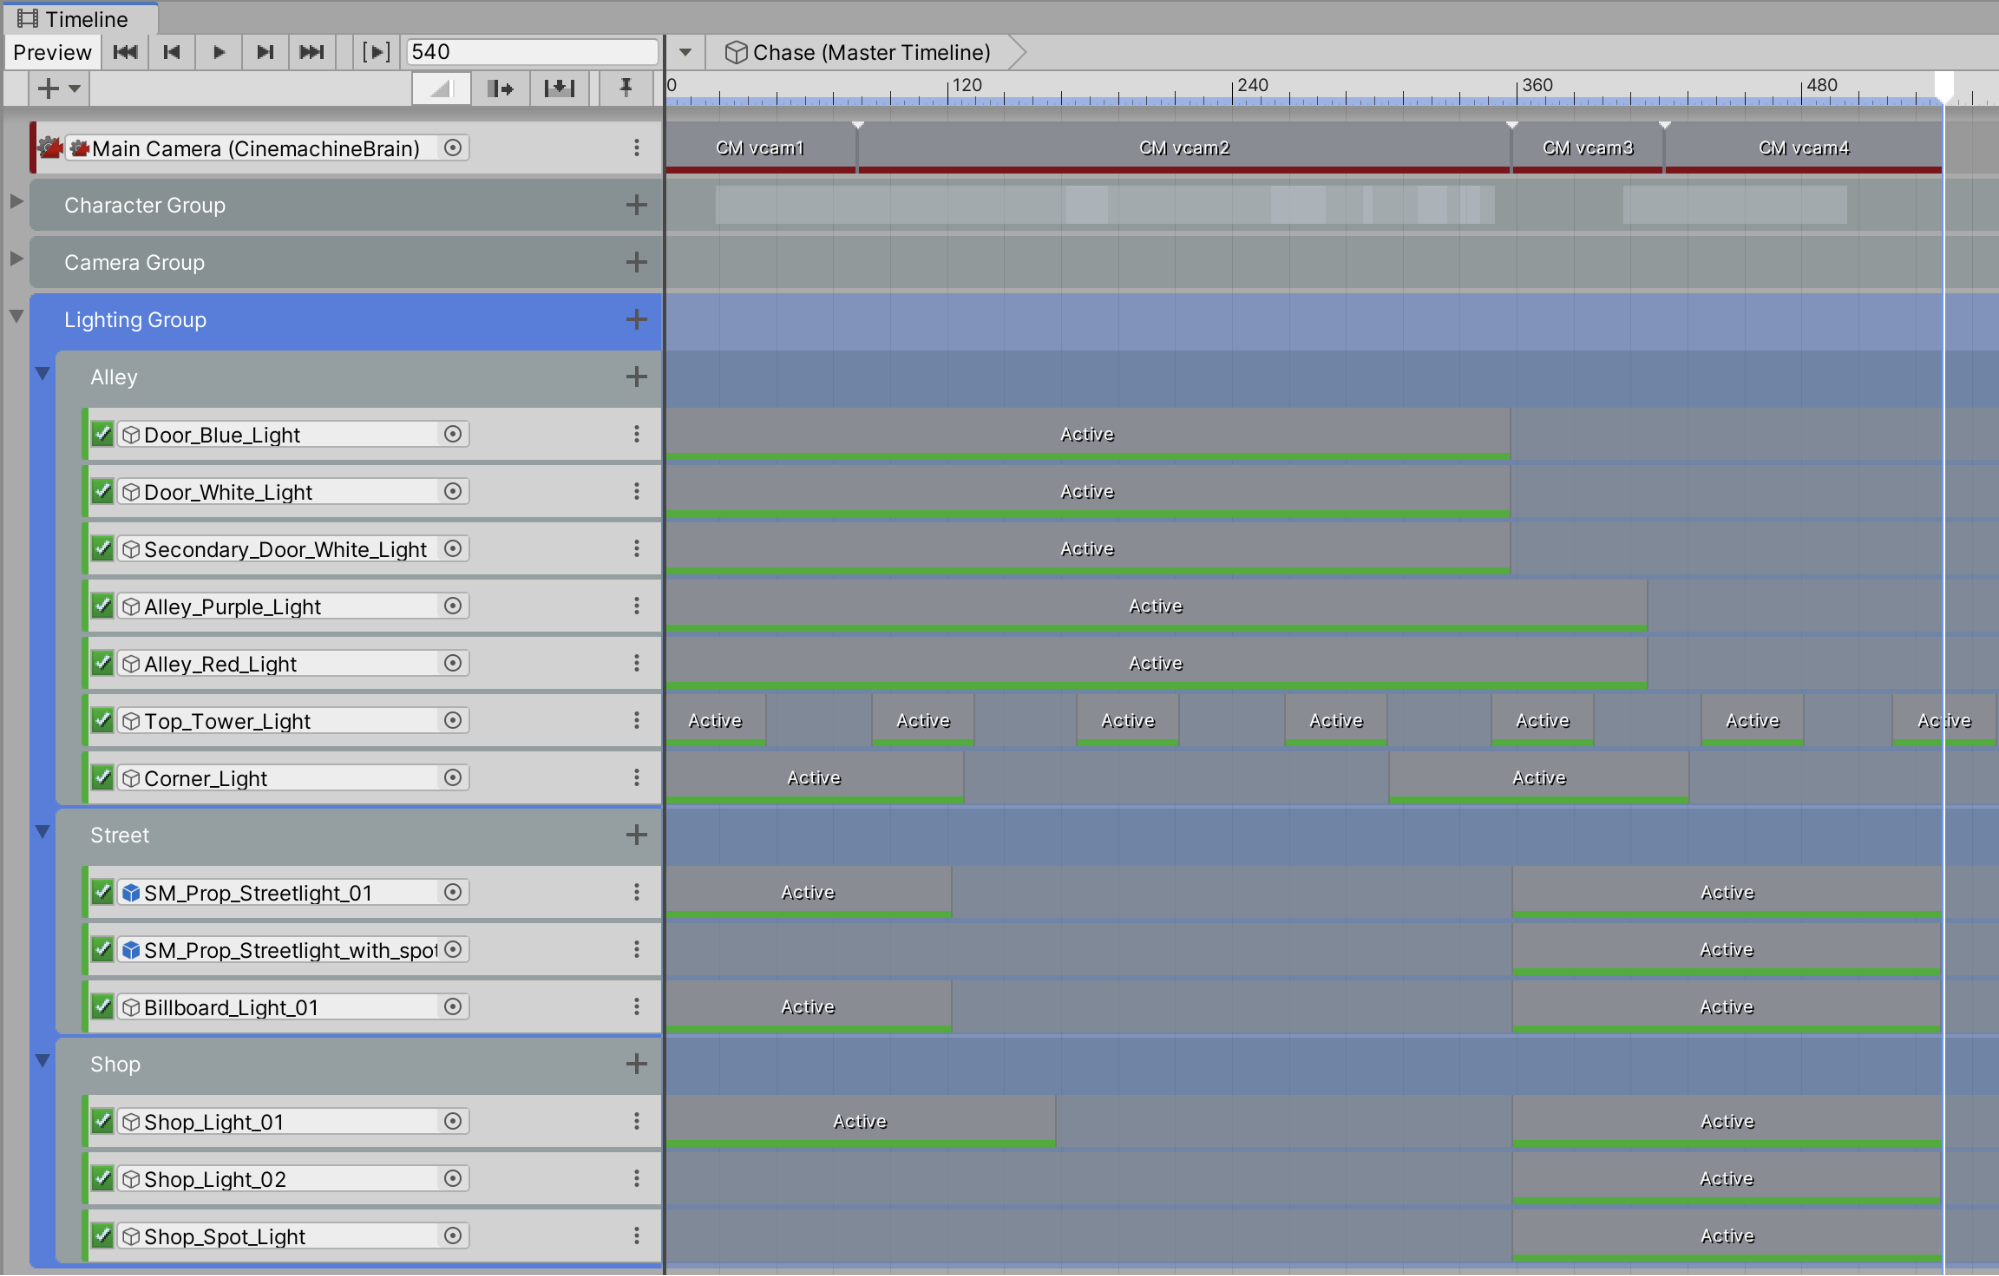
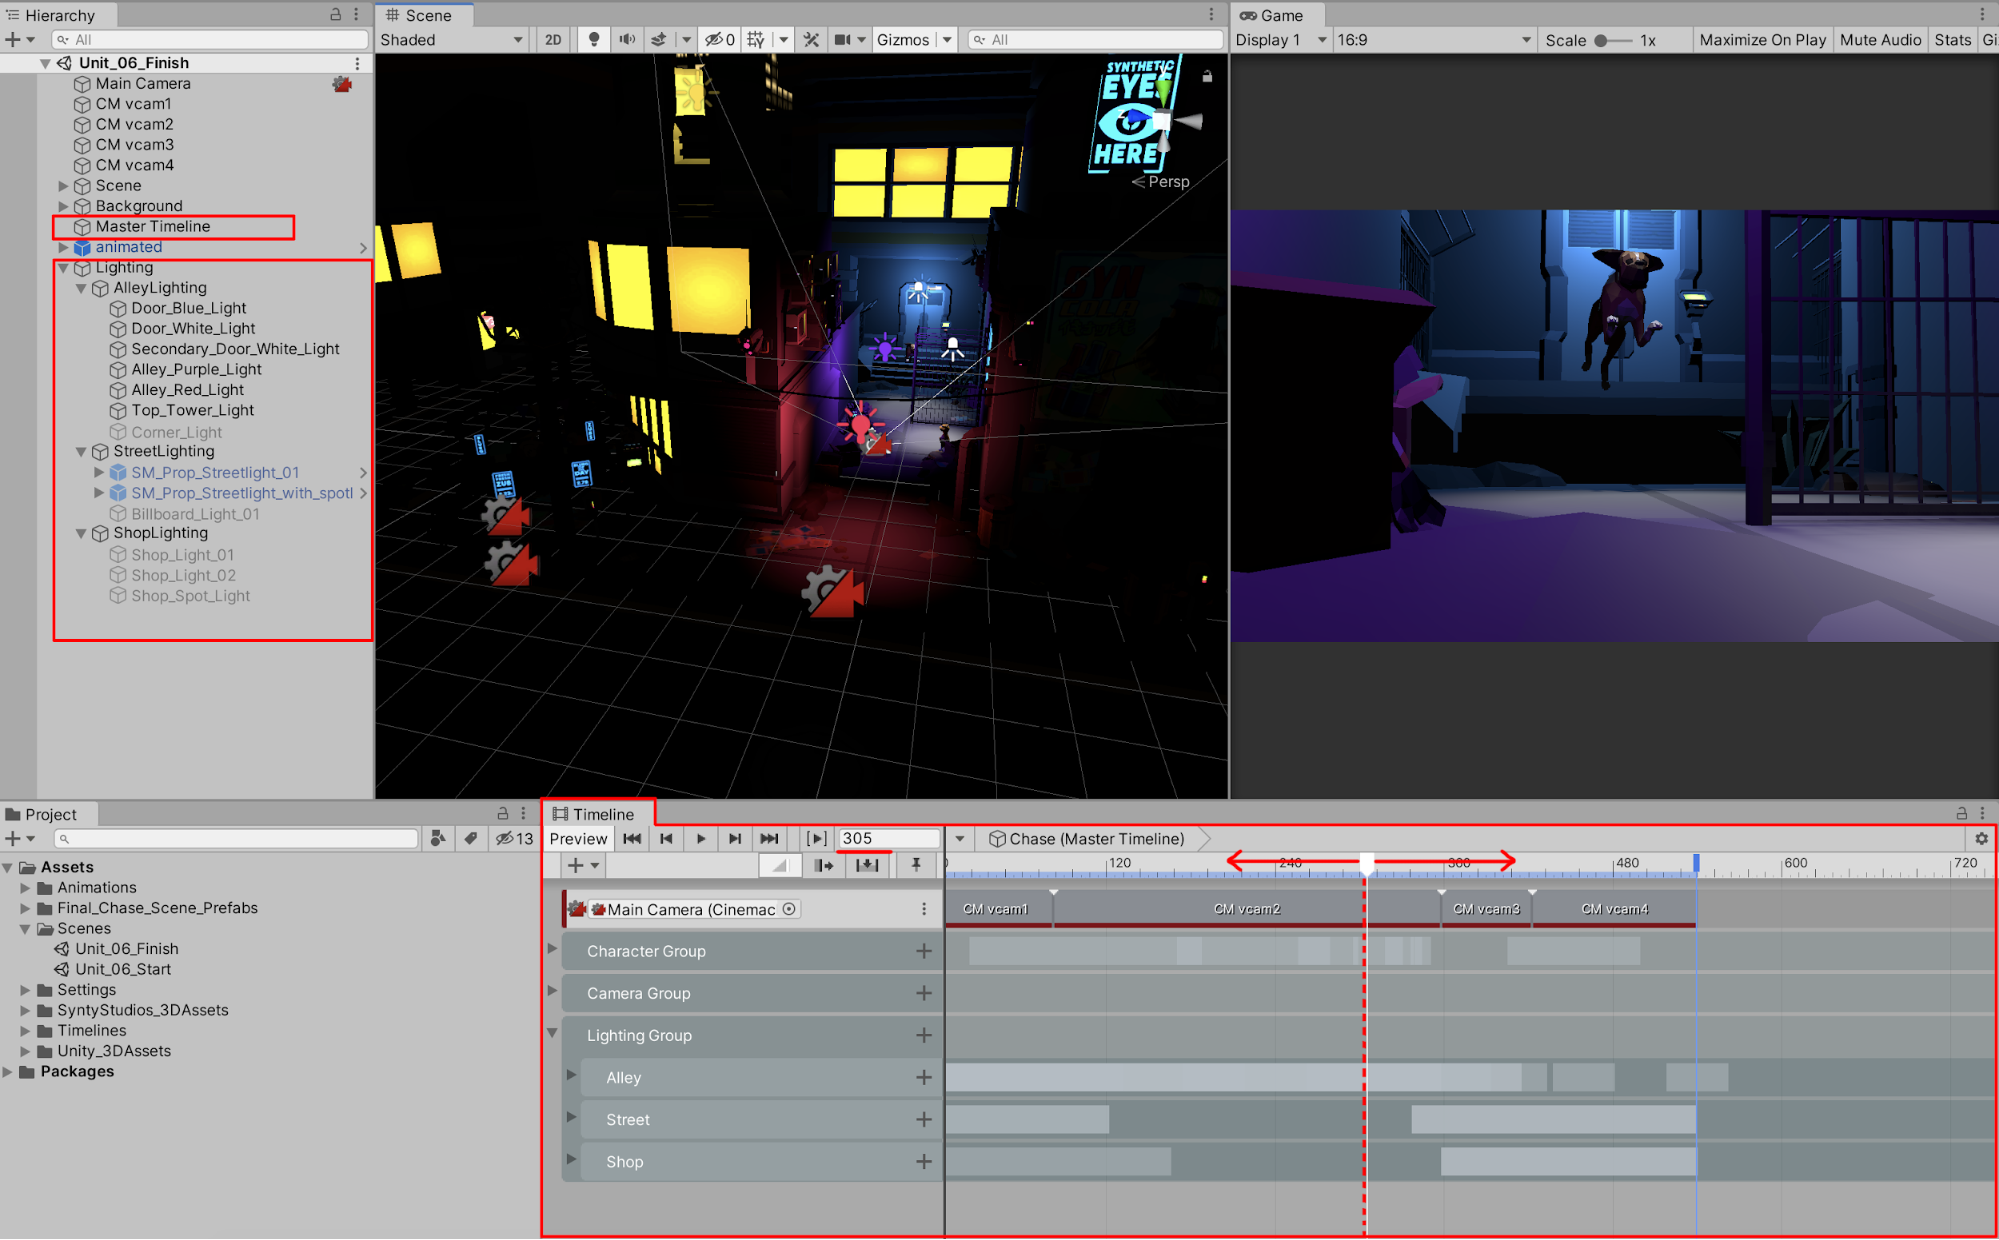
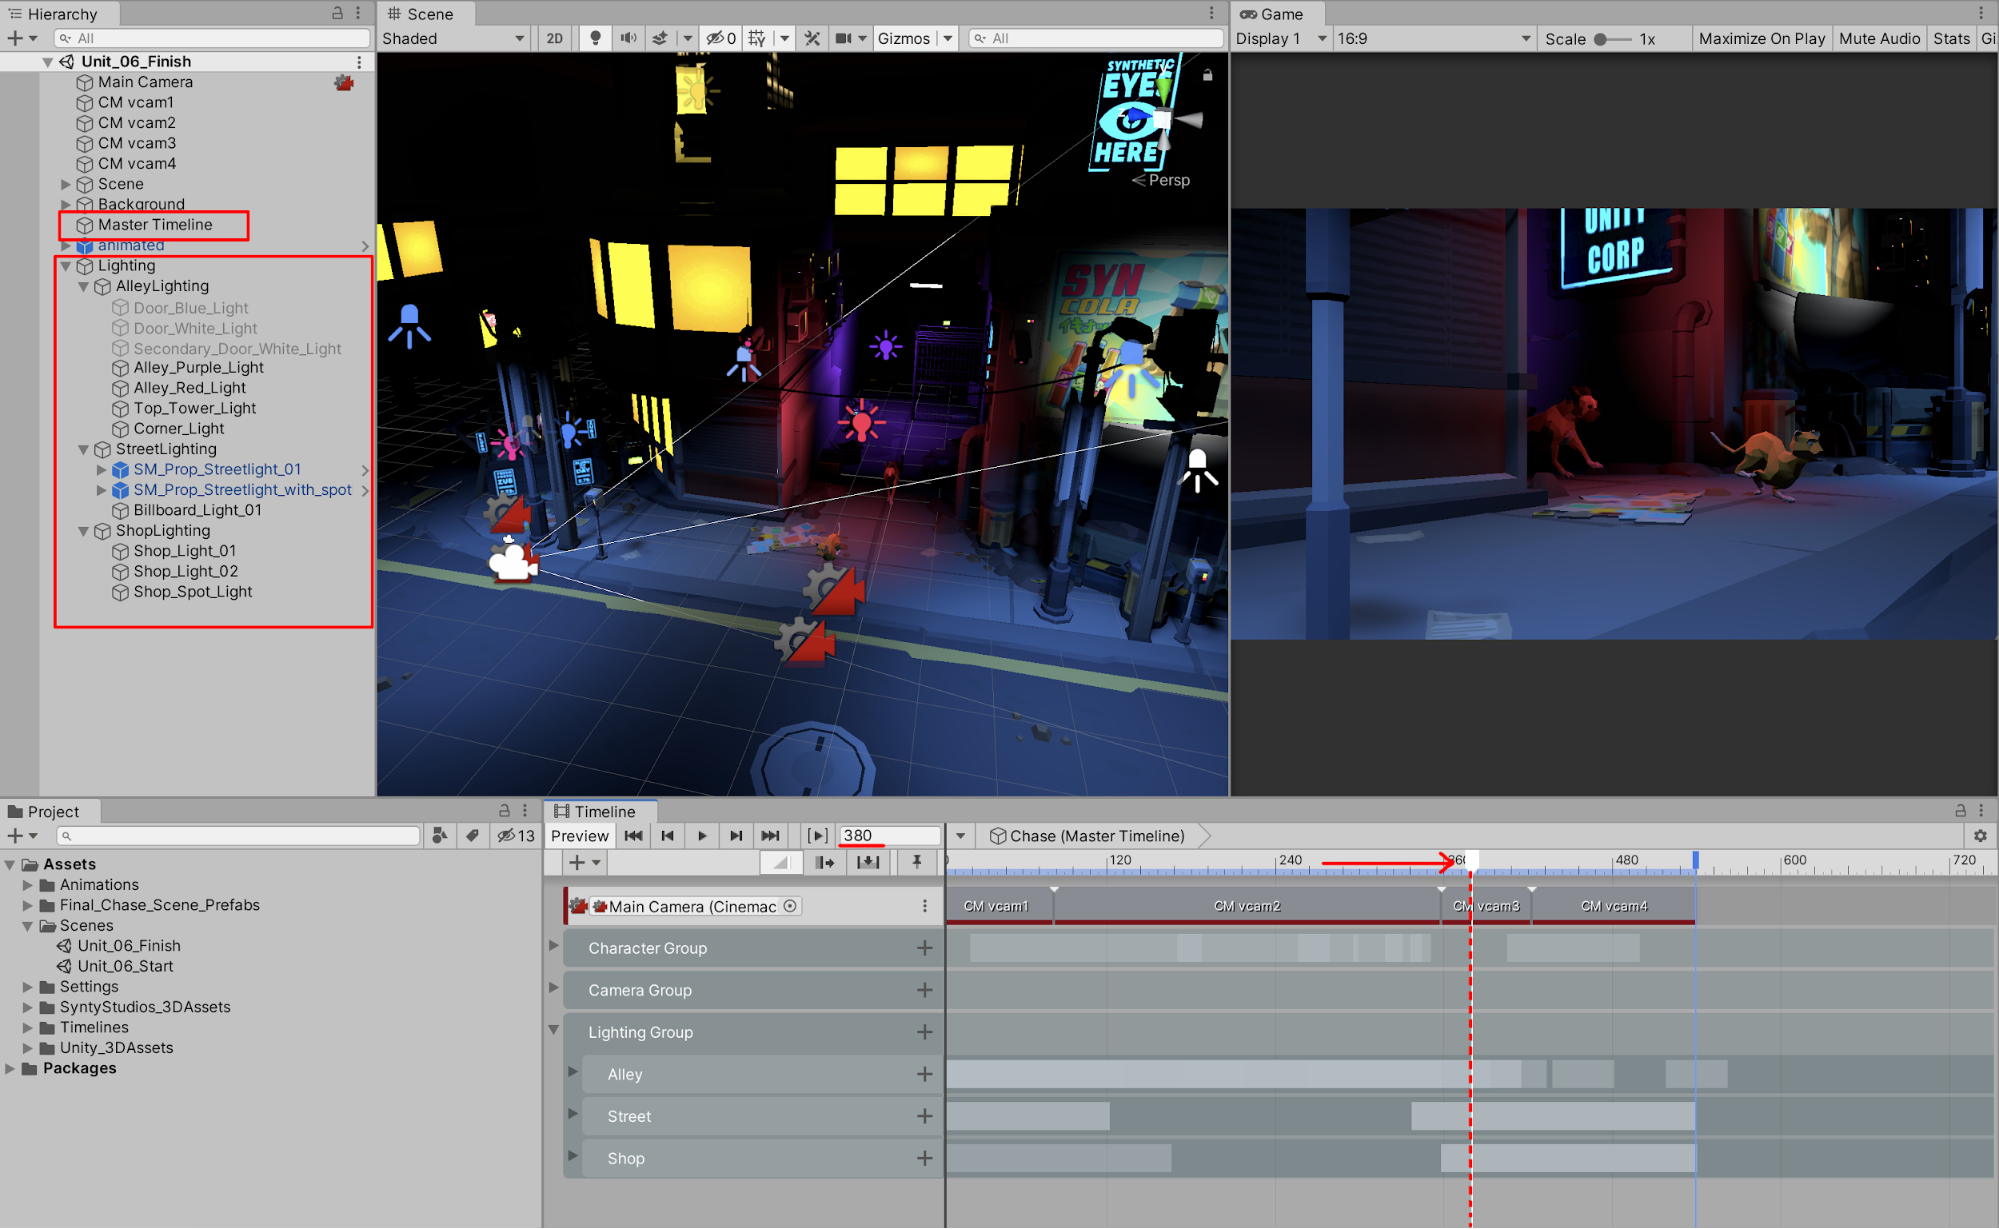
Let’s see your results! Your Activation Tracks may look similar to the above example. Note that for the Streetlamp lights we are using the parent GameObject rather than the Light. Any GameObject in Unity can be placed on the activation track After setting up the tracks for the lights in the Scene, let’s preview the results by scrubbing through the Timeline. When the Timeline’s playhead is advanced to Frame 305, for example, certain lights are visible and activated, while others are deactivated. You can preview the lighting in both the Scene and Game windows, as well as checking to see if the lights are active or greyed out in the Hierarchy Window (Figure 23). When advancing the Timeline’s playhead forward to Frame 380, note that the street and shop lights are active, while other lights in the alley are deactivated (Figure 24).
5. Adding Fog
In the next step, we’ll add some atmosphere to our Scene by adding fog. Fog in a Scene simulates a natural atmospheric fade from the camera’s position to objects becoming less visible farther off in the distance. With fog enabled, your Scene’s atmospheric qualities are greatly enhanced.
1. Open the Lighting Settings window by selecting from the top menu drop-down: Window > Rendering > Lighting Settings. If you scroll down in the Lighting Settings window to the Other Settings field, you will see the Fog properties (Figure 25).
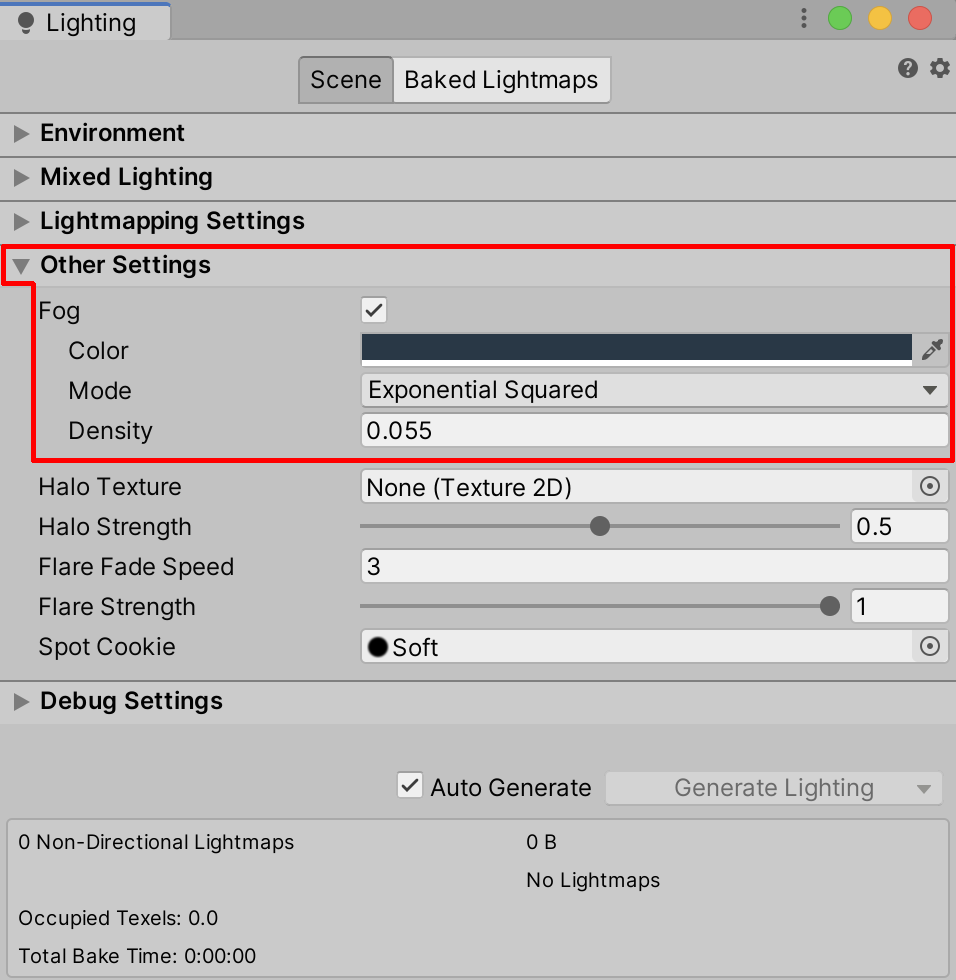
2. Check the checkbox next to Fog to enable it, then increase the Density of the Fog by changing the Density value to .1 or higher. Preview the resulting fog density and return the Density value back to .055.
You can adjust the values and properties of fog in your Scene by changing the Color, Mode, or Density. Setting the Mode to Exponential Squared, for instance, controls the mathematical function that determines the way the fog accumulates exponentially with the distance from the camera. You then control the Density setting to increase or decrease the fog’s thickness.
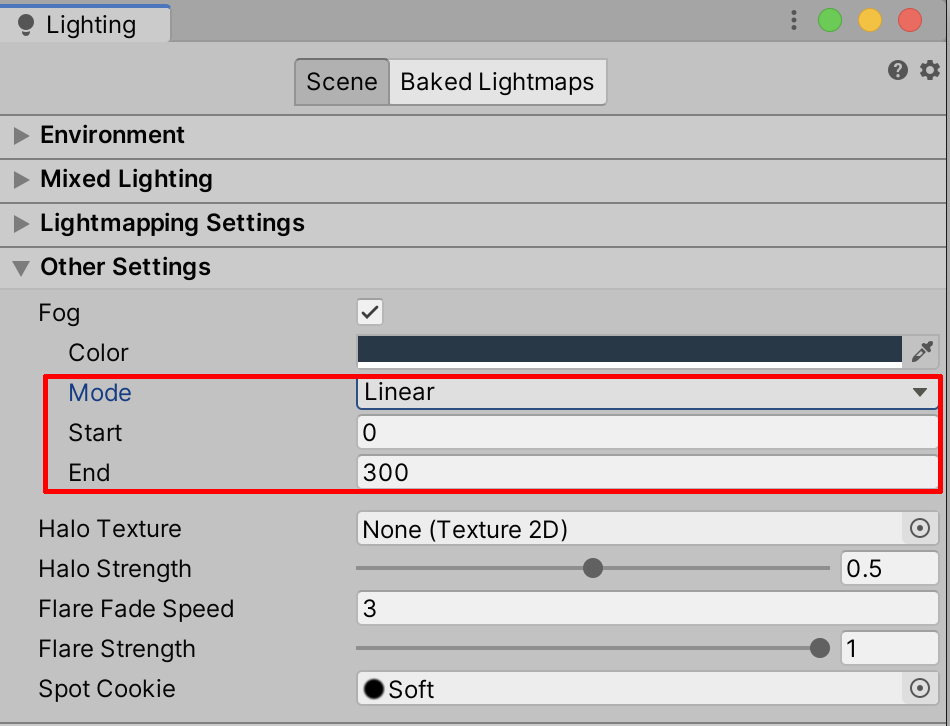
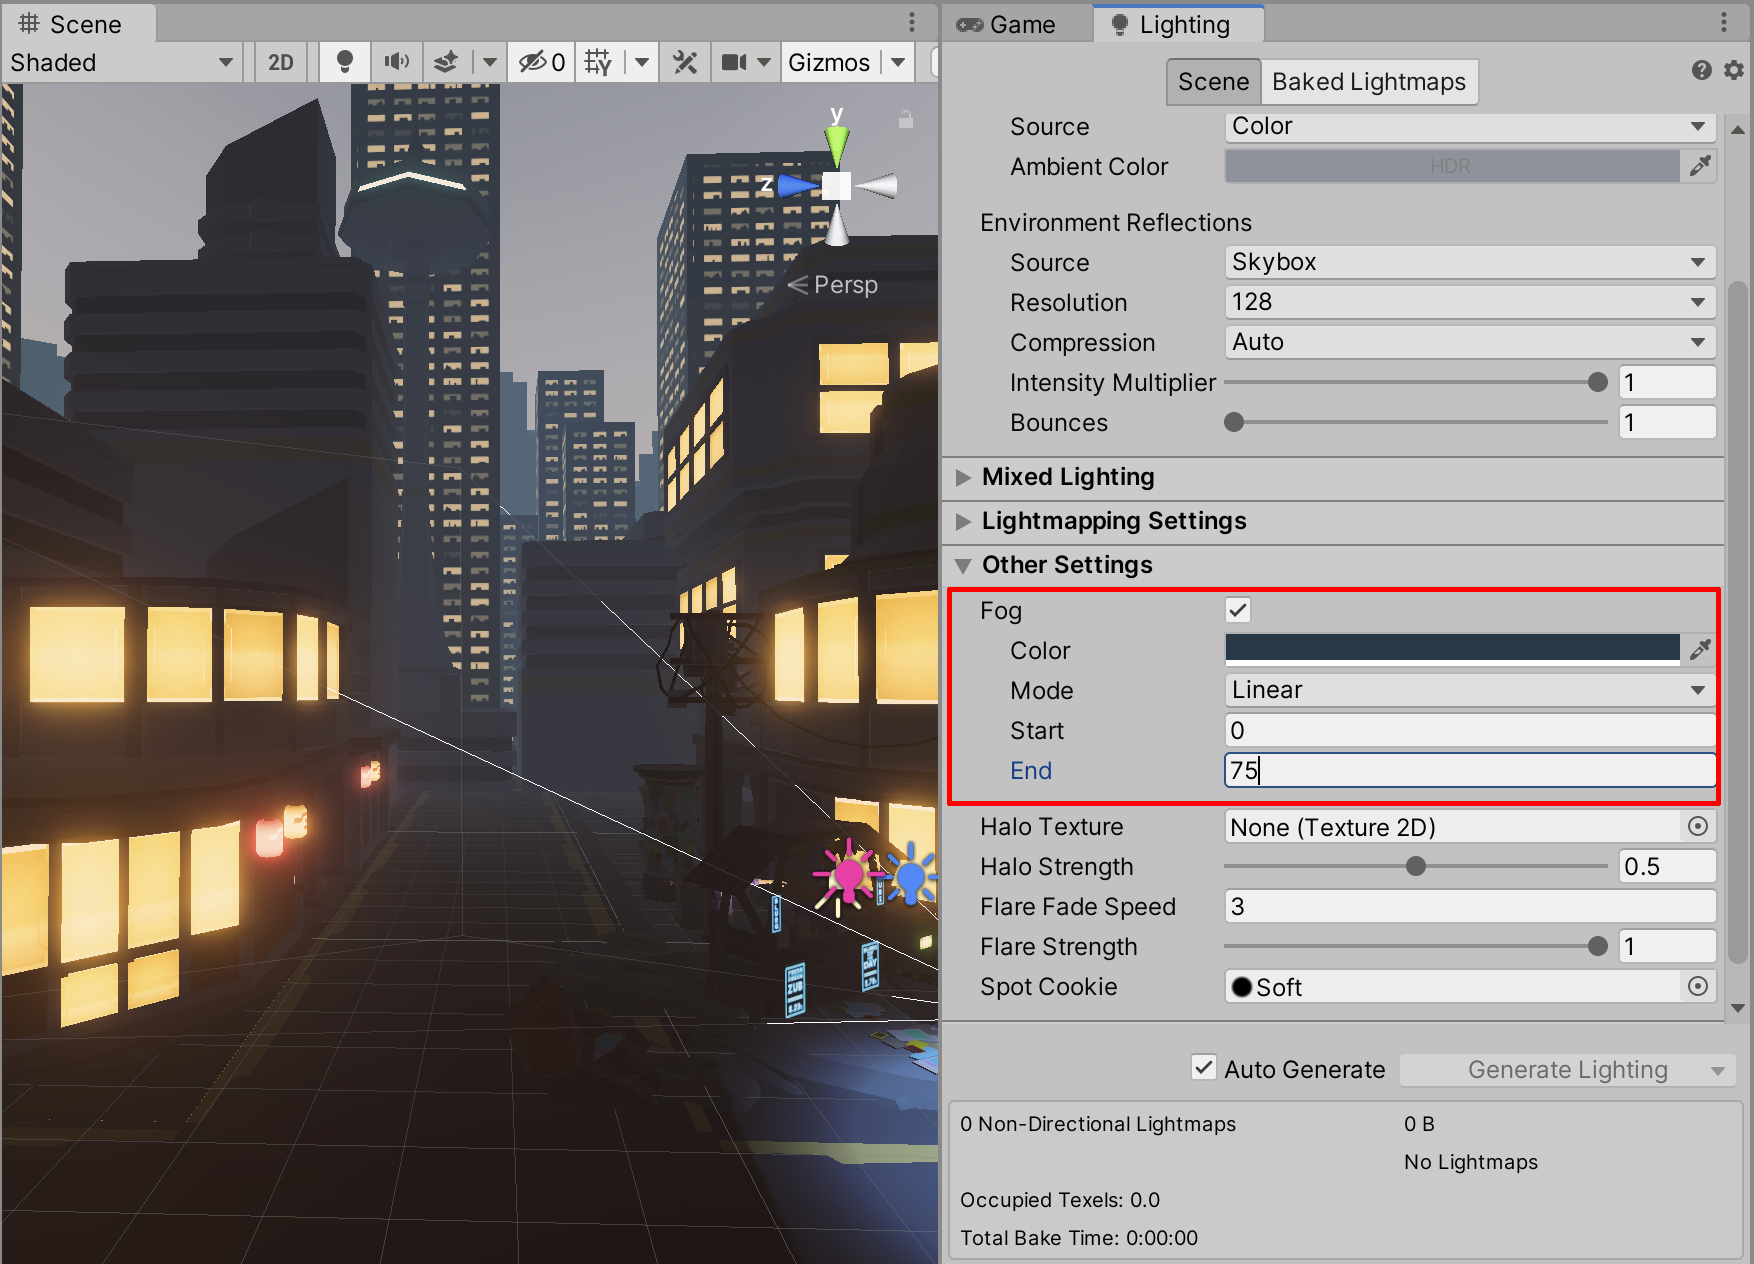
3. To set a specific length or distance of visibility falloff, change the Mode from Exponential Squared to Linear (Figure 26).
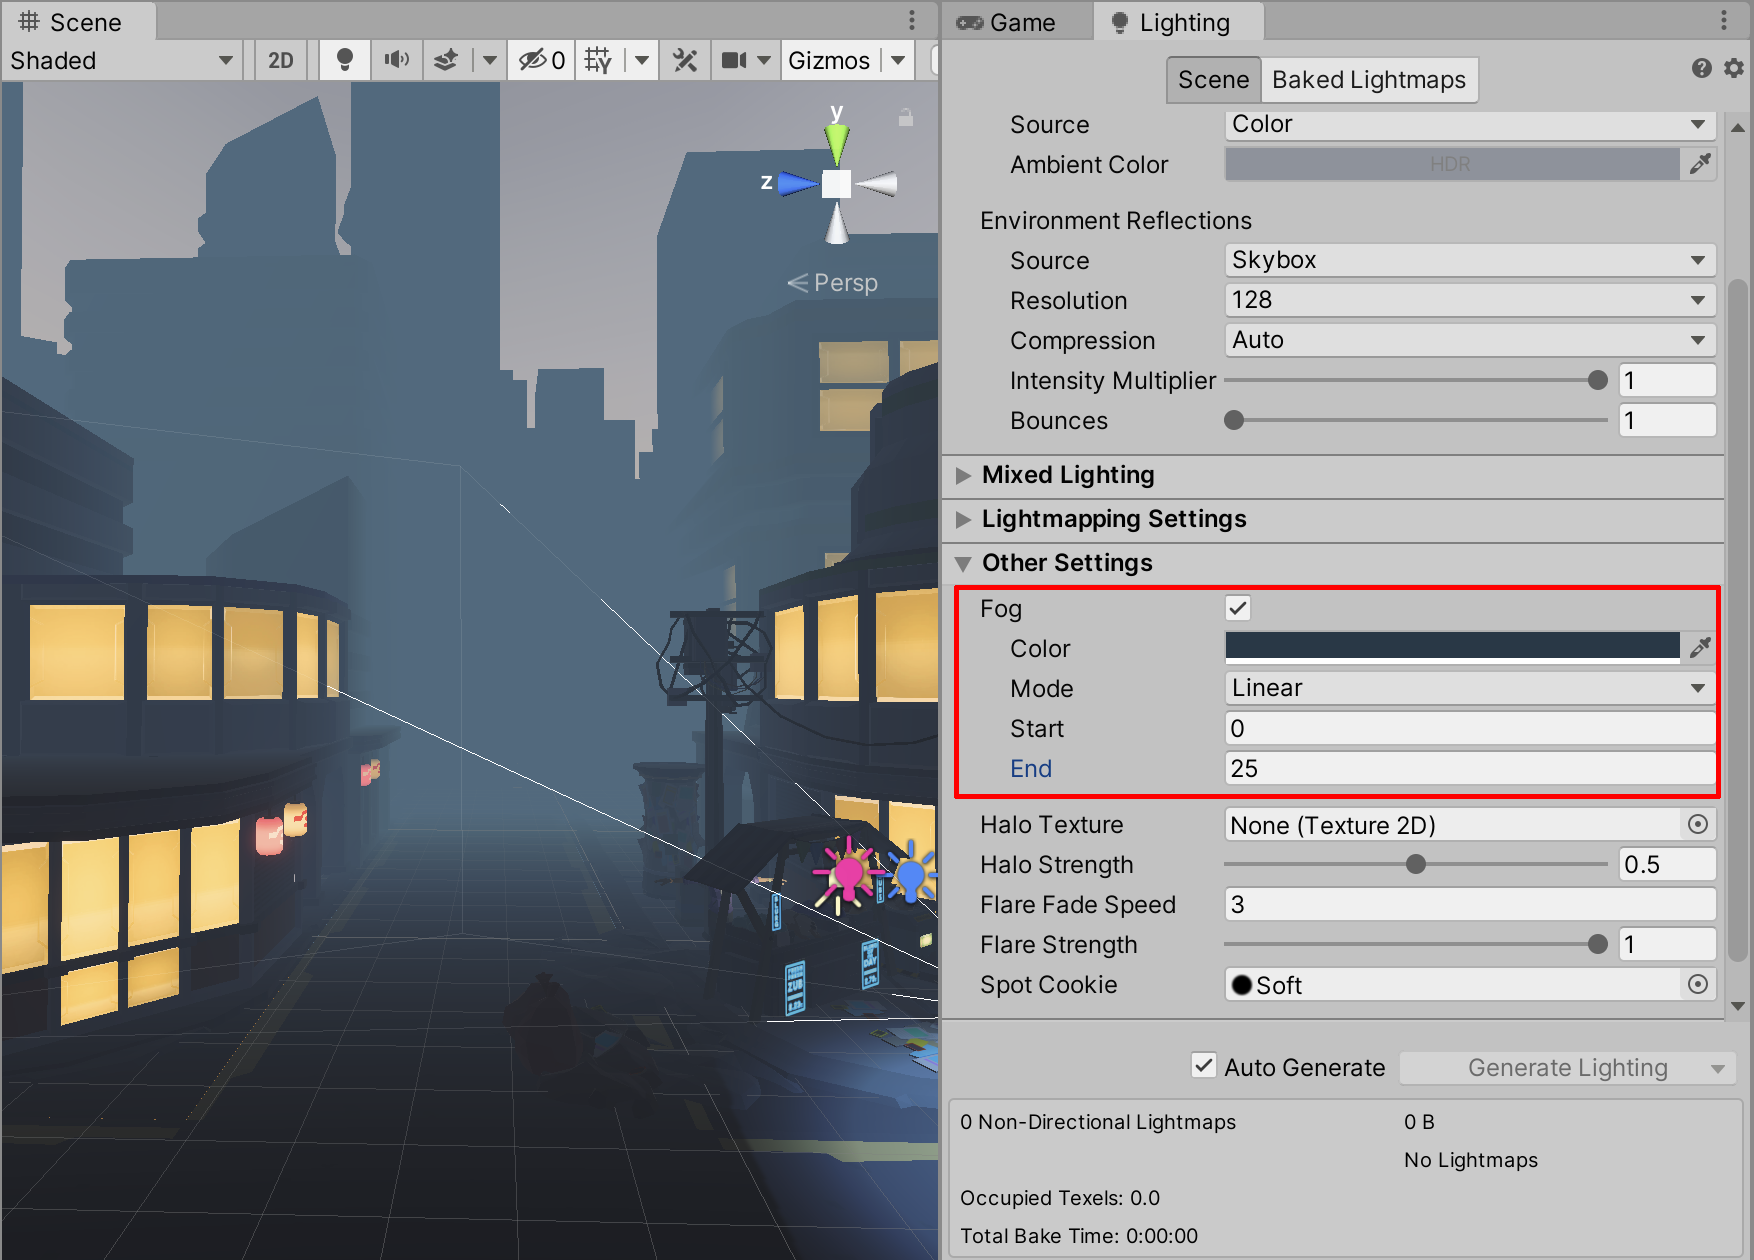
4. Adjust the visible distance in the Scene by first comparing the fog’s Linear End setting of 25 with an increased Linear End setting of 75. The higher Linear End value will reduce the level of fog and increase the distance of visibility (Figure 27).
6. Recap
Unity gives you nuanced control over the lighting in your Scene. In this unit, we covered adding street lighting through Prefabs, working with the Light Explorer, using Activation Tracks to activate your lights, and adding fog to your Scene. In the next lesson, we’ll show you how to refine your lighting even further through post processing.