
Lesson 6.4 - Adding Post Processing Effects per Camera Shot
Tutorial
Beginner
+10XP
60 mins
161
Unity Technologies
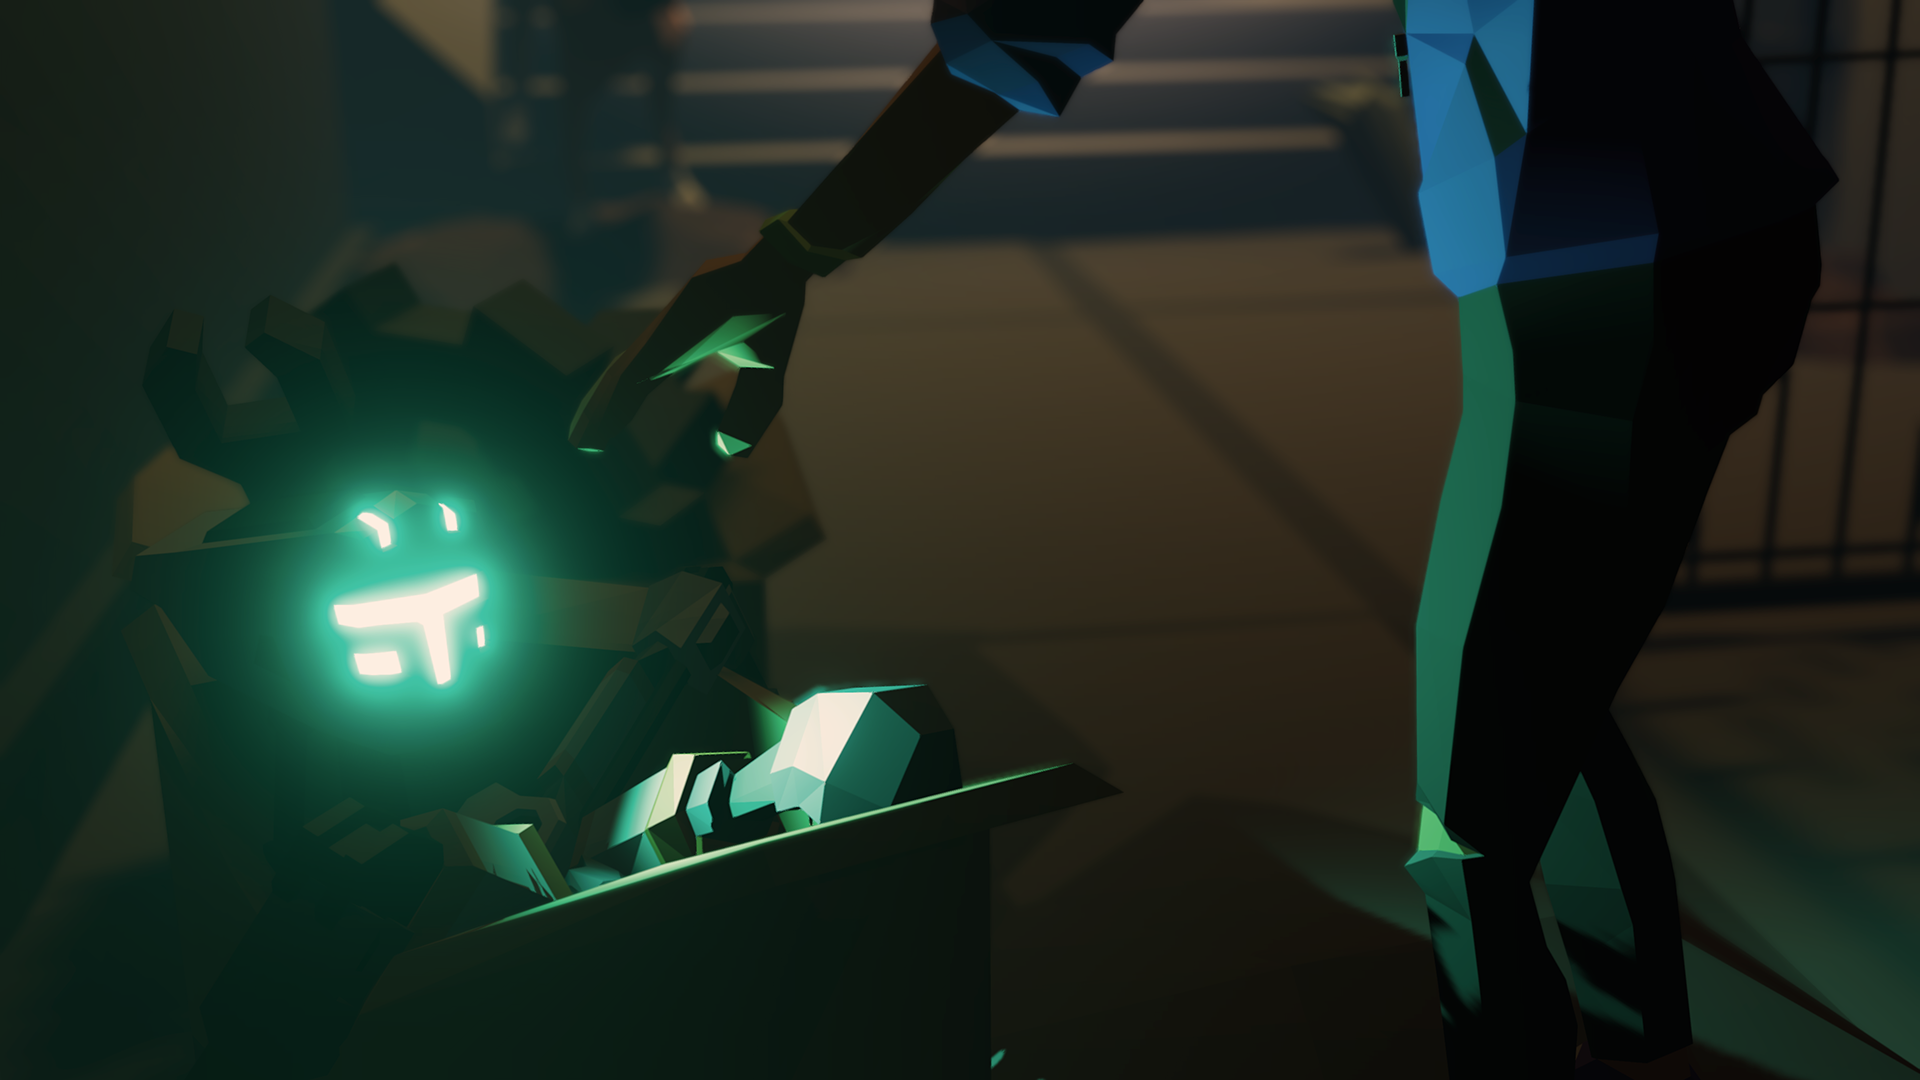
In this lesson, you will learn how to add specific post-processing effects to your cameras. Applying post-processing effects per camera allows you to customize shots to achieve a distinct look and style without affecting your entire Scene. This lesson will cover adding a vignette effect, as well as adding and animating depth of field over time.
1. Lesson Overview
2. Using Vignette
A vignette effect is one in which the camera softens or blurs the edges of a shot, making the center the focus.
To make sure the camera’s frame of view remains visible in the Game window, first lock the Master Timeline’s window. That way, we can position the Frame Playhead Cursor along the Timeline to preview the camera’s shot while making the adjustments to the post-processing effects.
1. With the Master Timeline GameObject selected in the Hierarchy window, select the Lock icon in the upper-right corner to ensure the Master Timeline’s properties remain visible (Figure 01).

2. Position the Frame Playhead Cursor to a frame where the first Cinemachine Camera displays the establishing shot for the Chase Scene in the Game window (any frame between 0 and 80 should work).
3. You’ll notice the ScenePostProcessing GameObject from the previous lesson is still visible and locked in the Inspector window. Select the Lock icon in to unlock it.
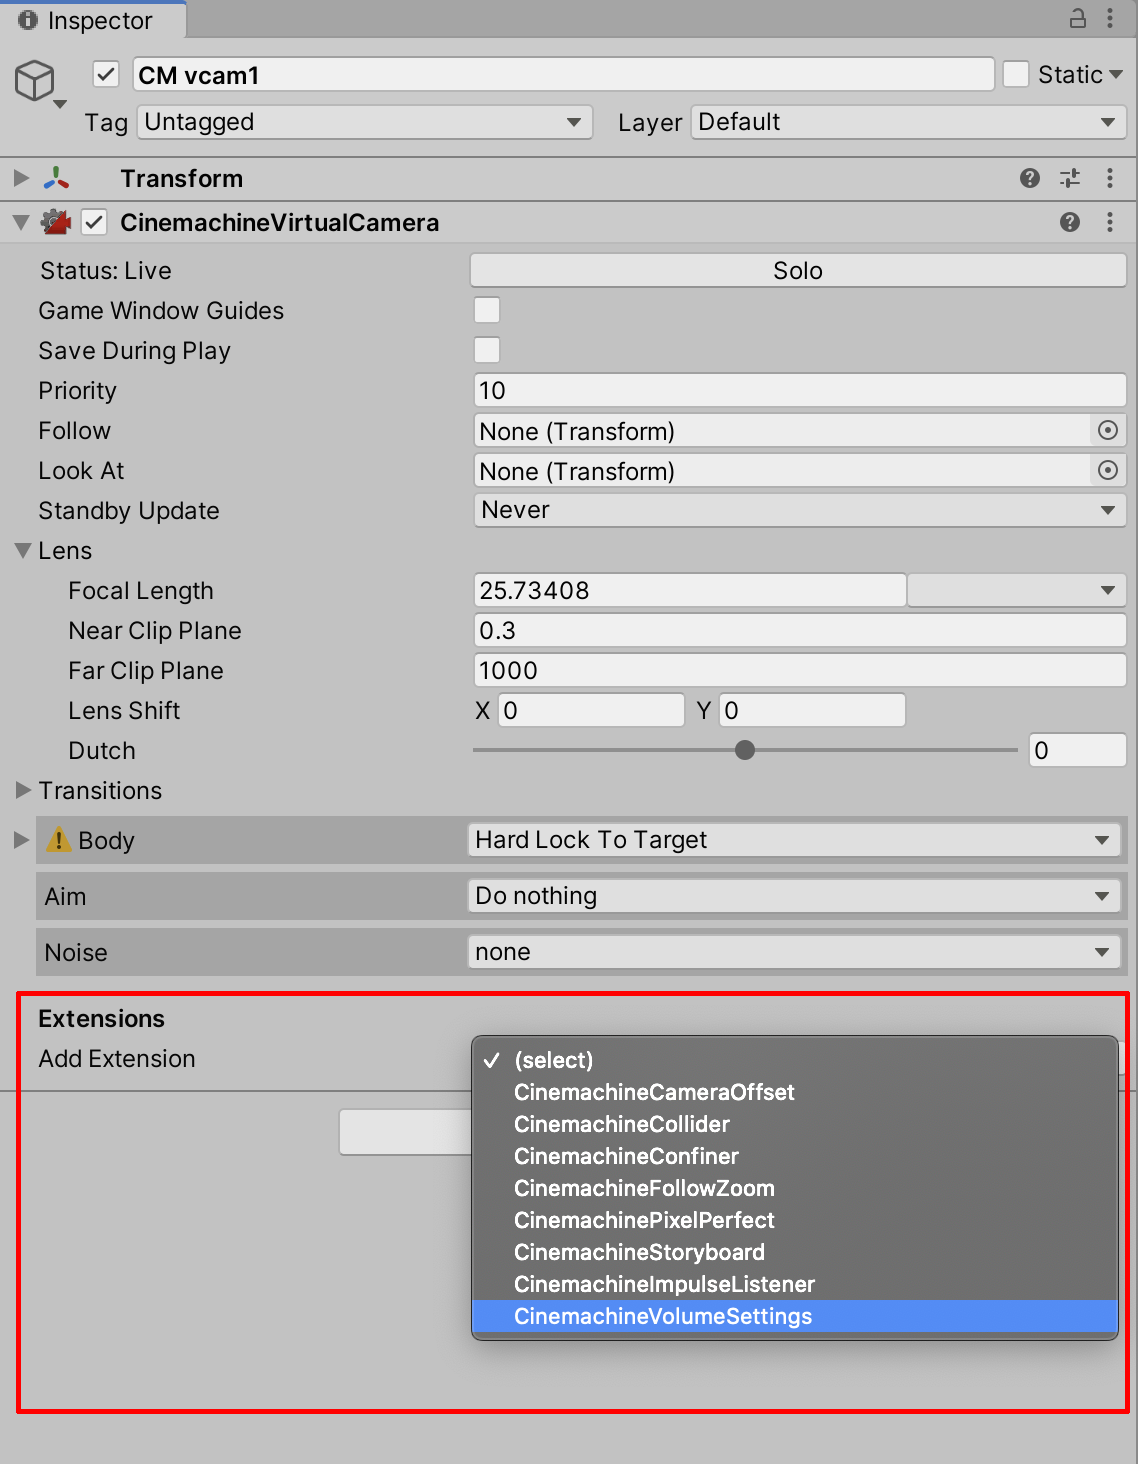
4. With CM vcam1 selected in the Hierarchy window, expand the CinemachineVirtualCamera component in the Inspector. Select the Add Extension field and select CinemachineVolumeSettings (Figure 02).
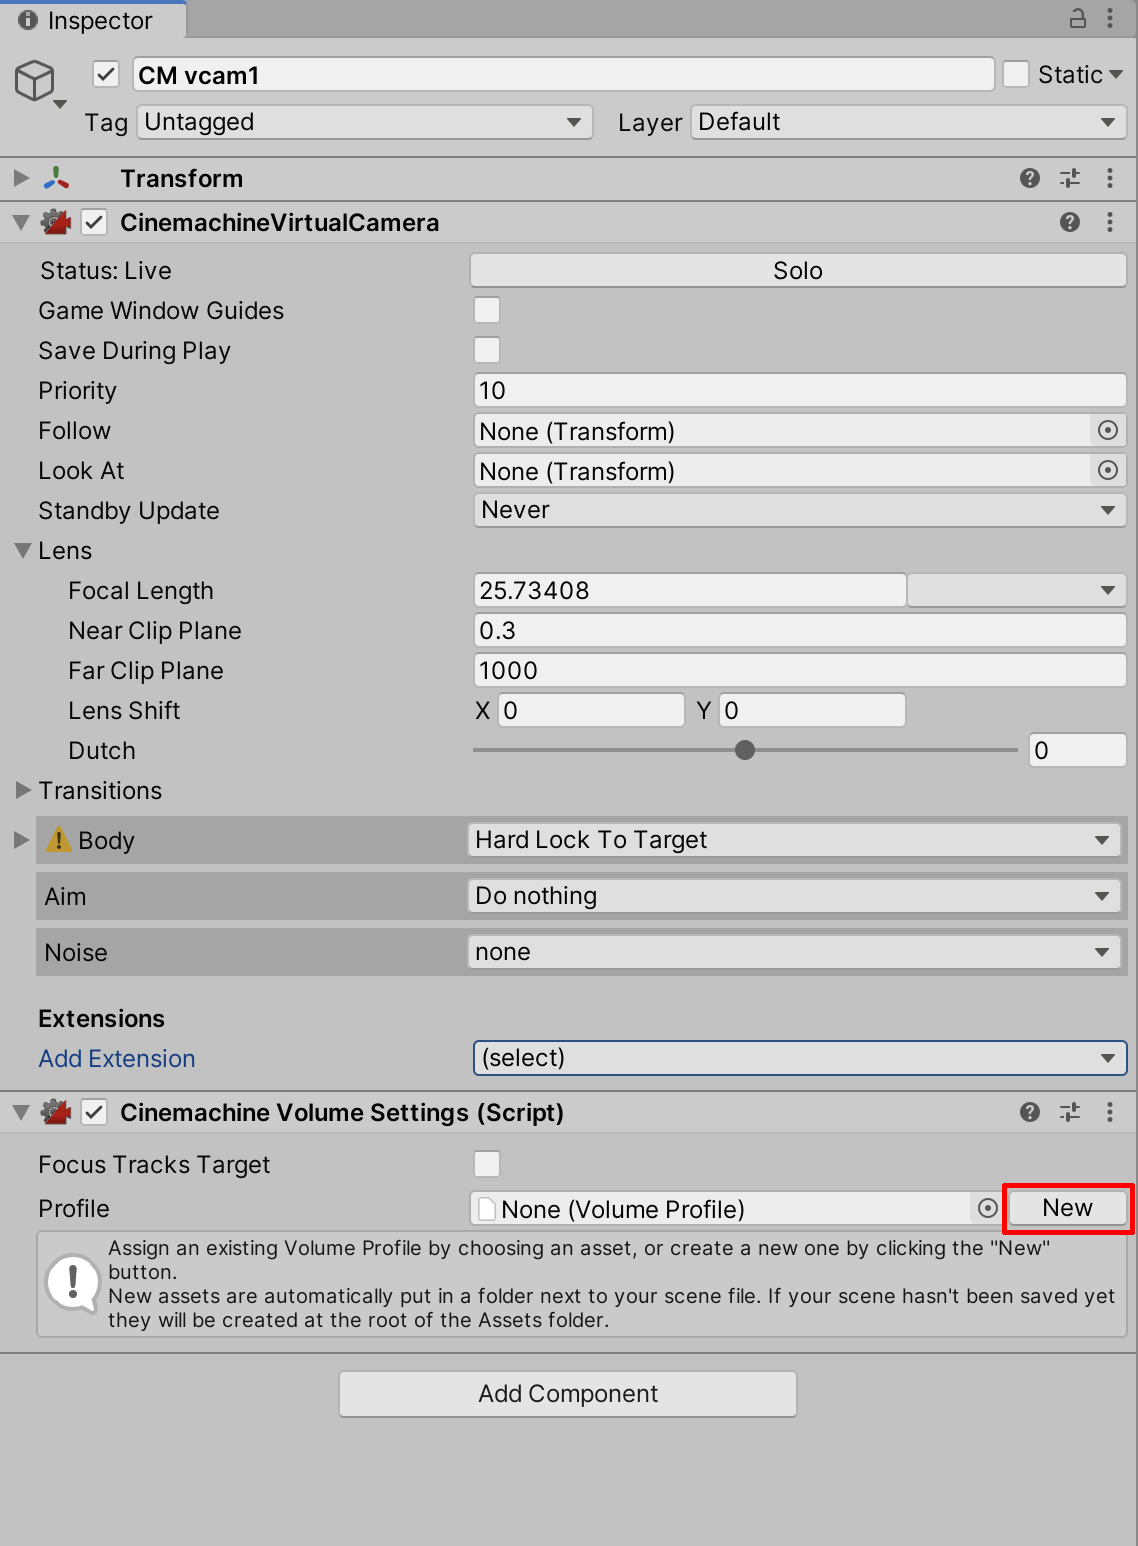
5. Now let’s create a new profile on the Cinemachine Volume Settings Extension we just added. Select New to create a new Volume Profile in the Cinemachine Volume Settings component (Figure 03).
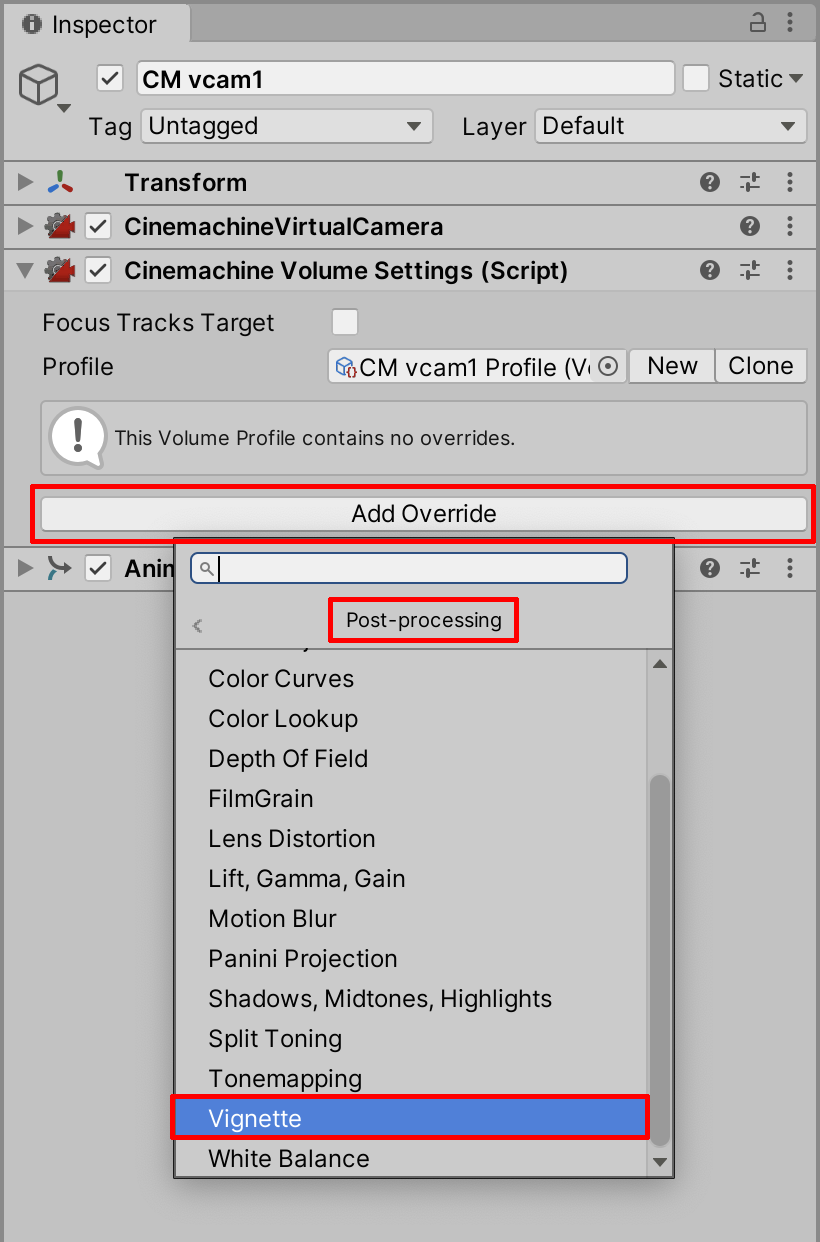
6. Next, select Add Override in the Inspector and select Post-processing > Vignette (Figure 04).
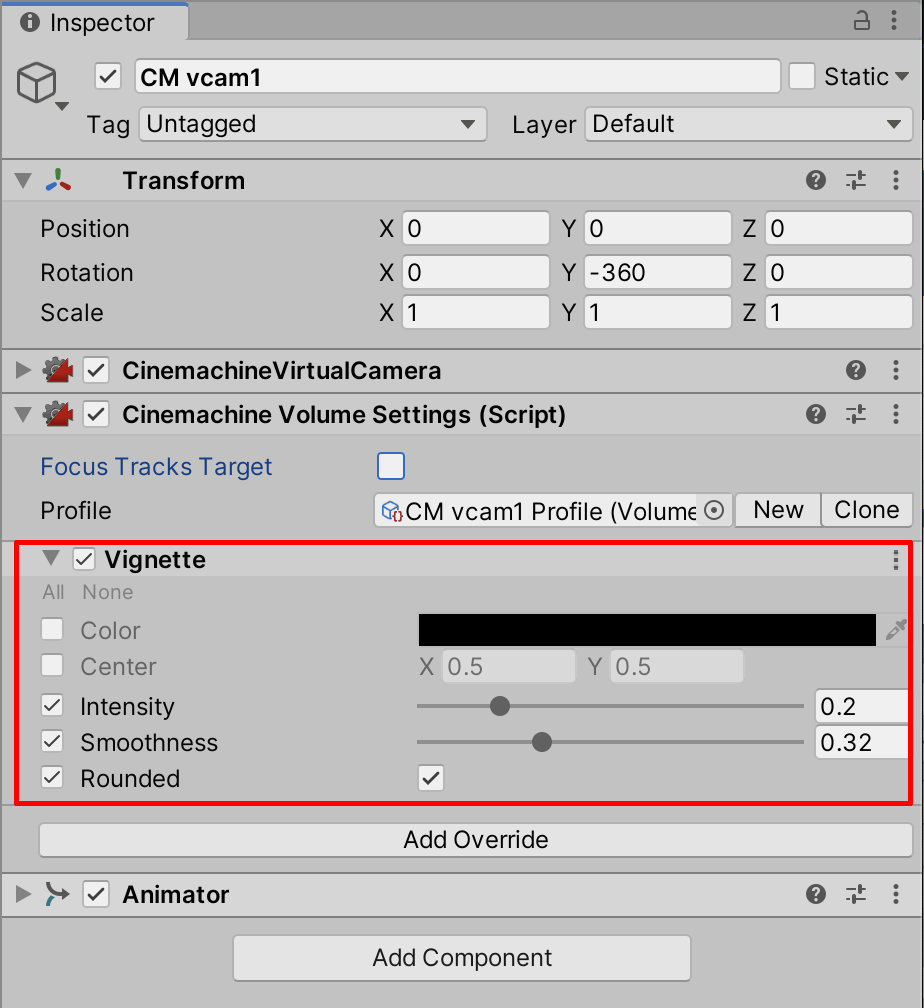
7. Select the checkboxes to enable Intensity, Smoothness, and Rounded. Set the Intensity value to 0.2. Set Smoothness to 0.32 (Figure 05).
3. Using Depth of Field
Depth of field refers to the range of distance at which an object remains in focus. A deep depth of field shows objects in the foreground as well as distant objects. A shallow depth of field will soften or blur objects outside the focal range.
1. In the Timeline window, move the Frame Playhead Cursor to Frame 200. Next, ensure that CM vcam2 is selected in the Hierarchy window.
2. Repeat the steps for adding the CinemachineVolumeSettings Extension. Select Add Extension from the drop-down field in the Inspector and then select CinemachineVolumeSettings.
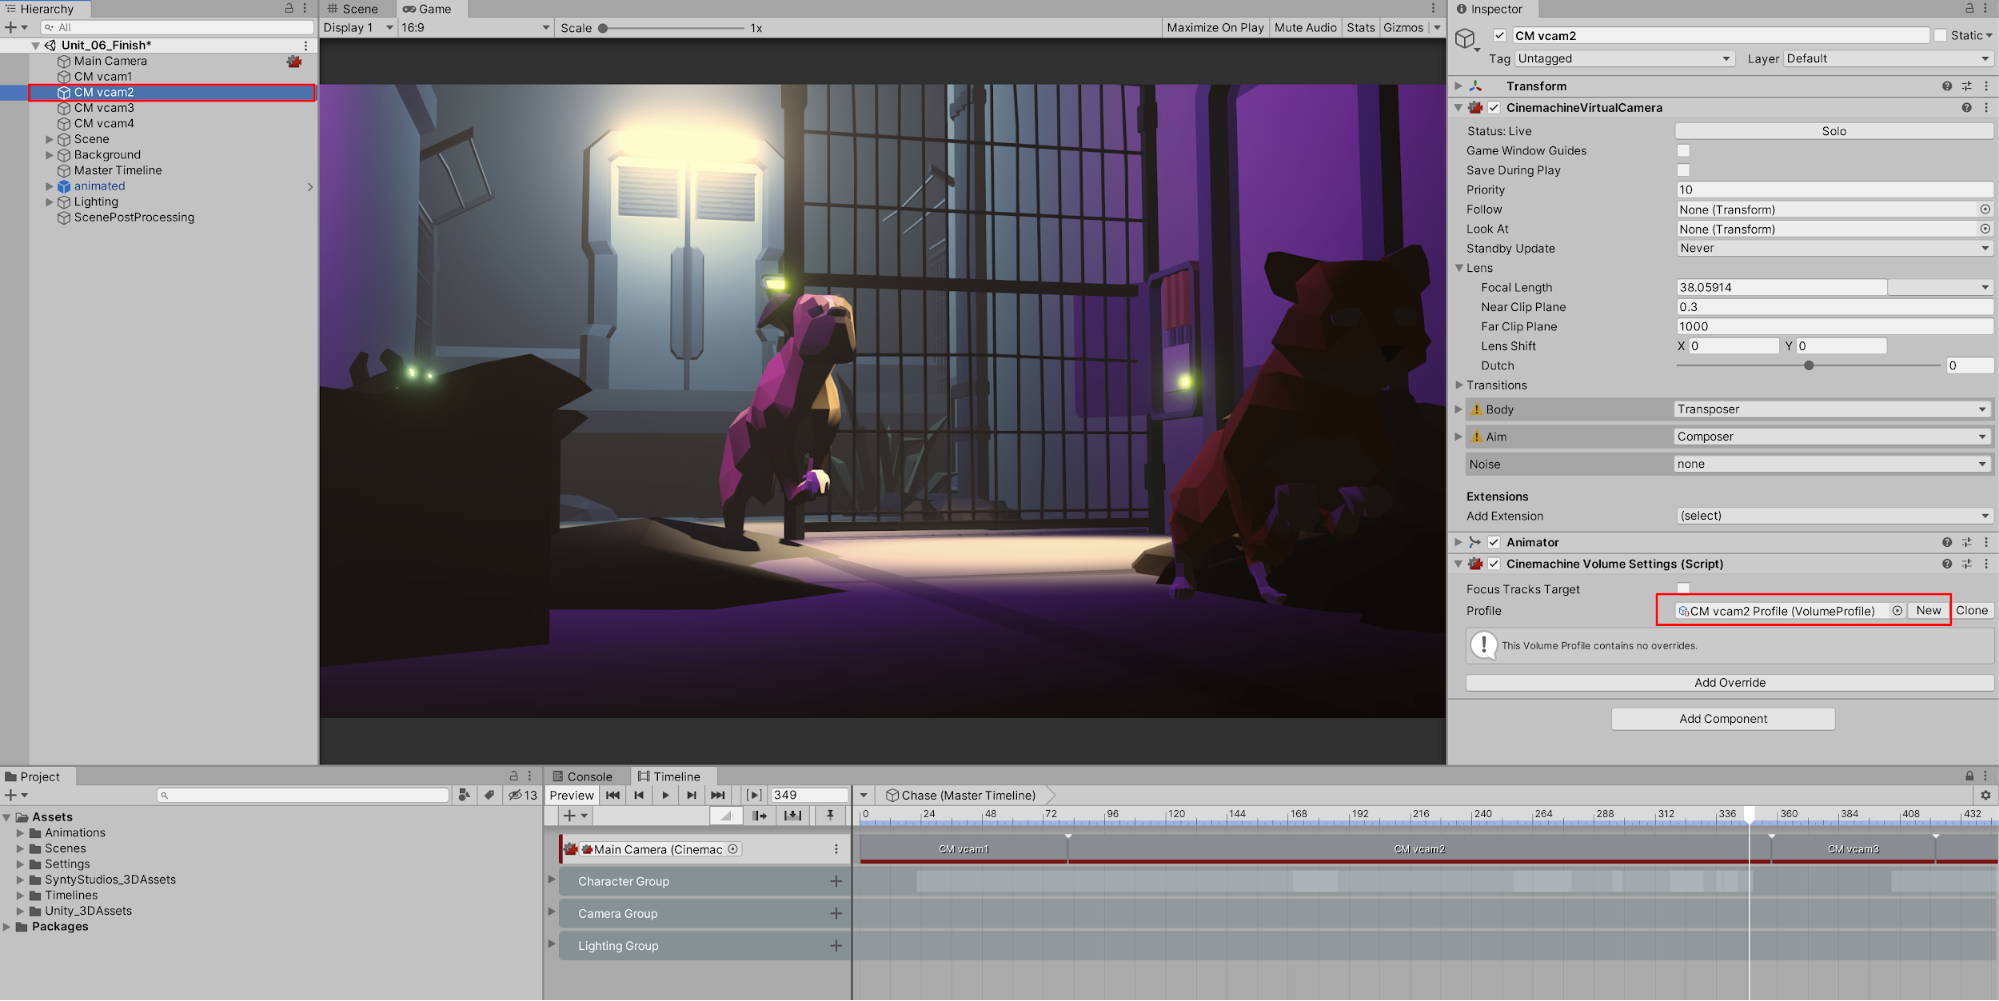
3. Again, select New to create a new Profile in the Inspector. Name the Profile CM vcam2 Profile (VolumeProfile) (Figure 06).
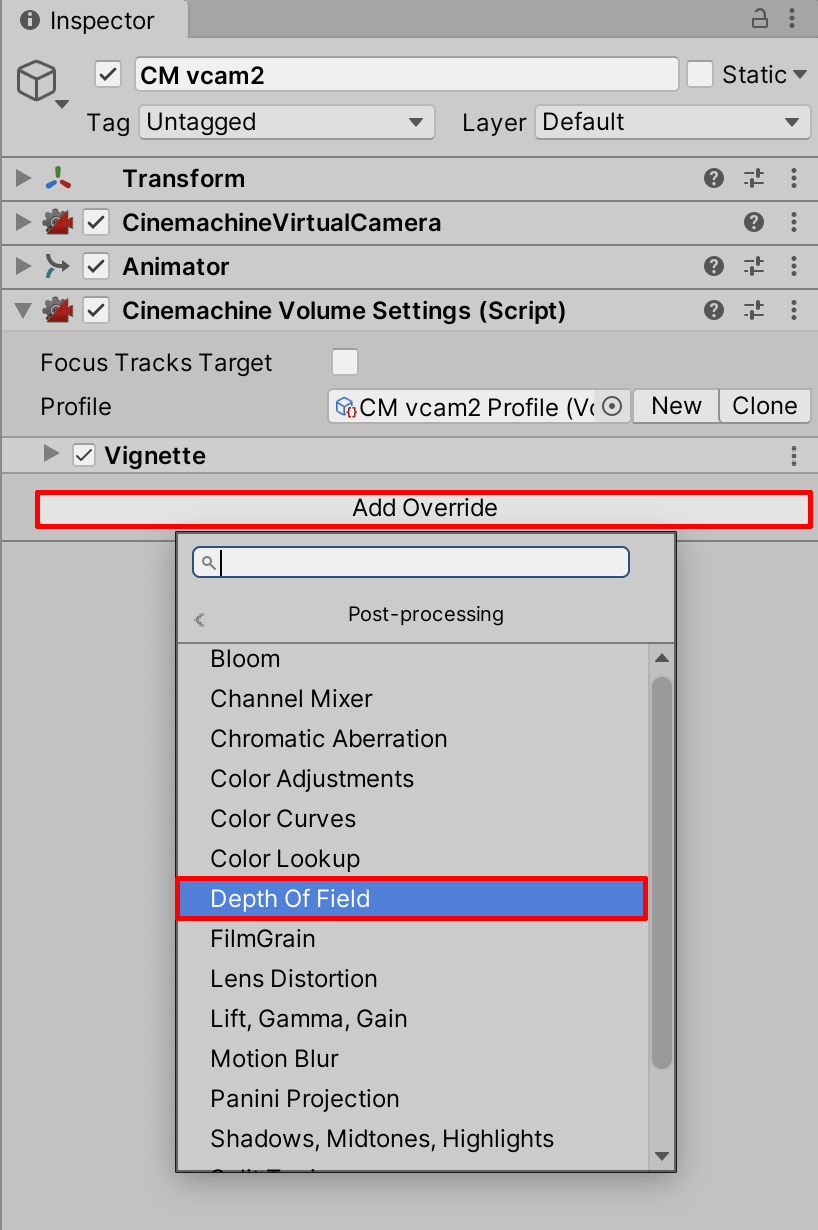
4. Next, select Add Override in the Inspector and select Post-processing > Depth Of Field (Figure 07).
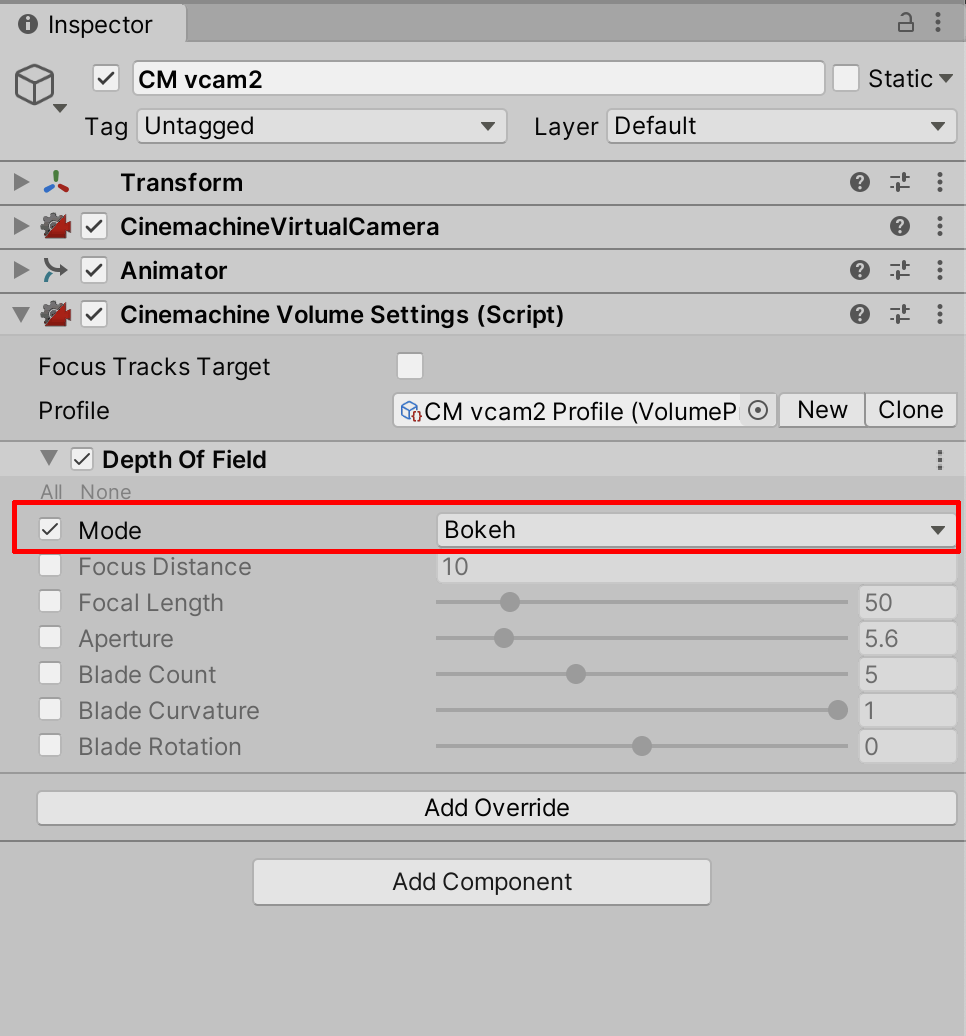
5. Select Mode and then select Bokeh. “Bokeh” is an aesthetic effect that blurs part of in an image while the rest is in sharp focus (Figure 08).
6. Enable Focus Distance and set the value to 2.7, which is nearly the precise distance from the Camera to the cat’s eyes, which we want to keep in focus (Figure 09). You would increase or decrease this value depending on the distance to the subject.
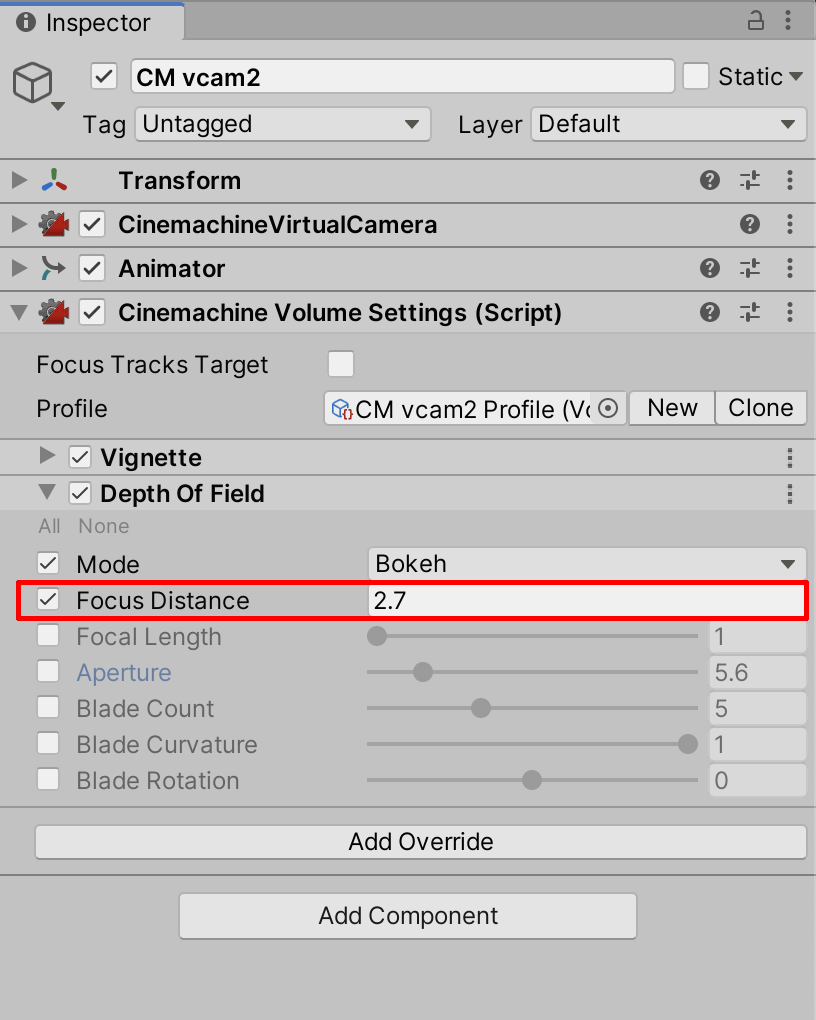
7. Select the checkbox for Focal Length. Set the Focal Length to 230.
The focal length is the distance between a real-world camera’s lens and its image sensor. With a real-world lens, you’d “zoom in” on an object by reducing the focal length. Remember that we enabled the Main Camera’s Physical Camera checkbox in Unit 5.2, and any Virtual Camera’s lens setting will show the focal length. For our purposes, however, the Depth of Field Volume Settings include a Focal Length setting, in which zoom is not affected. Instead, with the Focal Length value increased for Depth of Field, the resulting image will display an effect commonly referred to as “tilt shift,” which shows a very shallow depth of field.
8. If you prefer a more moderate level for the Scene’s depth of field, reduce the Focal Length to 115.
9. Enable the checkbox for Aperture. Set the Aperture to 2.5
In a real-world camera, aperture determines the amount of light that reaches the image sensor. The aperture’s value also affects depth of field. The smallest aperture value produces the deepest depth of field, while the largest creates the shallowest depth of field.
With the cat’s features sharply in focus at Frame 200, the resulting image previews a shallow depth of field (Figure 10).
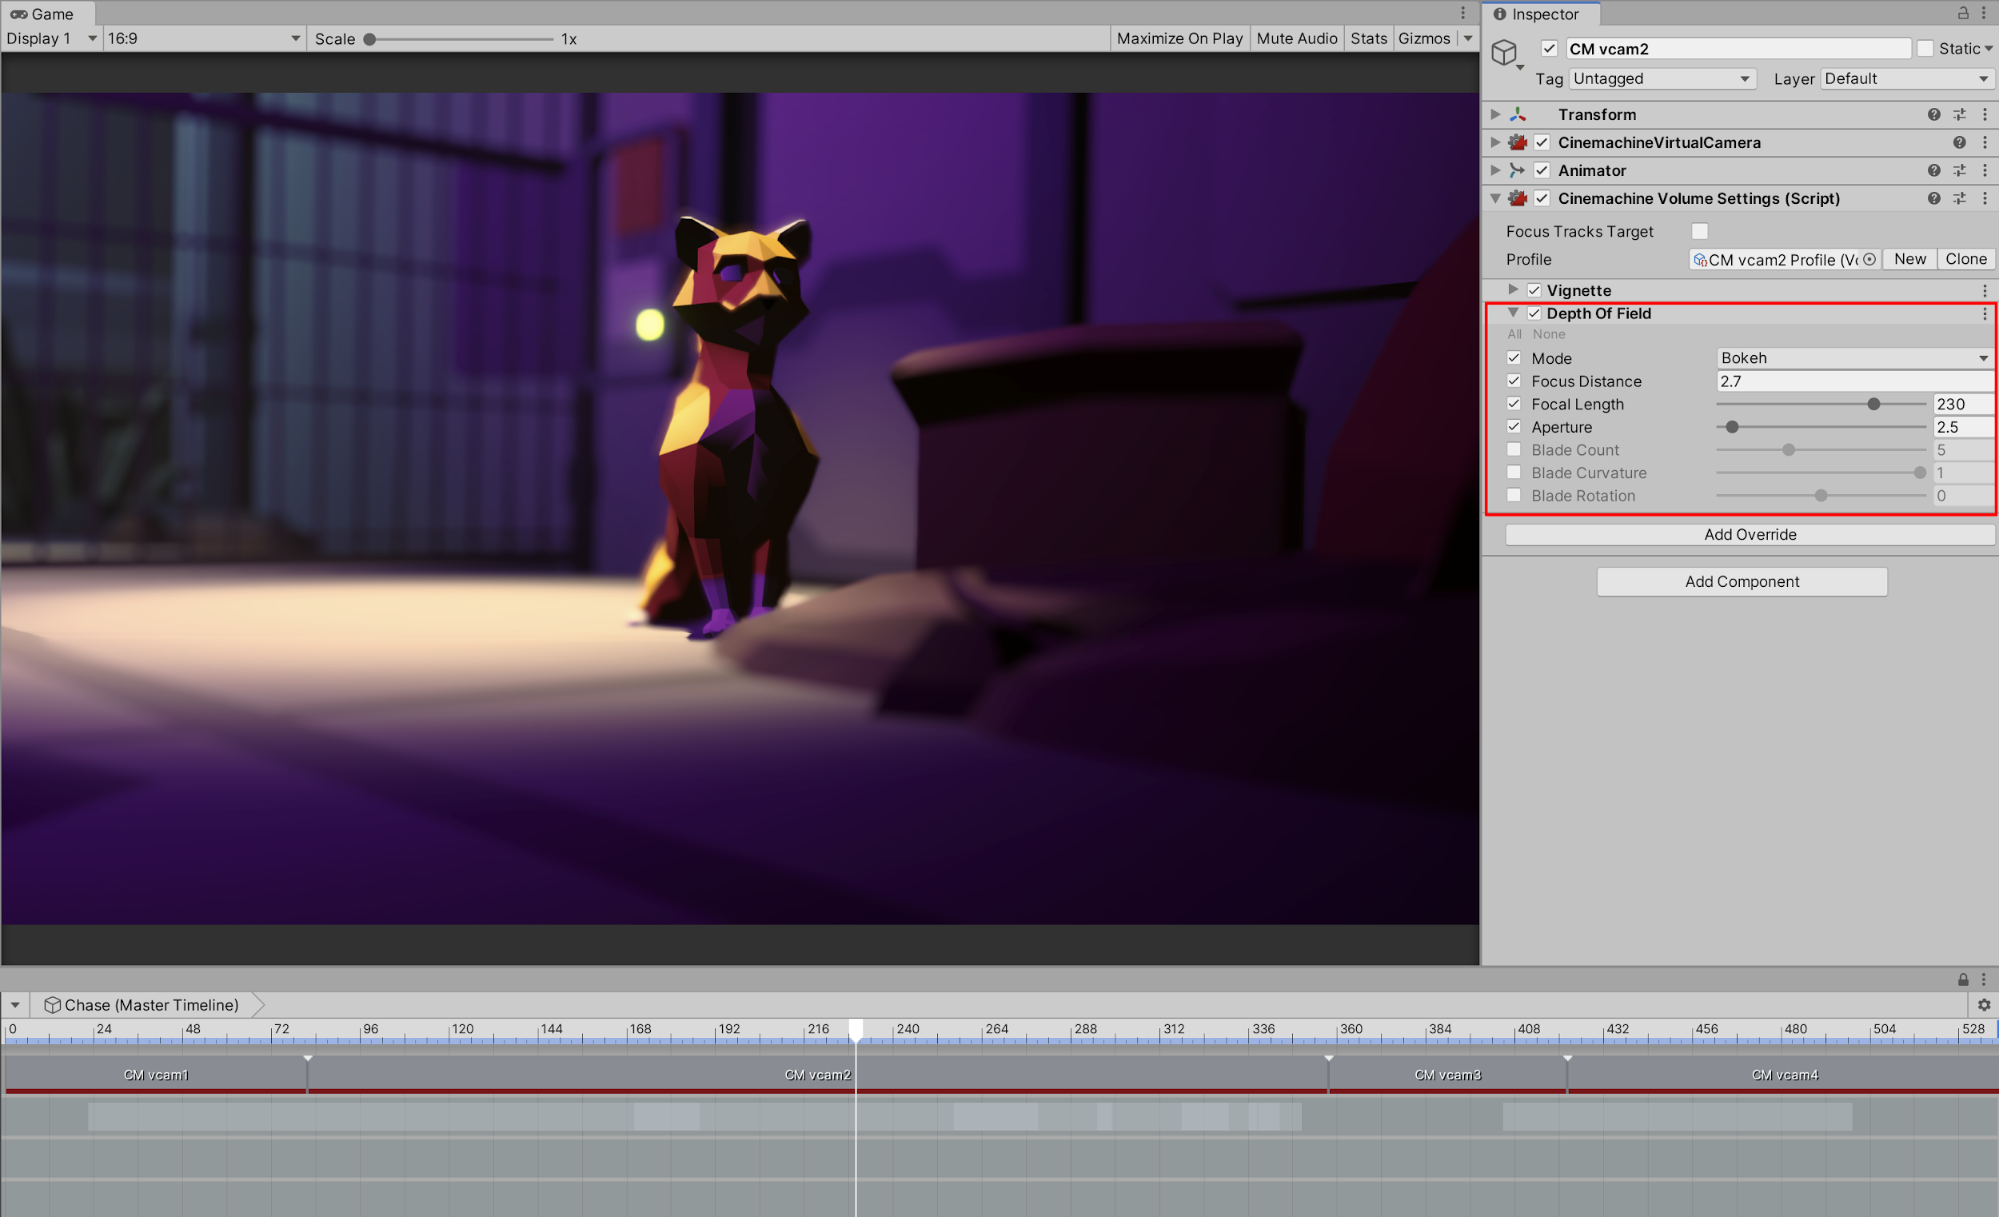
If you scrub further along the Timeline, you’ll notice that the Camera’s distance to the subject changes, resulting in the dog and cat both being out of focus. Because we previously set the Focus Distance to a specific value targeted for Frame 200, we will need to adjust the Focus Distance value to change over time.
4. Animating Depth of Field with Focus Offset
This lesson will guide you through adding a focus tracking effect. This technique is especially useful for shots that follow a moving subject, or other cinematographic effects where the focus may change. Previously, we’ve animated the Camera Group in the Timeline, which by now you’re familiar with. We will continue to use the techniques for animating Track Groups in the Timeline, as covered in Unit 5.
We’ll continue working with the second Cinemachine Camera, starting at Frame 200, where our cat is in focus. Our goal will be to shift the Camera’s focus to the dog in the background as the frame advances in the Timeline. As is customarily the best practice, ensure that the Master Timeline remains visible by making sure the Timeline window’s Lock icon is selected.
1. Select CM vcam2 in the Hierarchy window. We’ll continue to use the Profile previously created for the second Camera, defined in the Cinemachine Volume Settings component. Later on, you may need to select either the New button to create a new Profile, or Clone to duplicate an existing Profile. Or, you may need to restore a previously saved Profile. To do so, select Object Loader Circle and then select the intended Profile (Figure 11). For now, select the Object Loader Circle and choose the CM vcam2 Profile we’ve created previously.

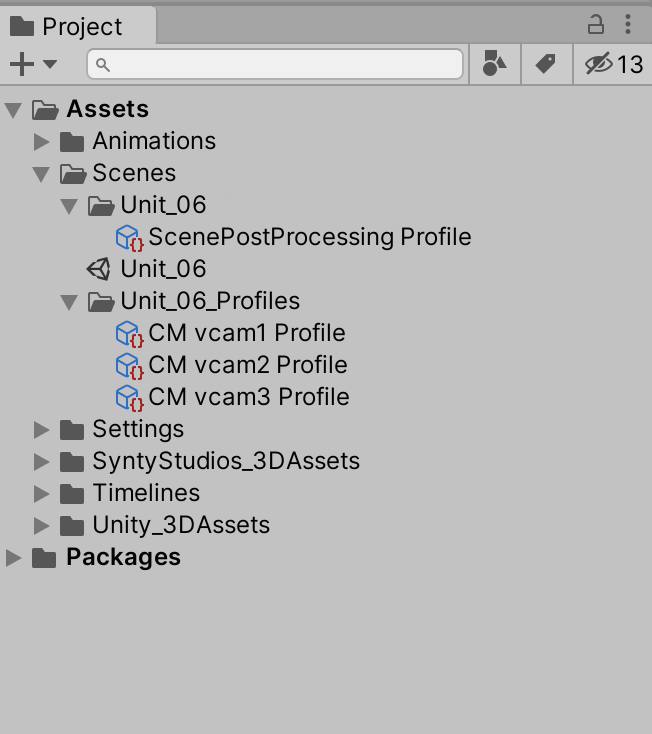
Note that for each new Volume Profile, the Profiles themselves are stored in the project’s Assets folder, under Assets > Scenes > Unit_06_Profiles (Figure 12).
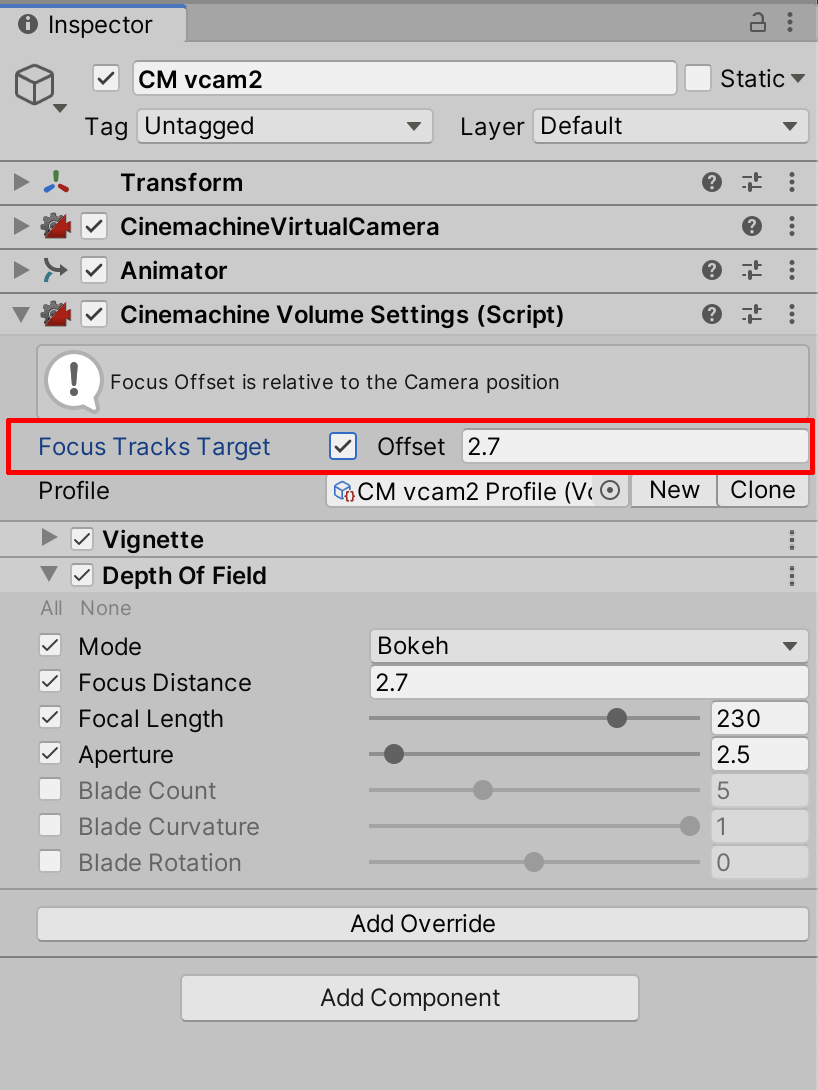
2. With the CM vcam2 selected in the Hierarchy Window, select the Focus Tracks Target checkbox to enable focus tracking (Figure 13).
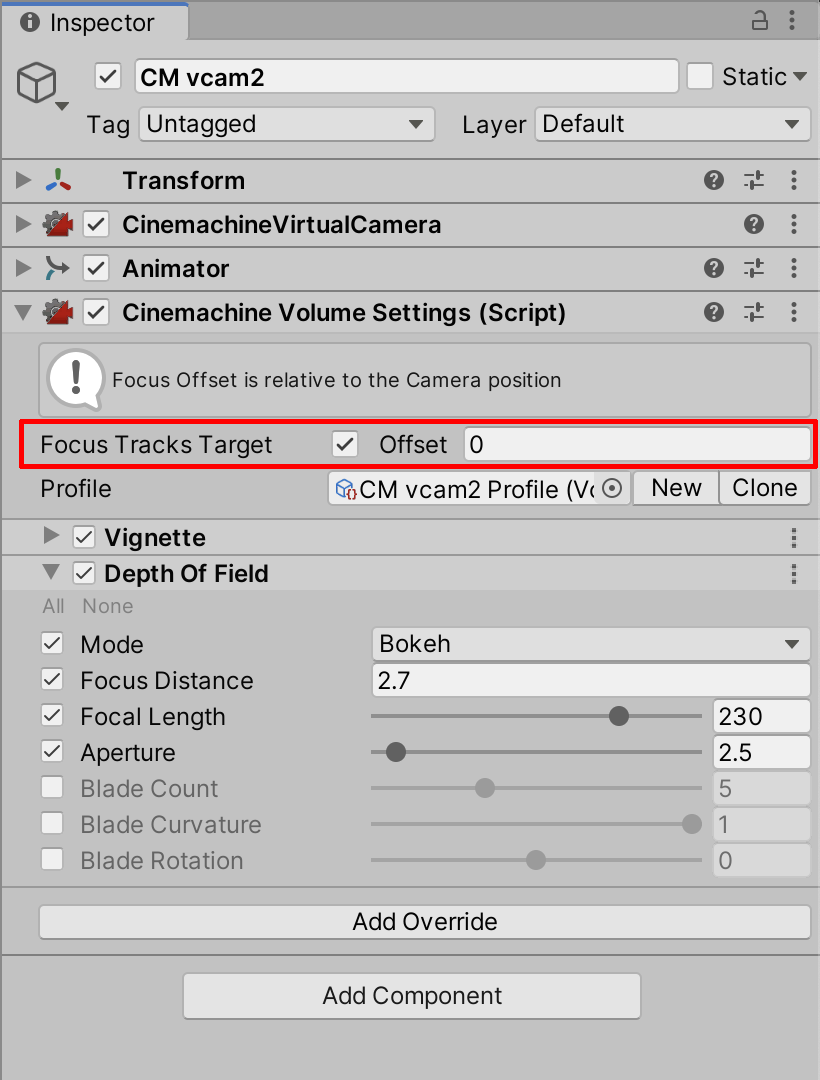
3. Set Offset to 2.7 (Figure 14). Offset will now be the primary way to set the focus distance to our subject, which we’d previously set from the Focus Distance field in the Depth of Field setting, which we can now ignore. With the Focus Tracks Target checkbox enabled, we will be able to animate the Offset value.
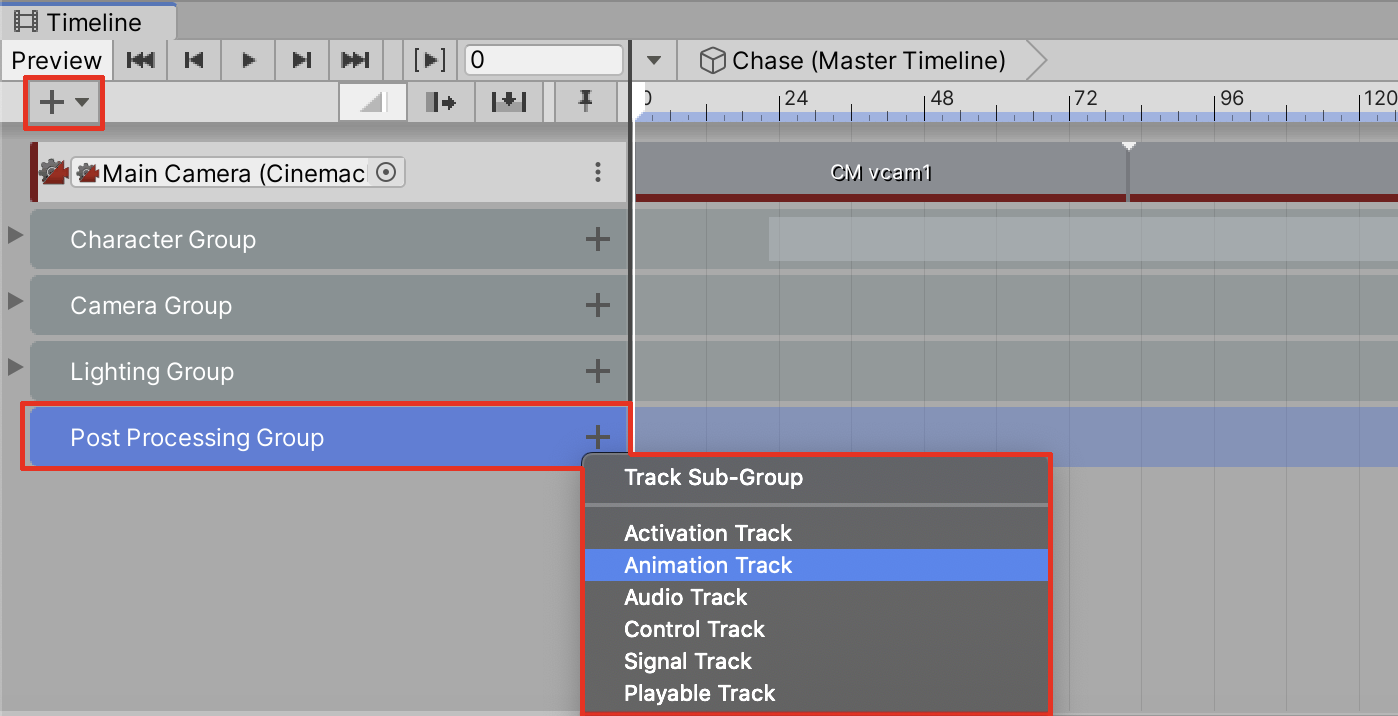
4. In the Timeline window, click + to create a New Track Group and name it Post Processing Group. Select + in the newly created Post Processing Group to add a new Animation Track (Figure 15).
5. Select CM vcam2 from the Hierarchy window by clicking and holding and then dragging it into the empty Animation Track field labelled None (Animator) in the Timeline (Figure 16).
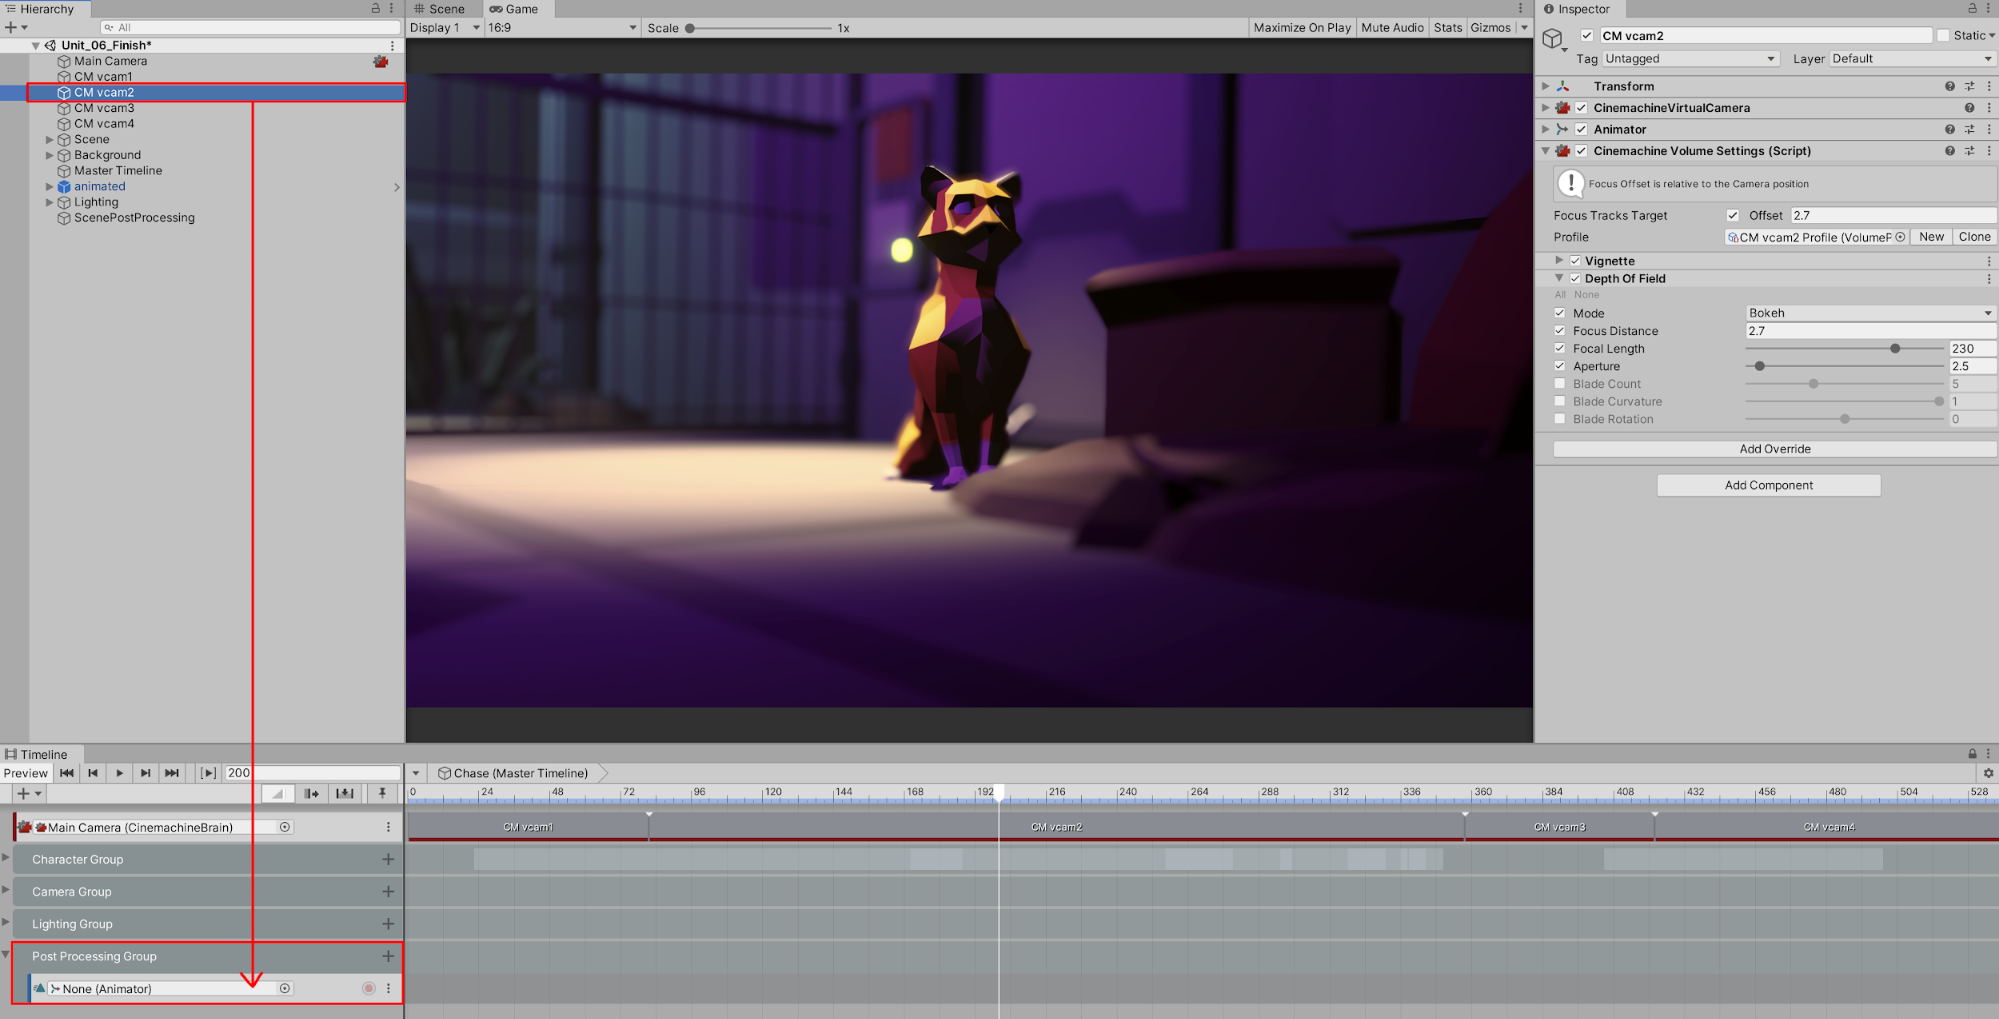
6. Select Record. The Post Processing Group’s Animation Track will be highlighted in red, indicating that the track is now recording (Figure 17).

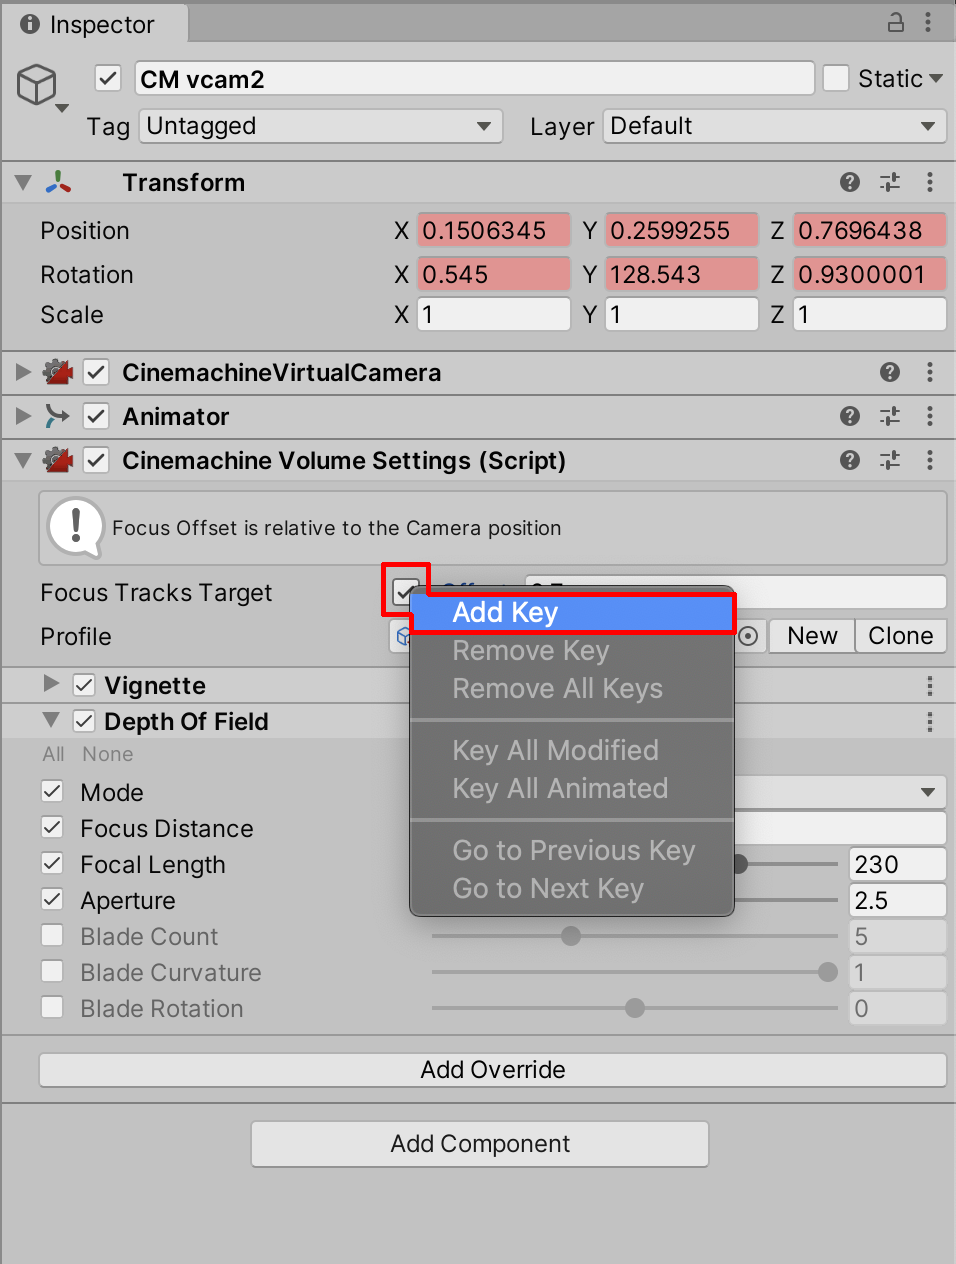
7. Right-click on Focus Tracks Target, then select Add Key (Figure 18).
8. Advance the Frame Playhead Cursor to Frame 280. At this moment in the animation, the Camera will start to pan left. We’ll change the Offset value by a small amount to first establish a keyframe at the moment when the focus will start to change. Set the Focus Tracks Target Offset to 2.71.
9. Advance to Frame 290. Change the Focus Offset value to 7 to focus on the dog. Changing this value will add another keyframe to the current frame location (Figure 19). When you scrub the Frame Playhead Cursor back to the beginning, you’ll see the Focus Offset values changing. You can then turn off Record in the Timeline to end the Animation Track’s recording.
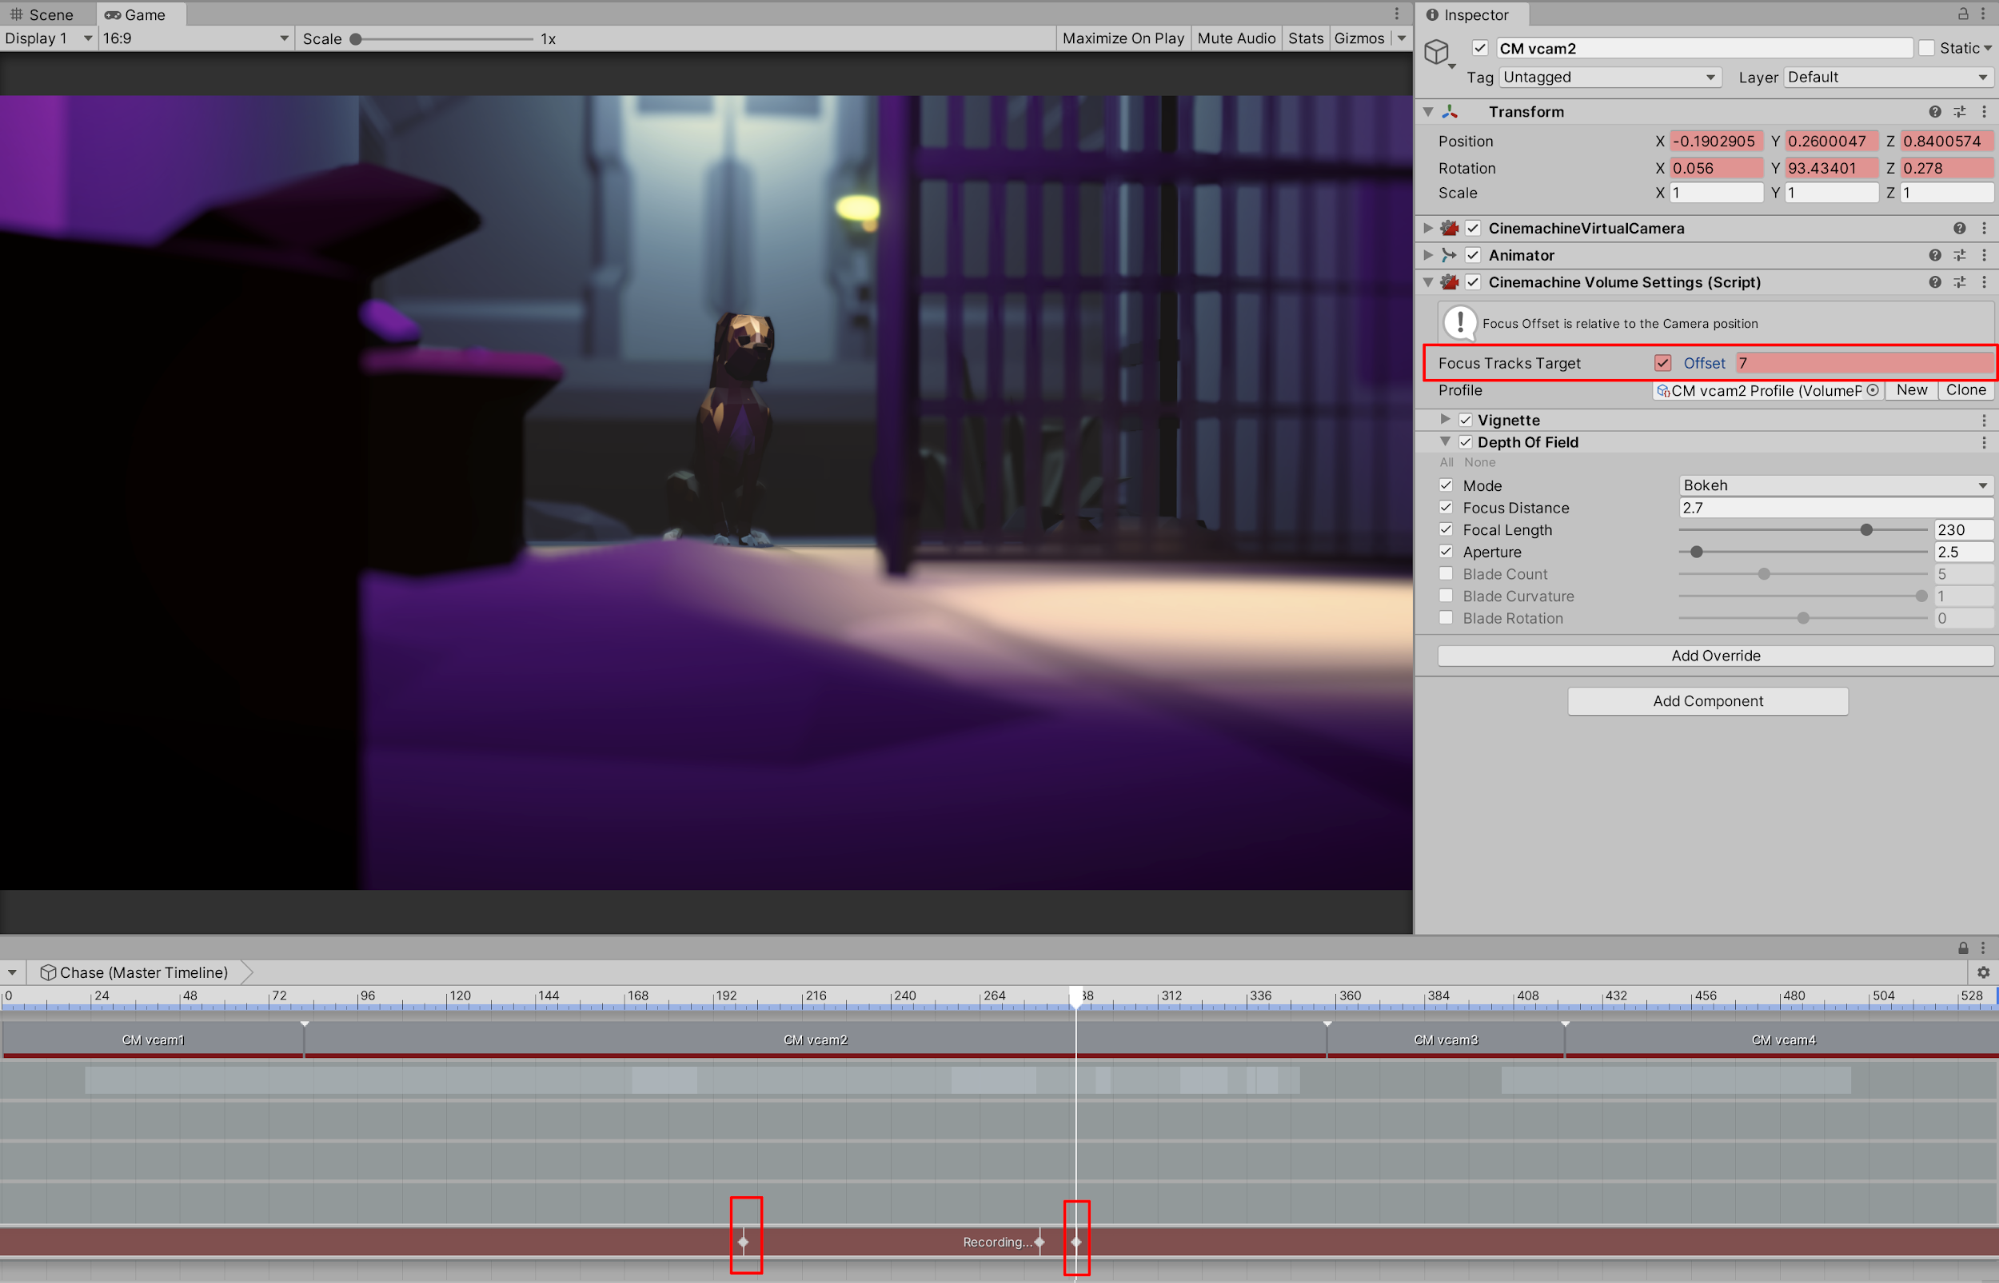
The Focus Offset animation now shows the cat starting out in sharp focus. The camera quickly changes focus to the dog, who’s in the distance. You can adjust how quickly or how gradually the effect occurs by dragging the keyframes along the Timeline to specific intervals.
10. To more finely tune the effect, select to enable the Graph view of the Animation Track (Figure 20).

11. Select individual keyframes and drag them left or right to lengthen or shorten the time it takes to change focus. Select and move the starting and ending points of the parametric curve to adjust the slope of the curve.
12. As a fun challenge, practice animating the Focus Offset to keep the cat in focus as it walks into the frame at the beginning of the second Camera’s shot. Scrub along the Timeline to Frame 82. With the Animation Track set to Record, add additional keyframes between Frame 82 and Frame 175.
5. Recap
Applying post-processing effects to Cameras in Unity gives each camera’s view a unique cinematographic quality. By using a vignette or depth of field effect, or by combining effects, you add a custom look to the Camera’s view. And, via Timeline, you can animate effects to change over time.