Configure your AR development environment
Tutorial
Beginner
+10XP
45 mins
548
Unity Technologies
Developing for AR requires a bit more setup than a typical Unity project because you're working with two separate machines: your computer and your AR device.
In this tutorial, you'll make sure you have all required software set up on your computer and on your mobile device. Then you’ll open and explore a new Unity project configured specifically for AR development.
Languages available:
1. Overview
Developing for AR requires a bit more setup than a typical Unity project because you're working with two separate machines: your computer and your AR device.
In this tutorial, you'll make sure you have all required software set up on your computer and on your mobile device. Then you’ll open and explore a new Unity project configured specifically for AR development.
2. Before you begin
New to Unity?
This learning experience assumes that you're already familiar with the Unity Editor. If you’re new to Unity, the Unity Essentials learning pathway has been designed to help you get set up and ready to create in the Unity Editor.
Update the Unity Hub
Before you begin to set up your Unity project, consider updating your Unity Hub to the latest release. If you're using an older version of the Hub, there may be differences between the guidance provided here and your experience.
Review the Unity Editor basics
If you need to refresh your memory of the Unity Editor basics, you can take a moment to review Explore the Unity Editor at any time.
3. Determine your target mobile operating system
Depending on which type of phone you have, the setup process will be different:
- If you have an iPhone or iPad, you'll work with Apple’s proprietary operating system: iOS.
- If you have any other (non-Apple) phone or tablet, you'll likely work with Google’s mobile operating system: Android.
Take note of which operating system you'll be using, since this will affect which instructions you follow going forward.
4. Download XCode [iOS only]
This step is only relevant for iOS development. If you're developing for Android, you can skip this step.
To develop for an iOS handheld device, you need an Apple ID and an app on your Apple computer called XCode. XCode is Apple’s custom Integrated Development Environment (IDE) that allows you to build and test applications for MacOS and iOS.
To install XCode on your Mac computer, complete the following steps:
1. Make sure you have an Apple ID and that you know your login credentials. If you don’t have an Apple ID, you can create one here.
2. Open the App Store app on your Mac computer.
3. Search for “XCode”, then select download to begin the download and installation process.

Note: XCode is an extremely large application (over 12 GB), and therefore may take a very long time to download and install. Feel free to continue on to the next step while XCode downloads in the background.
5. Install Unity with Android or iOS build modules
To follow this course, you'll need Unity version 2022.3.62f3 LTS as well as the build module for the platform you’re targeting (iOS or Android). These additional modules will allow you to build applications for your desired platform from Unity.
To install the required version of Unity, complete the following steps:
1. Install Unity 2022.3.62f3 LTS. You can find this specific version of Unity in the Unity Download Archive.
Caution: To ensure the steps match what you see in the Editor, we encourage you to use this specific version of Unity. However, this tutorial should also work with later Unity versions.
2. When prompted to add modules during the installation process, select either Android Build Support along with its sub-modules or iOS Build Support.
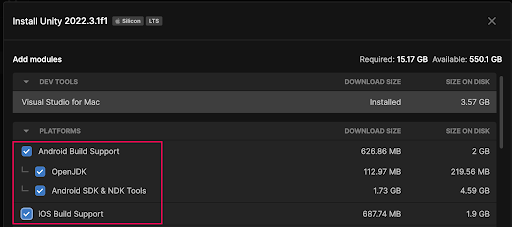
Note: If you already had Unity 2022.3.62f3LST installed, you can add modules to an existing install.
6. Create a new project with the AR Mobile project template
After Unity and the appropriate build modules have finished installing, you're ready to create a new project using the AR Mobile project template.
To create a new project using Unity Hub, follow these instructions:
1. In the Projects tab of the Hub, select the New Project button.
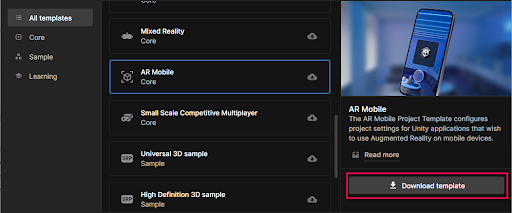
2. Select the AR Mobile Core template from the template list and select the Download template button to download the template to your computer.
3. Give your project a meaningful name, like “[your-name]_AR_Project”, and select a suitable location to save it on your computer.
4. Select your desired Unity Cloud Organization from the dropdown, and optionally disable Connect to Unity Cloud.
We won’t be using any gaming services in this project.
5. Select Create project and wait for Unity to load.
7. Explore the starter project
This starter project is pre-configured with all the packages and project settings needed for AR development to save you time when you create your first AR project. Let’s examine the project to understand what makes it AR-ready.
Packages
Here’s how to explore the packages you’ll need for your AR projects:
1. From the main menu, select Window > Package Manager.
2. From the Packages dropdown, select In Project to view only packages currently in this project.
3. Notice the four packages in this project that are not included in default Unity projects: Apple ARKit XR Plugin, AR Foundation, Google ARCore XR Plugin, XR Plugin Management.
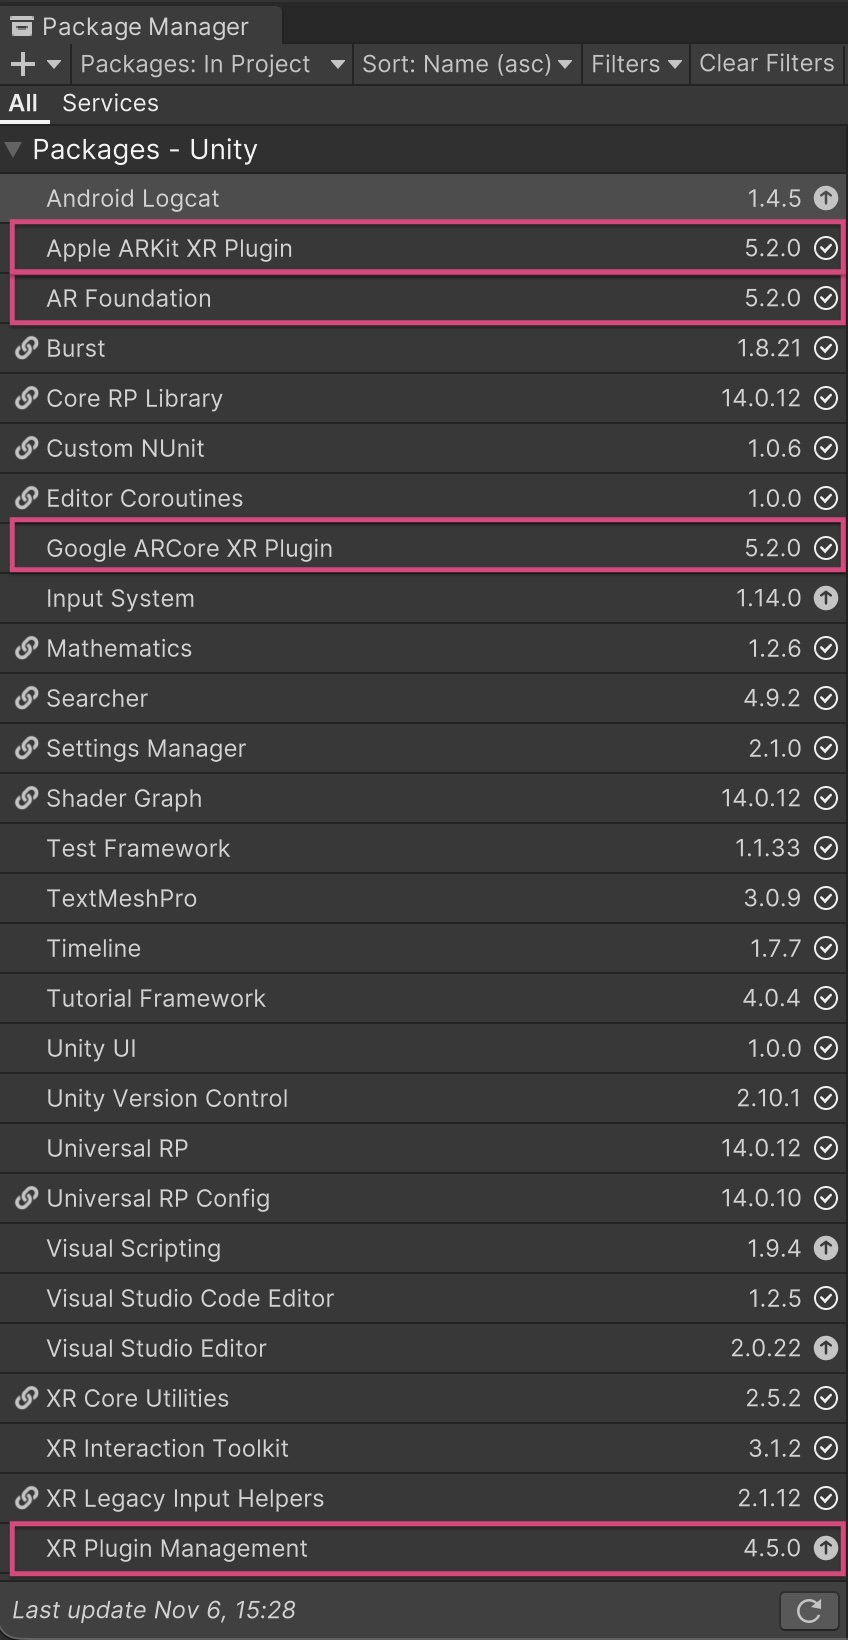
- The AR Foundation package provides all of the GameObjects and classes that you need to quickly develop interactive AR experiences in Unity.
- Google ARCore XR Plugin is Android’s AR framework. AR Foundation communicates with ARCore to get AR features on Android devices.
- Apple ARKit XR Plugin is Apple’s AR framework. AR Foundation communicates with ARKit to get AR features on Apple devices.
- The XR Plugin Management package is a simple management tool for any platform-specific XR plug-ins, such as ARKit and ARCore.
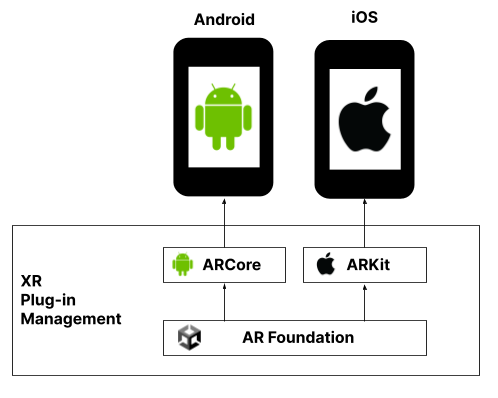
In Unity, you can use AR Foundation to develop AR features for both iOS and Android. However, these two platforms do not have equal support. If you’re interested, you can learn the specific feature support per platform. Currently, ARKit supports more features than ARCore, including 3D object tracking and body tracking.
Player settings
Some Player settings have also been pre-configured for AR development. To browse through the Player settings, complete the following steps:
1. Go to the main menu and select Edit > Project Settings.
2. From the left panel, select Player.
3. From the Player settings, choose either the iOS or Android tab, depending on your target.
4. Locate and scroll through the Other Settings.
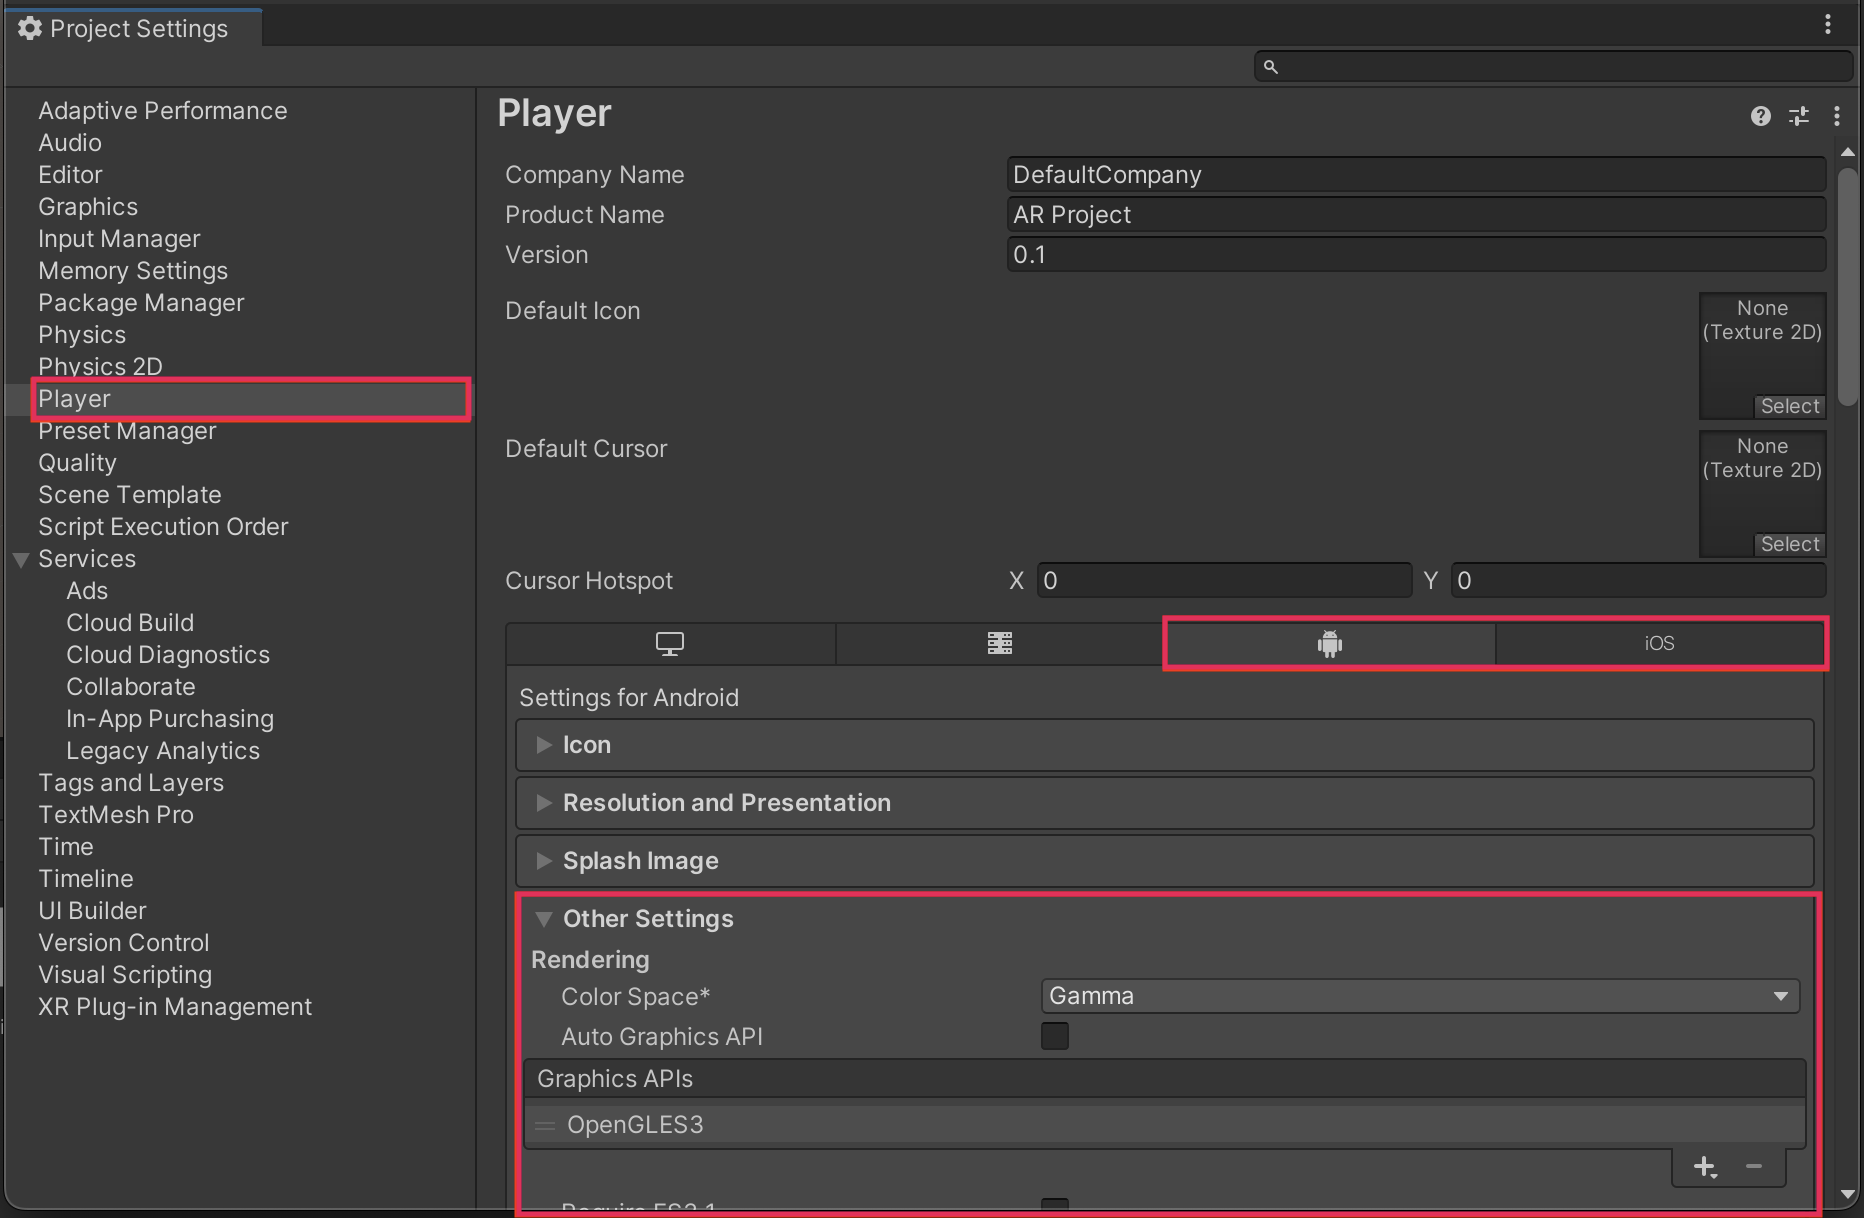
Most of these settings are pretty technical, so you don’t need to understand them completely or remember them at this point. However, if you’re interested, the settings that have been pre-configured for AR development include the following:
- Removing the Vulkan Graphics APIs for Android, since these are not yet supported by ARCore.
- Setting the minimum API levels for iOS and Android.
- Setting the Scripting Backend to IL2CPP instead of Mono to allow for 64-bit support.
- Setting the Target Architecture to ARM64 (64-bit ARM) to meet the Google Play 64-bit requirement.
You can also read more about these default settings in Google’s documentation on setting up an AR project.
8. Create a new AR scene
In addition to providing you with a pre-configured project, the AR Mobile Template also provides you with a pre-configured template scene. This will help you get new AR projects up and running as quickly as possible.
You’ll now create a new scene using this template and explore it to understand how it’s set up:
1. From the main menu, select File > New Scene.
2. From the New Scene window, select the AR Scene Template thumbnail and then select Create.
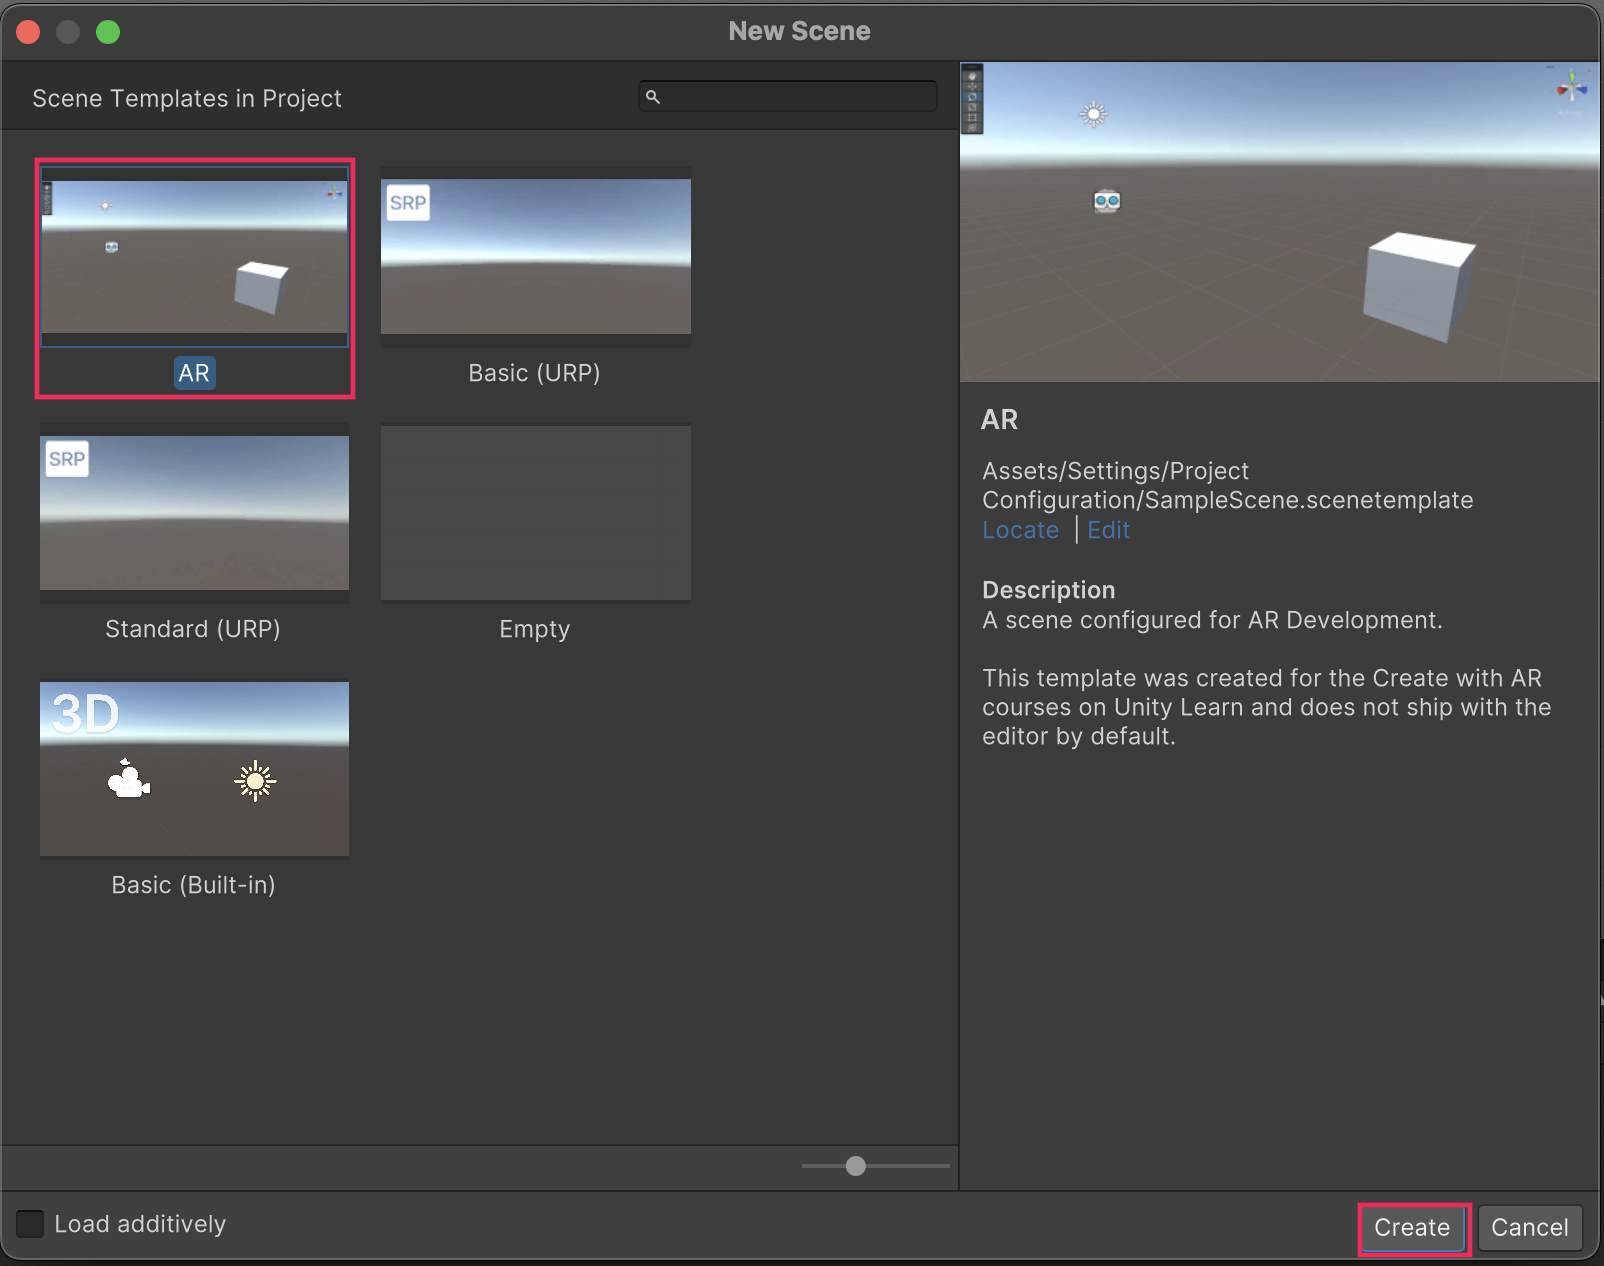
3. A new untitled scene will be created. To save it, select File > Save As, and in the file explorer window that opens, navigate to the Scenes folder inside your project’s Assets folder.
4. Name the scene something like “AR Template Scene” and save it inside the Scenes folder.
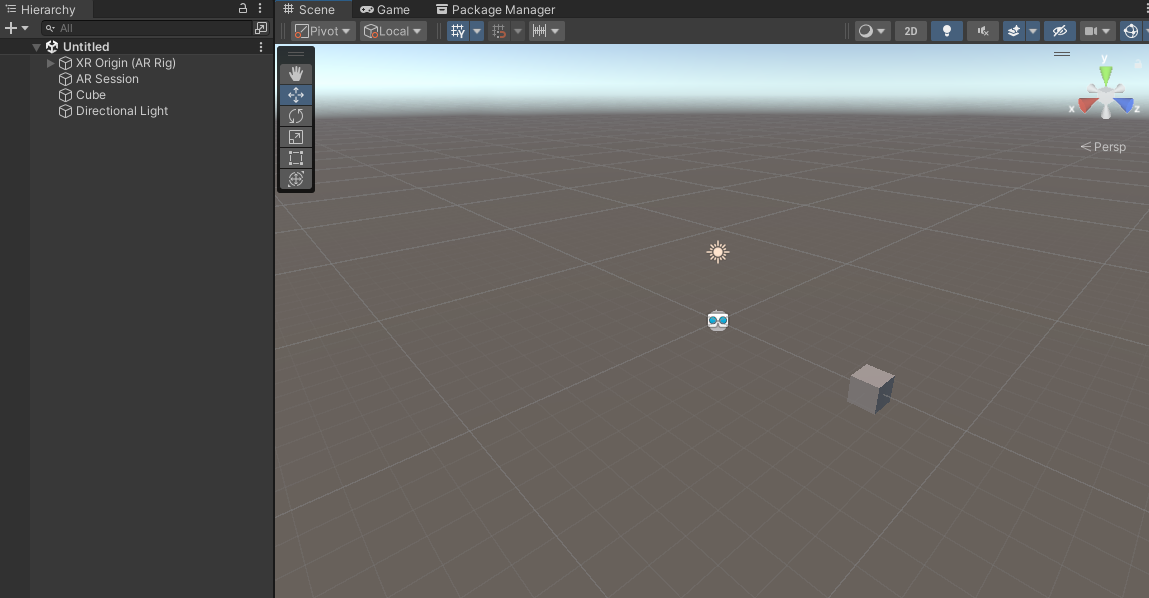
You should now have a new copy of the AR template scene open in Scene view.
9. Explore the template scene
This template scene can serve as a starting point for any AR app you want to create. It displays a spinning cube in the environment.
A typical 3D scene in Unity only has two GameObjects: the Main Camera and a Directional Light. Let’s look at what makes this scene ready for AR development:
1. In the Hierarchy window, identify the two new unfamiliar GameObjects: the XR Origin (AR Rig), and the AR Session.
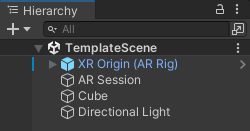
The XR Origin (AR Rig) represents the device in space. When the user moves or rotates in the real world, the XR Origin (AR Rig) moves accordingly in the Unity scene. And just like your real device has a camera, the XR Origin (AR Rig) has a Camera GameObject attached to it.
The Camera (a child of XR Origin (AR Rig)) is the main camera of the AR application and must be set with the MainCamera tag. It comes with additional components that allow this camera to work for AR, which you can read about in the Tracked Pose Driver, AR Camera Manager, and AR Camera Background documentation. It is recommended that you delete any other cameras in the scene to avoid conflicts.
The AR Session manages an individual session of the AR experience, including things like frame rate and communication with the device. There can only be one active AR Session in a scene.
2. Select Play and inspect the GameObjects in the Hierarchy window while in Play mode.
3. Notice that when the scene loads, a simple environment appears. This is an XR Environment view, which is used to simulate what the AR experience will be like directly in the Editor.
4. Press and hold the right mouse button and move the mouse to look around in the scene using the SimulationCamera that is included with the XR Environment.
5. Notice the XRInteractionManager in the Hierarchy window. This manager allows you to interact with objects within the XR Environment. Like the SimulationCamera and XR Environment, it is only present while in Play mode.
6. Notice the new GameObject named Trackables that appears as a child GameObject of the XR Origin (AR Rig). This GameObject will store any objects detected in the real world environment, such as tracked faces, planes, or points.
7. Select Play again to stop the application.
The template project already includes the AR Session and XR Origin (AR Rig), but adding these two GameObjects to your own scene from scratch is a simple process. For detailed instructions on setting up an AR scene and more information on each of these objects, check out the AR Foundation documentation.
10. More things to try
If you want to further develop your skills, explore new concepts, or improve your project, check out some of the optional activities below. Each one is tagged as either Easy, Medium, or Difficult, so you can choose the level of challenge.
These activities are entirely optional, so if you’re not interested, no problem — just skip this step.
We do recommend attempting at least one of them in order to get the most out of this learning experience. Good luck!
Easy: Look at other AR examples
AR apps can be used for fun, education, marketing, art, and so much more. Sometimes AR is used on mobile devices like phones and sometimes it is used with head-mounted displays (HMDs). As you're starting your AR journey, it can be a great time to check out some of the ways that Unity has been used to make AR experiences in the past. Here are a few more examples of AR apps made with Unity:
Medium: Edit the rotation speed/direction
You can adjust the speed of the rotation for the Cube by finding the SceneTemplate_RotateCube component to make it rotate slower or faster. Remember that if you're testing in the Editor before building to your device, none of the changes you make during Play mode will be saved!
Difficult: Replace cube with another primitive
It’s time to think outside the box. Replace the cube included in the scene for another type of primitive 3D shape. If you would like the object to rotate like the cube did, remember to add the SceneTemplate_RotateCube script and then change the Rotation Speed and Object Rotation values.
11. Next steps
In this tutorial, you configured your computer, your mobile device, and your Unity project to prepare for AR development. In the next tutorial, you'll actually build this project to either your iOS or Android device and test it out! This will ensure your AR Dev environment is set up and working perfectly before you begin designing your own AR apps.