
Create and publish WebGL builds
Tutorial
Beginner
+10XP
15m
(4456)
Unity Technologies
In this tutorial, you will:
- Create a WebGL build
- Publish it directly on Unity Play, using the WebGL Publisher package
Languages available:
1. Overview
When your real-time experience is ready, you need to create a build to share it with others. A build is a standalone, playable version of your game. There are different kinds of build you can create — this tutorial focuses on WebGL builds, which you can publish online for others to play.
In this tutorial, you will:
- Create a WebGL build
- Publish it directly on Unity Play, using the WebGL Publisher package
2. Before you begin
To build your project, you will need:
- The WebGL Build Support module added to your Unity installation
- The WebGL Publisher package, installed for your Unity version via the Package Manager
Follow the instructions in this step to make sure that you are ready to begin this tutorial.
Check for the Build Support module
To check whether you have the necessary Build Support module installed:
1. Open the Unity Hub.
2. Select the Projects tab, and identify the version of Unity you are using in the project you want to build.
3. Select the Installs tab and search for the version in the list available. If the WebGL Build Support module is installed, a WebGL icon will be present at the bottom of the version tile.
4. If the WebGL icon is not present, add the WebGL Build Support module to your version of Unity.
Check for the WebGL Publisher package
To check for this package:
1. Open the project you want to publish in Unity Editor.
2. Open the Package Manager by selecting Window > Package Manager.
3. Use the drop-down filter menu in the upper-left corner of the window to select In Project packages.
4. Search for WebGL Publisher. If it’s listed and up-to-date, you’re ready to build and publish your real-time experience. If not, install or update the package now.
Important:
- If you can’t find the package when searching, try using the previous name of the same package: Share WebGL Game. Make sure that you update the package to the current version.
- If you currently have a preview version of this package installed, make sure that you update it to the latest version. If you don’t, you will find that the instructions in this tutorial do not exactly match the process required to build and publish your project.
3. Introduction to WebGL builds
Before you create a WebGL build, let’s review some background information.
What is a WebGL build?
WebGL builds are a collection of files which contain your real-time experience. You can play them in your browser locally, or publish them on Unity Play or other online hosting platforms.
What sort of projects can I use to create WebGL builds?
Generally speaking, the smaller the size of a Unity project, the more suitable it is for WebGL builds. Designers and developers often spend significant effort optimizing their experiences to make sure that they are small enough to give users a good experience when they load them online.
The Microgames, Create with Code challenges, and Junior Programmer portfolio projects on Unity Learn should all be suitable for creating WebGL builds.
How can I share WebGL builds of my projects?
You can publish the collections of files that make up a WebGL build on a range of different online hosting platforms. You can publish to Unity Play directly from the Unity Editor, or upload the files to an alternative service if you prefer.
4. Create a WebGL build
To create a build of your real-time experience:
1. Open the project in the Unity Editor. If you don’t have your own project in mind, why not try one of our Microgames?
Important: Make sure that you’ve installed the WebGL Build Support module for the version of Unity that project uses.
2. In the Unity Editor top menu, go to File > Build Settings. You can also use the shortcut Ctrl + Shift + B (Windows) or Cmd + Shift + B (macOS).
3. In the Build Settings window, find the Scenes in Build section. This is where you can control which Scenes are included in your build. You can:
- Select Add Open Scenes button to add any open Scenes to your build.
- Disable Scenes (using the checkbox to the left of their name) if you want to exclude them from the build.
- Drag Scenes to resequence them in the list — Scene 0 is the first one that will load when you play the build.
4. Select Player Settings, at the bottom left of the Build Settings window. This opens the Project Settings window.
5. In the Project Settings window, update the Company Name, Product Name and Version fields with details for your build.
Note:
- The Version field here refers to the version of this build in relation to your project, rather than the Unity version you are using.
- The settings below the top set of fields are beyond the scope of this tutorial — you don’t need to configure these settings to create a basic WebGL build.
6. Close the Project Settings window and return to the Build Settings window.
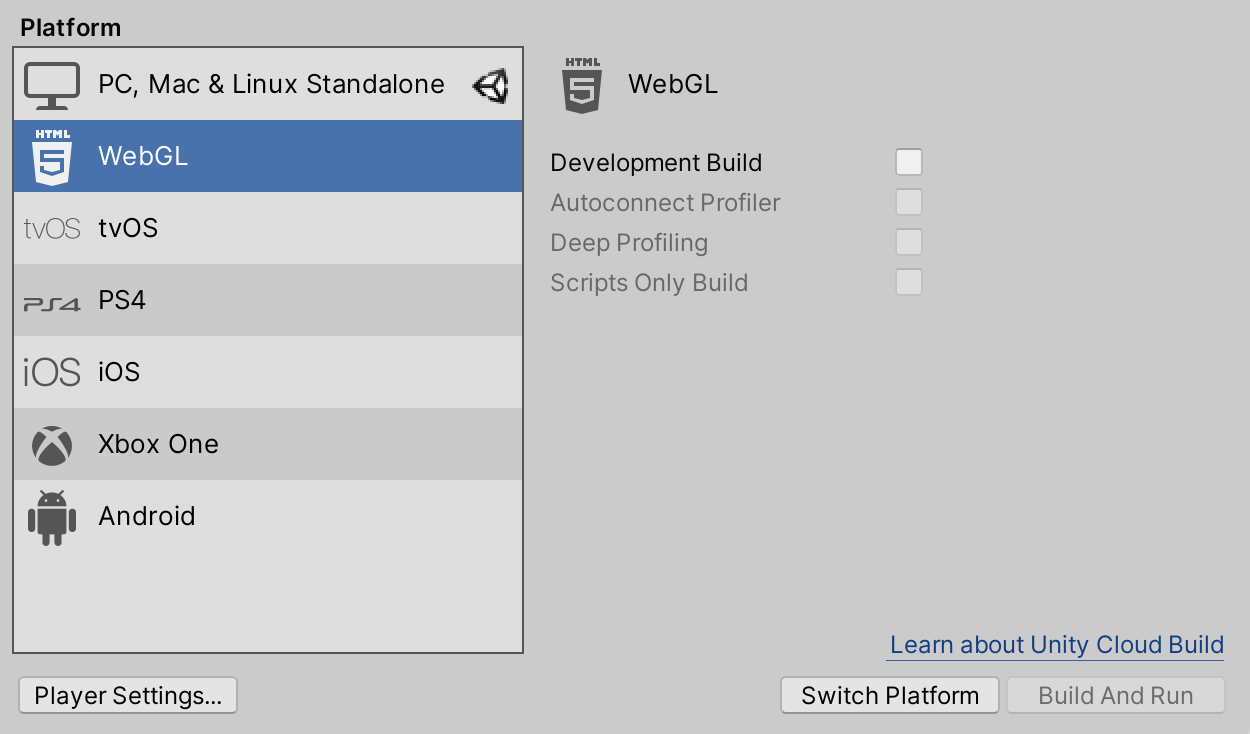
7. Find the Platform selection and select WebGL from the list available. This will change the settings and configuration options available to the right of the list.
8. In most cases, a Switch Platform button will be present available at the bottom right of the window. If this is present, select it to prepare to create a WebGL build.
9. Now you’re ready to build your real-time experience! You can:
- Select Build to create the build.
- Select Build And Run to create the build and immediately run it in your default browser.
10. Choose a filename and location to save your build files, then select Save to continue.
Important: Don’t save your build in the Assets folder Unity project; you can create a separate folder for builds in the root directory or choose a new location that you prefer.
11. Finally, wait for Unity to create your build. Depending on the size and configuration of your project, this can take some time and slow down other computer operations while the build is underway. Don’t worry if the Unity Editor is shown as non-responsive in Task Manager (Windows) or Activity Monitor (macOS) — unless it is interrupted with a force quit it will finish creating your build.
5. About your build files
Your WebGL build consists of an index.html file, as well as other folders, files and assets that the game will need to run. The index.html file is a loader file; it functions as a launcher for your game. However, without the other files in their correct locations it won’t work properly, as it is dependent on them to run your build.
If you need to move the build files to a different location, make sure to move everything together — we recommend zipping the files to do this.
Sharing your WebGL build with others
The best way to share your WebGL build with others is by hosting it online. However, you can give a zipped folder of your WebGL build to others directly.
6. Publish your WebGL build on Unity Play
To publish your WebGL build on Unity Play:
1. Make sure that you have installed the WebGL publisher package and checked for updates.
2. In the Unity Editor, go to the main menu and select Publish > WebGL Project.
3. In the WebGL Publish window, select Get started.
4. Find the build that you created in the list and select Publish.
Note:
- If you created your build in a previous Unity Editor session, you will not see your build listed. In that case, select Locate Existing Build and navigate to the folder containing your build.
- You can create a WebGL build from this point in the process and publish it directly, but you will not be able to configure the Scene order or project settings if you do so.
5. Unity Editor will then publish your build to Unity Play; this could take some time, depending on the size and complexity of your project.
6. Partway through the uploading process, the Unity Play page for your build will open in edit mode in your default browser window.
You’ll be able to:
- Name your build
- Add a short description
- Provide a thumbnail image — we recommend taking one in the Unity Editor, from Play Mode
- Tag the assets and tutorials you used to make your real-time experience
Make sure to save your changes when you’re done!
7. Copy the URL directly from your navigation bar or use the Share button to share your real-time experience with others.
7. Publishing your build in other places online
There are other places you might want to upload your real-time experience as a creator.
Game hosting platforms
If a platform can host user-submitted HTML5 games, it should be able to host your WebGL build. These platforms will have their own guidance to help you with the process.
One popular option for creators at the moment include:
Personal sites and portfolios
You can also upload your build to a personal website or portfolio. Many website platforms (such as Squarespace and Wix) have options to host WebGL content integrated into their platform tools.
8. Summary
In this tutorial, you created a WebGL build and uploaded it to Unity Play. You also reviewed guidance for hosting builds of your real-time experiences in other online locations.
Sharing your work is a great way to engage with the wider creator community and connect with users — we can’t wait to see what you create!
Next steps
If you choose to publish a game on Unity Play, you’ll be invited to participate in our monthly showcases. These are a great way to increase interaction with your game and get player feedback. Your game might also be played and reviewed on our showcase Twitch streams!