
Transform a model with the Modifier System
Tutorial
intermediate
+10XP
25m
(35)
Unity Technologies
In this tutorial, you'll explore the power and flexibility of UModeler X's Modifier feature. Modifiers allow for automated operations that enhance and alter your object's geometry without permanently changing the underlying structure. This non-destructive approach facilitates complex effects like subdivision surfaces, streamlining what would typically be a time-consuming manual process. By mastering these tools, you'll learn how to creatively transform your 3D models while maintaining their original form, providing you with an efficient workflow for advanced modeling techniques.
Languages available:
1. Overview
The Modifier System can transform the original model in a non-destructive way. This system allows for efficient modeling because it allows modifications to be made to the model while preserving the original model.
In this tutorial, you will learn how to use the Modifier System in UModeler X to apply various transformations to a 3D model while preserving the original model.
Key concepts
- Modifier: A tool that applies a specific effect to a 3D model to change its shape or structure.
- Non-destructive modeling: a method of making changes to a model while preserving the original model.
Additional resources
You can learn more about the Modifier System in the official manual.
2. Before you begin
New to Unity?
If you’re new to Unity, welcome! The Unity Essentials learning pathway has been designed to help you get set up and ready to create in the Unity Editor. We recommend you complete this pathway before continuing with this UModeler X tutorial.
Update the Unity Hub
Before you begin to set up your Unity project, consider updating your Unity Hub to the latest release. If you are using an older version of the Hub, there may be differences between the guidance provided and your experience.
Review the Unity Editor basics
If you need to refresh your memory of the Unity Editor basics, you can take a moment to review Explore the Unity Editor at any time.
3. The Modifier System
First, let's take a look at the basic setup and operation of the Modifier System. Modifiers allow you to model in a non-destructive way, but you can use and manage them more efficiently if you know how to configure and manipulate them.
Modifier stacks
A modifier can compile the results of edits made by multiple modifiers into a cumulative history known as a modifier stack. It is also possible to selectively enable or disable specific modifiers.
Add a modifier
The Add Modifier button allows you to add a modifier of your choice. To add a modifier, follow these instructions:
Renaming modifiers
A modifier's name is defaulted to its function, but this can be changed as needed.
To rename a modifier, double-click on the name of the modifier, enter the new name you want to give the modifier, and press Enter. You can also click on any area except the text input area to complete the renaming.
Tip: If you give the modifier the same name as its purpose, you can see the purpose as you work without having to check the modifier properties.
Disabling modifiers
Modifiers are enabled by default upon creation, but you can choose to disable them, by disabling the checkbox next to the modifier’s name.
Change the position of the modifier
You can reposition the modifier by clicking and dragging it to the desired location.
Note: Modifiers cannot be moved below the original mesh, nor can they change the position of the original mesh.
Collapse modifiers
The Collapse Modifiers button applies the results of the current modifiers to the original mesh. When merging, the Collapse Modifiers button combines all the modifiers that are below the selected modifier.
Caution: This feature is difficult to reverse and may result in less efficient work.
Delete modifier
The Delete Modifier button allows you to delete the selected Modifier. To delete a modifier, follow these instructions:
1. Select a modifier you want to remove.
2. Select on the Delete Modifier button.
4. General procedure for using a modifier
When using modifiers, there is a general order of use that is common. Once you know the procedure in which modifiers are used, you can effectively apply them to your modeling process. This methodical approach will minimize mistakes you may make while using modifiers and maximize the efficiency of your editing:
1. Adding modifiers: Add the desired Modifier while editing the model in Modeling mode.
2. Change modifier properties: Select the added Modifier and change its properties in the Modifier's Properties area.
3. Continue editing in Modeling Mode: Return to the Source Mesh and continue editing in Modeling Mode.
4. Add Modifiers: Select Add Modifiers if needed.
5. Collapse Modifiers: When you are finished modeling, use the Collapse Modifiers button to apply them to the Source Mesh.
5. Using modifiers to transform
When modeling, there will be times when you want to deform the entire model. UModeler X includes modifiers that allow you to deform the entire model while keeping the model you are currently working on intact.
Below is a brief overview of how each different modifier enables deformation.
- Bend modifier: This modifier allows you to bend objects. You can adjust the shape using properties such as the Axis to Bend and the Angle properties.
- Free Form Deformation (FFD) modifier: This modifier deforms shapes using a grid box surrounding the mesh and vertices that can manipulate the grid. The FFD modifier comes in three different modifiers based on the number of vertices that can be manipulated: the FFD 2x2x2, FFD 3x3x3, and the FFD 4x4x4. To deform an object using the FFD modifier, follow these instructions:
1. Select the Add Modifier button.
2. Select the FFD modifier with the desired number of vertices.
3. Click and drag the vertices in the grid box.
The mesh will deform smoothly.
- Push Modifier: This modifier is used to push faces apart along the face normal or opposite direction.
6. Using modifiers to apply non-destructive changes to a mesh
Once you have deformed your model using a modifier, you can also use the modifier to generate a mesh of the model. If you want to create a symmetrical model, you only need to create one side of the model and use the Mirror modifier to create the other side! The Mirror modifier duplicates a symmetrical mesh along an axis you choose.
Create left and right symmetry with the Mirror modifier
To use the Mirror modifier to create a symmetrical model, follow these instructions:
1. Select a UModeler X object and select the Add Modifier button.
2. Select the Mirror modifier.
3. In the Mirror Axis properties, select the desired axis.
A symmetrical mesh will be duplicated along the selected axis.
The Shell modifier is a modifier that can generate thickness in a model.
The thickness can be generated by scaling up or down in the normal direction of the original mesh, and you can also add a face to the cross-section of the generated thickness.
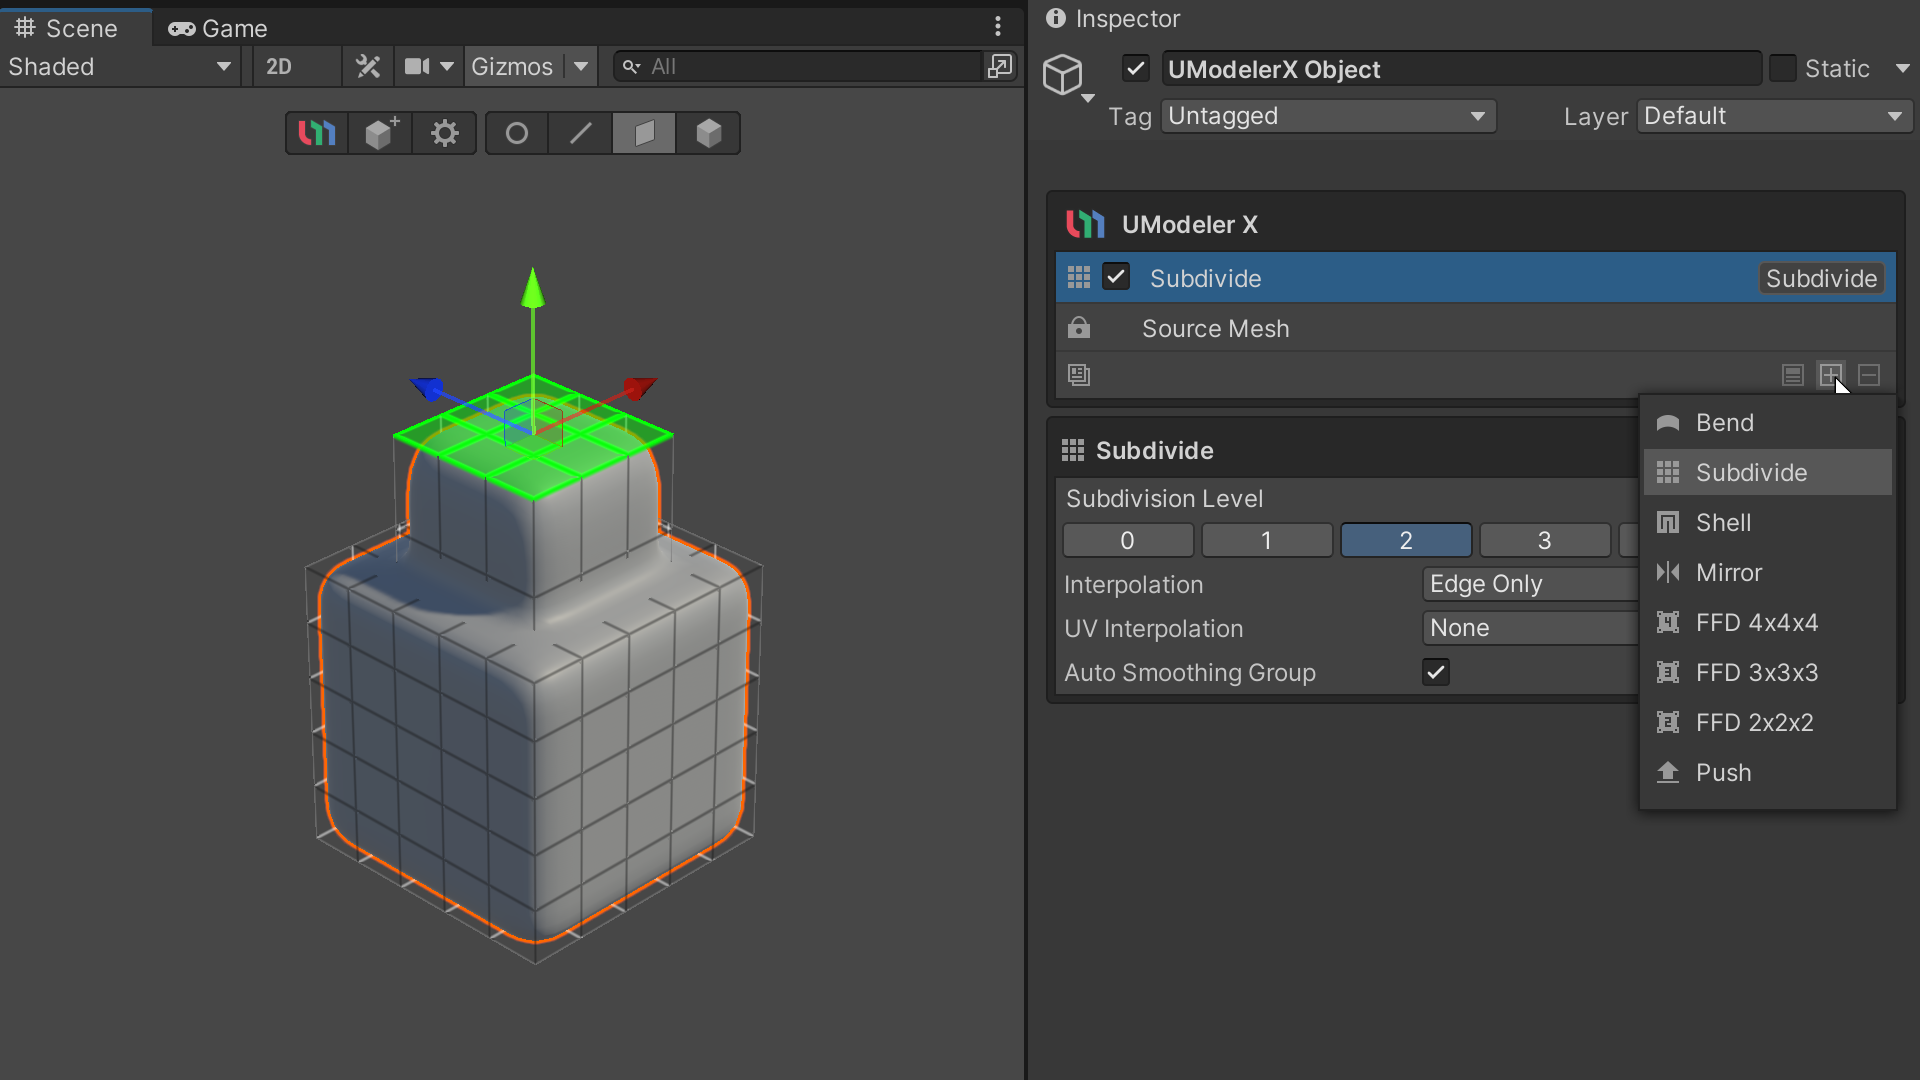
7. Use modifiers to smooth out an object
Use the Subdivide modifier to divide a selected face of an object into quarters while simultaneously softening the bend. To use the Subdivide modifier, follow these instructions:
1. Select a UModeler X object and select the Add Modifier button.
2. Select the Subdivide modifier.
3. In the Subdivision Level property, to apply the desired level of subdividing, select the number button for that level.
Caution: Because the entire face is divided into four parts per step, depending on the step in the Subdivision Level property, you may experience optimization issues with 3D objects due to the large number of faces, such as a momentary slowdown in the editor. It is recommended that you try to select a lower step first to find the right one.
Faces are added to the object and bends are smoothed out!
8. Next steps
Congratulations, you now know the basics of the Modifier System. In the next tutorial, you’ll learn how to unwrap the UVs using the UV Editor.