Add damage zones to decrease health (static hazards)
Tutorial
·
Beginner
·
+0XP
·
30 mins
·
(1058)
Unity Technologies
In this tutorial you’ll create static damage zones to decrease the player character’s health.
By the end of this tutorial, you’ll be able to do the following:
- Adapt your previous code to decrease player character health.
- Implement a period of invincibility when player health is decreased.
1. Overview
In your game the player can increase their character’s health up to the maximum level, but there’s currently nothing that can negatively impact that health. In this tutorial, you’ll apply what you’ve previously learned to decrease player health when they enter a damage zone (collide with a particular GameObject). Later in the course you’ll build on this work to create moving enemies too.
By the end of this tutorial, you’ll be able to do the following:
- Adapt your previous code to decrease player character health.
- Implement a period of invincibility when player health is decreased.
Working on your own project?
This tutorial is part of Beginner 2D: Adventure Game and refers to the game project for that course, but this information will be helpful for any beginner creator who wants to set up a basic health system in their game.
Note: For the purposes of this tutorial, we chose to use the Ruby’s Adventure asset set, and the file paths used in instructions will reflect this. If you chose another asset set, the file names will be the same, but in your corresponding theme folder.
2. Adjust the currentHealth value at game start
When you set up the health collectibles, you set the player character's currentHealth value as 1 at game launch. To revise your script so the player starts at full health, follow these instructions:
1. Open the PlayerController script in your IDE.
2. At the top of the script, find the variable declaration for currentHealth. Revise the declaration so it no longer sets the variable to 1:
int currentHealth;3. In the Start function, remove the double slashes from the instruction to set currentHealth to the maxHealth value when the game launches:
currentHealth = maxHealth;The Start function will now execute this instruction when it runs.
4. Save your changes.
3. Challenge: Create a functioning damage zone
You have already set up a GameObject to increase the player character’s health on collision — now you’ll do the opposite and decrease the character’s health. Apply what you’ve learned so far to set up a damage prefab, then you’ll have the opportunity to review the solution before we guide you through refining the damage object to give players an engaging experience. The damage zone should decrease the player character’s health value by one when the character collides with it.
Check your damage zone
Review these high-level instructions to confirm that you have set up the damage zone correctly:
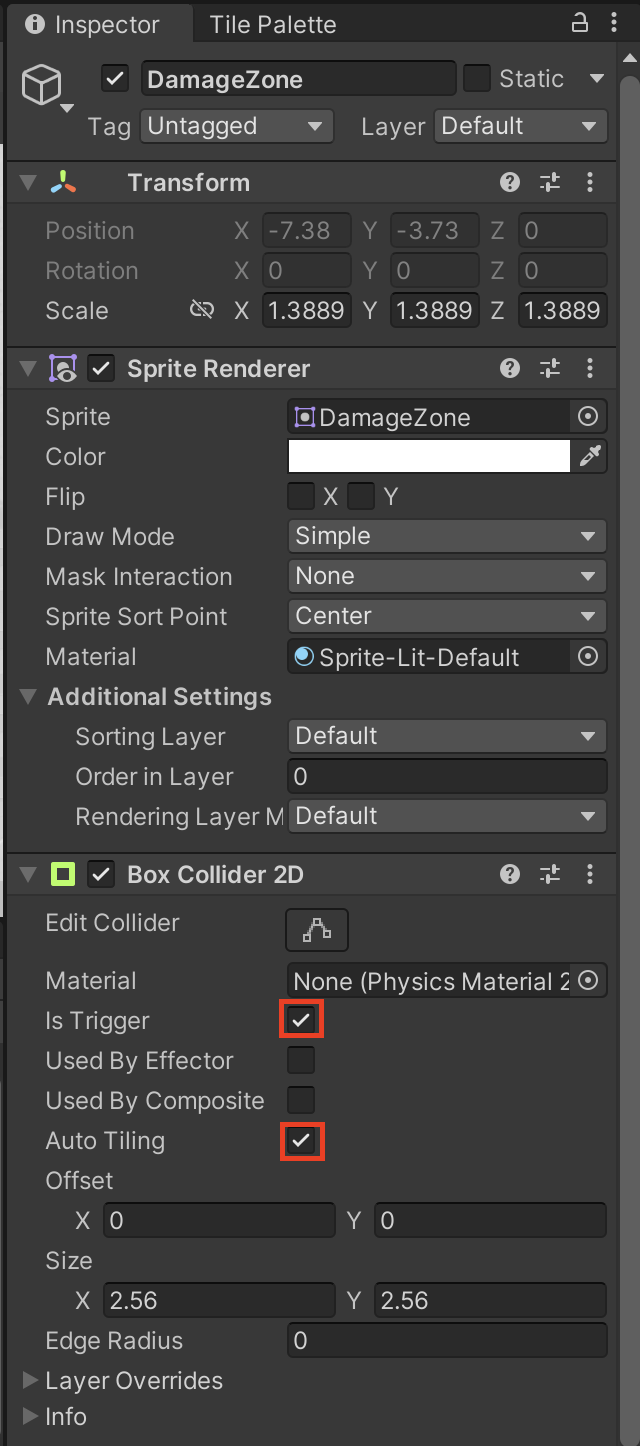
1. Place some instances of the DamageZone prefab you created before around your scene.
2. In prefab editing mode, add a Box Collider 2D component and enable Is Trigger and Auto Tiling.
This setting automatically resizes the collider to fit the area of the object.
3. Create a new script called “DamageZone” and attach it to the GameObject.
4. Copy the HealthCollectible script and adapt it to decrease player character health:
using System.Collections;
using System.Collections.Generic;
using UnityEngine;


public class DamageZone : MonoBehaviour
{
   void OnTriggerEnter2D(Collider2D other)
   {
       PlayerController controller = other.GetComponent<PlayerController>();


       if (controller != null)
       {
           controller.ChangeHealth(-1);
       }
   }
}
Here’s an explanation of this code:
- Player health is irrelevant to the damage zone functionality, so the only condition for the health decrease is whether the colliding GameObject has a PlayerController script on it.
- Damage zones that disappear immediately won’t be very powerful, so the instruction to destroy the GameObject has been removed.
5. Save your changes and return to the Unity Editor. Test the damage zone to confirm that it decreases player character health on collision.
4. Refine your damage zone functionality
At the moment, the player character’s health decreases by one when they enter the damage zone (hit its collider), but that’s the only damage the zone does. That approach isn’t very challenging for players — the zone should cause ongoing damage for as long as the player character is within its collider.
To adjust the damage zone functionality, follow these instructions:
1. In your DamageZone script, adjust the function name to OnTriggerStay2D:
void OnTriggerStay2D(Collider2D other)OnTriggerStay2D is called every frame that the GameObject with the Rigidbody component is inside the collider, not just when it enters. This change means that the damage zone won’t have a one-time impact — the function will continue to be called as long as the player character is in the damage zone.
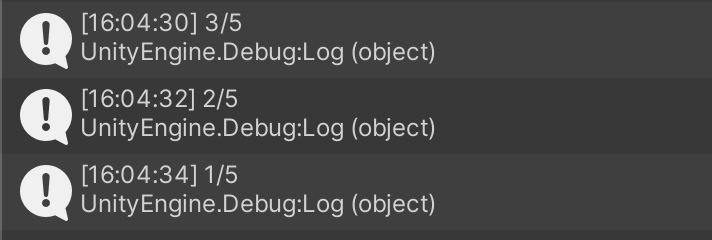
2. Save your changes, return to the Unity Editor, and test the updated functionality. You should notice the following:
- The player character gets to zero health in less than a second (in five frames, to be precise, unless you have adjusted the maxHealth value in your own project).
- There are no updates about the player character health in the Console window when you keep the player character still in the damage zone, only when you move the character.
Important: Remember to exit Play mode when you’ve finished testing.
3. Open the PlayerCharacter prefab in prefab editing mode.
4. In the Rigidbody 2D component, set the Sleeping Mode property to Never Sleep.
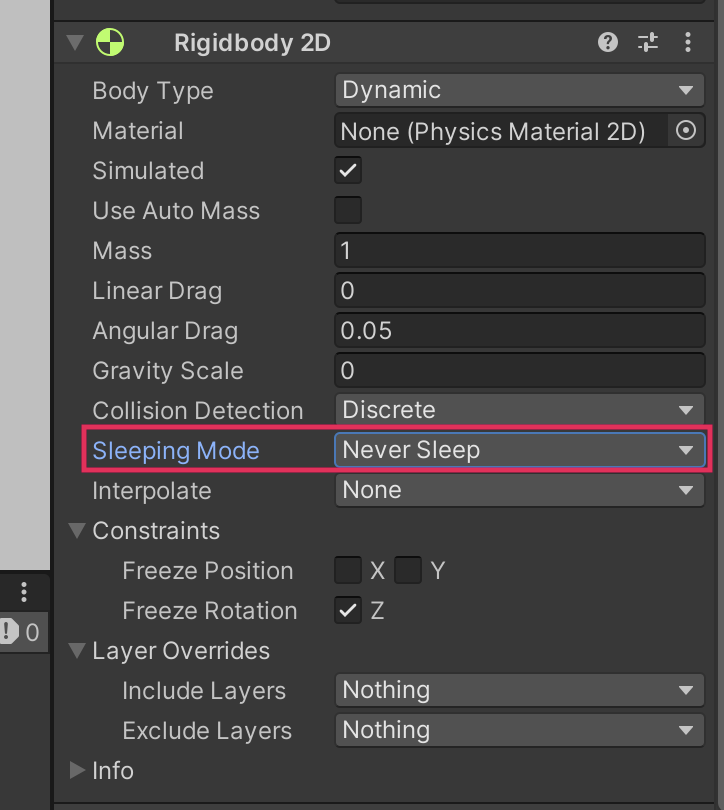
By default, the physics system stops computing collisions for a GameObject with a Rigidbody component when that GameObject stops moving: the Rigidbody component sleeps. This approach optimizes resources and avoids wasted calculations. However, for the damage zone to work properly, you need that computation to happen even when the PlayerCharacter GameObject is stationary.
5. Save your changes and exit prefab editing mode.
5. Implement a cooldown after the character takes damage
Your adjustment to make the damage zone more dangerous also means that the player character loses all their health almost immediately. Even if you want to make your game challenging, the current configuration is impossible for a player to overcome.
There are different ways that you can address this issue. In this case, you’ll make the player character invincible after they receive damage for a brief cooldown period to avoid complete loss of health immediately.
To add a damage cooldown period after the player character takes damage, follow these instructions:
1. Open the PlayerController script in your IDE.
2. At the top of the PlayerController class, with the other variable declarations, add three new variables:
// Variables related to temporary invincibility
  public float timeInvincible = 2.0f;
  bool isInvincible;
  float damageCooldown;
Here’s an explanation of this code:
- The public float variable timeInvincible controls how long the player character remains invincible after taking damage, measured in seconds. This variable is public, so you can adjust it in the Inspector window for quick iteration.
- The private bool variable isInvincible stores whether the player character is currently invincible. Bool type variables (short for Boolean) can only be true or false. This variable type can be very useful for constructing conditional statements.
- The private float variable damageCooldown stores how much time is remaining until the player character is no longer invincible and can take more damage.
3. At the top of the ChangeHealth function, add an if statement that will execute if the character health is currently being decreased:
if (amount < 0)
{
   if (isInvincible)
   {
     return;
   }
   isInvincible = true;
   damageCooldown = timeInvincible;
}
Here’s an explanation of this code:
- The condition for this statement is the amount parameter having a value below zero. The value will be below zero if a health decrease has been made through the ChangeHealth function.
- The nested if statement exits the ChangeHealth function if the player character is already invincible using the return statement. You can use the return statement to end a function early if a particular condition is met.
- The second instruction sets isInvincible to true to avoid further damage during the cooldown period.
- The third instruction sets damageCooldown (the cooldown timer) to the current value for the public timeInvincible variable.
4. At the bottom of the Update function, add an if statement that will be executed if the player character is currently invincible:
if (isInvincible)
{
    damageCooldown -= Time.deltaTime;
    if (damageCooldown < 0)
    {
       isInvincible = false;
    }
}Important: Make sure that the if statement and code block are enclosed within the closing brace of the Update function.
Here’s an explanation of this code:
- The condition for this if statement is isInvincible being true — that is, the player character has taken damage since the last time that Update was called (the previous frame).
- The first instruction in the block subtracts (-=) Time.deltaTime from the damageCooldown timer. Time.deltaTime is the interval in seconds from the previous frame to the current one, so the instruction reduces the damageCooldown timer value every frame.
- An if statement follows, with the condition that any instructions in the block after the statement will only be executed when damageCooldown is less than zero — that is, when the timer countdown has finished.
- The final instruction in the block sets isInvincible to false, meaning that the player character is once again vulnerable to damage after the countdown finishes.
5. Save your changes and return to Unity Editor.
6. Test your changes and adjust TimeInvincible
Now that you’ve written the cooldown functionality, test it and adjust the cooldown duration:
1. Enter Play mode and test that the damage cooldown functionality works. The damage will now reduce the player character health at two second intervals while the character is within the damage zone collider — you can find the notifications of this in the Console window.
2. With your PlayerCharacter GameObject selected, in the Inspector window, go to the PlayerController (script) component and find the exposed Time Invincible property.
3. Adjust the Time Invincible value and test the player experience until you are happy with the damage cooldown time.
4. Exit Play mode and save your changes when you’ve finished testing.
Note: You can always adjust the cooldown again later as you continue to develop your game. You might also find it helpful to get specific user feedback on the damage cooldown period when you have created the full 2D Beginner game.
7. More things to try
If you want to further develop your skills, explore new concepts, or improve your project, check out some of the optional activities below. Each one is tagged as either Easy, Medium, or Difficult, so you can choose the level of challenge.
These activities are entirely optional, so if you’re not interested, no problem — just skip this step. We do recommend attempting at least one of them in order to get the most out of this learning experience. Good luck!
Easy: Position damage zones to challenge the player
Take some time to experiment with your placement of damage zones and health collectibles within the environment, and consider the fact that you will soon add moving enemies too. It’s important to give your players sufficient challenge, but that needs to be balanced — an almost-impossible game probably isn’t your goal here!
Easy: Create an ultra damage zone
You might have created variant health collectibles, and you can take a similar approach here: switch the value that the DamageZone script passes to the ChangeHealth function to a public float variable, then configure a prefab variant as you like.
Medium: Create a slow healing zone
If you want to practice applying what you’ve learned in this unit, you can configure slow healing zones that increase player health using the same principle as the damage zones. You know everything that you need to implement this functionality.
8. Check your scripts
If you’re completing the 2D Beginner course, take a moment to check that your scripts are correct before continuing.
PlayerController.cs
Important: If you completed any extension work in your script, this will not be reflected in the reference script below.
using System.Collections;
using System.Collections.Generic;
using UnityEngine;
using UnityEngine.InputSystem;


public class PlayerController : MonoBehaviour
{
  // Variables related to player character movement
  public InputAction MoveAction;
  Rigidbody2D rigidbody2d;
  Vector2 move;
  public float speed = 3.0f;


  // Variables related to the health system
  public int maxHealth = 5;
  int currentHealth;
  public int health { get { return currentHealth; }}


  // Variables related to temporary invincibility
  public float timeInvincible = 2.0f;
  bool isInvincible;
  float damageCooldown;


  // Start is called before the first frame update
  void Start()
  {
     MoveAction.Enable();
     rigidbody2d = GetComponent<Rigidbody2D>();


     currentHealth = maxHealth;
  }

  // Update is called once per frame
  void Update()
  {
     move = MoveAction.ReadValue<Vector2>();


     if (isInvincible)
     {
         damageCooldown -= Time.deltaTime;
         if (damageCooldown < 0)
         {
            isInvincible = false;
         }
     }
   }


// FixedUpdate has the same call rate as the physics system
  void FixedUpdate()
  {
     Vector2 position = (Vector2)rigidbody2d.position + move * speed * Time.deltaTime;
     rigidbody2d.MovePosition(position);
  }


  public void ChangeHealth (int amount)
  {
     if (amount < 0)
     {
        if (isInvincible)
        {
           return;
        }
     isInvincible = true;
     damageCooldown = timeInvincible;
  }


     currentHealth = Mathf.Clamp(currentHealth + amount, 0, maxHealth);
     Debug.Log(currentHealth + "/" + maxHealth);
  }


}
DamageZone.cs
using System.Collections;
using System.Collections.Generic;
using UnityEngine;


public class DamageZone : MonoBehaviour
{
   void OnTriggerStay2D(Collider2D other)
   {
       PlayerController controller = other.GetComponent<PlayerController>();


       if (controller != null)
       {
           controller.ChangeHealth(-1);
       }
   }
}
9. Next steps
The player character has a fully-functional health system, and can both take and heal damage. At the moment though, the player has no way of knowing what their health level is — you’ve been using the Console window as you test, but that won’t help your player. In the next unit, you’ll create a heads-up display (HUD) and configure it to show the player character’s health level.