Set up a basic health system
Tutorial
·
Beginner
·
+10XP
·
20 mins
·
(1215)
Unity Technologies

In this tutorial, you’ll set up a basic health system for the player character.
By the end of this first tutorial, you’ll be able to do the following:
- Write a new function to change player character health variables.
- Expose a variable using the public keyword.
1. Overview
So far in this course you’ve set up movement for a player character and created an environment for them to navigate, including areas that they can’t move over. Now it’s time to start implementing interactions within that world to craft a game experience for your players. Over the next sequence of tutorials, you’ll set up a basic player character health system, then create collectible objects that increase player health and a damage zone to decrease it.
By the end of this first tutorial, you’ll be able to do the following:
- Write a new function to change player character health variables.
- Expose a variable using the public keyword.
Working on your own project?
This tutorial is part of Beginner 2D: Adventure Game and refers to the game project for that course, but this information will be helpful for any beginner creator who wants to set up a basic health system in their game.
Note: For the purposes of this tutorial, we chose to use the Ruby’s Adventure asset set, and the file paths used in instructions will reflect this. If you chose another asset set, the file names will be the same, but in your corresponding theme folder.
2. Add new variables to store health
Before you increase or decrease the player character’s health, you need to create variables to store that health.
To add variables for health to your player controller script, follow these instructions:
1. Open the PlayerController script in your IDE.
2. At the beginning of the PlayerController class, after the Rigidbody2D declaration, add the following instructions:
  public int maxHealth = 5;
  int currentHealth;
Think back to your previous variable declarations before you read on — what is the difference between these two new declarations?
- Both variables are int type. Int here means integer, a whole number without decimal points.
- maxHealth has the public keyword, which means that you can adjust it using the Inspector window in the Unity Editor. The variable’s value is set in the declaration as 5.
- currentHealth is not public, so it will not be visible in the Inspector window. This variable’s value has not been set in the declaration.
3. In the Start function, beneath the existing code, add the following instruction:
currentHealth = maxHealth;This instruction sets the current health of the player character to the maxHealth value when the game launches.
3. Write a new function to change health
Now that you’ve established a maximum and current health value for the player character, you can add code to change the current value.
To write a new function to change the currentHealth value, follow these instructions:
1. At the bottom of the class, after the FixedUpdate function, declare a new function called “ChangeHealth”:
void ChangeHealth (int amount)
  {

}Important: Make sure that you declare the function inside the closing brace for the class.
Here’s an explanation of this code:
- The declaration begins with the void keyword — the functions that you’ve worked with previously also have this keyword in their declarations. When some functions are executed, a value is produced at the end. The void keyword means that this function doesn’t return a value after its instructions have been executed; the function is for changing the player character’s health, so that makes good sense.
- Inside the parentheses at the end of the declaration is a parameter — a value that will be passed to (assigned to) the function, which it will use to change the currentHealth variable.
2. Add the following instruction inside the new ChangeHealth function:
currentHealth = Mathf.Clamp(currentHealth + amount, 0, maxHealth);Take a moment to identify the things that you are familiar with in the instruction before reading on.
- This instruction makes sure that currentHealth cannot be set to a value that is over the maxHealth value or below 0. Fixing a range of possible health values will help you to keep the system balanced for a good player experience.
- This instruction uses a built-in function, Mathf.Clamp, to fix the range of possible health values. Mathf.Clamp clamps (restricts) the possible values within a set range using three parameters separated by commas.
- The first parameter is the value that needs to be restricted (currentHealth + amount).
- The second parameter is the minimum allowed value (0).
- The third parameter is the maximum allowed value (maxHealth).
3. Add the following instruction below the first:
Debug.Log(currentHealth + "/" + maxHealth);Here’s an explanation of this code:
- You don’t currently have a way to display the player character’s health in the game — this instruction prints it to the Console window using Debug.Log whenever the character’s health changes.
- To make this information easier to read, the + symbol adds a string value between the two integer values for current and maximum health. In this case, that string is just a forward slash (/).
- String values are contained inside double quotation marks. Make sure that you don’t paste smart quotes or curly double quotation marks without changing them to the straight versions, as this can cause errors in your scripts.
4. Save your changes and return to the Unity Editor.
4. Check the maxHealth variable in the Inspector
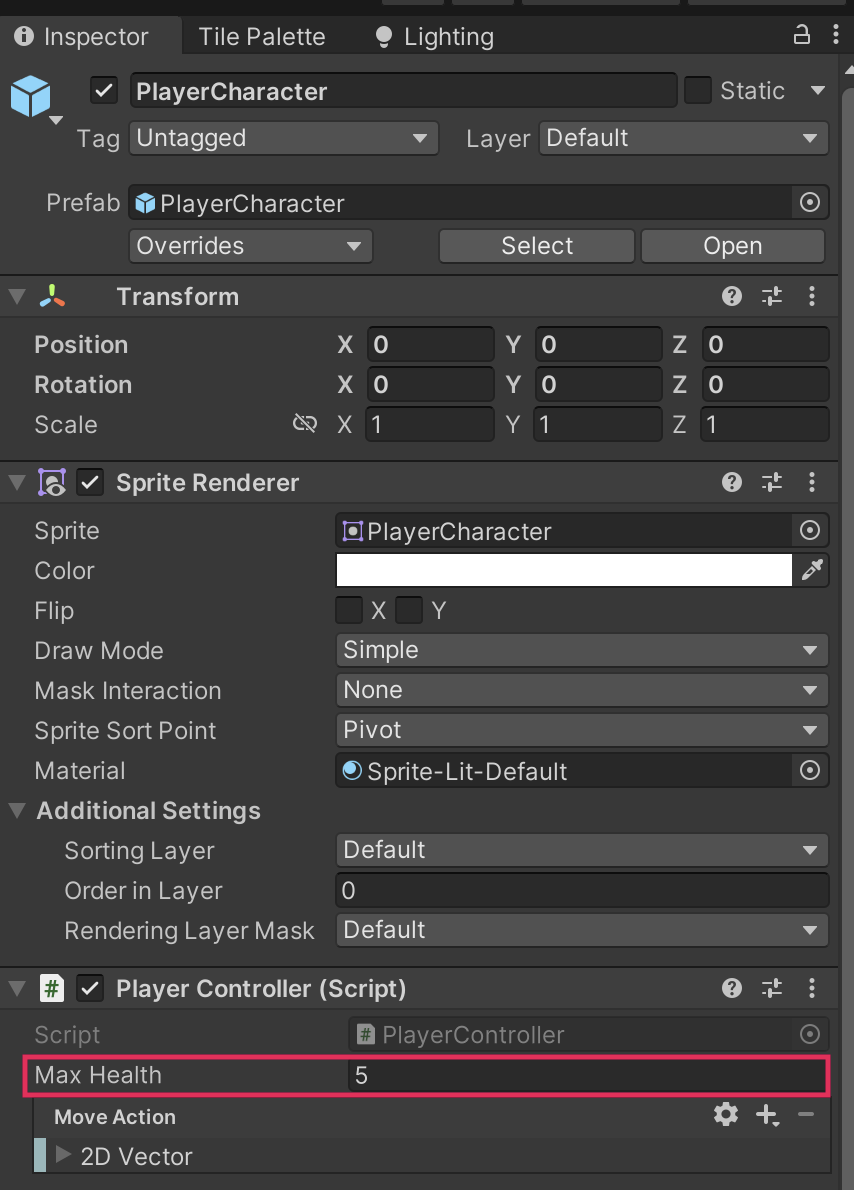
When you make a variable public, it is displayed and can be set in the Inspector window. Inspector window access for variables can be very useful if you’re working with others (for example, game designers who might want to make changes without editing scripts) or you want a quick way to test possible changes.
To check the maxHealth variable, follow these instructions:
1. In the Hierarchy window, select the PlayerCharacter GameObject.
2. In the Inspector window, find the Player Controller (Script) component. Max Health is now a property displayed in the component underneath the Move Action list. Any value that you set in the Inspector window will override the default value set in your script.

At the moment you can’t test this functionality — you’ve set up the system to change health and display changes in the Console window, but haven’t yet implemented anything that will do so.
5. Expose a variable to control player character speed
Exposed variables can be very useful for values that you might want to fine-tune to create the best player experience. Apply what you’ve learned in this tutorial to declare a new variable and expose its value in the Inspector window to control the speed of the player character.
You’ll need to do the following things:
- Declare a public float variable at the top of the class.
- Provide an initial value for the variable — 3.0f is a good starting point.
- Revise your movement calculation in the FixedUpdate function to use the new variable.
Important: Remember to test your changes in Play mode — this is a change that you will be able to test with the current game functionality.
You can review the example script in the next step to check your work.
6. Check your script
If you’re completing the 2D Beginner course, take a moment to check that your script is correct before continuing.
PlayerController.cs
Important: If you completed any extension work in your script, this will not be reflected in the reference script below.
using System.Collections;
using System.Collections.Generic;
using UnityEngine;
using UnityEngine.InputSystem;


public class PlayerController : MonoBehaviour
{
  // Variables related to player character movement
  public InputAction MoveAction;
  Rigidbody2D rigidbody2d;
  Vector2 move;
  public float speed = 3.0f;


  // Variables related to the health system
  public int maxHealth = 5;
  int currentHealth;


  // Start is called before the first frame update
  void Start()
  {
     MoveAction.Enable();
     rigidbody2d = GetComponent<Rigidbody2D>();
     currentHealth = maxHealth;
  }

  // Update is called once per frame
  void Update()
  {
     move = MoveAction.ReadValue<Vector2>();
     Debug.Log(move);
  }


  // FixedUpdate has the same call rate as the physics system
 void FixedUpdate()
  {
     Vector2 position = (Vector2)rigidbody2d.position + move * speed * Time.deltaTime;
     rigidbody2d.MovePosition(position);
  }


  void ChangeHealth (int amount)
  {
     currentHealth = Mathf.Clamp(currentHealth + amount, 0, maxHealth);
     Debug.Log(currentHealth + "/" + maxHealth);
  }


}
7. Next steps
Now that you’ve set up a basic health system, you’re ready to start working with it. In the next tutorial, you’ll begin by creating an object that the player character can collect to increase their health. At the moment there’s nothing in the world that can damage the player character, but you’ll be changing that very soon!