Create Input Actions for player character movement
Tutorial
·
Beginner
·
+0XP
·
40 mins
·
(2858)
Unity Technologies
In this tutorial you’ll use Input Actions, a feature of Unity’s Input System, to implement a more scalable approach to player input for your 2D adventure game.
By the end of this tutorial, you’ll be able to do the following:
- Define and bind Input Actions for your game.
- Read Input Action values.
- Move the player character based on Input Action values.
1. Overview
In Read keyboard input to control 2D character movement, you set up a character controller script to read input directly from an input device — in this case, a keyboard. This approach to handling player input can be useful for quick prototyping, but it doesn’t scale well. If you want to create a game that supports multiple input devices (keyboard and gamepad, for example) or multiple ways to move, then you need to write a lot of code to implement everything.
In this tutorial you’ll use one of Unity’s Input System features to add this functionality in a more efficient way: Input Actions.
By the end of this tutorial, you’ll be able to do the following:
- Define and bind Input Actions for your game.
- Read Input Action values.
- Move the player character based on Input Action values.
Working on your own project?
This tutorial is part of Beginner 2D: Adventure Game, but you might find it useful if you want to create a 2D character controller that works using Unity’s Input System package. For further guidance on using the package, refer to the Input System package documentation.
If you are working in your own 2D Unity project, make sure that you have installed the Input System package before you continue with this tutorial.
Note: For the purposes of this tutorial, we chose to use the Ruby’s Adventure asset set, and the file paths used in instructions will reflect this. If you chose another asset set, the file names will be the same, but in your corresponding theme folder.
2. Define an Input Action
Instead of directly testing for input from a particular device, you can define an Input Action and bind (assign) different forms of input to that action. This means that you can then check the Input Action itself, rather than checking for input on every possible device a player could use for your game.
To define a Input Action for left movement, follow these instructions:
1. Open your PlayerController script in your IDE, if you haven’t already done so.
2. Add the following line to the start of the script class, after the first brace, and before the Start method:
public InputAction LeftAction;This instruction defines an Input Action called LeftAction. The keyword public means that this InputAction will be available to you in the Unity Editor.
3. Save your script changes and return to Unity Editor.
4. In the Hierarchy window, select the PlayerCharacter GameObject, then find the Player Controller (Script) component in the Inspector window.
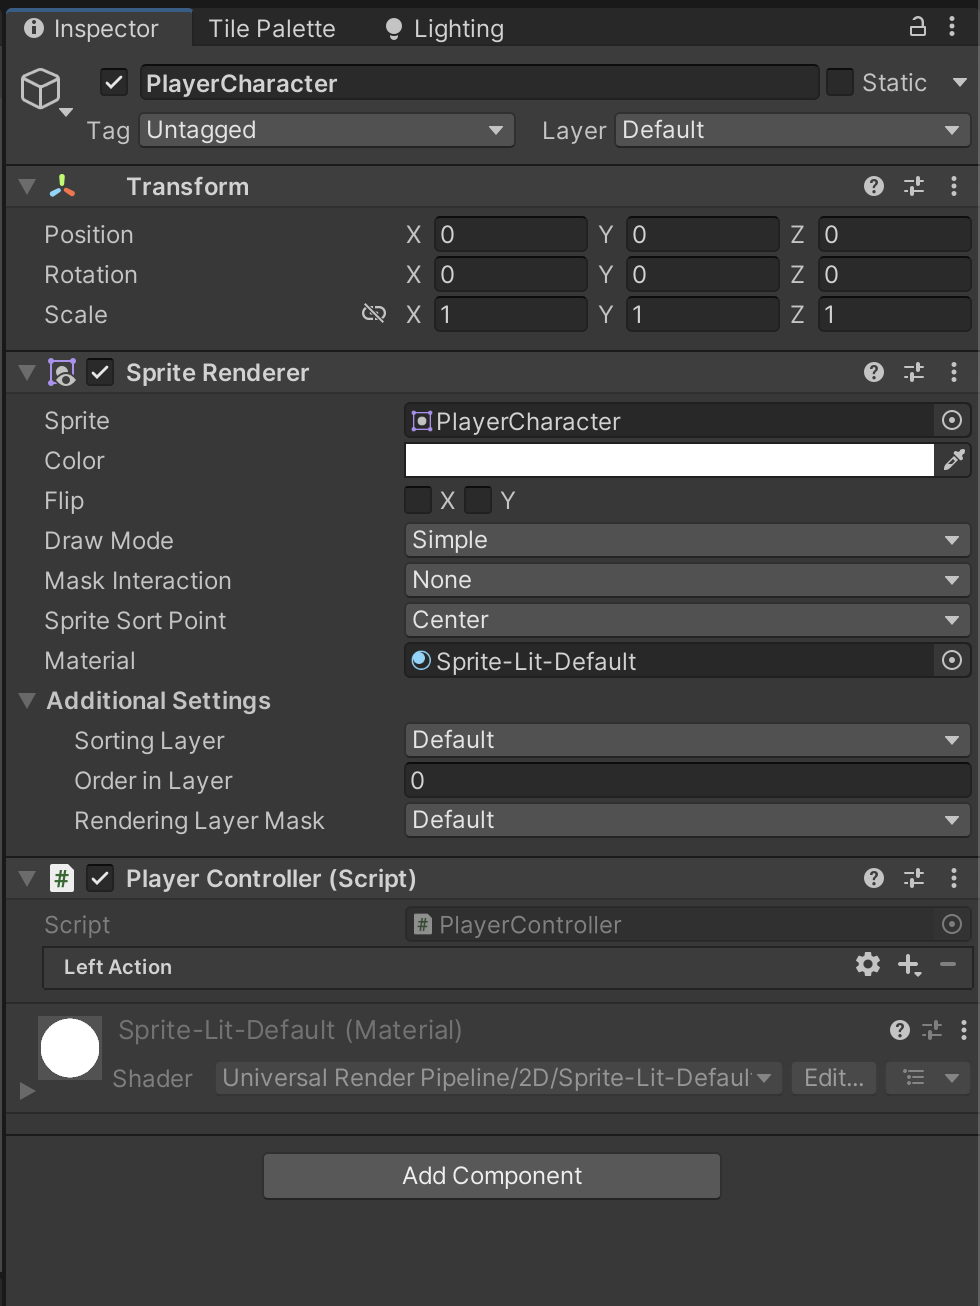
5. Select Action Properties (gear icon).
6. Set Action Type to Button.
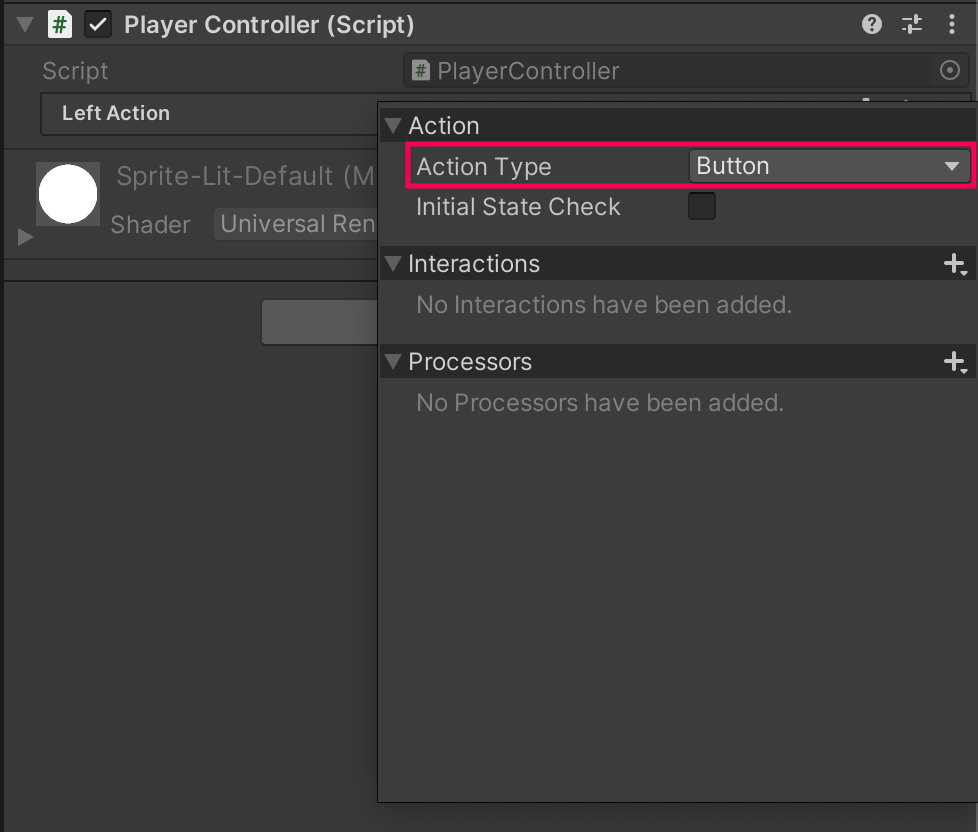
In this game the player character will either move or be static based on a button press, whatever the input controller, so Button is the right type for this Input Action.
3. Add a binding for the Input Action
To add a binding for the Input Action you have created, follow these instructions:
1. In the Player Controller (Script) component, go to Left Action in the list and select Add (+) > Add Binding. This creates an empty binding.
2. Double-click the empty binding in the list to open the Binding Definition window.
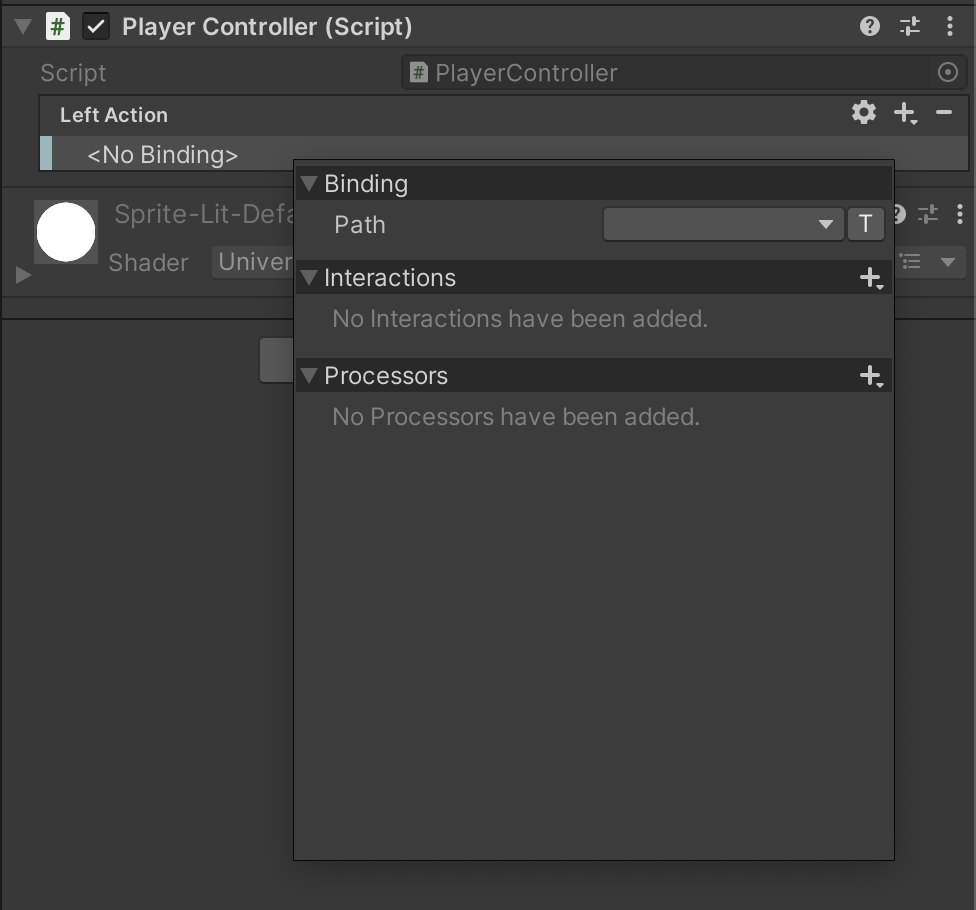
3. Select the Path property dropdown and then select Listen. The Path property determines the path to specific input that you bind to the Input Action. The Input System will list all the input binding options that correspond to the input you provide when you do this.
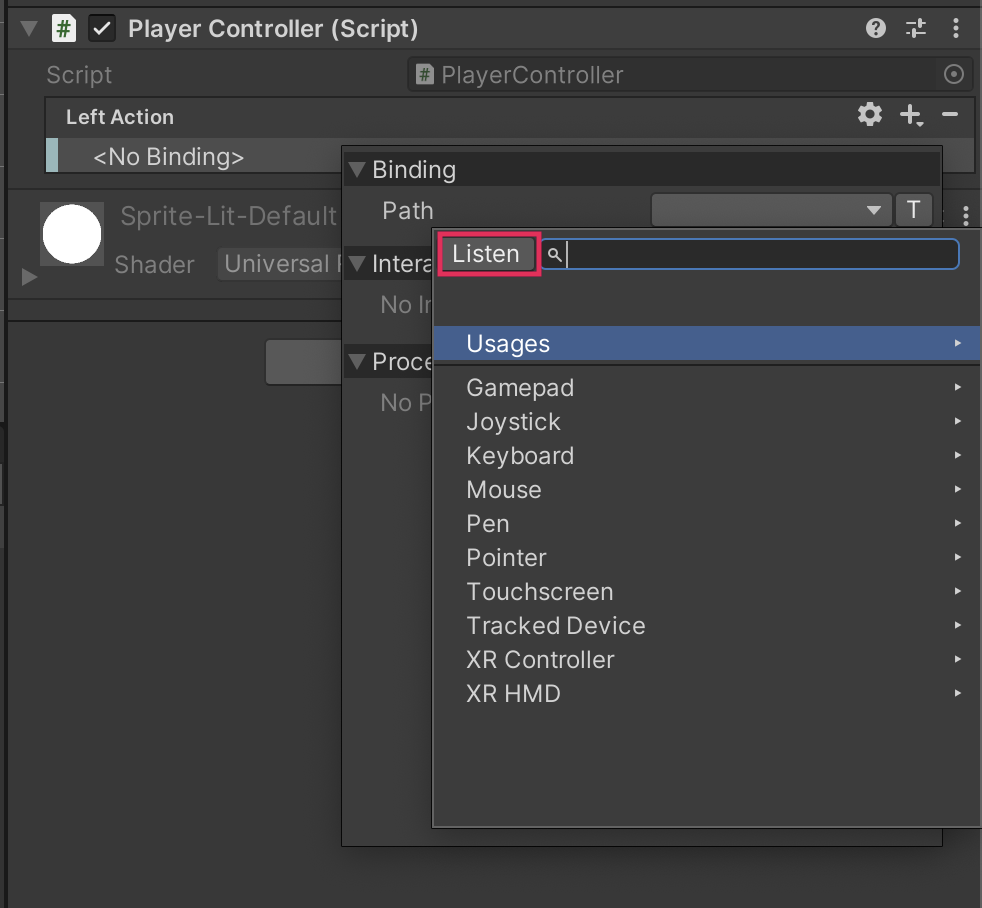
4. Press the Left arrow key on your keyboard and then select Left Arrow [Keyboard] in the Binding Definition window.
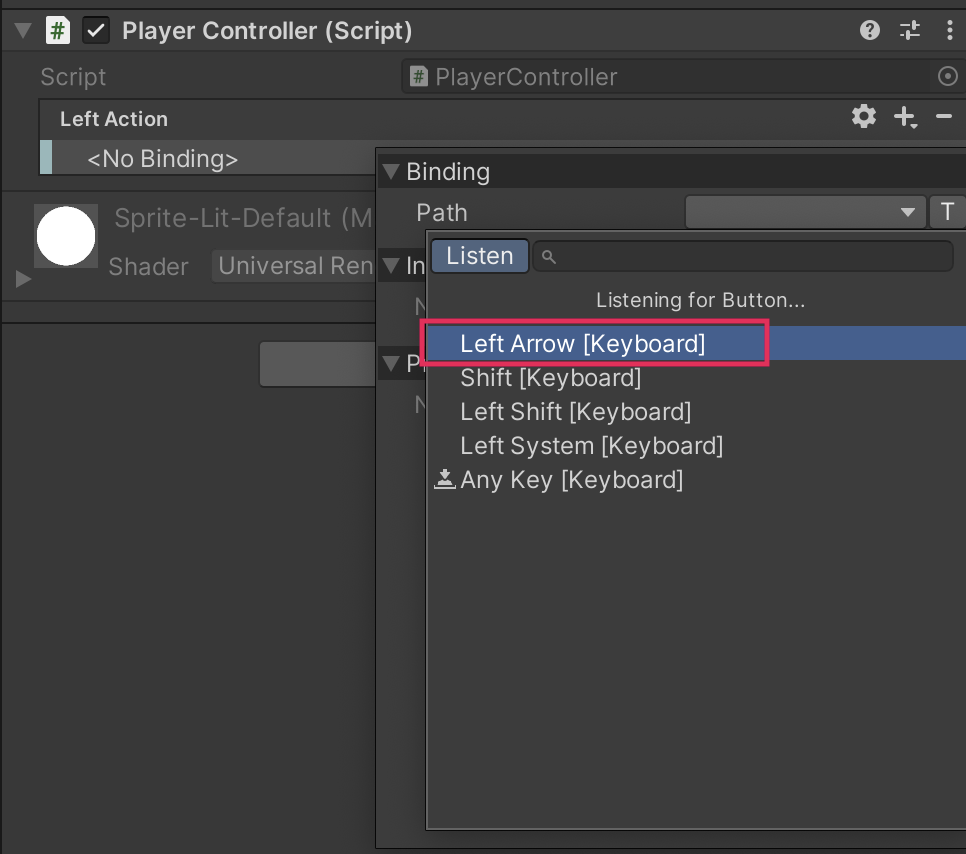
Note: You can also navigate through potential input in the Binding Definition window, but listening is a more efficient way to create the binding in this situation.
5. The binding path that you have selected will now be displayed in the Left Action list in the Player Controller (Script) component.

4. Adjust your Player Controller script
To adjust the Player Controller script to use the new Input Action, follow these instructions:
1. Return to the Player Controller script in your IDE.
2. After the Start function is declared, inside the brace, add the following instruction:
LeftAction.Enable();This instruction enables the LeftAction Input Action. All actions are disabled by default, so they are only available to the player when they are needed.
Tip: Forgetting to enable the Input Action at the start is a common error — if an Input Action is not working as you expect, check to make sure that it is enabled!
3. In the Update function, find the if statement that currently checks whether the Left arrow key is pressed (at the top of the function). Update this instruction to use your new Input Action:
if (LeftAction.IsPressed())
{
   horizontal = -1.0f;
}
4. Save your changes and return to Unity Editor.
5. Enter Play mode to test your changes. The PlayerCharacter GameObject will still move to the left when you press the Left arrow key, but this time your press is being detected using the Input Action rather than directly through the keyboard.
Note: Remember to exit Play mode when you’re done testing.
5. Configure a Value Input Action
You could continue to configure the player character movement by adding individual Input Actions for each direction, but there are limitations to this approach:
- Configuring individual Input Actions isn’t a very efficient way to work at scale — it would be a lot of effort to bind multiple input devices for each Action!
- The current approach to movement is binary input (button pressed or not pressed), but for player movement you may want more granular input. For example, you might want to use a joystick so the character walks slowly if it is barely pressed or runs when the controller is pushed all the way in a particular direction.
A Value type Input Action addresses these issues by returning a value instead of just checking whether a button is pressed or not. A Trigger input device would provide a float value (based on how hard the trigger is pressed), and a Joystick would provide a Vector2 value indicating direction of movement on horizontal and vertical axes. In this case, a Vector2 Value Move Action will handle the input that you need for player movement in your adventure game.
To create and configure a new Value type Input Action, follow these instructions:
1. In your IDE, at the top of the script class, define a new Input Action named MoveAction below the first one:
public class PlayerController : MonoBehaviour
{
  public InputAction LeftAction;
  public InputAction MoveAction;
  }
2. Save your changes and return to the Unity Editor.
3. With your PlayerCharacter selected, in the Inspector window, go to the Player Controller (Script) component and find the Move Action value. Select Action Properties (gear icon). The Type property is already set to Value by default.
Note: If you can’t find the component in your Inspector window, make sure that you have selected the PlayerCharacter GameObject in the Hierarchy window or the Scene view.
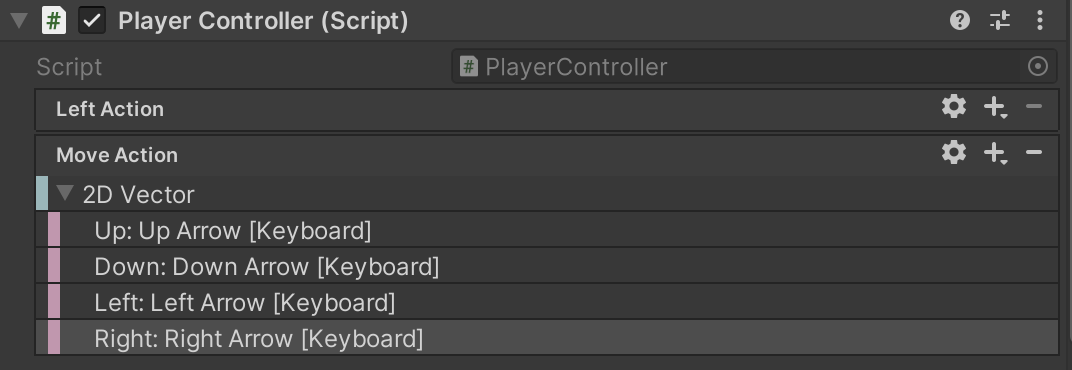
4. Select Add Binding (+) and choose Add Up/Down/Left/Right Composite.
You can use composite bindings to bind multiple keys into a direction. This approach means that the player can move the character diagonally, if they want to.
Note: You can keep the default name 2D Vector or use the context menu (right-click) to rename the Move Action composite binding.
5. Assign the relevant keyboard keys to each direction sub-binding, as you did earlier in this tutorial. Save your changes in the Editor.
6. Revise the Player Controller script
To adjust your PlayerController script to use the new Input Action, follow these instructions:
1. In your IDE, go to the Start function and add an instruction to enable the MoveAction.
MoveAction.Enable();2. Go to the Update function and replace the existing code with the following instructions:
 void Update()

   {
     Vector2 move = MoveAction.ReadValue<Vector2>();
     Debug.Log(move);
     Vector2 position = (Vector2)transform.position + move * 0.1f;
     transform.position = position;
   }
What do you think that this updated code does? Take a moment to consider before reading on!
Here’s an explanation of your change:
- The first instruction uses ReadValue to get the current value of the Move Action, rather than determining whether or not a key is being pressed as you did with the previous code.
- The value type that is being read is contained within angle brackets (<>) — in this case, it’s a Vector2 value because the input controls movement on two axes.
- The debug log will now print the Vector 2 value in the console.
3. Delete the lines of code that define and enable the LeftMove Input Action.
4. Save your changes and return to the Unity Editor.
5. Enter Play mode to test your changes.
The PlayerCharacter GameObject will now move in all four directions using the MoveAction.
7. More things to try
If you want to further develop your skills, explore new concepts, or improve your project, check out some of the optional activities below. Each one is tagged as either Easy, Medium, or Difficult, so you can choose the level of challenge.
These activities are entirely optional, so if you’re not interested, no problem — just skip this step. We do recommend attempting at least one of them in order to get the most out of this learning experience. Good luck!
Easy: Add an additional composite binding
Try adding an additional composite binding for the Move Action so that your players can use alternative keys (such as the WASD keys) to move the player character.
Medium: Add a binding for gamepad input
If you want to challenge yourself and you have a gamepad available, you could try to add an additional binding for gamepad thumbstick input.
8. Check your script
Take a moment to check that your script is correct before continuing.
PlayerController.cs
Important: If you completed any extension work in your script, this will not be reflected in the reference script below.
using System.Collections;
using System.Collections.Generic;
using UnityEngine;
using UnityEngine.InputSystem;


public class PlayerController : MonoBehaviour
{
   public InputAction MoveAction;


   // Start is called before the first frame update
   void Start()
   {
      MoveAction.Enable();
   }


   // Update is called once per frame
   void Update()
   {
     Vector2 move = MoveAction.ReadValue<Vector2>();
     Debug.Log(move);
     Vector2 position = (Vector2)transform.position + move * 0.1f;
     transform.position = position;
   }
}
9. Next steps
In this tutorial you implemented the player character movement that you’ll use as the foundation for the rest of your game, using an approach that has the potential to support more input devices in the future.
You’ll finish this unit of the 2D Adventure course by making your game frame rate independent, which will improve the player experience of movement.