Scene setup
Tutorial
Beginner
+10XP
30 mins
290
Unity Technologies

In this tutorial, you’ll create a Unity scene that includes your game’s level environment and player character.
1. Overview
In this tutorial, you’ll check out a preview of the game you’re going to build. Then, you’ll configure the foundational elements of your game: you'll create a new scene, add the level art, and choose your desired character model.
2. Preview the finished Haunted House game
Before you start creating, it’ll be helpful to see an example of how your final game might turn out. Check out the video below to see an example or play it yourself in the demo project on Unity Play.
Whether you watched the video or played the game yourself, you probably noticed the following elements of the game:
- A creepy and immersive haunted house environment, decorated with eerie details to enhance the horror experience.
- A fully functional animated character that transitions smoothly between idle and walking animations.
- Camera effects that create a specific atmosphere, adding to the game’s spooky vibe.
- Static enemies that detect and catch the player character when they enter their field of vision.
- Dynamic enemies that patrol different rooms and catch the player character if they’re spotted.
- A win screen that appears when the player character reaches the haunted house exit and a lose screen if they're caught by enemies.
- Distinct audio sources including enemy noises and ambient effects for an immersive soundscape.
- The game is playable on Unity Play and is fully compatible with desktop platforms.
By the end of this course, you’ll have created a game with all of this functionality. If you want to push your skills even further, we’ve included optional challenges that will add more complexity to your game. Also, depending on the choices you make along the way, your game might look and feel very different than the example above.
When you’re done creating your game, you’ll build and publish your project on Unity Play, making it easy to share with friends and family.
But before you can do any of this, the first step is to create a brand new Unity project, which you’ll do next.
3. Create a new project and configure the Unity Editor
To begin creating your game, you’ll first create a new Unity project. Then you’ll set up your Editor workspace to match the tutorials' layout. This will ensure easier navigation and consistency as you follow the next steps.
1. Create a new project:
- From the Unity Hub, create a new project named “Haunted House” using the Universal 3D template on any version of Unity 6.
- If you’re not sure how to do this, follow these instructions on how to create a new project from the Unity Hub.
2. Set the Layout:
- In the upper-right corner of the Unity Editor, open the Layout dropdown and select 2 by 3.
- You can manually resize the windows’ height by clicking and dragging their edges.
- Select the Project window and drag and dock it below the Hierarchy window, then drag it up so that it’s about the same height as the Hierarchy window.
- In the Project window, select the More (⋮) menu in the upper-right corner and select One Column Layout.
This layout is popular among game developers because it allows you to see the Scene view and Game view at the same time.
Note: If the layout gets unintentionally misconfigured, reset it by reselecting 2 by 3.
Your Editor is now optimized for working with the project.
4. Import the project assets
We’ve provided you with the assets you’ll need to complete this project. In this step, you’ll download these assets and add them to your project.

1. Download the assets from the Asset Store:
- In your internet browser, open the Haunted House tutorial assets.
- Select Add to My Assets.
Note: You’ll need to be logged in with your Unity ID.
- When the completion dialog window opens, select Open in Unity.
- The package will open in the Package Manager window in the Unity Editor.
2. Install the package to your project:
- Select Download.
Note: If you haven’t accepted the Asset Store EULA in a while, you’ll need to read and accept it before you can continue.
- Select Import [version] to project.
Note: This course is made for Unity 6.0 or 6.1. You can use either version, just make sure to select the corresponding one at the top of this page.
- Select Import. If the asset package requests to install dependencies, select Install/Upgrade.
- A dialog will open asking you to confirm that this process will overwrite your current project settings. Select Import.
- The Import Unity Package window will open, listing the contents of the package. In the lower-right corner of the window, select Next, then select Import.
The assets are now added to the Assets folder of your Unity project. When this process is completed, close the Package Manager window and continue to the next step.
5. Delete unnecessary files from your Assets folder
Everything you need to complete this project is included in the _3DStealthGame folder that you just imported into the Project window. All of the other files and folders you can see in the Assets folder were generated when you created the project and are not necessary for this course. In this step, you’ll delete all those unnecessary files to stay organized.
1. Delete all of the additional files:
- In the Project window, in the Assets folder, select the first item beneath the _3DStealthGame folder.
- Hold Shift, then select the last item in the Assets folder to multi-select all the unnecessary items (not including the Packages folder).
- Right-click any of the selected items, then select Delete to remove them.
Now the only item in your Assets folder should be the _3DStealthGame folder. This is the folder you’ll be working in throughout this course.
6. Create a new scene
Creating a new scene ensures a clean, organized starting point for your game. In this step, you’ll set up and save a dedicated scene.
1. Create your Main scene:
- In the Project window, right-click the _3DStealthGame folder and select Create > Folder.
- Rename the new folder “Scenes”.
- Select the Scenes folder.
- Right click and then select Create > Scene > Scene, and rename it “Main”.
2. Open the Main scene:
- Double-click Main to open your new scene.
- A dialog stating “Scene(s) have been modified” might appear, referencing the SampleScene. When prompted, select Don’t Save, as you have created a new scene, and this one is no longer needed.
- You should see the name of your scene (Main) appear at the top of the Hierarchy window.
You now have a new scene open, but it’s empty. In the next step, you’ll add an entire level into this empty scene.
7. Add the Level prefab
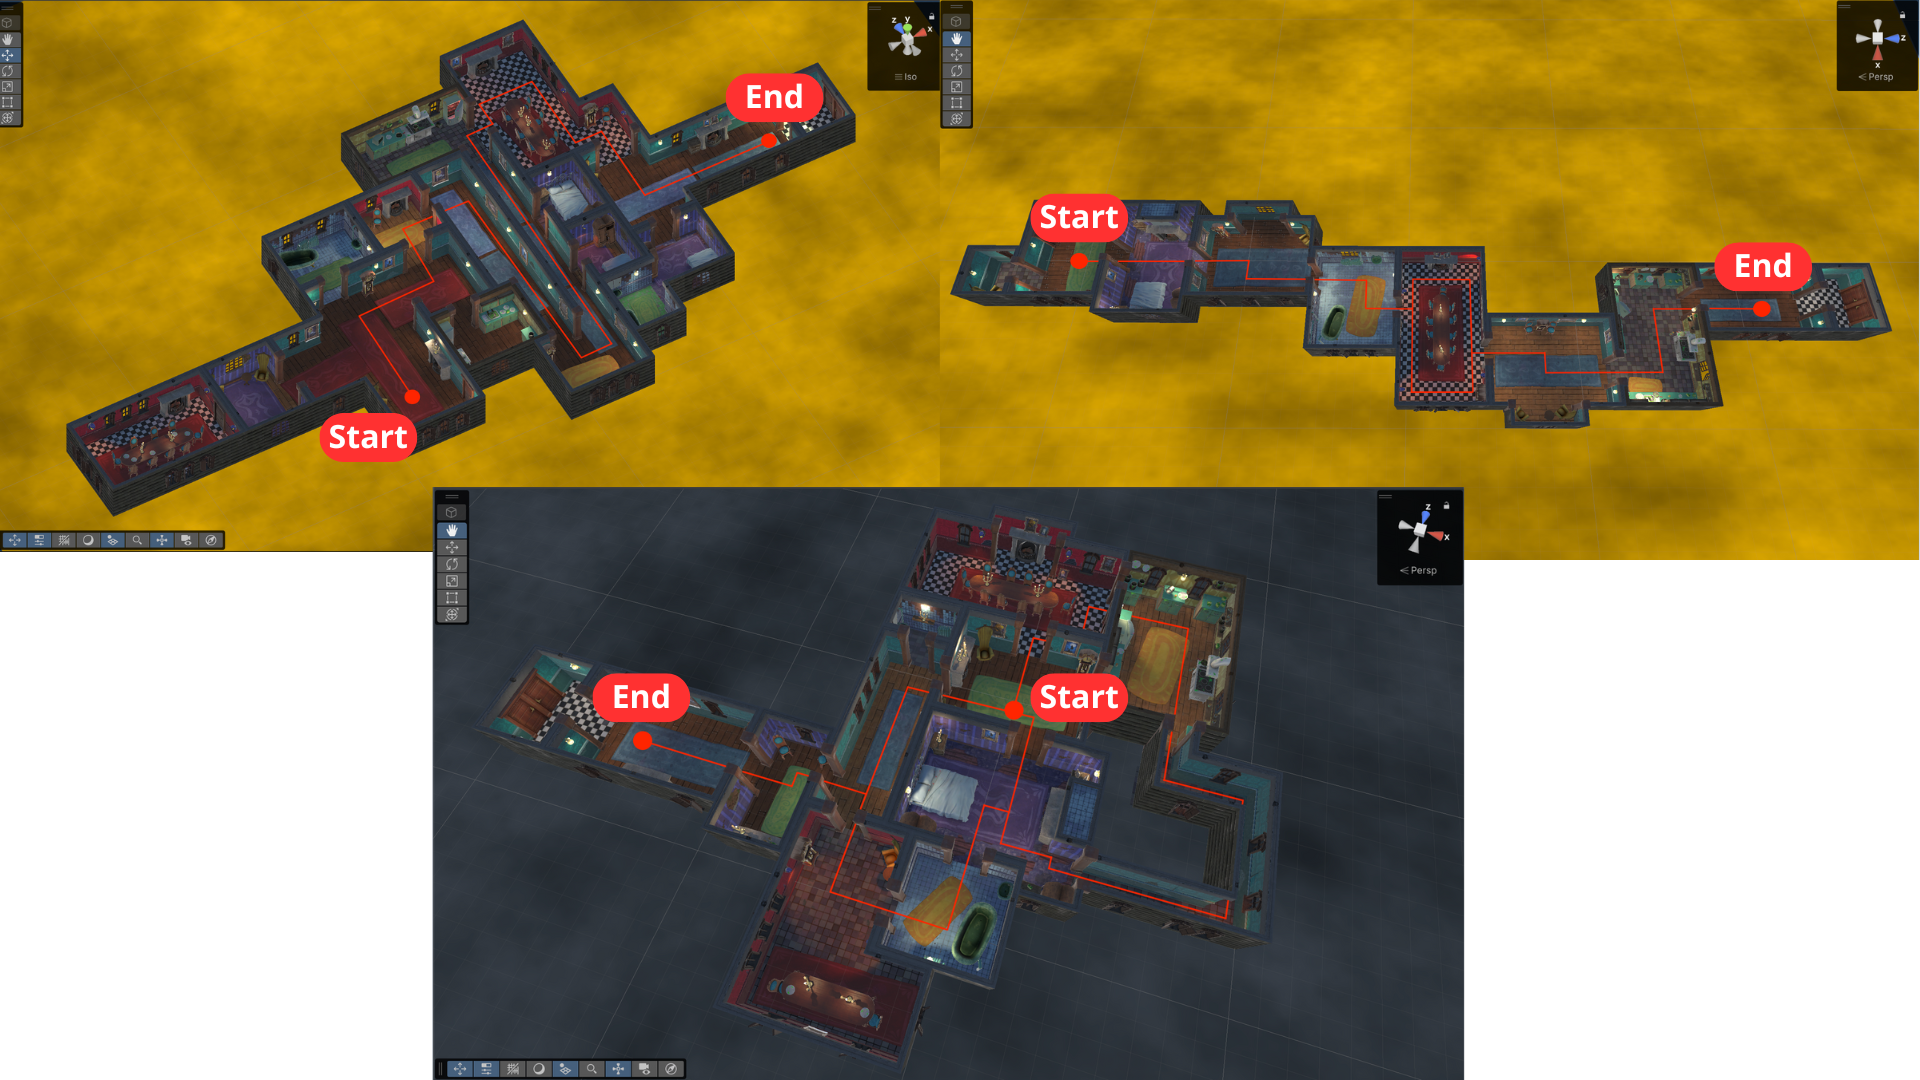
In this step, you'll add a complete level to your scene. You can choose from three premade options, each designed with a different scale and level of complexity:
- Level_A: The largest and most complex level, featuring over 10 rooms to explore as you search for the escape.
- Level_B: A medium-sized level with a narrow corridor that leads to the final destination.
- Level_C: The smallest and simplest option, ideal if you want a more controlled environment to build your game in.

All levels are designed with a clear path in mind: your character begins in the room with a long blue carpet and finishes in a corridor with a black-and-white checkered floor at the end. You’re free to set your own start and end points, but this is the recommended flow based on how the levels were built.
If you’d rather create your own level from scratch, that’s totally possible too—we cover how to do that in the Bonus Features tutorial. But if you want to use our premade options, that’s a great way to get started quickly.
1. Explore the available Level prefabs:
- In the Project window, navigate to _3DStealthGame > Prefabs > Levels and browse the available level prefabs.
- To get a better preview of each level, drag the top of the Preview window up located at the bottom of the Inspector window.
- Select the object’s preview while you drag your mouse to rotate it around, allowing you to view it from different angles.
2. Add your desired Level to your scene:
- Drag the Level_[Variant] prefab into the Hierarchy window.
- Reset its position by setting its Transform component’s Position property to X = 0, Y = 0, and Z = 0.
The level prefab is now centered and ready for further adjustments.
8. Create the player character
The player character is the central GameObject in the game. In this step, you’ll create a Player GameObject, assign a character model, and make sure it’s correctly placed in the scene.
Lucky for you, we have two extremely cute characters you can choose as the main star of your game:
- John Lemon: A little devil with yellow skin who looks like a lemon. He’s always been shy and a bit scared, and his classmates used to tease him at school. But now, he’s doing his best to escape this haunted house.
- Ivan von Vamp: A young vampire and John’s best friend. Unlike John, he’s not shy at all. He’s more of a rebellious spirit, constantly trying to prove that he’s braver than the rest.
1. Create an empty container for your player character:
- In the Hierarchy window, right click (or open the Add (+) dropdown in the upper-left corner) and select Create Empty. This will create a new empty GameObject in your scene.
- Rename it “Player”.
2. Add your desired character model:
- In the Project window, navigate to _3DStealthGame > Art > Models > Characters > Players , inspect the models we have provided using the Preview window, and choose your favorite.
- Drag the [Character]_Model of your choice onto the Player GameObject in the Hierarchy window.
- In the Inspector window, make sure that the Transform component of the [Character]_Model has its Position property set to X = 0, Y = 0, and Z = 0.
Note: Make sure you add the model as a child GameObject of the Player GameObject.
3. Locate your player character at the starting point:
- With the Move Tool selected, position your Player GameObject at the spot where you want the player character to start the game. Make sure the player character doesn’t float above the ground.
Note: If you're using one of the premade levels, we’ve included a designated Start Room inside them—this is our recommended starting location. To find it, switch to top-down view by clicking the Y axis in the Scene Gizmo, then expand your Level_[Variant], locate the Start Room GameObject, select it and press F to focus on it, and place your player there!
You have added your level and player character to scene.
9. Save your scene
You don’t want to lose any of the hard work you’ve done! Regularly save your progress to prevent data loss.
1. Save your project:
- From the main menu, select File > Save or use the shortcut Ctrl+S (macOS: Cmd+S).
Note: You’ll see that after saving your scene, the asterisk (*) that was next to the scene name in the Hierarchy window will disappear.
Your scene is saved with all the above configurations applied.
10. Next steps
With these steps completed, your scene is fully set up and ready for further development.
In the next tutorial, you’ll move on to creating the movement for your player character.