
Branch and merge workstreams with Unity Version Control
Tutorial
Beginner
+10XP
(222)
Unity Technologies
Branches allow you to keep track of separate workstreams that are in progress at the same time. In branches, collaborators can work on separate parts of an application without disturbing one another. Then, branches are merged for the final application.
In this tutorial, you’ll learn how to use Unity Version Control to branch and merge.
1. Overview
On most teams, different members work on separate parts of the project. For example, three programmers might want to work on different systems of the same game simultaneously. However, while each collaborator makes changes and tests them, the project could get messy or even become unusable, which would disrupt everyone! An alternative might be to create very large changesets and check them in only after testing, but then all collaborators lose the benefits of source control to back up their work and keep track of their changes.
Instead, it’s best practice to create a branch for each collaborator’s work. Each branch represents one separate variation of the entire project. In a branch, you can design, debug, and optimize in your own part of the project, and even check in files that aren’t yet working correctly, without affecting your team members. You can also check in small changesets often, which helps with debugging and design. When work on a branch is complete, you can merge it onto the main branch.
2. Before you begin
It is necessary to complete the previous tutorials in this learning experience before continuing with this tutorial. You may also have completed the following tasks:
- Download and install the Unity Version Control Cloud Edition client application.
- Create a Unity Version Control account.
- Create a new workspace and repository.
- Check in a simple Unity project into the repository.
- Make a few additional changesets to the repository.
- Invite a collaborator to share your repository.
- Update your workspace with incoming changes from a collaborator.
3. Create a branch
You can use the Unity Editor’s Unity Version Control window or the Unity Version Control app to create a branch.
Follow these instructions to create a branch from inside the Unity Editor:
1. For this exercise, add a sphere to your scene (GameObject > 3D Object > Sphere), move it to a different location (away from 0,0,0), and check in a changeset with the comment “Added sphere.”
2. If the Branches tab is not showing in the Unity Version Control window, select the Branch button and then select Branches.
3. In the Branches tab, select the main branch. (It is probably the only one listed.)
4. Right-click and select Create child branch.
5. For this exercise, name your branch “Sphere”, and add any comment you want. Keep Switch workspace to this branch enabled. Select Create.
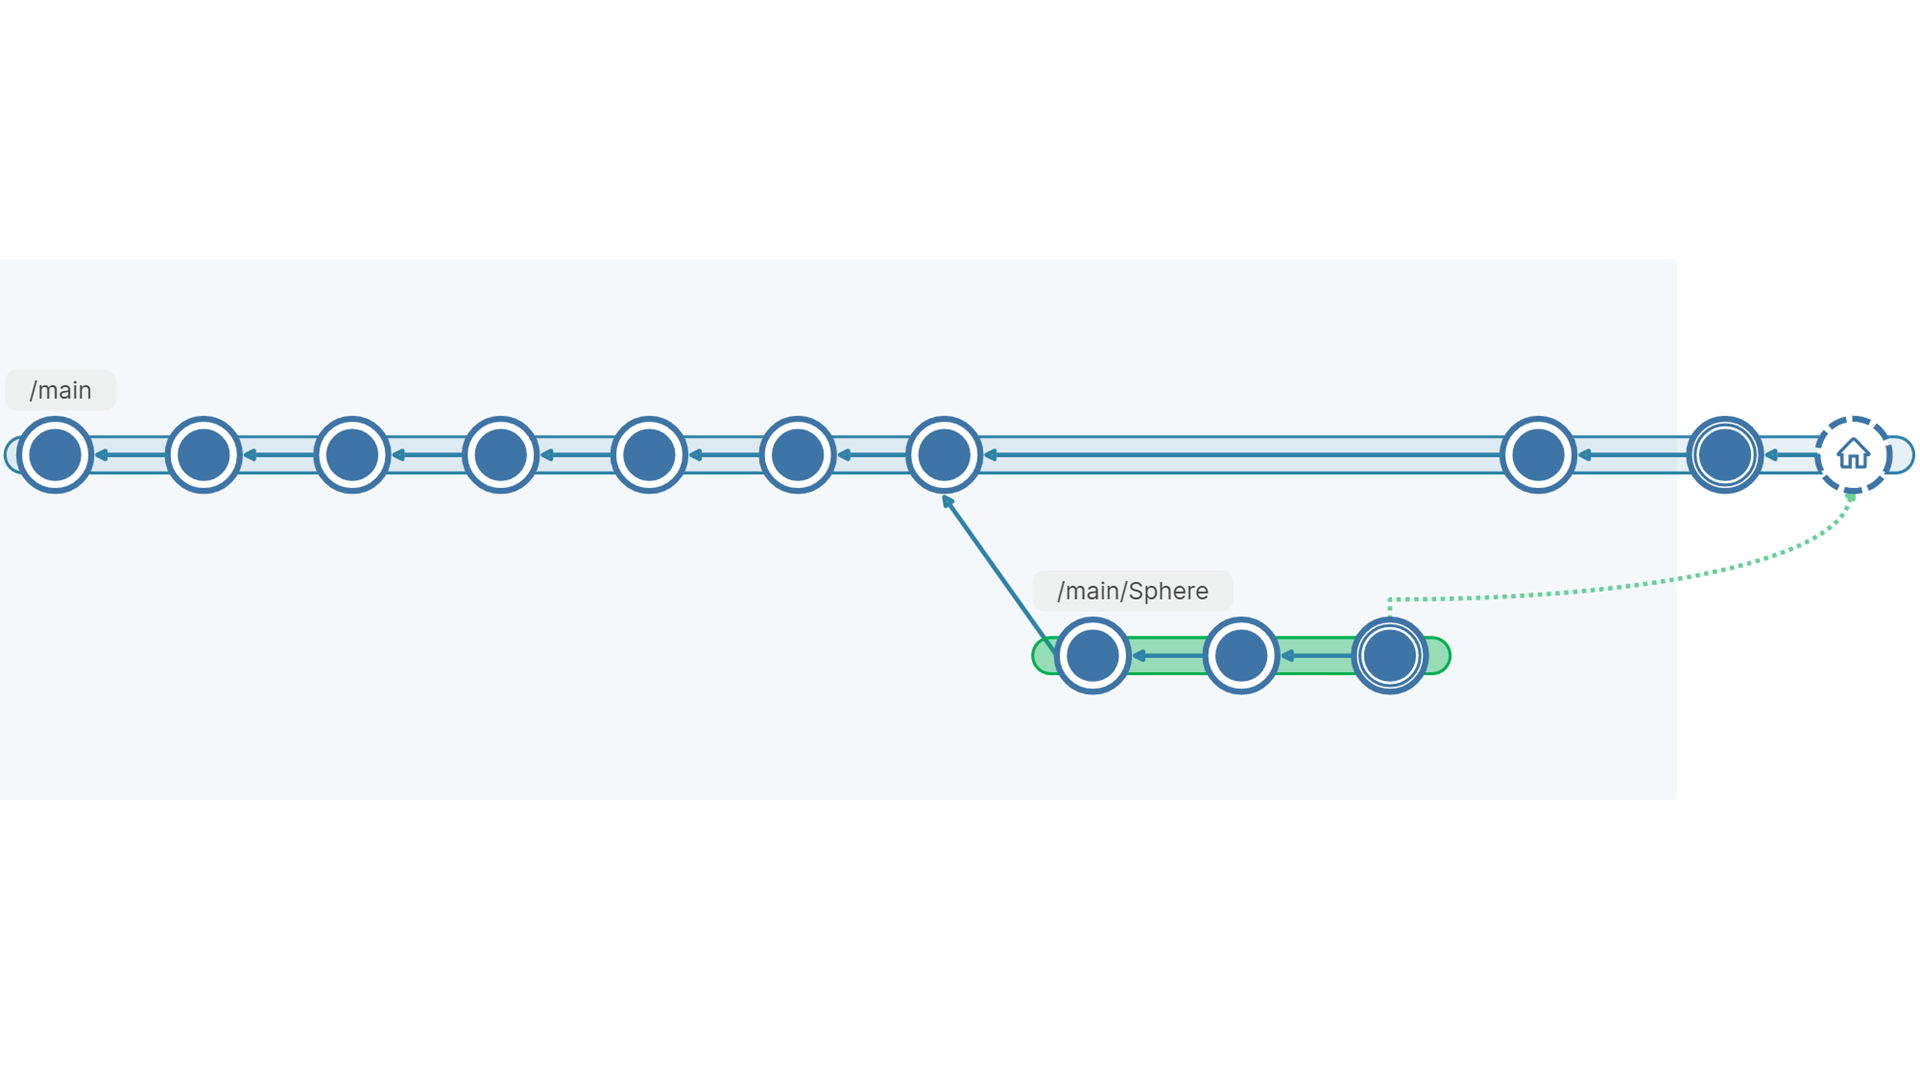
6. Select the Branch button again to open the Unity Version Control app, and open the Branch Explorer. After you refresh this window, you’ll see your new branch represented in the diagram. The home icon should be on the branch. The branch doesn’t have any nodes on it because you haven’t checked in any changes yet.
4. Add changesets to a branch
Next, you’ll add changesets to your branch. For this exercise, we’ll keep the changesets very simple so that you’ll be able to easily observe the merging process later.
For best results, follow these instructions exactly to add some simple changesets to your branch:.
1. Move the sphere to a noticeably different location and check in your changes.
2. Resize the sphere to a noticeably different size and check in your changes.
3. As you add changesets to your branch, you’ll see it expand in the Branch Explorer. (Remember to refresh the view.)
4. Now switch your workspace back to the last changeset of the main branch. In the Unity Editor, go to the Changesets tab, select the last (topmost) changeset that is not on the branch, and right-click to select Switch workspace to this changeset.
5. Now add a cube to your scene (GameObject > 3D Object > Cube), move it to a different location (away from 0,0,0).
6. Move the sphere to a different location from the one you used in the Sphere branch. Make the change noticeable.
7. Check in a changeset with the comment “Added cube, moved sphere”
Your Branch Explorer will look something like this:
Imagine that you have been working on the new branch, and your collaborator has been working on the main branch. Next, you’ll merge your branch back onto the main branch, and see all the changes together.
5. Merge a branch
Next, merge your branch back onto the main branch so that everyone on your team can see your progress and view all changes together:
1. In the Branch Explorer, make sure that the home icon is on the last changeset of the main branch. If it isn’t, select that node, right-click, and select Switch workspace to this changeset. Accept any prompts from both Unity Version Control and the Unity Editor.
2. In the Branch Explorer, select the bar behind the changeset nodes of the branch — this bar represents the entire branch.
3. Right-click and select Merge from this branch. The following message will appear:
Why is this occurring? Because your changes in both the Sphere branch and the main branch changed the same file: the scene file. Since the scene file stores a lot of information about the GameObjects in a scene, you will frequently see conflicts in this file.
6. Resolve a conflict
To continue this merge, you’ll have to tell Unity Version Control which changes you want to keep.
Follow these instructions to resolve the conflict and complete the merge:
1. Select Resolve conflicts.
Note: If an error appears that states the merge tools are incorrectly defined, select Preferences > Merge Tools and change the path to your Unity installation folders.
When the GameObjects that are changed in one branch are completely different from the ones changed in the other branch, then Unity Version Control will be able to resolve conflicts automatically. In that case, you’ll see a message to that effect and continue.
In this case, you resized the sphere in one branch, and you added a cube in one branch — these changes are not in conflict. But you changed the position of the sphere in both branches, so you’ll have to resolve that conflict manually.
The following information screen will appear. Let’s examine it.
2. Close the information window, and look at the Mergetool window behind it. Here, you’ll see three columns:
- Blue: The scene file from the Sphere branch
- Yellow: The scene file as it was before the branch
- Green: The scene file from the main branch
The line that differs in any of these three files is highlighted.
3. Scroll up in the Mergetool to find the GameObject: section and the m_Name: line in that section. This will be the name of the sphere.
In other cases, if you have multiple conflicts to resolve in the scene file, it will help to be able to identify each GameObject that has a conflict.
4. Scroll back down to the highlighted line, and notice the bottom pane of the Mergetool window. This is your result file. By default, all three lines are listed, but specifying three different positions for the sphere would cause an error in your scene file.
5. To resolve the error, deselect the base and destination (yellow and green) versions by toggling the colored bars at the top of the panes. In the example below, we’ve selected the location in the Sphere branch, because the purpose of the branch was to work on the sphere. Note that there is only one line, the blue line, highlighted in the result file.
6. At the top of the Mergetool, select Save & exit.
In the Unity Version Control window, you’ll see a message like the following:
7. Select Apply changes, then select the Pending Changes tab in the Unity Version Control app. The file in which you resolved conflicts is now a pending change. The Unity Version Control app also shows you the difference between your repository and your workspace.
8. Enter a comment for this changeset and select Checkin.
9. Open the Branch Explorer to see the result of the merge.
In the Unity Editor, you’ll see the cube that you created in the main branch along with the sphere you changed in the Sphere branch.
About conflicts
In the exercise above, we specifically set up a conflict that would be easy to resolve. Your own conflicts might not be so easy. Here are some tips to help you avoid and resolve conflicts:
- Plan your branches to avoid conflicts. In each branch, have collaborators work on separate GameObjects, assets, and scripts.
- When you have multiple conflicts in the scene file, read the lines of the file carefully. They are similar to reading the properties in the Inspector. With the Mergetool you can examine each conflict and resolve it.
7. Getting started with Unity Version Control
If you want to learn more about version control in Unity, watch this introductory video. You’ll learn how to set up your own repository, invite collaborators, and check in changes to your project.
If you want to ensure your team collaboration is smooth and efficient, make sure to check out the: Best practices for project organization and version control guide (Unity 6 edition).
8. More things to try
This learning experience is just enough to get your started with Unity Version Control. There are many more features to explore!
Unity Version Control in the Unity Editor provides a simplified workflow called Transparent SCM. Read more about the transparent workflow in the Unity Version Control (formerly Plastic SCM) documentation.
The full Unity Version Control client application provides more advanced features for any of your source control needs. To learn more, read a primer on Unity Version Control (Plastic SCM) workflows in the client app and command line interface.
For advanced use of Unity Version Control, review all of their documentation on the Unity Version Control (formerly Plastic SCM) website.