Audio
Tutorial
·
Beginner
·
+10XP
·
30 mins
·
(2550)
Unity Technologies

Now you’re ready to add the finishing touches to your game with engaging audio.
In this tutorial, you’ll:
- Explore the different kinds of audio that can be used in a game
- Add a soundtrack and range of audio effects
- Write a script to control the use of audio in your game
Once you’ve completed this tutorial, your game will be finished and you’ll be ready to create a build!
Languages available:
1. Audio
Now you’ve filled your level with enemies to make JohnLemon’s escape a challenge, but when you tested the game it was a little quiet. In this tutorial, you’ll add the finishing touches to your game with a range of spooky audio to enhance the atmosphere.
There are two different kinds of audio you will be using in this tutorial:
- Non-diegetic sound, which has no identifiable source (for example, a soundtrack)
- Diegetic sound, which has an identifiable source (for example, the sound of a gun firing)
Let’s start by adding non-diegetic audio to your game!
2. A Primer on Audio in Unity
Before you begin to add audio to your game, let’s quickly explore how audio works in Unity. There are three main parts: Audio Clips, Audio Sources and the Audio Listener.
- Audio Clips are Assets such as MP3s which contain all the data specific to a particular sound.
- Audio Sources are components which act as the origin of a sound in the game world. Most things that make sound in a game should have an Audio Source Component, so that the sound has a location.
- The Audio Listener is a single component in a Scene that works like the virtual ears of the player (in the same way that the Camera component works like the virtual eyes of the player). By default, the Audio Listener Component is on the Main Camera.
These different parts generally work together as follows: an Audio Source plays an Audio Clip, and if the Audio Listener is close enough to the Audio Source then the sound is heard.
The spatial blend of a particular Audio Source determines whether it sounds like it’s coming from a particular point in the game world, or if it is equally loud no matter the distance between the source and the Audio Listener.
You’re starting with non-diegetic audio. Since this sound doesn't have an origin, its spatial blend is set to 2D. When the spatial blend is set to be purely 2D, distance between the Audio Source and the Audio Listener does not affect the volume. It is called 2D because it can still pan left and right using the Stereo Pan setting. If an Audio Source’s spatial blend is set to purely 3D, the volume will vary with distance to the Audio Listener. Values between 2D and 3D vary the strength of this effect.
3. What is Non-Diegetic Audio?
Non-diegetic audio (audio without an identifiable source) can have a big impact on your game and the experience for players. Think about the games you have enjoyed playing and how they use these sounds to create a particular atmosphere — how do they make you feel? What about them is particularly effective?
You’re going to add three non-diegetic sounds to your game:
- An ambient track which will loop and give a general atmosphere to the haunted house
- A sound effect which plays when JohnLemon gets caught
- A sound effect which plays when JohnLemon manages to escape
4. Create Audio Sources for your Game
First, create some Audio Sources for your game:
1. In the Hierarchy window, click on the Create menu and select Create Empty. Rename the GameObject “Ambient”.
2. In the Inspector, set the position of Ambient to (0, 0, 0).
The position of the GameObject doesn’t technically matter, since the volume of the audio will be the same wherever it is. However, it is always helpful to keep your GameObjects organised positionally in case this matters later.
3. Next, you need to add an Audio Source component. Normally you would do this with the Add Component button, but when you want to assign an Audio Clip as well there is a shortcut you can use.
In the Project window, go to Assets > Audio. Drag the SFXHouseAmbience Audio Clip from the Project window onto the Inspector window to create an Audio Source component and automatically assign it as the AudioClip.
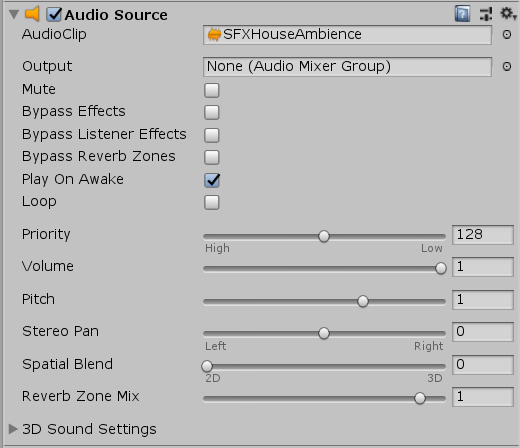
4. The Spatial Blend property has already been set fully to 2D, so you don’t need to change it. Play On Awake has also been enabled by default. This means that as soon as the level starts, the audio will start playing.
5. However, by default it will stop after a single run through. Enable the Loop checkbox to loop the ambient track for your game.
6. Now your haunted house has some creepy background sound! Enter Play Mode and test that the audio plays properly.
7. You should hear the audio, but it’s a bit loud compared to the other sounds you’ll add in this tutorial. Exit Play Mode so you can adjust this.
8. In the Inspector, set the Volume property of the Audio Source Component to 0.5.
5. Duplicate your Audio Source
Rather than repeat this process for the two game ending sound effects, let’s be more efficient and duplicate the GameObjects then change the settings as appropriate.
1. In the Hierarchy window, select the Ambient GameObject. Duplicate it twice with the shortcut Ctrl + D (Windows) or CMD + D on (macOS). Rename the first copy “Escape” and the second “Caught”.
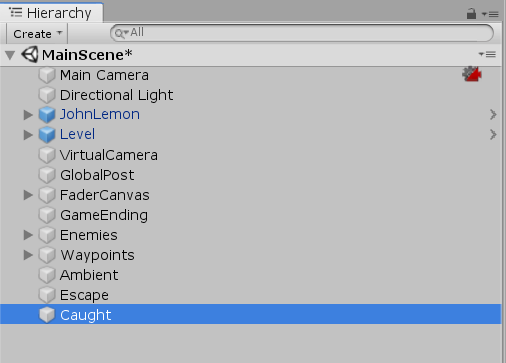
2. The only difference between these two sound effects will be the AudioClip used; their settings are exactly the same.
In the Hierarchy window, press Ctrl (Windows) or CMD (macOS) and click on the Escape and Caught GameObjects. This enables you to edit them both together.
3. These noises shouldn’t play straight away or loop. They also need to be heard over the other sounds in the game, so should be louder than the ambient audio.
With both Escape and Caught GameObjects selected:
- Disable the Play On Awake checkbox
- Disable the Loop checkbox
Set the Volume value to 1
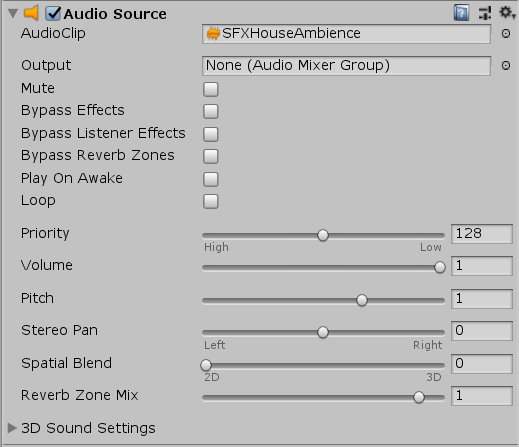
Now that you have their common settings adjusted, you can set the AudioClip for each.
4. Select the Escape GameObject and set the AudioClip for its Audio Source Component to SFXWin, either by dragging it from the Project window or by using the circle select button.
5. Select the Caught GameObject and set the AudioClip for its Audio Source Component to SFXGameOver, either by dragging it from the Project window or by using the circle select button.
Now you’ve set up your non-diegetic Audio Sources, but before you move on to implementing the Escape and Caught sounds let’s tidy the Audio Sources under a single parent.
6. Tidy up your Audio Sources
To tidy up your Audio Sources:
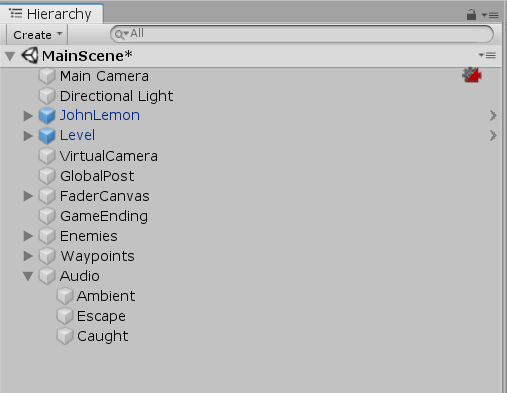
1. In the Hierarchy window, create an empty GameObject. Rename it to “Audio”.
2. Select the Ambient, Escape and Caught GameObjects in the Hierarchy window, by holding Ctrl (Windows) or CMD (macOS) and clicking on each of them.
3. Drag the selected GameObjects onto the Audio GameObject, to make it their parent.
7. Return to your GameEnding script
Now you’ve tidied up, let’s move on to implementing the game ending sounds in the GameEnding script.
In the Project window, open the Assets > Scripts folder and double click on the GameEnding script to open it for editing.
When you last finished the GameEnding script, it looked like this:
using System.Collections;
using System.Collections.Generic;
using UnityEngine;
using UnityEngine.SceneManagement;

public class GameEnding : MonoBehaviour
{
    public float fadeDuration = 1f;
    public float displayImageDuration = 1f;
    public GameObject player;
    public CanvasGroup exitBackgroundImageCanvasGroup;
    public CanvasGroup caughtBackgroundImageCanvasGroup;

    bool m_IsPlayerAtExit;
    bool m_IsPlayerCaught;
    float m_Timer;

    void OnTriggerEnter (Collider other)
    {
        if (other.gameObject == player)
        {
            m_IsPlayerAtExit = true;
        }
    }

    public void CaughtPlayer ()
    {
        m_IsPlayerCaught = true;
    }

    void Update ()
    {
        if (m_IsPlayerAtExit)
        {
            EndLevel (exitBackgroundImageCanvasGroup, false);
        }
        else if (m_IsPlayerCaught)
        {
            EndLevel (caughtBackgroundImageCanvasGroup, true);
        }
    }

    void EndLevel (CanvasGroup imageCanvasGroup, bool doRestart)
    {
        m_Timer += Time.deltaTime;
        imageCanvasGroup.alpha = m_Timer / fadeDuration;

        if (m_Timer > fadeDuration + displayImageDuration)
        {
            if (doRestart)
            {
                SceneManager.LoadScene (0);
            }
            else
            {
                Application.Quit ();
            }
        }
    }
}
8. Update your GameEnding Script to Play Audio
You need to add the functionality of playing an Audio Source when the EndLevel method is called. There are two different Audio Sources that could play, so you will need a reference to each. Remember: the EndLevel method is called every frame in Update. You don’t want the Audio Sources to keep playing, so you’ll need a way of stopping it after the first time.
Let’s get started by adding your Audio Source references:
1. Below the exitBackgroundImageCanvasGroup variable declaration, add the following code:
public AudioSource exitAudio;2. Below the caughtBackgroundImageCanvasGroup variable declaration, add the following:
public AudioSource caughtAudio;3. Next, you need to create a variable to make sure the audio only plays once. A bool variable will be false by default, when you want to play the audio you can check it’s false and play the audio, setting it to true once it has.
Below the m_Timer variable declaration, add the following:
bool m_HasAudioPlayed;
9. Adjust your Method to use the New Variables
Now let’s use these new variables:
1. Since the game should play a different Audio Source depending on whether JohnLemon was caught or escaped, you need to add another parameter to the EndLevel method. Change the EndLevel method signature to the following:
void EndLevel (CanvasGroup imageCanvasGroup, bool doRestart, AudioSource audioSource)2. Your calls to EndLevel no longer have the correct parameters passed to them — they now need and AudioSource as well. Change the first EndLevel method call to the following:
EndLevel (exitBackgroundImageCanvasGroup, false, exitAudio);3. Change the second EndLevel method call to the following:
EndLevel (caughtBackgroundImageCanvasGroup, true, caughtAudio);The method calls are correct again, but currently your EndLevel method doesn’t do anything with its new parameter.
10. Make Sure the Audio Only Plays Once
The audio should play regardless of how far through the timer is, so it makes sense to have the audio code at the start of the EndLevel method. You also only want the audio to play if it hasn’t already played, so you need to put it within an if statement checking that.
1. Add the following to the start of the EndLevel method:
   if(!m_HasAudioPlayed)
        {

        }
The exclamation mark means negate whatever is to the right of it. That means that the code within the if statement will only be executed if the audio has not played.
2. The first thing you need to do within this if statement is play the audio. To play the Audio Clip assigned to an Audio Source, call the Audio Source’s Play method as follows:
audioSource.Play();4. Because you only want the audio to play once, you now need to set the value of m_HasAudioPlayed to true. This will mean that the code in the if statement isn’t called again. Within the if statement below the Play method call, add the following:
m_HasAudioPlayed = true;5. You’ve now finished editing the GameEnding script. It should look like this:
using System.Collections;
using System.Collections.Generic;
using UnityEngine;
using UnityEngine.SceneManagement;

public class GameEnding : MonoBehaviour
{
    public float fadeDuration = 1f;
    public float displayImageDuration = 1f;
    public GameObject player;
    public CanvasGroup exitBackgroundImageCanvasGroup;
    public AudioSource exitAudio;
    public CanvasGroup caughtBackgroundImageCanvasGroup;
    public AudioSource caughtAudio;

    bool m_IsPlayerAtExit;
    bool m_IsPlayerCaught;
    float m_Timer;
    bool m_HasAudioPlayed;

    void OnTriggerEnter (Collider other)
    {
        if (other.gameObject == player)
        {
            m_IsPlayerAtExit = true;
        }
    }

    public void CaughtPlayer ()
    {
        m_IsPlayerCaught = true;
    }

    void Update ()
    {
        if (m_IsPlayerAtExit)
        {
            EndLevel (exitBackgroundImageCanvasGroup, false, exitAudio);
        }
        else if (m_IsPlayerCaught)
        {
            EndLevel (caughtBackgroundImageCanvasGroup, true, caughtAudio);
        }
    }

    void EndLevel (CanvasGroup imageCanvasGroup, bool doRestart, AudioSource audioSource)
    {
        if (!m_HasAudioPlayed)
        {
            audioSource.Play();
            m_HasAudioPlayed = true;
        }

        m_Timer += Time.deltaTime;
        imageCanvasGroup.alpha = m_Timer / fadeDuration;

        if (m_Timer > fadeDuration + displayImageDuration)
        {
            if (doRestart)
            {
                SceneManager.LoadScene (0);
            }
            else
            {
                Application.Quit ();
            }
        }
    }
}
6. Save the script and return to Unity.
7. The final step is to set the references that you added to the GameEnding script. In the Hierarchy window, select the GameEnding GameObject.
8. In the Inspector, use the circle select button to set the Exit Audio field to Escape and the Caught Audio field to Caught.
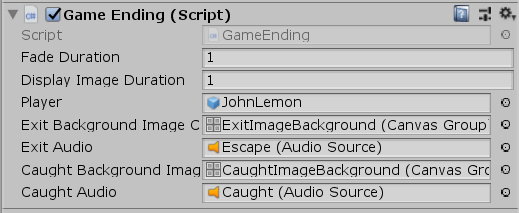
That’s it — you’ve finished the non-diegetic audio!
11. Add in Footsteps Audio
Now you need to implement the audio where you can identify the source. Let’s start with footsteps:
1. In the Hierarchy window, select the JohnLemon GameObject.
2. In the Inspector, add an AudioSource component.
3. Use the circle select button to set the AudioClip property to SFXFootstepsLooping.
4. Despite this being a diegetic sound, you should still use a Spatial Blend of fully 2D so the volume doesn’t vary as JohnLemon moves about — the default setting is fine.
5. You do not want the audio to play as soon as the scene starts as JohnLemon starts stationary. Disable the Play On Awake checkbox.
6. You do want the sound to keep playing until you tell it to stop, so it needs to loop. Enable the Loop checkbox.
Just as you did before, you now need to edit a script so you can play the audio whenever you want.
12. Return to your PlayerMovement Script
To enable the footsteps audio, you’re going to edit your PlayerMovement script. Double click on the Script property of the PlayerMovement component to open the PlayerMovement script for editing.
When you last finished the PlayerMovement script, it looked like this:
using System.Collections;
using System.Collections.Generic;
using UnityEngine;

public class PlayerMovement : MonoBehaviour
{
    public float turnSpeed = 20f;

    Animator m_Animator;
    Rigidbody m_Rigidbody;
    Vector3 m_Movement;
    Quaternion m_Rotation = Quaternion.identity;

    void Start ()
    {
        m_Animator = GetComponent<Animator> ();
        m_Rigidbody = GetComponent<Rigidbody> ();
    }

    void FixedUpdate ()
    {
        float horizontal = Input.GetAxis ("Horizontal");
        float vertical = Input.GetAxis ("Vertical");

        m_Movement.Set(horizontal, 0f, vertical);
        m_Movement.Normalize ();

        bool hasHorizontalInput = !Mathf.Approximately (horizontal, 0f);
        bool hasVerticalInput = !Mathf.Approximately (vertical, 0f);
        bool isWalking = hasHorizontalInput || hasVerticalInput;
        m_Animator.SetBool ("IsWalking", isWalking);

        Vector3 desiredForward = Vector3.RotateTowards (transform.forward, m_Movement, turnSpeed * Time.deltaTime, 0f);
        m_Rotation = Quaternion.LookRotation (desiredForward);
    }

    void OnAnimatorMove ()
    {
        m_Rigidbody.MovePosition (m_Rigidbody.position + m_Movement * m_Animator.deltaPosition.magnitude);
        m_Rigidbody.MoveRotation (m_Rotation);
    }
}
13. Update your PlayerMovement script to play audio
You now need to edit your script, so the footsteps play when JohnLemon is walking and stop when he is still.
The first thing you will need is a reference to the Audio Source Component you just added to JohnLemon
1. Below the m_Rigidbody variable declaration, add the following code:
AudioSource m_AudioSource;Since this isn’t a public variable, you won’t be able to assign it in the Inspector window. Instead, you will need to assign it in code like you did with the Animator and Rigidbody Components.
2. In the Start method, after the m_Animator and m_Rigidbody variables are assigned their references, add the following code:
m_AudioSource = GetComponent<AudioSource>();That’s it! Next you need to use this reference to the Audio Source component.
14. Adjust your Method to use the New Variables
Luckily, you already have a variable created in the FixedUpdate method called isWalking. This will work perfectly for playing and stopping the footsteps sound:
1. Below the SetBool method call on the Animator component, add the following if-else statement:
     if(isWalking)
        {

        }
        else
        {

        }
You can now call Play on the Audio Source if isWalking is true, and Stop on the Audio Source if it is false.
2. You don’t want to keep calling Play every frame, only if the Audio Source isn’t already playing. To make sure it doesn’t call every frame, add the following if statement within the if statement you just added:
   if(!m_AudioSource.isPlaying)
            {

            }
3. Now add the call to the Play method to the if statement:
m_AudioSource.Play ();4. To stop the Audio Source from playing, add the following code to the else statement:
m_AudioSource.Stop ();5. Check that your completed PlayerMovement script looks like this:
using System.Collections;
using System.Collections.Generic;
using UnityEngine;

public class PlayerMovement : MonoBehaviour
{
    public float turnSpeed = 20f;

    Animator m_Animator;
    Rigidbody m_Rigidbody;
    AudioSource m_AudioSource;
    Vector3 m_Movement;
    Quaternion m_Rotation = Quaternion.identity;

    void Start ()
    {
        m_Animator = GetComponent<Animator> ();
        m_Rigidbody = GetComponent<Rigidbody> ();
        m_AudioSource = GetComponent<AudioSource> ();
    }

    void FixedUpdate ()
    {
        float horizontal = Input.GetAxis ("Horizontal");
        float vertical = Input.GetAxis ("Vertical");

        m_Movement.Set(horizontal, 0f, vertical);
        m_Movement.Normalize ();

        bool hasHorizontalInput = !Mathf.Approximately (horizontal, 0f);
        bool hasVerticalInput = !Mathf.Approximately (vertical, 0f);
        bool isWalking = hasHorizontalInput || hasVerticalInput;
        m_Animator.SetBool ("IsWalking", isWalking);

        if (isWalking)
        {
            if (!m_AudioSource.isPlaying)
            {
                m_AudioSource.Play();
            }
        }
        else
        {
            m_AudioSource.Stop ();
        }

        Vector3 desiredForward = Vector3.RotateTowards (transform.forward, m_Movement, turnSpeed * Time.deltaTime, 0f);
        m_Rotation = Quaternion.LookRotation (desiredForward);
    }

    void OnAnimatorMove ()
    {
        m_Rigidbody.MovePosition (m_Rigidbody.position + m_Movement * m_Animator.deltaPosition.magnitude);
        m_Rigidbody.MoveRotation (m_Rotation);
    }
}
6. Save the script and return to Unity.
15. Move the Audio Listener to JohnLemon
The final piece of audio for your game is spooky sounds that Ghosts will make as they move past. This will not only develop the atmosphere, it will also help the player identify how close danger is.
One challenge is that the Ghosts won’t get louder as they get closer to JohnLemon, they’ll get louder as they get closer to the camera. This is because the Audio Listener is on the Main Camera by default. The first step is to change this.
To move the Audio Listener component to the JohnLemon GameObject:
1. In the Hierarchy, select the Main Camera GameObject.
2. In the Inspector, click on the Audio Listener component’s context menu and select Remove Component.

3. In the Hierarchy, select the JohnLemon GameObject.
4. In the Inspector, add an Audio Listener component to JohnLemon.
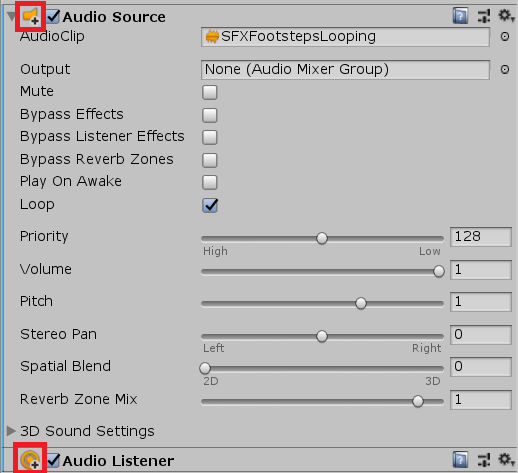
16. Update the JohnLemon Prefab
The changes you have made to JohnLemon in this tutorial have all been made to an instance of the JohnLemon prefab.
The new components that you have added have a + over their icon, to show that they have been added in the Prefab instance. If you were to instantiate another JohnLemon, these audio components wouldn’t be there.
You can fix this by applying these changes to the JohnLemon Prefab:
1. In the Hierarchy, select the JohnLemon GameObject.
2. In the Inspector, find the Overrides drop-down menu at the top of the window.

The Overrides drop-down shows you all the ways that the JohnLemon instance is different from the JohnLemon Prefab.
3. Click on the drop-down menu to see the changes.
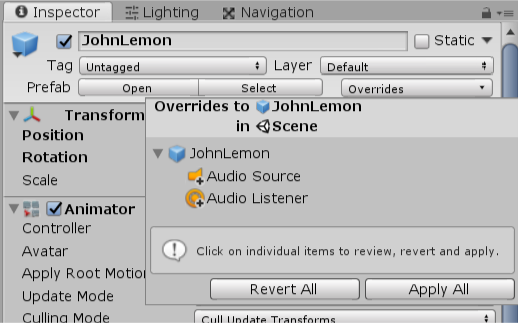
You have two added components: an Audio Source and an Audio Listener. Let’s make these changes part of the JohnLemon Prefab.
4. Click the Apply All button at the bottom of the Overrides dropdown.
17. Add an Audio Source to the Ghosts
Now that the JohnLemon Prefab has an Audio Listener, all the Ghosts audio will have a volume relative to JohnLemon’s position. This will make it much easier for the player to identify how close they are. Now let’s add audio to the Ghosts:
1. In the Hierarchy window, expand the Enemies GameObject.
2. Select one of the Ghost GameObjects. Use the arrow shortcut next to its name to open the Prefab for editing.
3. In the Project window, expand the Assets > Audio folder and find the SFXGhostMove Audio Clip.
4. Drag the SFXGhostMove Audio Clip from the Project window onto the Ghost GameObject in the Hierarchy window.
5. In the Inspector window, find the Audio Source component.
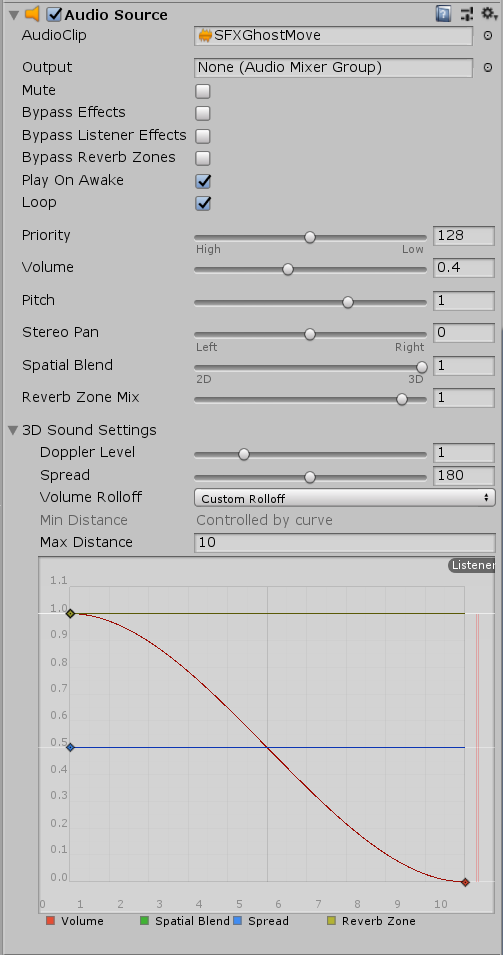
6. To stop the volume level from being overwhelming and make sure it varies depending on the distance from JohnLemon:
- Enable the Loop property checkbox
- Set the Volume property to 0.4
- Set the Spatial Blend to 1, so that it is fully 3D
That’s the basics sorted!
18. Adjust the 3D Sound Settings features
Let’s adjust a couple of advanced features to really make your Ghosts sound really great:
1. In the Audio Source component, expand the 3D Sound Settings section.
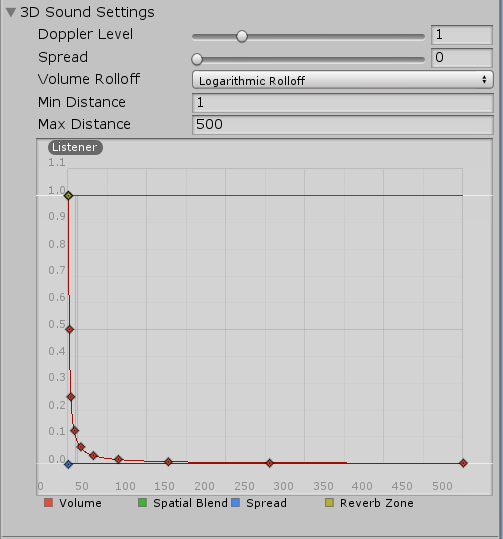
The 3D Sound Settings control how the audio varies with distance from the Audio Listener.
2. Change the Max Distance property to 10. Setting the Max Distance to 10 will mean that when a Ghost is 10 meters away the player will be able to hear them, but very quietly.
3. The way that the volume changes with distance is controlled by the Volume Rolloff. Currently this is set to Logarithmic Rolloff, which works well for longer distances. Since your Max Distance is now only 10, change the Volume Rolloff to Custom Rolloff.
4. The default custom curve is just right for this game, so there’s no need to adjust this..
However, there’s one final thing to fix before you’re done.
19. Correct the Direction of the Ghost Sound Effect
You put the Audio Listener Component on JohnLemon, but there’s a small problem — when JohnLemon turns, the Audio Listener turns with him. This means that when the JohnLemon is facing towards the screen, the player’s virtual eyes (the Camera) and the player’s virtual ears (the Audio Listener) will be facing different directions. Because of this, the Ghosts will sound like they’re on the opposite side.
Let’s use a combination of two properties to make the Ghost’s sound seem directionless but still get louder as Ghosts get closer:
1. The SFXGhostMove Audio Clip has been set to play Mono instead of Stereo. This means that the sound is identical through the left and right channels. (If you want to see the Import Settings, find it in Assets > Audio and select the clip to view its settings.)
2. In the Audio Source for the Ghost Prefab, find the 3D Sound Settings. The Spread property controls the range in degrees that a sound seems like it is coming from.
3. Set the Spread property to 180. This means that half the sound will come from each channel — and since these channels are the same, the audio will seem directionless.
4. Save the Ghost Prefab and return to the Scene.
5. Save the Scene.
Your game is now finished! Congratulations! Make sure to give your game a test, to see what it will be like for players.
20. Summary
In this tutorial, you explored the basics of audio in Unity through adding an ambient soundtrack and sound effects to your game. Your game is now complete! There’s one more thing to do: in the final tutorial, you’ll create a build of the game so you can distribute it.