Challenge: Complete Clive’s Quest
Exercise
Beginner
+10XP
60 mins
Unity Technologies

You are ready to create Clive’s next adventure! In this challenge, you will create a third Scene of your own. This challenge will test your ability to apply the following visual scripting skills:
- Create visual scripts for common game mechanics.
- Adapt existing visual scripts for other purposes.
- Create and use subgraphs in a visual script.
- Given a desired result, code an appropriate visual script.
You can also challenge yourself to apply the following new skills:
- Apply custom events in visual scripts.
- Create a State Machine in a visual script.
Materials
Languages available:
1. Overview
In this challenge, you will script Clive’s next conundrum. Your task is to invent your own puzzle for Clive to solve in three rooms of a new scene. You’ll use a custom Level editor to add obstacles, controls, inventory items, and pushable objects to your scene.
When you’re finished, we encourage you to publish your project and post it in our gallery to share with others who are learning Visual Scripting with Clive the Cat!
2. Preview the challenge Scene
Follow these instructions to preview the Scene in which you’ll be working:
1. Open the scene at Assets > UnityTechnologies > VisualScriptingTutorial > Tutorial > Scenes > ChallengeScene.

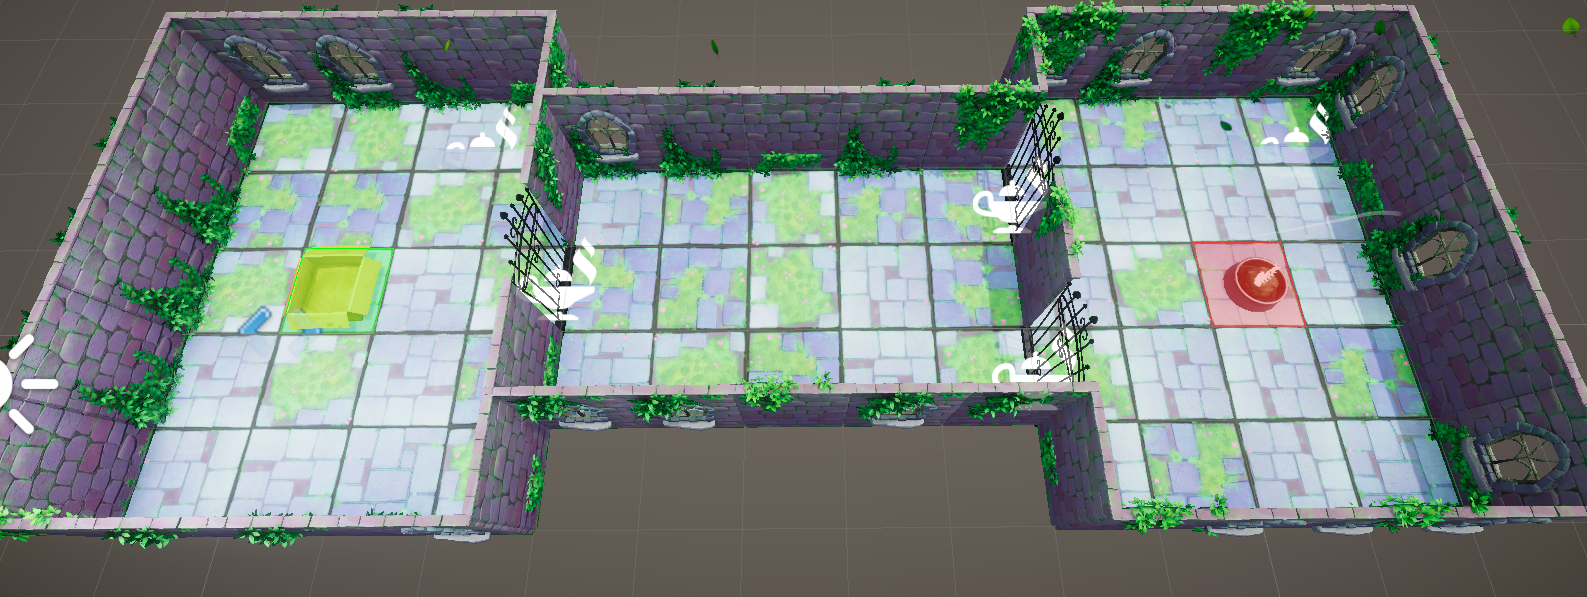
2. Observe the rooms and doors, as well as the green and red shaded cells, which indicate the start and end points. You may use this layout as it is, or you may change any of the walls and doors — and even change the size of the playing area — using a custom Level editor tool explained below. What path should Clive take to get to his dish?
3. In the Project window, navigate to Assets > UnityTechnologies > VisualScriptingTutorial > CompleteGame > Prefabs > Objects and the subfolders there. Please don’t use these yet, but examine them to see the objects available to add to your puzzle. What objects would you like to add to your puzzle?
4. Try playing this Scene. You’ll see that Clive stops at the walls, but he can jump through the doors. There are no scripts to prevent him from moving through the doors. Other objects you add might have default visual scripts, but these will only be to prevent any moving object from entering. What challenges would you like to create for Clive?
With all this in mind, brainstorm your ideas for Clive’s challenge. Consider the visual scripts in this project that you enjoyed creating, or that you want to improve upon. What will Clive need to do to get through each door? What could you do with the wall with two doors? Where would you put obstacles in Clive’s way — and will he be able to push those obstacles, or will he have to find a path around them?
Review the SampleScene and TutorialScene for ideas. Some additional ideas include the following:
- Use pushable objects as obstacles as well as items that can push a button.
- Give Clive more items to collect in his inventory or eat (mushrooms, cucumbers, etc.)
- Make items only pushable if Clive has an item in his inventory, has pushed another button, or has switched a lever.
- Make items only collectible if Clive has another item in his inventory, has pushed another button, or has switched a lever.
- Add the Fox, as seen in the first Scene! The Fox moves left and right whenever Clive moves.
3. Start with the logic
Once you have some ideas in mind, start planning the logic for each one. By planning your logic ahead of time, you will potentially save yourself long hours of rework!
For example, you might sketch or outline a plan for a door like this (Note: this is an example only!):
Wants to Enter Cell:
- If door is open, do nothing.
- If door is closed:
- If Clive has the cucumber, open TrapDoor and cancel movement.
- If Clive has the key and the mushroom, open door and play animation.
- Otherwise, cancel movement.
4. Research solutions
What if you have an idea to script logic that we haven’t covered here? Here are some ways to do some research on your own:
- Use the fuzzy finder to explore overloads of nodes you know and names of nodes you haven’t tried yet.
- Consult the Unity Scripting API documentation. The functions and methods described there are also available as nodes. For example, search “Transform” to see documentation on other nodes that configure the Transform component of a GameObject.
Consult the Unity Visual Scripting documentation to learn about additional features.
5. Level Editor
To add objects to your scene, and even rearrange the rooms and doors if you like, use the custom Level Editor provided with this project.
Follow these instructions to activate the level editor:
1. On the Unity Editor main menu, select Tutorial > Tools > Level Editor.
2. An undocked LevelEditor window will appear. Dock this window if you prefer.
Once the level editor is activated, you can use its controls as follows:
- Use the Ground and Wall buttons to build and erase the ground of the crypt and walls between rooms.
- Use the Spawn Point and End Point buttons to move the start and end points of the puzzle.
- In the Cell Object section, open the sections to see objects you can place in a cell, as well as an Erase button for cell objects.
- There are similar buttons and an Erase button for doors in the Edge Object section.
When you're finished editing the level, exit the level editor to return to the Unity Editor.
For more details, view the documentation for the Level Editor in the file Assets > UnityTechnologies > VisualScriptingTutorial > CompleteGame > Documentation > DocumentationAndNotes.
Note: You may add your own assets to the game at your own risk. There are instructions in the documentation file on how to make any GameObject a Cell Object or Edge Object.
6. Cell Objects and Moving Objects
Moving Objects, such as the PushableBox (Crate), PushableStatue (Statue), and Fox, must be added using the prefabs in Assets > UnityTechnologies > VisualScriptingTutorial > CompleteGame > Prefabs > Objects. These prefabs have the Moving Object component that was created in C# for this game.
Other objects in cells have the Cell Object component.
To convert a Cell Object to a Moving Object (one that Clive can push), remove the Cell Object component and add the Moving Object component.
To convert a Moving Object to a Cell Object (one that Clive can’t push), remove the Moving Object component and add the Cell Object component.
7. Convert logic to gameplay
With your plans ready and your GameObjects in place, it is time to start scripting!
Remember to take your own “trips” to the first level of the game (Assets > UnityTechnologies > VisualScriptingTutorial > CompleteGame > Scenes > SampleScene) and the Sample visual scripts in the TutorialScene to borrow visual scripts. However, be sure to add some original puzzling and logic to your own puzzle scene.
When players are able to get Clive to his food dish through your puzzle, we hope you will share the final result!
8. Publish your project
9. Submit your project
We encourage you to upload your project to our Project Gallery below, to share with others who are learning Visual Scripting, just like you.
Be sure to explain, in your comments, anything that players might need to know. Add any other interesting information about how you created it and what inspired you.
We can’t wait to see what you create!
