
Challenge: Enhance Hover Racer UI with Nested Prefabs
Tutorial
Beginner
+10XP
20 mins
(14)
Unity Technologies
Nested prefabs are a useful way of managing and manipulating reusable assets. For example, you might want to deploy a number of UI panels across your project that are similar but contain some variations. Using nested prefabs helps you iterate on the UI design across multiple prefab instances.
In this challenge you will apply what you have learned about creating nested prefabs and overriding prefab properties to create and modify multiple instances of the GameOver panel.
Resources
Languages available:
1. Get Ready
Start by doing one of the following:
- Load a Hover Racer project from a previous lesson in this course that has been migrated to Unity 2018 LTS
OR - Download, unzip, and open the project Hover Racer 2018 LTS using the link above.
2. Take the Challenge
Your challenge is to create some additional UI panels that could be used at different places in the game, such as progress markers along the track or vehicle configuration menu screens.
Using the existing GameOver Panel as a prototype, you'll make a Nested Prefab of a panel with a Restart button that will allow the user to go back to the beginning of the track. (Making these buttons functional is up to you.)
You'll then use Prefab Variants to create panels with different text and colors, while using a Nested Prefab of the button so that all buttons look the same.
You'll see how powerful Nested Prefabs can be to maintain properties across multiple objects.
3. Make Nested Prefabs from Existing Objects
Convert the children of the GameOver Panel, GameOver Text and Replay Button, into prefabs by dragging and dropping them into a new folder in the Project window.
Then convert the GameOver Panel to a new base Prefab using the same method.
The objects in the Hierarchy should now look like this (Figure 01):
Tips:
- Create Prefabs of the children first, so that the Prefabs will be nested.
- The GameOver UI object is disabled in the scene by default. Locate it in the Hierarchy window under the GameManager prefab and enable it in the inspector window.
- For scene clarity, disable the Countdown UI object in the Inspector window.
- Because this is a UI, switch to 2D view in the Scene View.
4. Make Prefab Variants of the GameOver Panel
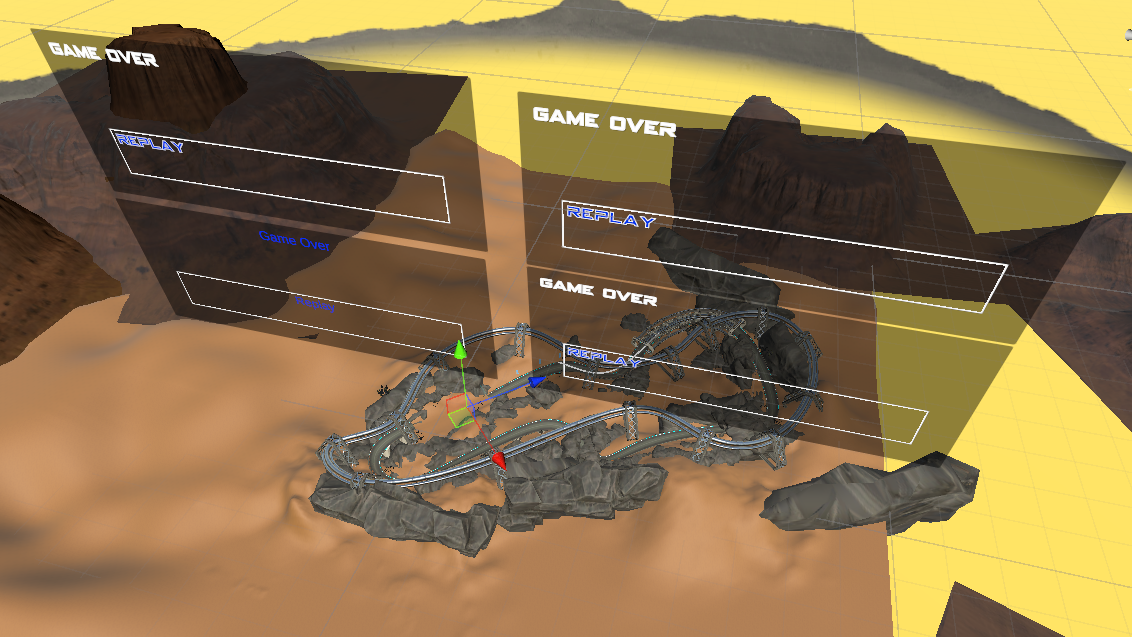
- Create three or four duplicates of the GameOver Panel in the Hierarchy window.
- Separate them in the scene view with the move tool.
- Convert the GameOver UI object into a Base Prefab. Your result might look something like Figure 02:
- Change the properties of the panels any way you like.
- For one of the panels, select the Replay Button > Text child object in the Hierarchy window, and change the font, color, and/or alignment in the Inspector window.
An example of the result is shown in Figure 03:
This creates a Prefab Variant highlighted in the Inspector by the bold text and blue lines next to the modified properties.
5. Update the Nested Prefab
Then, for the Replay Button text, apply only the color change as an override to the parent prefab. This updates all prefabs that are children of the parent.
You’ll see this change made to all replay buttons, because they are all children of instances of the same parent prefab. You only have to make the change once, even though this prefab is nested under the GameOver Panels (Figure 04).
6. You're All Set
Your project should look something like our example, in the file Hover Racer Nested Prefabs FINAL, linked above.
Nested Prefabs are powerful for creating complex assets with many duplicated parts, such as tree leaves and wheel spokes. Use them to speed up your development, create visual realism, and maintain consistency throughout your projects.