Unity Learn home
View Tutorial Content
Steps

Creating LODs in Maya for Unity

Tutorial
Beginner
+10 XP
35 Mins
(36)
Overview
Summary
In this workflow, we will use Maya to automatically create multiple LOD meshes and group them. We will also create an LOD group of various existing meshes. Finally, we will export an FBX file containing the LODs and LOD group to Unity.
Select your Unity version
Last updated: June 15, 2022
2019.4
2019.3
2019.2
2019.1
2018.4
2018.3
2018.2
2018.1
Language
English
Also included in

1.LODs in Maya for Unity

Video Player is loading.
Current Time 0:00
Duration 0:00
Loaded: 0%
Stream Type LIVE
Remaining Time 0:00
 
1x

2.Creating LODs in Maya for Unity

This tutorial has been verified using Unity 2019 LTS and Maya 2019
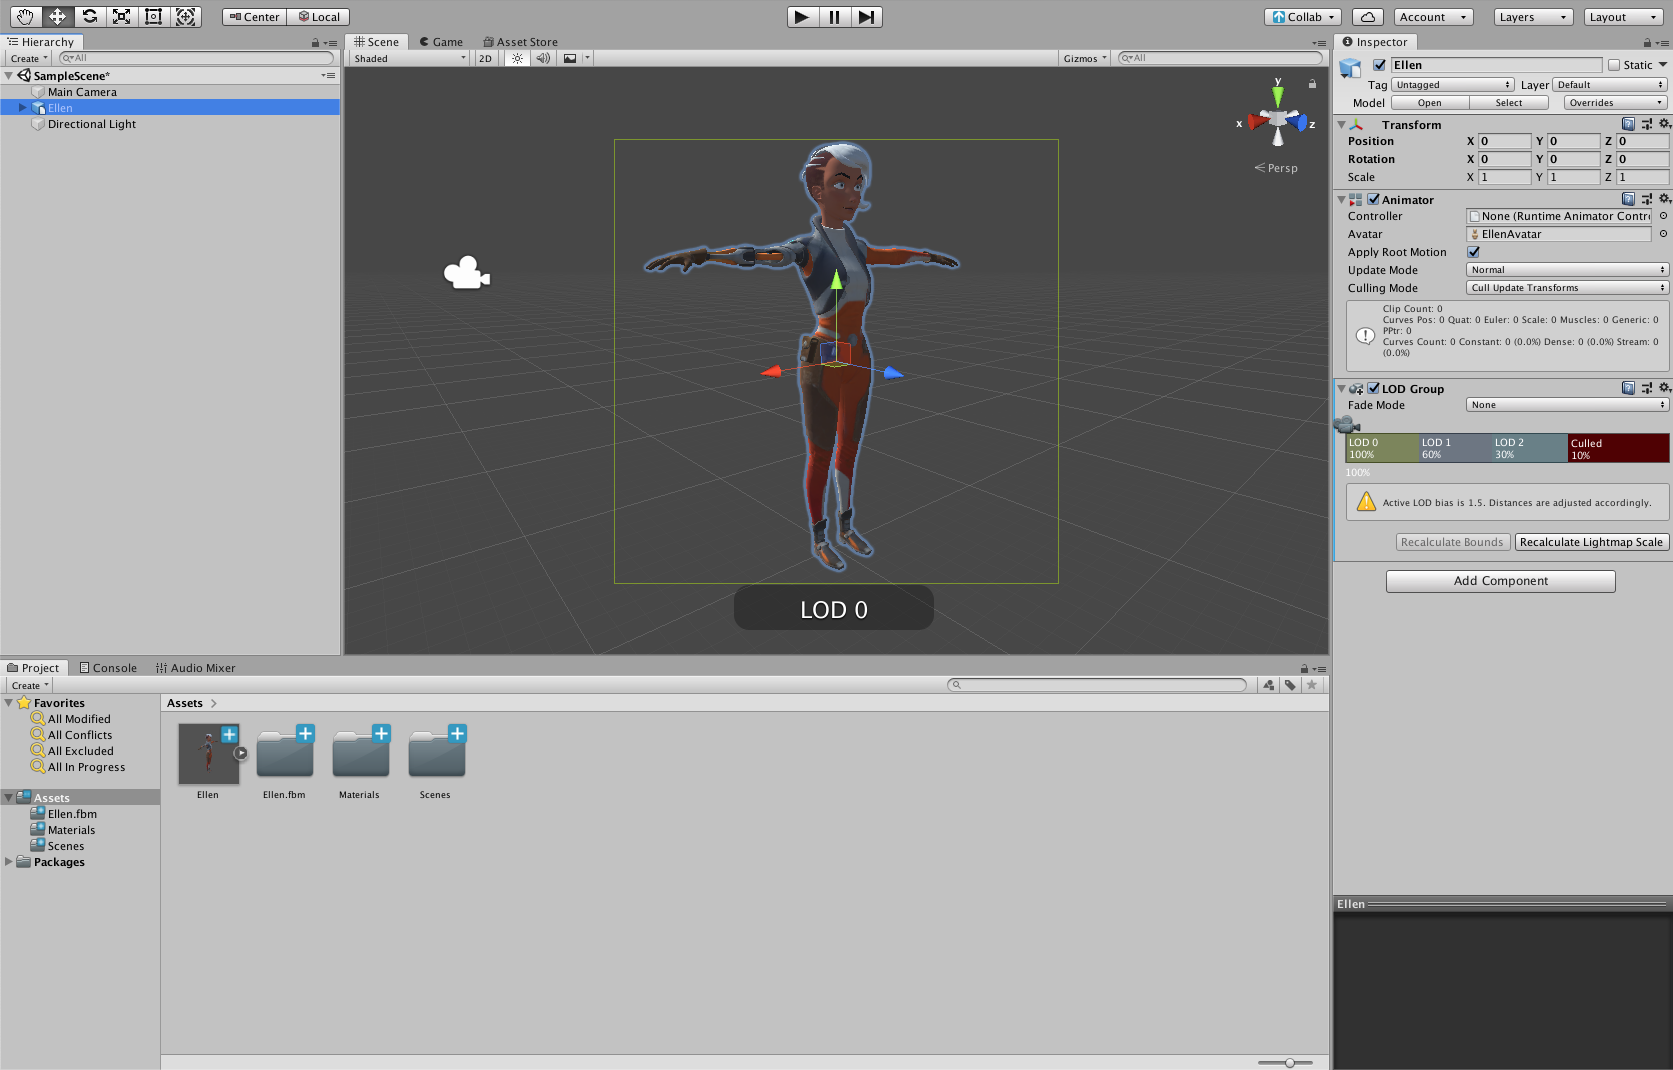
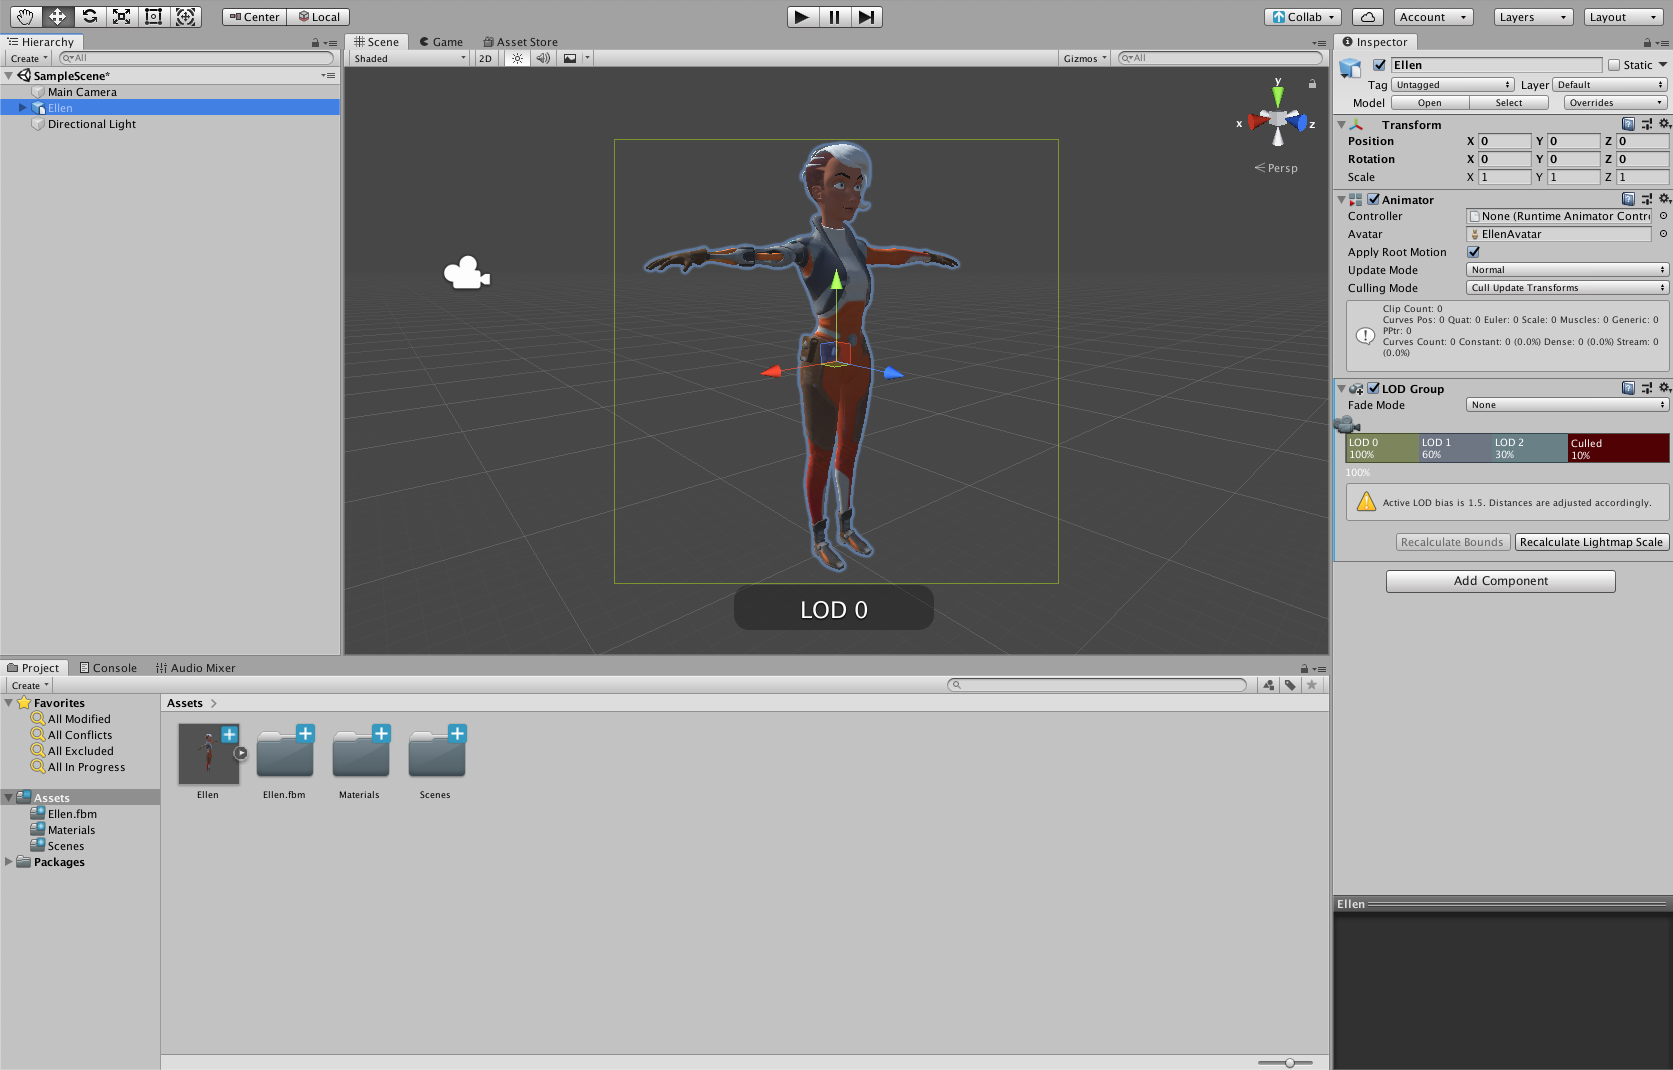
Level of Detail (LOD) is a function in Unity that allows an object to have multiple polygon densities, from high-count to low. Unity will switch between the lower and higher poly Meshes based on the distance between the object and the camera. Using LODs optimizes workload by displaying an object’s higher polygon count when it’s closer to the camera and a lower count when it’s farther away, similar to what the eye might see. Generally, an LOD Group includes two or three LODs, but you might want additional LODs to make a smooth transition when the distance to the camera changes. (Figure 01)
Select image to expand
Figure 01: A character in Unity as an exported FBX from Maya with the LOD Group setup.
In this workflow, we will use Maya to automatically create multiple LOD Meshes and group them. We will also create an LOD Group of various existing Meshes. Finally, we will export an FBX file containing the LODs and LOD Group to Unity.

3.Generate LOD Meshes and Group Them Using Maya

Maya provides a simple method to create LODs and organize them into a group. It can generate various lower-resolution Meshes based on a high-poly Mesh and place them into an LOD Group prior to exporting to Unity.
Maya automatically names generated LODs in numeric order. The highest polycount LOD is named LOD_0, which is active when the object is closest to the camera. Each LOD in the group will be named by sequentially higher numbers so that the LOD with the highest number will have the lowest polycount. You can create LODs using this method on a rigged character or an asset that doesn’t require rigging.
1. In Maya, open and select a high-poly model. You can select the model in the main viewport, or the outliner.
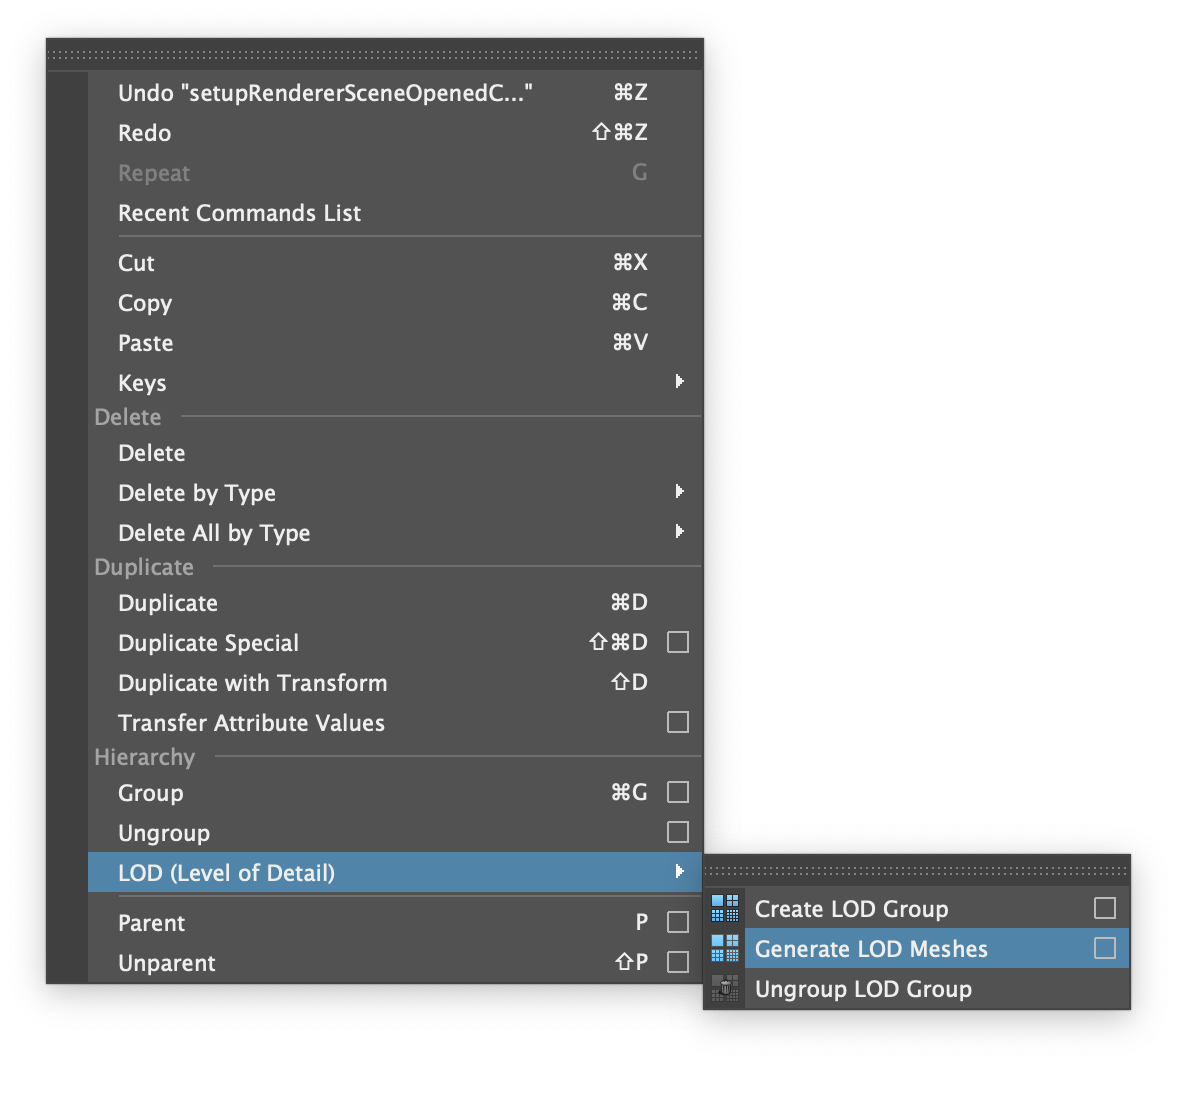
2. From the main window, choose Edit > LOD (Level of Detail) > Generate LOD Meshes, and click the Options box.
Select image to expand
Figure 02: Select the Generate LOD Meshes option from the main window Edit menu.
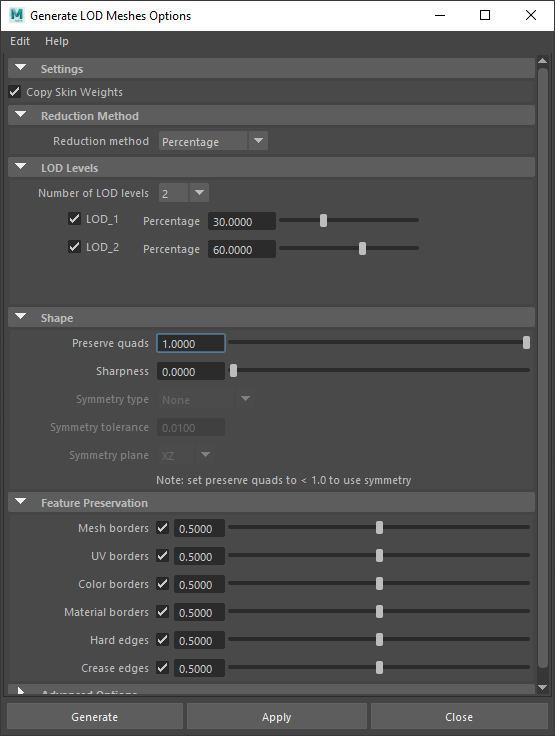
3. Check the Copy Skin Weights option to keep the new LODs of a rigged character skin attached to the same rigged skeleton.
4. Make sure the Reduction Method dropdown menu is set to Percentage.
5. In the LOD Levels section, choose the number of LOD Meshes to create from the dropdown menu next to Number of LOD levels. This is in addition to the high-poly Mesh that’s already in the Scene. The existing high-poly Mesh will not be changed, but added to the LOD Group.
6. Adjust the percentage of reduction in geometry for each LOD as needed.
7. Adjust any other settings necessary for the LODs. (Figure 03)
Select image to expand
Figure 03: The Generate LOD Meshes options window showing optimal settings for the LODs.
8. Click the Generate button to create the LODs, group them together, and close the window. (Note: The new LOD Meshes will be generated and placed so they can be swapped precisely when needed.)
9. Open the Outliner window: Window menu > Outliner.
10. Expand the LOD Group to see the LOD hierarchy, then dolly in and out of the Scene (using the scroll wheel on the mouse operates the camera’s dolly tool). You’ll see the visibility change for each LOD in the Outliner as the camera moves toward and away from the object.
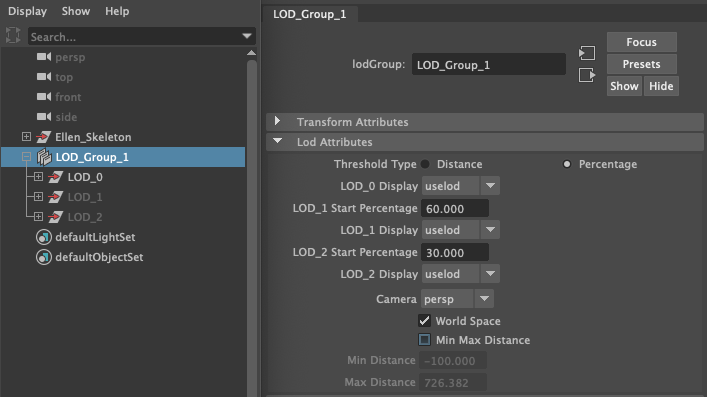
11. Normally only one Mesh will be displayed in the viewport. You can see them all, or individually, by selecting the LOD Group from the Outliner window and, in the Attribute Editor, changing the LOD display dropdown for the Mesh you want to view to Show. Make sure to turn off the other LODs if you don’t want to see them all stacked together. Also, change them back to “uselod” to keep the LOD working properly. (Figure 04)
Select image to expand
Figure 04: The Attribute Editor displaying the LOD Group settings next to the Outliner window with the LOD Group expanded, displaying the child LODs.
Note: The LOD Start Percentage values change the Screen Height Percentage, which will display the LOD of the group based on the percentage of screen height the LOD Group fills up in the camera frame. When changing this value in Maya, you can preview how these percentages affect the LOD Group; however, these percentages will not be transferred to Unity’s LOD Group settings after the file is imported.
The group containing the LODs is now ready to be exported from Maya and imported into Unity.

4.Create an LOD Group with pre-made LOD Meshes

You can create an LOD Group without automatically generating different levels of the Mesh. This option is possible if you’ve already retopologized the high-poly Mesh into a lower-poly Mesh, or various levels of lower-poly Meshes. All the objects to be added must be in the same location in the Scene, usually at the center of the grid or origin.
1. In Maya, open and select the objects in order of highest to lowest polycount. The easiest method is to use the Outliner window (Windows > Outliner). Select the geometry to add to the LOD Group with the highest-resolution model first and the lowest-resolution model last. The objects will be added to the LOD Group and named in the order they are selected.
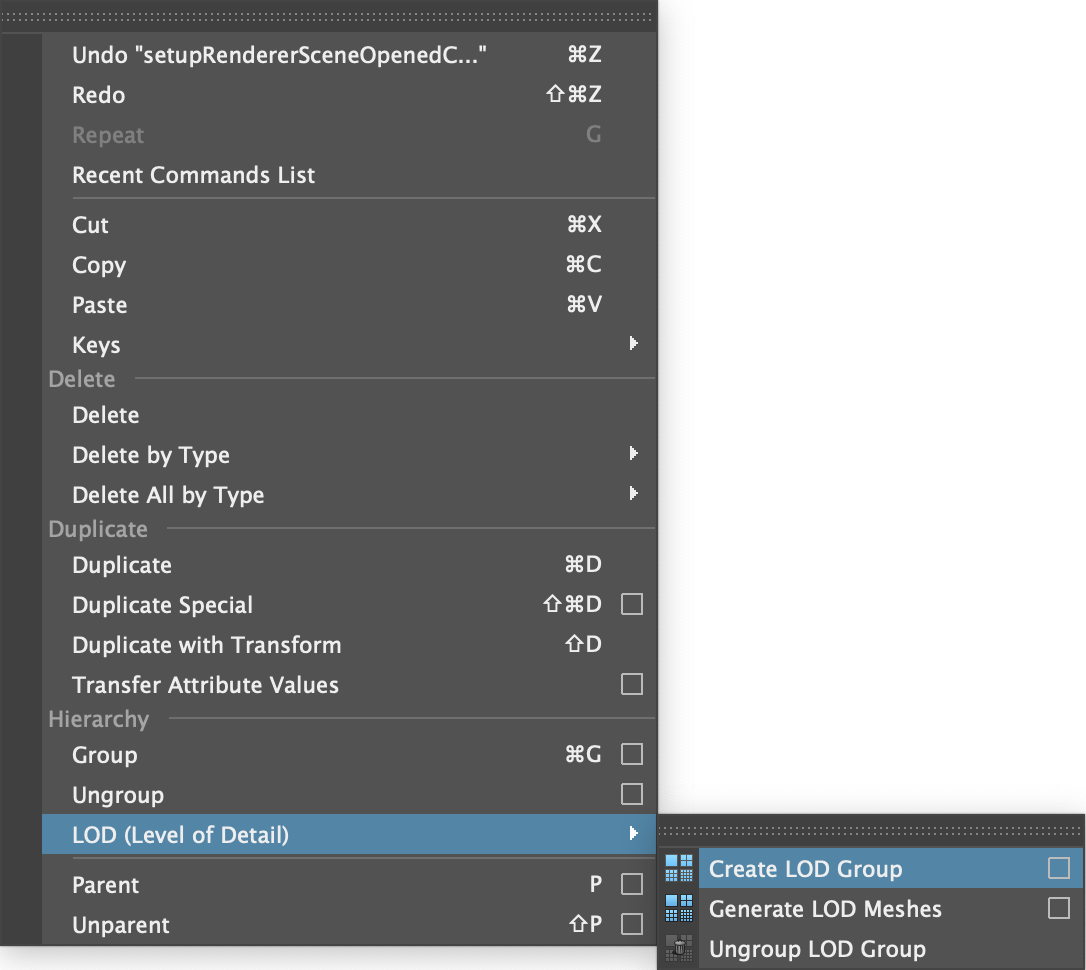
2. From the main window, choose Edit > LOD (Level of Detail) > Create LOD Group and click the Options box. (Figure 05)
Select image to expand
Figure 05: Select the Generate LOD Group option from the main window Edit menu.
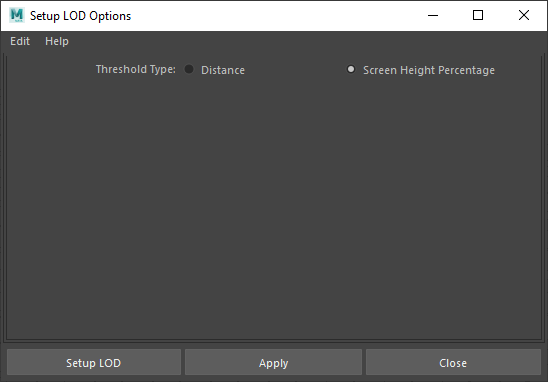
3. In the Setup LOD Options window, make sure the Screen Height Percentage option is checked. (Figure 06)
Select image to expand
Figure 06: The Setup LOD Group options window showing the optimal settings needed for use in Unity.
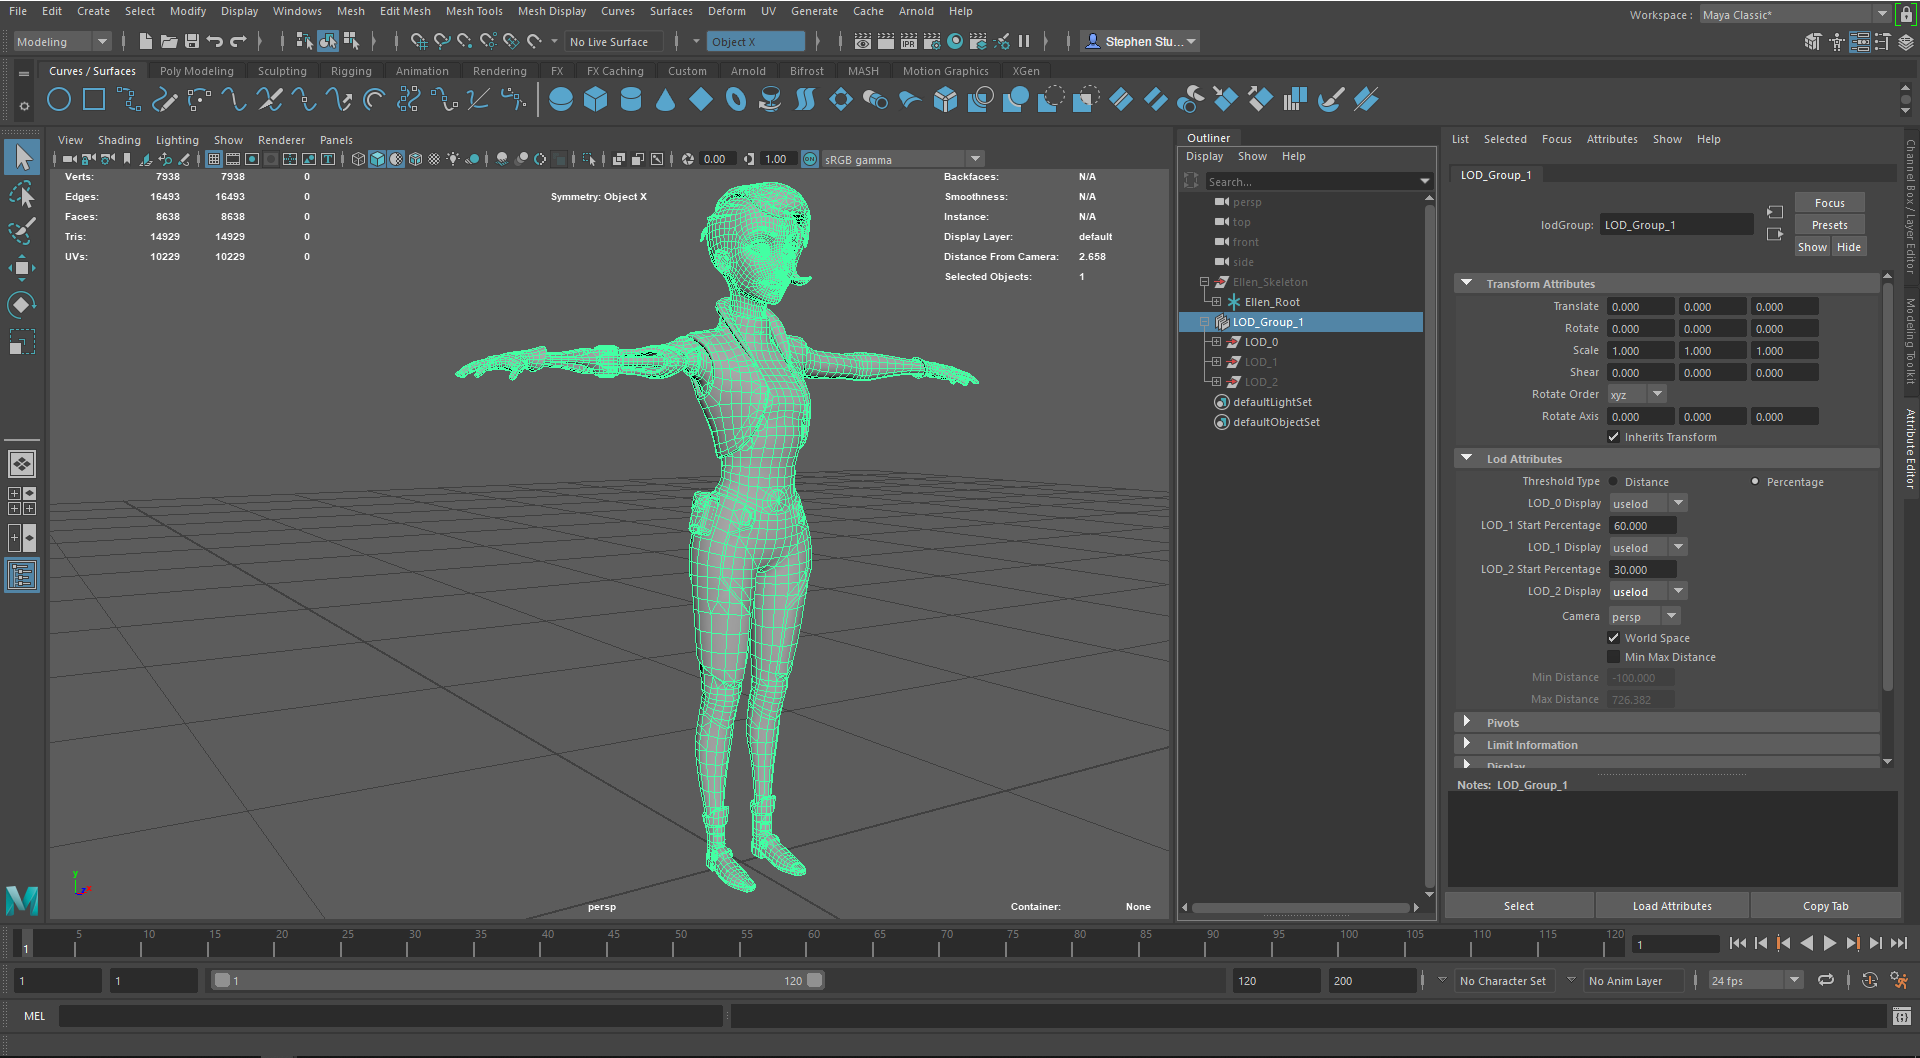
4. Click the Setup LOD button to create the group and close the window. (Figure 07)
Select image to expand
Figure 07: The final result of the LODs and the LOD Group in Maya.
The LOD Group will be created in Maya and will contain the objects selected in the Scene prior to creating the group. If the Meshes were selected incorrectly, or are out of order, you can rename them in the Outliner or Attribute Editor to put them in the correct order.

5.Export FBX to Unity and adding an LOD Group component

To use the rig or asset with the LOD Group in Unity, use Maya to export the entire Scene with the LOD Group as an FBX file.
1. Export the Maya Scene by selecting File > Send to Unity > All. Alternatively, if the Unity FBX Exporter integration has been installed, select File > Unity > Export. (Note: You may need to locate the Unity project folder before exporting the file.)
2. Switch to the Unity Editor (if it’s open), or open a project in Unity for the Exported FBX file.
3. Select the imported FBX file in the Project panel to adjust the import settings.
4. In the Inspector panel, modify any properties needed for the model, rig, animation, or materials.
5. Add the object to a Scene and select it in the Scene to view its properties in the Inspector panel.
6. Click the Add Component button.
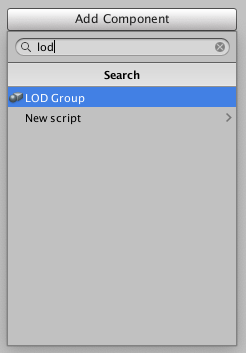
7. In the search box of the Component Browser, type in “LOD,” and choose the LOD Group from the results. This will add the LOD Group component to the selected GameObject(Figure 08)
Select image to expand
Figure 08: Search for the LOD Group in the Component Browser.
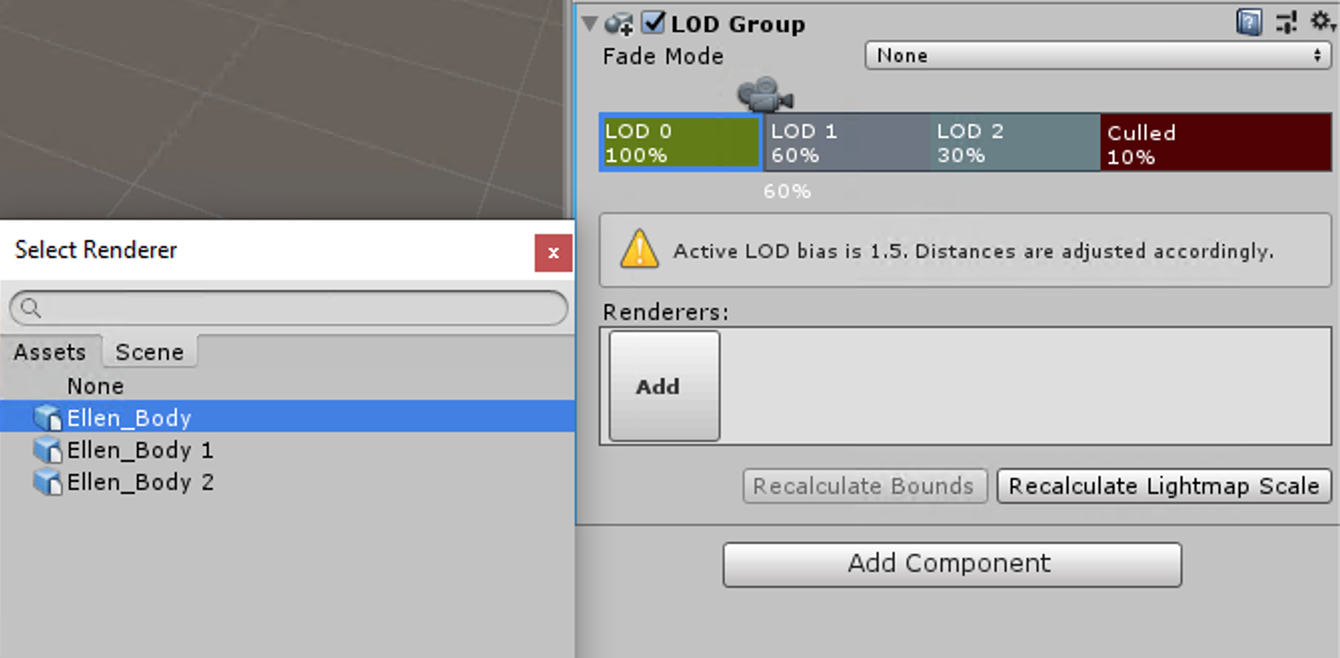
8. Click on one of the LODs in the bar (other than the Culled section), then click the Add button in the Renderers section.
9. In the object browser, double-click the label for the LOD level to assign it as the renderer. (A renderer is a GameObject that contains a Mesh to represent the LOD level; it is a child of the LOD Group.) Assign the high-poly version as LOD 0 and the lower-poly versions as LOD 1, LOD 2, and so on. Although any object can be selected for each LOD, those are the appropriate renderers. (Figure 09)
Select image to expand
Figure 09: Select the LOD Mesh from the Select Renderer window after clicking the Add button for the specific LOD in the Inspector panel.
10. Click and drag the camera icon left or right to see the changes to each LOD Group.
11. Adjust each group’s percentage value by dragging the vertical lines between the bars left or right. The percentages listed in the bars determine what level is active when the camera nears the object. (Figure 10)
Select image to expand
Figure 10: Drag the vertical bar between two detail levels to adjust when the object will change from a higher to lower poly version.
12. Add an LOD level by right-clicking anywhere on the bar and selecting the Insert Before option from the context menu.
13. Remove an LOD level by right-clicking on the bar and selecting the Delete option.
Once the options for the LOD Group are set, you can move your object closer or farther away in the Scene and see the changes in the LOD.

6.Conclusion

It’s fairly simple to create LODs and LOD Groups in Maya for use in a Unity project. Creating LODs for a character or object allows for polycount level adjustments based on an object’s distance from the camera. Understanding how to create and adjust LODs and LOD Groups in Maya, and importing the LODs into Unity, will reduce the workload on the player’s computer and aid in optimization.

Creating LODs in Maya for Unity
General Tutorial Discussion
0
0
1. LODs in Maya for Unity
0
0
2. Creating LODs in Maya for Unity
0
0
3. Generate LOD Meshes and Group Them Using Maya
0
0
4. Create an LOD Group with pre-made LOD Meshes
0
0
5. Export FBX to Unity and adding an LOD Group component
0
0
6. Conclusion
0
0