
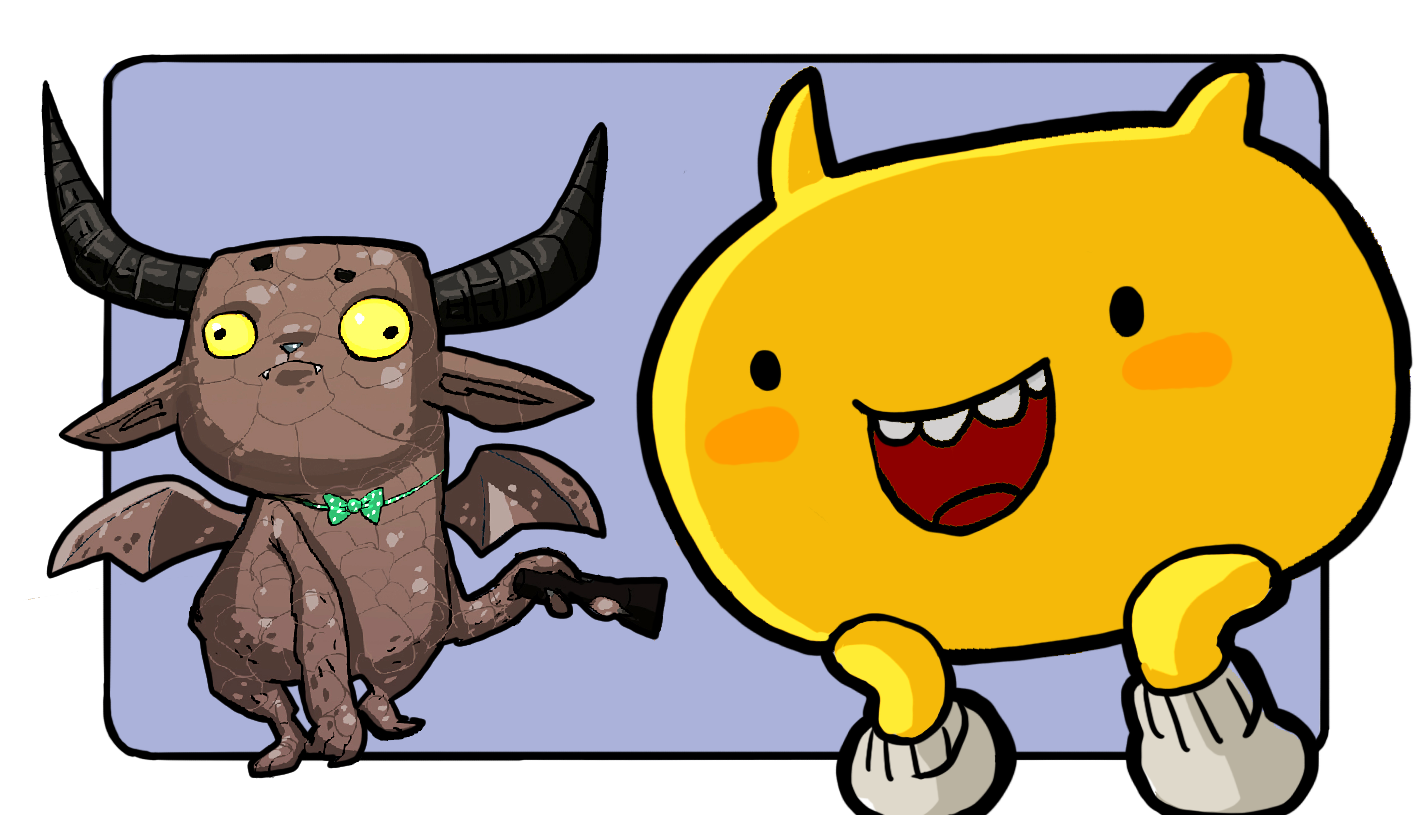
Enemies, Part 1: Static Observers
Tutorial
Beginner
+10XP
55 mins
(3080)
Unity Technologies
You’ve now spent a long time developing your game, improving your understanding of scripting in C# along the way. But something’s missing: what’s a stealth game without enemies to evade?
In this tutorial, you’ll:
- Create a static Gargoyle enemy
- Write a custom script so the Gargoyle can find JohnLemon
- Set the game to restart if JohnLemon is caught
Once you’ve completed this tutorial, you’ll have one type of enemy ready for your level.
Languages available:
1. Setting up the Gargoyle Prefab
Your game is now taking shape — JohnLemon can move around an environment with the camera following him, and when he leaves the house the game ends. There’s one thing missing, though: enemies to make that a challenge!
In this tutorial, you’re going to add a static Gargoyle enemy to the haunted house.
The first step is to bring the Gargoyle model into the Scene, exactly as you did for JohnLemon:
1. In the Project window, navigate to the Assets > Models folder and find the Gargoyle Asset.
2. Drag the Asset from the Project window into the Hierarchy window, to create an instance of the model.
3. This haunted house needs multiple gargoyles. Remember, a model is read-only — to make edits you will need to create a Prefab.
Drag the Gargoyle GameObject from the Hierarchy window into the Assets > Prefabs folder in the Project window. When the Create Prefab dialogue box appears, select Original Prefab.
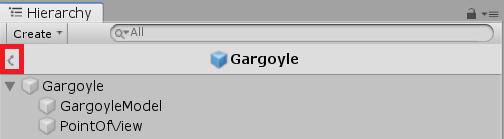
4. Now that you have a Gargoyle Prefab, you can open it for editing. This time you’re going to use a shortcut! In the Hierarchy, click the arrow to the right of the Gargoyle GameObject:

The Prefab will open for editing.
Now that you’ve added the Gargoyle to your game, it’s time to configure it. First, let’s animate it!
2. Animate the Gargoyle
Just like JohnLemon, the Gargoyle has signature movement which gives it personality and increases the atmosphere of the game. It will be trying to catch the player!
The Gargoyle only has one animation to play, so its Animation Controller will be very simple:
1. In the Project window, go to the Assets > Animation > Animators folder and right-click on it.
2. In the context menu, select Create > Animator Controller. Name the new Animation Controller “Gargoyle”.
3. Double click on Gargoyle to open the Animator window.
4. In the Project window, navigate to the Assets > Animation > Animations.
5. Expand the Gargoyle@Idle Model Asset.
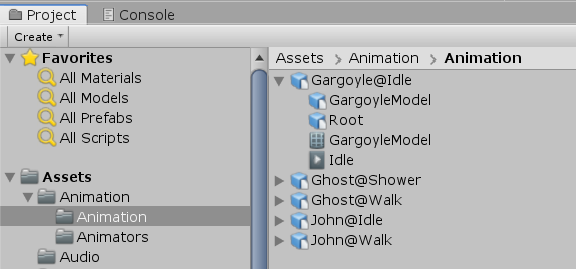
6. Drag the Idle animation from the Project window into the Animator window. This will create an Idle Animator State.
The Gargoyle’s simple Animation Controller is completed, but it still needs to be assigned to the Animator component.
7. In the Project window, go to the Assets > Animation > Animators folder.
8. In the Hierarchy window, select the Gargoyle GameObject.
9. Drag the Gargoyle Animator Controller from the Project window onto the Controller property of the Gargoyle’s Animator Component in the Inspector.
10. Save the Scene, then enter Play Mode to see what your Gargoyle looks like in action! Make sure to exit Play Mode when you’re done.
3. Add a Collider to the Gargoyle
Next, you need to make sure that the player can bump into Gargoyle and that it can see JohnLemon with its flashlight beam — this is a job for Colliders.
To add the Collider:
1. Check sure that Unity Editor is still in Prefab Mode. If not, you can use the shortcut you learned when you created the Gargoyle Prefab.
2. In the Inspector, add a Capsule Collider component to the Gargoyle GameObject.
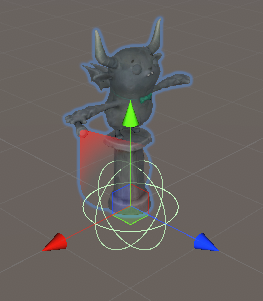
A Capsule Collider is about the right shape for this enemy.
3. Now adjust the settings so that it fits the Gargoyle model better:
- Change the Capsule Collider’s Center property to (0, 0.9, 0)
- Change the Radius property to 0.3
- Change the Height property to 1.8
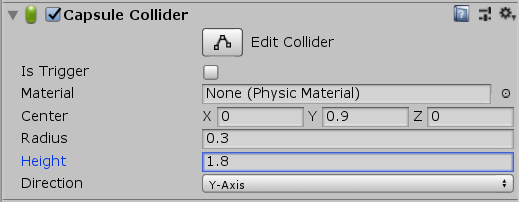
That’s a much better fit! Now the player can bump into the Gargoyle.
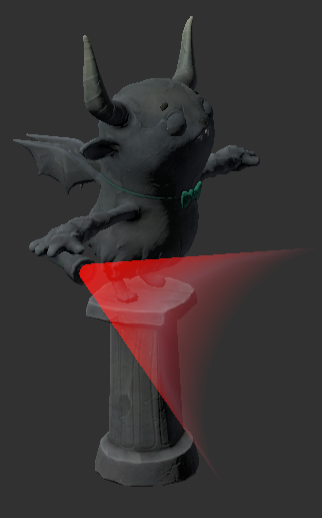
4. Create a Trigger to Simulate the Gargoyle's Line of Sight
The Gargoyle still needs a way to spot JohnLemon. You’ve used the character’s physical location to trigger events before when creating the ending of your game; you can do the same here. You’re going to write a custom script to make sure that the Gargoyle can’t see through walls, but first you need to create a Trigger.
To make positioning it a little easier, you’re going to create another GameObject as a child of the Gargoyle GameObject and place the Trigger on that.
To create the Trigger:
1. In the Hierarchy window, right-click on the Gargoyle GameObject and select Create Empty.
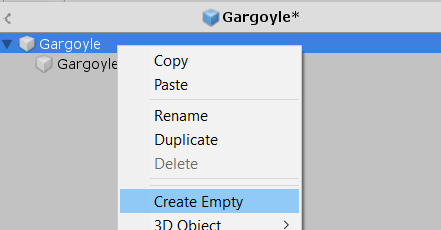
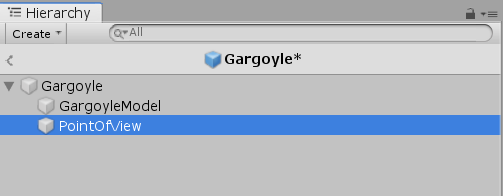
2. This GameObject will act as the Gargoyle’s point of view into the world, so rename it “PointOfView”.
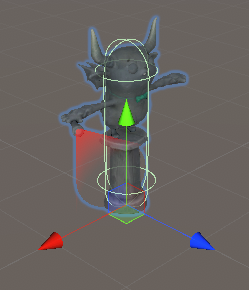
3. The Gargoyle animation shows it looking in front of its face and slightly downward, so you need to reposition the PointOfView GameObject. In the Inspector, find its Transform component.
- Change the Position property to (0, 1.4, 0.4)
- Change the Rotation property to (20, 0, 0)

Note: If the Transform handles in the Scene window aren’t pointing down slightly, it might be because they are set to Global instead of Local. You can change this by clicking the Handle Rotation Toggle in the toolbar:

Now you have set up the Gargoyle’s point of view, you can add and configure the Trigger.
4. In the Inspector, add a Capsule Collider component.
5. Enable the component’s Is Trigger checkbox.
6. Let’s adjust the settings for the Trigger.
- Change the Capsule Collider’s Center property to (0, 0, 0.95)
- Change the Radius property to 0.7
- Change the Height property to 2
- Change the Direction property from Y-Axis to Z-Axis
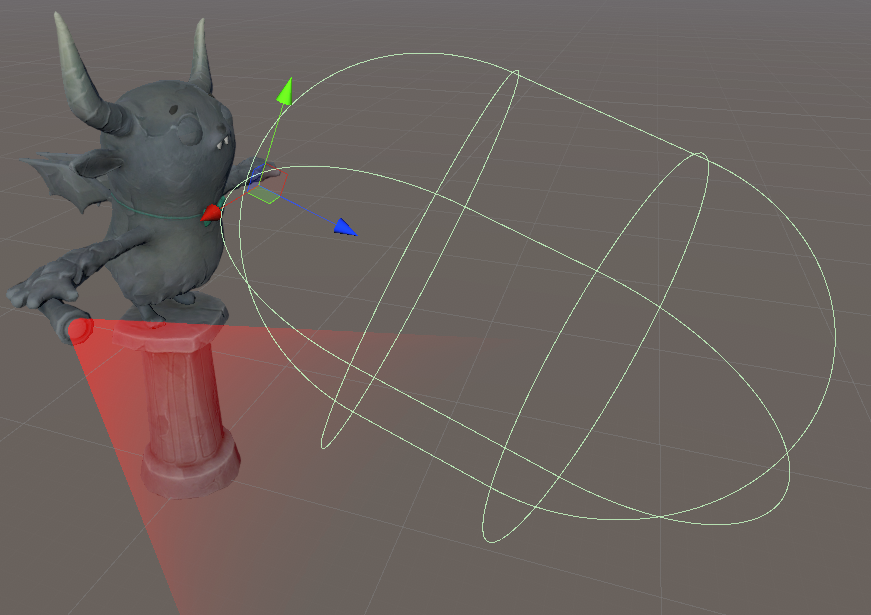
You’ve set the Collider to match the beam of the Gargoyle’s flashlight — perfect!
5. Write a Custom Observer Script
Now that you’ve created a Trigger, you need to write a script for what happens when JohnLemon walks into it.
To create the new script:
1. In the Project window, go to Assets > Scripts.
2. Right-click on the Scripts folder and select Create > C# Script. Name the new script “Observer”.
This name describes what the script will do: observe the player’s character and cause the game to restart if it’s spotted. You’ll be able to reuse this script for other enemies too, so it makes sense not to link its name to the Gargoyle.
3. Drag the Observer script Asset from the Scripts folder onto the PointOfView GameObject in the Hierarchy window to add it as a component.
4. Double click on the script Asset to open it for editing.
6. Add a Class to Detect the Player's Character
Let’s start your new script by adding a class to detect the player’s character:
1. As you did for the GameEnding script, remove the Start and Update methods and their comments. Your clean script should look like this:
using System.Collections;
using System.Collections.Generic;
using UnityEngine;

public class Observer : MonoBehaviour
{

}
2. First, you need the Observer class to detect the player’s character. Add the following line to your script, in between the braces:
public Transform player;This is slightly different to the approach you took for the GameEnding Trigger. This script will check for the player character’s Transform instead of its GameObject. It will make it easier to access JohnLemon’s position and determine whether there is a clear line of sight to him.
3. You previously used the OnTriggerEnter special method to detect the player’s character, and stored whether the character was within the Trigger using a bool variable. That can be reused here.
Add the following line directly below the declaration of the player Transform:
bool m_IsPlayerInRange; 4. Now add the OnTriggerEnter method directly below that:
void OnTriggerEnter (Collider other)
    {

    }
5. As with the GameEnding script, it’s important to check that JohnLemon is actually in range whenever OnTriggerEnter is called.
Add an if statement within the OnTriggerEnter method braces to check that:
 if(other.transform == player)
        {
            m_IsPlayerInRange = true;
        }
6. The player character entering this Trigger may not automatically mean the end of the game — for example, there may be a wall in the way. This means that it’s also important to detect when JohnLemon leaves the Trigger.
This can be done in a simple way with the special method OnTriggerExit, which is the opposite of OnTriggerEnter.
Copy and paste the OnTriggerEnter method directly below itself, then adjust Enter to Exit and true to false as follows:
void OnTriggerExit (Collider other)
    {
        if(other.transform == player)
        {
            m_IsPlayerInRange = false;
        }
    }
7. Your script should currently look like this:
using System.Collections;
using System.Collections.Generic;
using UnityEngine;

public class Observer : MonoBehaviour
{
    public Transform player;

    bool m_IsPlayerInRange;

    void OnTriggerEnter (Collider other)
    {
        if (other.transform == player)
        {
            m_IsPlayerInRange = true;
        }
    }

    void OnTriggerExit (Collider other)
    {
        if (other.transform == player)
        {
            m_IsPlayerInRange = false;
        }
    }
}7. Check the Enemy's Line of Sight is Clear
In this game, it’s important to check that the enemy’s line of sight to JohnLemon is clear. Otherwise, the end of the game could be triggered when there is actually a wall in the way. Since the player character’s position could change at any moment, this check needs to happen in every frame.
Let’s continue your script:
1. Add an Update method immediately below OnTriggerExit, as follows:
void Update ()
    {

    }
2. It only makes sense to check the line of sight when the player character is actually in range. Add the following if statement within the Update method’s braces:
if(m_IsPlayerInRange)
        {

        }
So far so good, but how can you actually check the line of sight?
In Unity, it’s possible to check whether there are any Colliders along the path of a line starting from a point. This line starting from a specific point is called a Ray. Checking for Colliders along this Ray is called a Raycast.
Your Ray needs an origin and a direction. The origin is just the PointOfView GameObject’s position, but working out the direction is slightly more complicated.
3. Add the following line of code within the IsPlayerInRange if statement braces:
Vector3 direction = player.position - transform.position + Vector3.up;This code creates a new Vector3 called direction. From vector math, we know that a vector from A to B is B - A. This means that the direction from the PointOfView GameObject to JohnLemon is JohnLemon’s position minus the PointOfView GameObject’s position.
You may remember that JohnLemon’s position is on the ground, between his feet. To make sure the Observer can see JohnLemon’s centre of mass, you’re pointing the direction up one unit by adding Vector3.up. Vector3.up is a shortcut for (0, 1, 0).
4. Now you have the direction, you can create a Ray. Add the following line of code below the direction variable:
Ray ray = new Ray (transform.position, direction);This line includes a keyword you haven’t met before: new. This keyword is used when creating a new instance of something by calling a special method called the type’s constructor.
Calling a constructor always uses the following syntax:
- The keyword new
- The type
- Parentheses
- Parameters for the constructor (in this case, the Ray’s origin and direction)
5. Now you have created a Ray, you can perform the Rayscast. There are lots of different Raycast methods in Unity, but all of them have two things in common: they need to define the Ray along which the Raycast happens and restrictions on what sort of Colliders they want to detect.
The Raycast method you will be using returns a bool which is true when it has hit something and false when it hasn’t hit anything. Because it returns a bool, it is very convenient to put the Raycast method inside an if statement. The code block of the if statement will only be executed if the Raycast has hit something.
Below where the Ray was created, and still within the previous if statement you wrote, add the following code:
      if(Physics.Raycast(ray))
            {

            }
6. You’ve defined a Ray, and you are not restricting the colliders that can be detected by the Raycast. Restrictions on Colliders tend to work more like filters than identifying single Colliders. What you need is information about exactly what is hit by the Raycast, so that you can check whether this is the player character.
But there’s a problem: the way you get information from a method is with its return and this Raycast only returns a bool. However, luckily there is very similar Raycast method which uses an out parameter.
Out parameters works like normal parameters, except they have the keyword out written before them. These parameters have their values altered or set by their method, so that they can be used by whatever calls it. The out parameter has a type called RaycastHit, and the Raycast method sets its data to information about whatever the Raycast hit.
Between the line creating the Ray and the Raycast if statement, add the following code:
RaycastHit raycastHit;This line defines the RaycastHit variable.
7. Next, you need to change the Raycast method in order to make use of this variable. Change the if statement with the Raycast method to the following:
if(Physics.Raycast(ray, out raycastHit))
            {

            }
This is a different Raycast method, which works very similarly but uses the out parameter to return information.
8. The script can now identify that the player’s character is in range, perform a Raycast and know whether anything has been hit. Next, it needs to check what has been hit.
Within the Raycast’s if statement, add the following code:
if(raycastHit.collider.transform == player)
                {

                }
9. Now you need to end the game. To do this, you’re going to need a reference to the GameEnding class.
Between the player and m_IsPlayerInRange variable declarations towards the top of the script, add the following code:
public GameEnding gameEnding;GameEnding is a class just like GameObject and Transform — each has different methods and variables, but referencing them works exactly the same.
10. Your Observer script is nearly finished! Let’s review what you have so far:
using System.Collections;
using System.Collections.Generic;
using UnityEngine;

public class Observer : MonoBehaviour
{
    public Transform player;
    public GameEnding gameEnding;

    bool m_IsPlayerInRange;

    void OnTriggerEnter (Collider other)
    {
        if (other.transform == player)
        {
            m_IsPlayerInRange = true;
        }
    }

    void OnTriggerExit (Collider other)
    {
        if (other.transform == player)
        {
            m_IsPlayerInRange = false;
        }
    }

    void Update ()
    {
        if (m_IsPlayerInRange)
        {
            Vector3 direction = player.position - transform.position + Vector3.up;
            Ray ray = new Ray(transform.position, direction);
            RaycastHit raycastHit;

            if(Physics.Raycast(ray, out raycastHit))
            {
                if (raycastHit.collider.transform == player)
                {

                }
            }
        }
    }
}
11. At the moment, this GameEnding class doesn’t have anything to call for when the player character has been caught by an enemy. You need to add a little more functionality to it.
Save the Observer script and open your GameEnding script for editing. You might be able to access the GameEnding script directly from your code editor, or you may need to return to Unity Editor and open it in the usual way.
8. Revise your GameEnding Script
This game needs two different ways to end the level: one if JohnLemon escapes and one if he’s caught. Currently, only his escape is included in the GameEnding script. In this section, you’ll revise your script to enable players who are caught be enemies to restart the level rather than quitting the game.
Before you begin, review your GameEnding script:
using System.Collections;
using System.Collections.Generic;
using UnityEngine;

public class GameEnding : MonoBehaviour
{
    public float fadeDuration = 1f;
    public float displayImageDuration = 1f;
    public GameObject player;
    public CanvasGroup exitBackgroundImageCanvasGroup;

    bool m_IsPlayerAtExit;
    float m_Timer;

    void OnTriggerEnter (Collider other)
    {
        if (other.gameObject == player)
        {
            m_IsPlayerAtExit = true;
        }
    }

    void Update ()
    {
        if(m_IsPlayerAtExit)
        {
            EndLevel ();
        }
    }

    void EndLevel ()
    {
        m_Timer += Time.deltaTime;

        exitBackgroundImageCanvasGroup.alpha = m_Timer / fadeDuration;

        if(m_Timer > fadeDuration + displayImageDuration)
        {
            Application.Quit ();
        }
    }
}
9. Create Two Ways To End The Level
Let’s start by adding the two different ways that you can end the level to your script:
1. First, add the following code below the exitBackgroundImageCanvasGroup variable declaration:
public CanvasGroup caughtBackgroundImageCanvasGroup;This will create another CanvasGroup for the new Images which will display if JohnLemon has been caught.
2. Add the following below the m_IsPlayerAtExit variable declaration:
bool m_IsPlayerCaught;This variable will check whether JohnLemon has been caught, in the same way that you created one to check whether he has reached the exit.
3. Now you have two new variables, but how exactly should you use them? The level should end when JohnLemon is caught, but in a different way.
First, let’s add an else-if statement to the Update method. An else-if statement can be used after an if statement, to continue checking things. Add the following code below the if statement in the Update method:
    else if(m_IsPlayerCaught)
    {
        EndLevel ();
    }
Your Update method should now look like this:
 void Update ()
    {
        if (m_IsPlayerAtExit)
        {
            EndLevel ();
        }
        else if (m_IsPlayerCaught)
        {
            EndLevel ();
        }
    }
This method is now instructing the computer, “If m_IsPlayerAtExit is true, call EndLevel. If it isn’t true, then check if m_IsPlayerCaught is true; if it is, call EndLevel.”
This needs to be adjusted, as both methods are currently the same. If m_IsPlayerAtExit is true, you need to fade in the exitBackgroundImageCanvasGroup. If m_IsPlayerCaught is true, then you need to fade in the caughtBackgroundImageCanvasGroup.
4. To fix this, you need to introduce a CanvasGroup parameter into the EndLevel method, so that it can change the alpha of this new parameter.
Change the EndLevel method as follows:
void EndLevel (CanvasGroup imageCanvasGroup)
    {
        m_Timer += Time.deltaTime;

        imageCanvasGroup.alpha = m_Timer / fadeDuration;

        if(m_Timer > fadeDuration + displayImageDuration)
        {
            Application.Quit ();
        }
    }
Instead of changing the exitBackgroundImageCanvasGroup’s alpha, the script will now change the alpha of whatever is passed in as a parameter.
5. You may have noticed that your code editor is now telling you there’s a problem with the two calls to EndLevel in our Update method. That is because your EndLevel method now requires you to pass in a parameter that is missing.
To fix this, you need to pass (assign) the exitBackgroundImageCanvasGroup parameter to the first call, and pass the caughtBackgroundImageCanvasGroup to the second call.
Adjust your Update method as follows:
 void Update ()
    {
        if (m_IsPlayerAtExit)
        {
            EndLevel (exitBackgroundImageCanvasGroup);
        }
        else if (m_IsPlayerCaught)
        {
            EndLevel (caughtBackgroundImageCanvasGroup);
        }
    }
Now there are two different ways to exit the game, but there are a few more adjustments you still need to make.
10. Allow the Player to Restart the Level
Currently, ending the level always quits the game. It would be pretty annoying if every time an enemy caught JohnLemon, the player had to reopen the game! Restarting the level will create a much better player experience.
To add this functionality:
1. If the player escapes the level the game should still quit, so you’ll need another parameter for the EndLevel method to help it decide what to do.
Add a bool parameter to the EndLevel method as follows:
void EndLevel (CanvasGroup imageCanvasGroup, bool doRestart)
2. Before you begin using this new parameter, let’s make sure the EndLevel method calls are correct.
If the player character has reached the exit then game should end. This should pass false as the parameter:
EndLevel (exitBackgroundImageCanvasGroup, false);If JohnLemon is caught, the game should restart. This should pass true as the parameter:
EndLevel (caughtBackgroundImageCanvasGroup, true);3. Now you need to use this parameter. Currently the if statement in the EndLevel method just closes the game. You need to adjust this, so it only happens if the game is not going to restart.
Change the if statement’s code block as follows:
       if (doRestart)
            {

            }
            else
            {
                Application.Quit ();
            }
This is an else statement. It works like the else-if statement that you used earlier, but is unconditional. As long as the if statement is false, the else code block will be executed. This means that if the doRestart parameter is false, the game will end.
4. If doRestart is true, the level needs to reload. The concept of levels in Unity are represented by Scenes, as you explored earlier in this tutorial. The easiest way to restart a Scene is to load it again.
Most of the functionality for dealing with Scenes is in a different namespace, so you’ll need to add that to your script before you go any further. Namespaces are a way of organising code so that parts of it are only available when they’re required.
By default, scripts created in Unity have three namespaces included at the top:
using System.Collections;
using System.Collections.Generic;
using UnityEngine;
Below the three namespaces, add another to the list:
using UnityEngine.SceneManagement;5. You now have access to the different classes and methods you need to reload the current scene. Within the blank if statement code block you created, add the following code:
SceneManager.LoadScene(0);This is calling a static method called LoadScene, from the SceneManager class. Remember, static methods are ones that don’t require an instance of the class in order to be called.
The parameter for this method is the build index of a scene. You will explore build indices and build settings in a bit more detail in the last tutorial in this series. For now, you just need to know that in C# and most programming languages, collections of items are indexed and that these indexes start at 0 not at 1. You can think of it as how far through a collection you have to go to get to a specific item: the first item is immediately there, and so you need to go passed zero items to get to it.
Since you only have one Scene, it is the first in your collection of Scenes and so has the index 0.
6. You’re nearly done with this script for now; the last thing you need to do is actually make a way of setting m_IsPlayerCaught. This will help illustrate the difference between public and private items in a class.
So far, you’ve used public variables which are visible in the Inspector, and other variables which are not visible there. Things in a class that are not marked as public are by default private.
The true difference between the two is that public things can be accessed from outside the class and private things cannot. The m_IsPlayerCaught variable is not marked as public and therefore it is private. This is the variable that needs to be set from outside the class in order to trigger the level restarting.
Your first option is to make the variable public instead, but this isn't a good habit to get into. Not all classes need to know whether JohnLemon has been caught.
Instead, you can limit the access to this variable and create a public method which sets it to true. By doing it this way, other classes may see that JohnLemon has been caught, but not that he hasn’t been caught.
This method can go anywhere in the class, but it makes the most sense to put it next to the OnTriggerEnter method. That way, the two methods that can trigger the end of the level are next to each other.
Add the following method below OnTriggerEnter:
  public void CaughtPlayer ()
    {
        m_IsPlayerCaught = true;
    }
7. You’ve finished revising your GameEnding script! The completed script should look similar this:
using System.Collections;
using System.Collections.Generic;
using UnityEngine;
using UnityEngine.SceneManagement;

public class GameEnding : MonoBehaviour
{
    public float fadeDuration = 1f;
    public float displayImageDuration = 1f;
    public GameObject player;
    public CanvasGroup exitBackgroundImageCanvasGroup;
    public CanvasGroup caughtBackgroundImageCanvasGroup;

    bool m_IsPlayerAtExit;
    bool m_IsPlayerCaught;
    float m_Timer;

    void OnTriggerEnter (Collider other)
    {
        if (other.gameObject == player)
        {
            m_IsPlayerAtExit = true;
        }
    }

    public void CaughtPlayer ()
    {
        m_IsPlayerCaught = true;
    }

    void Update ()
    {
        if (m_IsPlayerAtExit)
        {
            EndLevel (exitBackgroundImageCanvasGroup, false);
        }
        else if (m_IsPlayerCaught)
        {
            EndLevel (caughtBackgroundImageCanvasGroup, true);
        }
    }

    void EndLevel (CanvasGroup imageCanvasGroup, bool doRestart)
    {
        m_Timer += Time.deltaTime;
        imageCanvasGroup.alpha = m_Timer / fadeDuration;

        if (m_Timer > fadeDuration + displayImageDuration)
        {
            if (doRestart)
            {
                SceneManager.LoadScene (0);
            }
            else
            {
                Application.Quit ();
            }
        }
    }
}
You’re nearly there! Save the GameEnding script, and then reopen your Observer script to make a few final adjustments.
11. Complete your Gargoyle Prefab
Your Observer script can already:
- Identify when the player character is in the Trigger
- Use Raycast and know if it has hit a Collider
- Identify whether that Collider was the player character
Now that you have adjusted the GameEnding script, the Observer script has something to call when its Raycast hits the player character’s Colllider.
There are a few final adjustments to make before you can test your new enemy in the game:
1. In the last if statement of the Update method, add the following code:
gameEnding.CaughtPlayer (); You can add this here because the CaughtPlayer method is public. If it was private, your code editor would report an error with this line.
2. Save the Observer script and return to Unity.
3. Your Gargoyle Prefab is now finished! Save the Prefab using the Save button.

4. In the Hierarchy, click the backward arrow to return to the Scene.
5. You can add more Gargoyle Prefab instances later, but let’s put the one you currently have in the corner of the starting room. In the Inspector, find its Transform component.
- Change the Position property to (-15.2, 0, 0.8)
- Change the Rotation property to (0, 135, 0)
6. Now you can set the two references that the Observer script requires. In the Hierarchy window, expand the Gargoyle GameObject and select the PointOfView GameObject.

7. Drag the JohnLemon GameObject from the Hierarchy window onto the Player field of the Observer script in the Inspector. This will assign its Transform.
8. Drag the GameEnding GameObject from the Hierarchy window onto the Game Ending field of the Observer script in the Inspector.
9. Next, you need to create the UI for when level ends because the player has been caught. Expand the FaderCanvas GameObject in the Hierarchy window.

10. Right click on the ExitImageBackground GameObject, and select Duplicate from the context menu. The shortcut for duplicating is Ctrl + D (Windows) or CMD + D (macOS).
11. Rename the new copy to CaughtImageBackground. In the Hierarchy window, expand this GameObject to see its children.
12. Rename the ExitImage GameObject to CaughtImage.
13. In the Inspector window, you should see that Image component is still referencing the Won Sprite. This is the only setting that you need to adjust.
In the Image component, click the circle select button next to the Source Image property. When the dialogue box opens, select the Sprite called Caught.
14. Finally, you need to assign a reference to the Caught Background Image Canvas Group on the Game Ending script. In the Hierarchy window, select the GameEnding GameObject.
15. Drag the CaughtImageBackground GameObject from the Hierarchy window onto the Caught Background Image Canvas Group field of the Game Ending component in the Inspector.
16. Save your Scene.
Your Gargoyle is complete! Now you can enter Play Mode to give it a test.
12. Summary
In this tutorial, you created a static enemy for your game. You used physics and scripting to make sure JohnLemon could be caught, and you set the level to restart when he is.
Your Gargoyle enemy is excellent, but it’s stationary — enemies that move around will make the game more interesting. In the next tutorial, you’ll make a Ghost enemy which can roam around on a set path and populate the whole game with enemies.