
How to use the Unity Hub
Tutorial
Beginner
+0XP
20m
(282)
Unity Technologies
You can create, add, or join projects from the Unity Hub, if they are using Unity Version Control. By the end of this tutorial, you’ll be able to do the following:
- Use the Unity Hub and enable Unity Version Control for your new projects
- Invite new team members to join your project and start collaborating remotely, using the free tier
- Link an existing project to Unity Version Control and store it in the cloud
- Add an external project to your own Hub, when you get invited to work on it
Note: This tutorial is part of Get started with Unity DevOps. Explore the rest of the course to learn more about how DevOps can support your work as a creator.
Languages available:
1. Overview
As of version 3.6 of the Unity Hub, you now have the option to enable and try out Unity Version Control for free directly from the Hub, which allows you to invite team members and store both new and older Unity projects on the Cloud as backup.
In this tutorial, you will learn about the new Unity Version Control options located in the Hub. By the end of this tutorial, you’ll be able to do the following:
- Use the Unity Hub and enable Unity Version Control when creating a new Unity project.
- Invite new team members to join your project and start collaborating remotely, using the free tier and the Unity Version Control plugin in the Unity Editor.
- Link an existing project to Unity Version Control and store it in the cloud.
- Add an external project to your own Hub, when you get invited to work on it.
- Understand the differences between the free and the paid plans of Unity DevOps.
You'll also realize the value of Unity DevOps for creators working on collaborative projects and explore how DevOps can save you time, automate repetitive tasks, and reduce risk.
2. Before you begin
New to Unity?
If you’re new to Unity, welcome! The Unity Essentials learning pathway has been designed to help you get set up and ready to create in the Unity Editor. We recommend you complete this pathway before continuing to learn about DevOps.
Confirm access to the Unity Dashboard
To review the Unity DevOps tools and workflows on the Unity Dashboard as you work through upcoming tutorials in this course, you’ll need to activate a subscription for Unity DevOps and access your account on the Unity Dashboard.
Important: You will need to enter your credit card details to set up a Unity DevOps subscription, but basic use of these tools is free. You will only be charged if you add more than three users or use more than 5 GB data on the account.
If you want to activate a free subscription, you may find it useful to set this up now.
3. Use Unity Version Control from the Hub
Unity Version Control is a tool that allows you to collaborate with other team members on the same project. It also keeps a backup copy of the project safely in the cloud in case something goes wrong. To enable Unity Version Control from the Hub in a new project, follow these instructions:
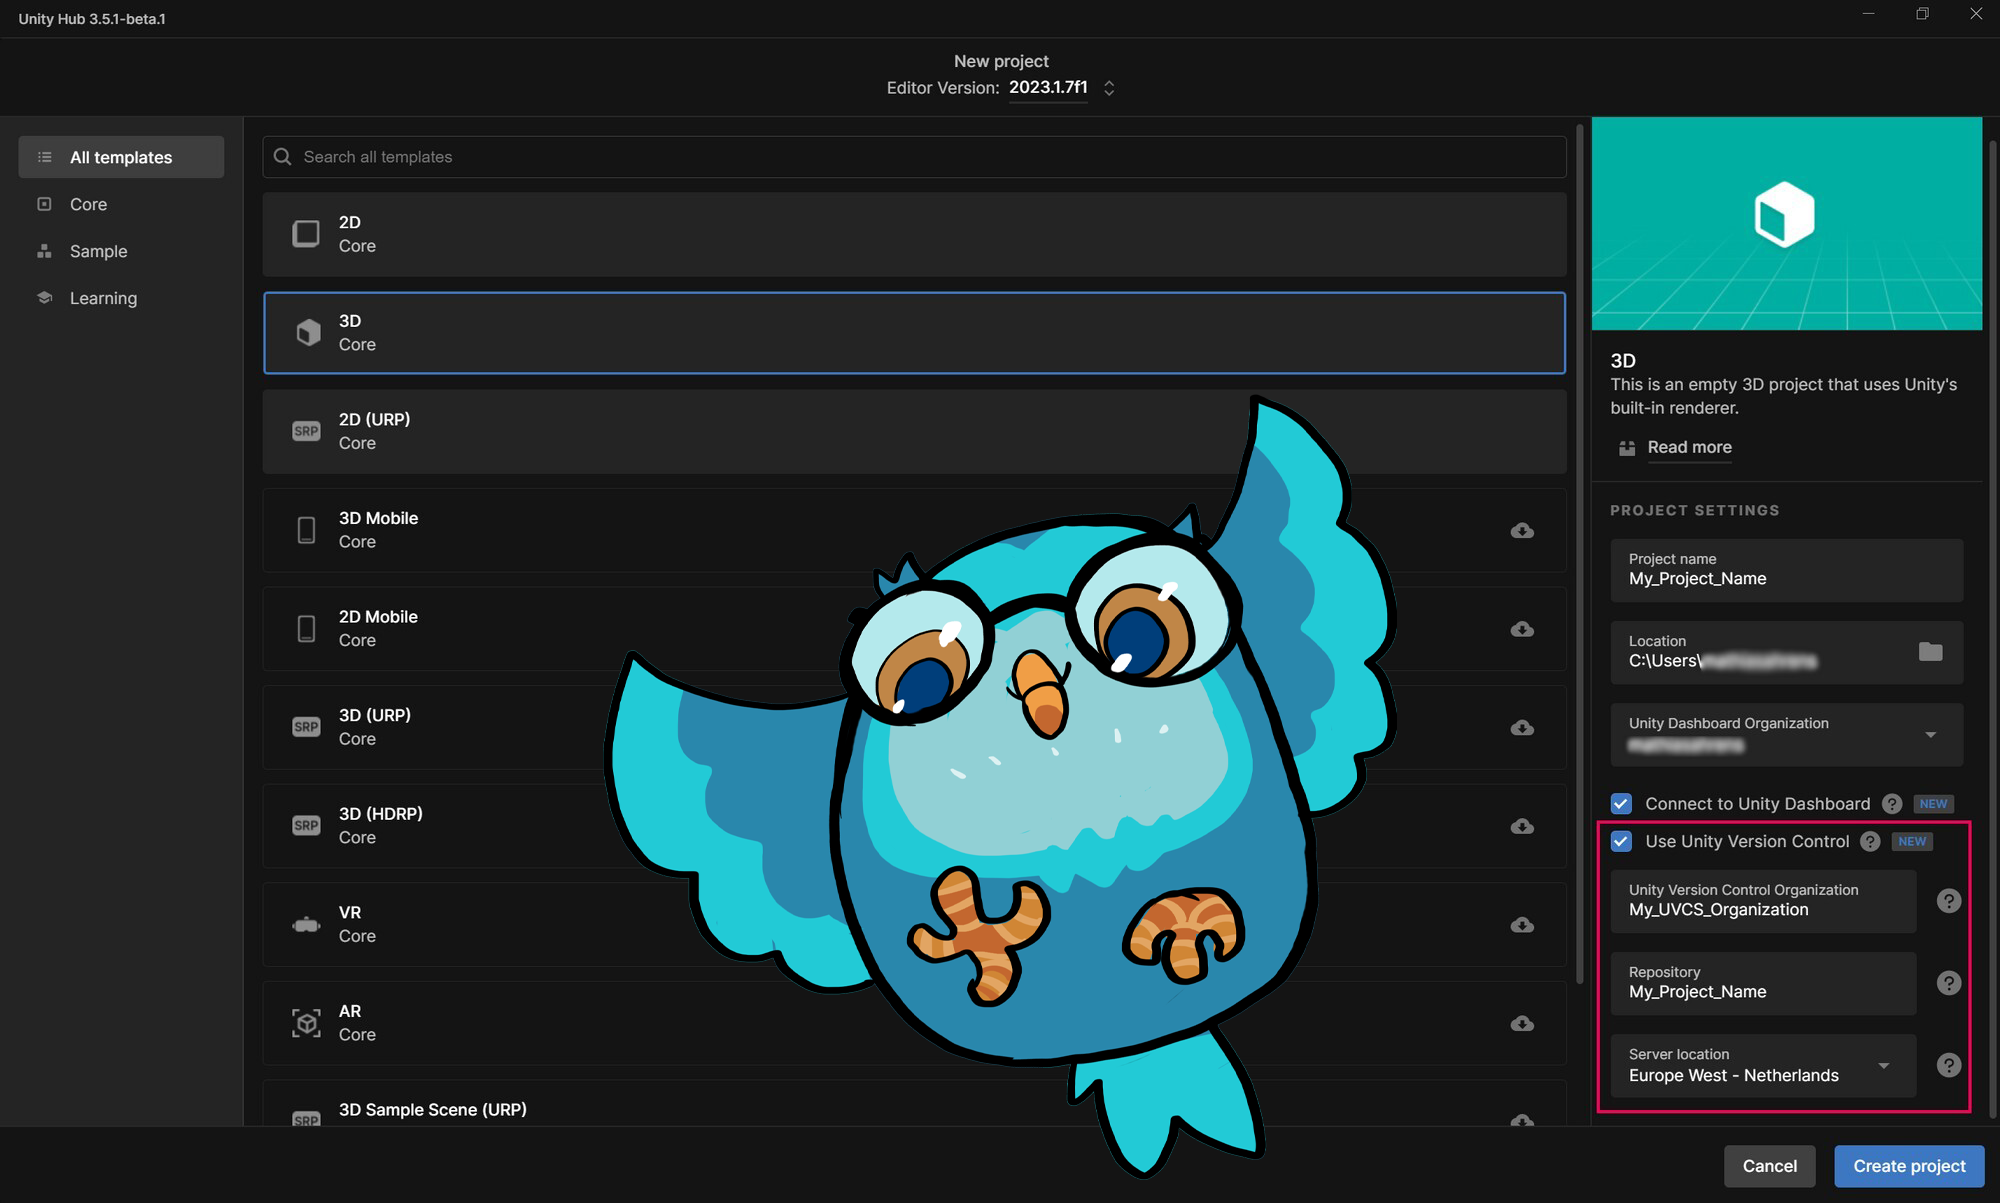
1. Create a new project and select the “3D Blank” template.
2. Name the project name “My_Project_Name”.
3. Enable Use Unity Version Control.
Now, browse the four tooltips to learn more about information about each setting:
- Unity Version Control Organization: Your Unity Version Control Organization is used to save all your different projects on the cloud. It is a different Organization than your Unity Organization, but to keep things simple, this box comes pre-filled by default and will use the same name as your Unity Organization. You can change this if you’d like, but we recommend that you leave it as is.
- Repository: A repository is the name of your cloud storage space for this specific project. It is the equivalent of your project name, but on the cloud. All your project data, assets and history will be saved there. This box also comes pre-filled by default and will use the name of your local project. Again, you can change this if you’d like, but we recommend that you leave it as is.
- Server location: This box allows you to choose which datacenter location your project data will be stored in. Think of your selected data center as your local harddrive, but securely stored on the cloud. You can choose from the different locations available by opening the Server location dropdown menu. The closer you are physically to the datacenter, the faster your project assets will be transferred to and from the server.
Tip: Choose a location that is close to you and most of your team members, since you cannot change it afterwards. For example, if you are working from Montreal, Canada, we recommend you pick US East as your datacenter location.
Please note that if you already have a Unity Version Control Organization, then some fields might be grayed out.
4. Select the Create project button and wait for the Editor to load your scene.
4. Unity Editor features
Now that the Unity Editor has launched, it is time to discover the Unity Version Control plugin!
By default, the Unity Version Control tab will open automatically the first time you open a new project you created from the Hub. For the purpose of this tutorial, we'll discuss the plugin as though you're opening a project you've previously worked on. To checkin your changes to your project, follow these instructions:
1. From the main menu, select Window > Unity Version Control to bring up the Unity Version Control tab at the bottom of your Unity Editor screen.
This is a default package that comes bundled with your Unity Editor version.
You can also easily find it by searching for “Version Control” in the Package Manager (Window > Package Manager).
Once you’ve selected the Package Manager, a new window will open.
2. Select Packages: Unity Registry at the top and find the Version Control package.
Make sure it is installed and up-to-date.
While older versions are compatible, we recommend choosing version 2.1.0 or higher of the Unity Version Control package.
3. Enter the comment “My first checkin” and select the Check in Changes button to submit your first changeset.
The Unity Version Control plugin will now upload your initial Unity project configuration files onto your secure Unity DevOps Cloud Storage.
Congratulations on successfully making your first check in.
As you start using and discovering Unity Version Control, you will quickly realize how useful it can be to do the following:
- Collaborate with other team members remotely.
- Share large asset files easily and securely over the Internet.
- Always keep a safe backup copy on your Unity DevOps storage, in case something goes wrong.
Next, it’s time to invite your friends to join the fun and help you build your game!
5. Invite team members
The free tier of Unity Version Control allows for up to three team members to join a Unity Version Control Organization and work together on the same project.
Since you created the Organization and the associated repository, you are officially the project’s admin. To invite other people to join a project, follow these instructions:
1. Select the Invite Members to Organization icon in the upper-right corner of the Unity Version Control tab.
Note: If you don’t see this icon, make sure you have updated your Unity Version Control package to version 2.1.0 or higher.
If your Unity Editor version doesn’t support the 2.1.0 version, an alternative way to access your Unity DevOps dashboard is to click on this link: https://dashboard.unity3d.com/devops/organizations/default/
Then, click “Seats” on the left navigation bar.
You will now get redirected to the Unity DevOps dashboard.
This is your central dashboard, where you can see your cloud storage, explore files from the web, and invite team members. Feel free to browse the dashboard and look at the different tabs.
Note: This is an optional step. If you wish to keep working on your project alone, then there is no need to invite team members via the dashboard. Unity Version Control is still a useful tool, however, since it allows you to keep a history of all your changes: if something breaks during development, you can go back to a previous version very easily.
2. Select the Seats menu and select Assign Seats.
3. Enter your team member’s email address and select the Assign seats button.
Notice how you have three free seats to assign. One of these seats is already taken by you, so you can invite two more people for free. If you want to add four or more seats to your Organization, note that the website will ask you to enter a credit card number and you will be charged for it, according to the pricing model you choose.
If you have multiple projects and you only want to give them access to one specific project, make sure to set the correct permissions in the Seats menu.
4. Select Seats, then select the Edit user icon, and then select the repository you want to edit permissions for. Then, you can choose to enable or disable certain permissions for each user.
5. Select Save changes.
Another way to grant specific permission to team members is to use custom User Permission Groups, but we will not cover these in this tutorial.
Once this is done, go back to the Unity Editor.
6. Getting invited to join a project
The team member(s) that you have just invited should have received an email inviting them to login with their email address and access your project.
Important: Everyone you invite will need to create a free Unity account in order to access your project.
The email should look like this:
In order for team members to add your project to their Unity Hub, follow these instructions:
1. Select the Add remote project button in the upper-right corner of the Unity Hub.
2. In the Add remote project window, find the name of your project and select the Next button.
3. Select a path on your hard drive where you would like to download and save the local files of this project to.
4. Select the Next button.
5. Make sure to review your remote project’s details and confirm the the following:
- It is using Unity Version Control.
- The Unity Editor version that it is using.
If you don’t have the correct Unity Editor version installed, you will need to download and install it by selecting the Install Version XXXX.YY.ZZ button before you can proceed.
Once this is done, you should see the project name appear at the top of the Unity Hub and with the link icon displayed. It might take a few seconds to load everything and change the icon.
6. Select the project to download the files and launch it in the Unity Editor.
Your team members can now start collaborating with you on the same project using Unity Version Control!
7. What about existing projects?
If you don’t want to create a new project, but instead want to add an existing local one, it’s very easy.
Note: In order to successfully add an existing project to Unity Version Control, you must be an admin of the Unity Version Control organization where you want to store this project.
To add an existing project to Unity Version Control, follow these instructions:
1. Find your project in the Projects list of your Unity Hub.
If the project is not currently using Unity Version Control, you will see a link off icon.
2. Select the More (⋮) menu and select Use Unity Version Control.
3. In the Unity Version Control window, double-check the name of your repository.
The name of the repository will be the same as your project name by default, but you change this if you wish.
4. Select the Connect to Version Control button.
This process might take some time if you are creating a new Unity Version Control Organization and the project’s associated Repository. Notice the progress activity icon in the following screenshot:
Once you have completed this step, the link off icon will have changed to a link icon, and you can start uploading your files to your cloud storage by using the Unity Version Control tab inside the Unity Editor. You can then check in any file or folder that you would like to store in the cloud.
8. Free tier vs Paid tier (How to track your consumption)
Let’s look at one last setting of your Unity Version Control dashboard: the differences between the free tier and the paid tier.
By default, you will start with a free tier that offers the following benefits for you to try out the tool:
- Three seats*
- 5GB of cloud storage*
- 200 Windows Build Minutes*
*Subject to changes - Please always refer back to the official pricing page.
Note: Build Minutes are a convenient way to build your game using Unity’s Build Automation tech, located on the cloud. Unity Build Automation allows you to build your game without using your own computer, so you can continue working on something else. Unity Build Automation also allows you to build on platforms that you don’t have hardware for (for example, you can build to iOS while you use Windows). If you want to know more about Build Minutes, check out the Build Automation documentation.
If you go above the free tier limit, you will have to enter credit card information.
Important: Entering credit card details means that your credit card will get charged every month, depending on how many seats you assigned and how much cloud storage and build minutes you have used.
For more information, check out our pricing table.
On the pricing webpage, you can select different studio size templates to get an approximate cost, depending on your project’s size.
In the example below, the cost for five seats and 20 GB of cloud storage would come to a total of $16.74/month + tax.
If you decide to also use the Build Automation component, with, for example, 400 Windows build minutes, 400 macOS build minutes, and 40 GB of build artifacts storage, the total would come to $37.47 + tax.
It’s really up to you: you can decide to stay on the free tier or subscribe to the paid plan.
As you start using the free tier, we will inform you about the status of your cloud storage capacity via email notifications and alerts on the website dashboard and the plugin when you reach the 50%, 75%, and 90% of the 5GB threshold.
If you reach or exceed the 5GB of cloud storage provided by the free tier, your account will be locked and you will be required to sign up for a paid plan and enter credit card information in your account settings. You will still be required to sign up for a paid plan even if you delete some stored data to fall below the 5GB storage limit again. Usage of all 200 Windows Build Minutes will only lock the Build Automation component of Unity DevOps. If you wish to keep building on the cloud, then you will need to sign up for a paid plan
Note: Only your files in the cloud storage will be locked. You will of course still be able to access the local files of your project at any time, no matter the status of your account. Just don’t delete them from your hard drive!
9. Next steps
Now that you’ve learned about Unity Version Control in the Hub, you’re ready to learn more about Unity’s DevOps tools and workflows.
Share your feedback
This learning experience was created by the Unity DevOps team. If you have any feedback, please share it in the DevOps forum.
Further resources
If you want to learn more about DevOps beyond these tutorials, here are some useful resources: