Import animation
Tutorial
Beginner
+10XP
30 mins
202
Unity Technologies

In this tutorial, you’ll learn how to configure imported animation and use it in an already existing project.
By the end of this tutorial, you'll be able to:
- Define the different rig types and their uses.
- Apply imported animation clips to rigged models in Unity.
- Configure a humanoid rig to share animations between characters.
- Trim animation clips to access specific keyframed sequences within them.
- Create a new Animator Controller for an imported rig.
- Share Animator Controllers between humanoid rigs.
- Identify the purpose of a specified parameter.
- Describe the relationship between parameters and transitions.
Languages available:
1. Overview
While the animation tools in Unity are powerful, complicated or very long animations are often created in external DCCs. This is particularly true when it comes to animating characters, which often require complex controls to aid in the animation process. Because of this, you will often encounter the need to import external animation into Unity. In this tutorial, you’ll learn how to configure imported animation and use it in an already existing project.
2. Can animation be shared?
Animating can be a very time intensive task. Often, animators have to decide where best to spend their time on a project, and may opt to use pre-built animations for background characters, or for animation sets that don’t need to be unique. This allows them to work on what the user will see the most in the interactive experience. Not all character types can easily make use of animation built for another rig, but in Unity, any character that follows a basic humanoid shape (a head, two legs, two arms) can make use of the Humanoid Animation System. In this system, Unity translates existing animation from one humanoid character to another based on the joints in the rig. This means that even drastically different looking characters can share the same animation set!
Aside from creating animation yourself in a DCC, there are hundreds of animation sets available for use online, especially on the Unity Asset Store. So long as the animations were originally created with a rig that falls under the humanoid requirements, you will be able to integrate it into your Unity project. As always, be sure to check the licenses for any animation you download to make sure you’re allowed to use it in your project.
3. Share the Controller
1. Open the TutorialScene_Animation_SharedAnimation_scene located in the scenes folder.
2. Enter Play mode and observe the scene.
This scene has several characters standing together on the platform in a group, but currently only the one in the front is animating. Before you begin adding new animations to the controller, let’s make sure the other characters can animate as well.
3. Exit Play mode.
4. Locate the Characters group in the Hierarchy and expand it to view all of the characters.
5. Select all of the characters in the group and use the object picker in the Inspector to select the Shared_Controller Animator Controller for the Controller parameter.
6. Enter Play mode again.
All of the characters will begin to animate. Even though they’re all sharing the same Animator Controller, you’ll probably notice that they’re animating differently. This is because the Animator Controller has three idle animations that it randomly selects from. Each character has their own instance of the Animation Controller (in other words, individual characters have their own copy of the Controller rather than all working from the exact same Controller), which means that the random animation selected for the idle may differ!
4. Configure the animation type
When preparing animation for import into Unity, an animator is able to create different files for each individual animation, or animate everything together in one file. When a single file containing multiple animations is imported into Unity, it can be split up in the import settings in the Clips section. Here, you can define the start and ending keyframe of each individual animation, and Unity will separate them out for use.
1. Navigate to the Imported Animations folder nested in the Animations folder and select Dance_x3.
2. In the Inspector, select the Rig tab to reveal the rig import settings.
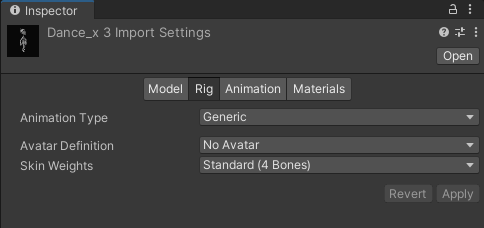
By default, even rigs that are compatible with the Humanoid Animation system will have an Animation Type set to Generic. The Generic rig is useful when working with custom characters that have non-standard bone structures, as it prevents you from sharing the animations with other humanoid rigs. The Humanoid rig type, on the other hand, is ideal for humanoid characters with standard bone structures; it allows you to take advantage of the animation retargeting and sharing capabilities provided by Unity's Humanoid Animation System.
3. Select the dropdown for Animation Type and select Humanoid from the list.
4. Select Apply.
The animations are now configured for use with the humanoid animation system.
Note: There may also be a Legacy Animation Type available, but it relates to an older animation system in Unity. It is considered a deprecated feature and is no longer actively developed or recommended for new projects.
5. Configure the first Animation Clip
Let’s take a look at the animations you’re importing.
1. With the Dance_x3 fbx file still selected, in the Inspector, select the Animation tab to reveal the animation import settings.
2. At the bottom of the Inspector, select the Play button to preview the animation.
The imported animation set contains three distinct dance sequences in one Animation Clip. Currently, these animations can’t be accessed individually, so let’s fix that next. The top half of the Animation import settings contains the Clips section; this is where you can define the individual Animation Clips.
3. In the clips section, select the Add (+) button twice to duplicate the existing Animation Clip.
4. Select the first clip labeled Dance_x3 to select it in the clip editing section below Clips and rename the Dance_x3 clip to Dance_01.
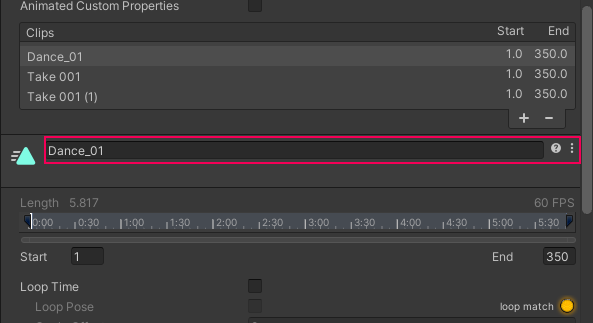
This clip will be for the first dance sequence, so the starting and ending frames need to be defined for that specific movement.
5. Scrub through the animation in the preview window at the bottom of the Inspector and take note of where the animation starts and ends.
Directly beneath the section where you rename the Animation Clip is a timeline with a parameter for the start and end frames. This is the first animation in the clip, so the start frame can remain at 1, but the end frame needs to be defined.
6. In the end frame parameter, type 150.
7. Preview the animation and make sure that it is looping seamlessly, and adjust the end frame if needed.
The animation is looping in the preview, but in the actual experience it’s currently set to only animate once.
8. Enable Loop Time so the animation will loop.
If you preview the animation now, you’ll notice that the ground plane that the character is dancing on will appear to be moving. This is an indication that there is root motion associated with this animation sequence. Left as is, when applied to the animator, the characters will look as if they’re sliding around on the floor as they animate. Root motion is an advanced subject that we won't cover in this project, so you can simply disable its use in this Animation Clip by baking the data into the clip. This will eliminate the sliding effect.
9. Enable the Bake into Pose option in Root Transform Rotation, Root Transform Position (Y), and Root Transform Position (XZ)
The ground plane in the preview will now be steady.
6. Configure the two remaining clips
The process you just completed for the first clip must now be repeated for the remaining two clips.
1. Select the second clip in the Clips list, currently named Take 001, and rename it to Dance_02.
2. Set the Start frame to 151.
3. Set the End frame to 260.
4. Enable Loop Time.
5. Enable the Bake into Pose option in Root Transform Rotation, Root Transform Position (Y), and Root Transform Position (XZ).
6. Select the final clip in the Clips list and rename it to Dance_03.
7. Set the Start frame to 261 and leave the End frame at 350.
8. Enable Loop Time.
9. Enable the Bake into Pose option in Root Transform Rotation, Root Transform Position (Y), and Root Transform Position (XZ).
10. Scroll down to the very bottom of the inspector and select Apply to save all of your import changes.
7. Add the new clips to the animation controller
The new clips are now fully configured and can be added to the already existing Animator Controller.
1. In the animations folder, locate the Shared_Controller Animation Controller and double-click to open it in the Animator.
2. Dock the Animator directly below the Scene view so you have access to the Project window and the Animator at the same time.
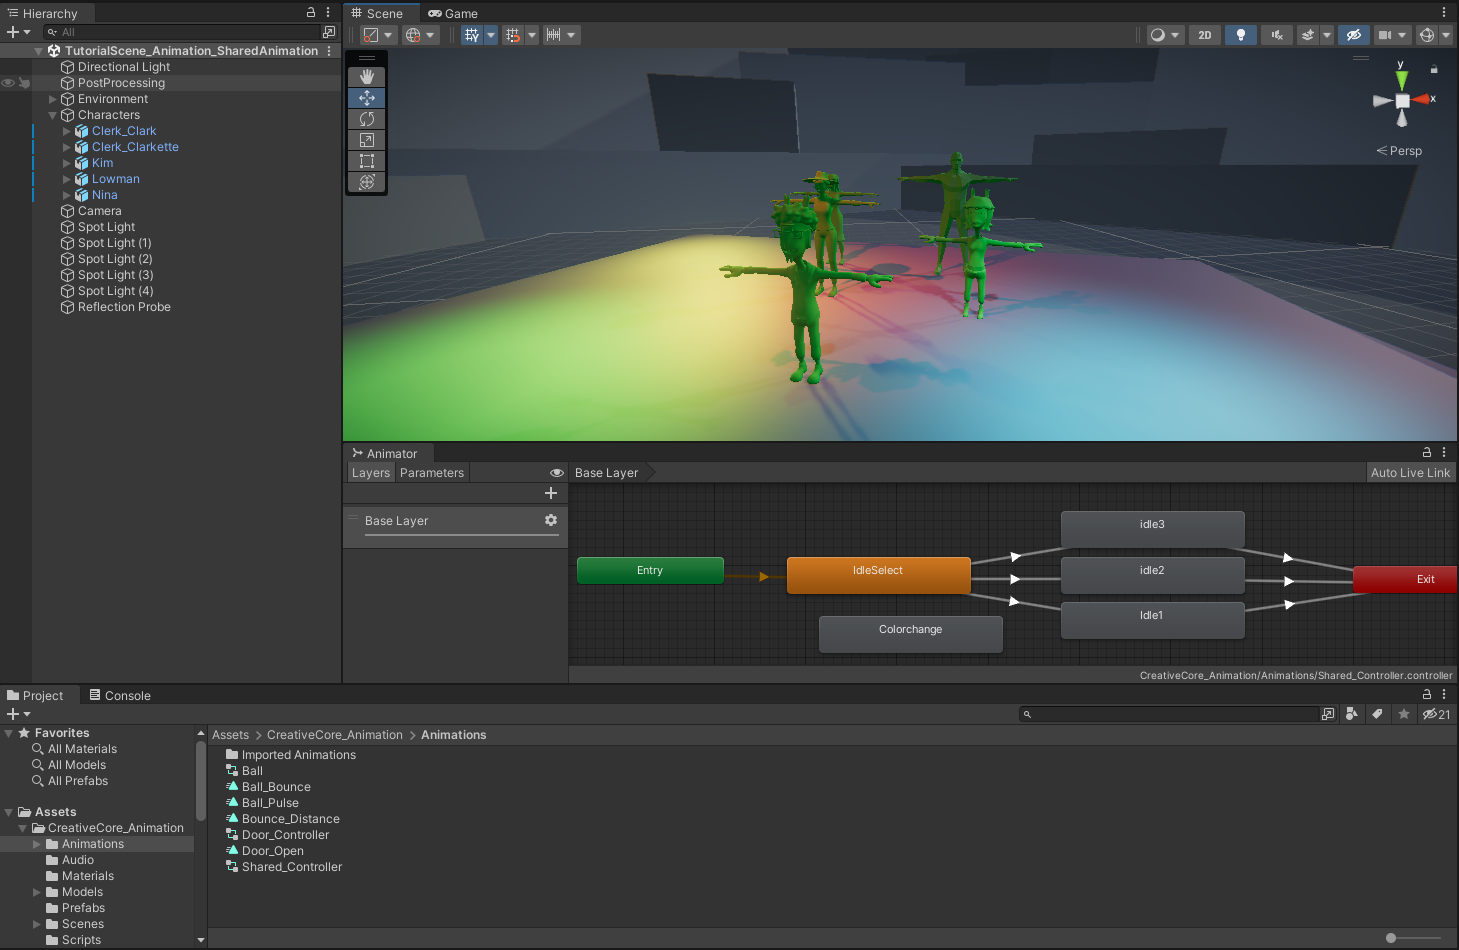
3. Locate the Dance_x3 animation in the Imported Animations folder and expand it to reveal all three new Animation Clips.
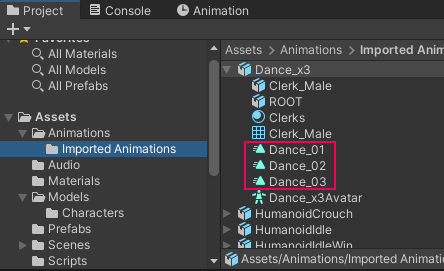
4. Drag the three dance clips into the Animator somewhere to the right of the Any State node.
When you drag an animation clip into the Animator, it automatically creates an Animation State from that clip.
Attached to each of the characters in the scene is a script called DanceParty. If you’d like to review it in Visual Studio, double-click it to open it. The script’s functionality is simple; when the application runs, the script accesses each character’s animator and will begin looking for keyboard input from the user. If the user presses Q, W, or E, then the script will call a Trigger Parameter named Dance_01, Dance_02, or Dance_03 respectively.
Let’s create those parameters in the Animator and connect them to the new Animation Clips.
5. Select the Add (+) button in the Parameters tab of the Animator and select Trigger from the list.
6. Name the new Trigger Dance_01, taking care to spell and case it exactly as written here, otherwise the script won’t work.
7. Create two more Triggers and name them Dance_02 and Dance_03.
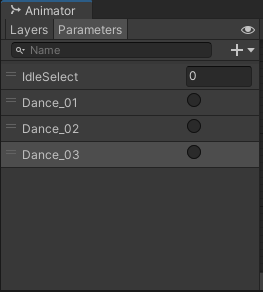
When the user presses the Q, W, or E key on the keyboard, the character should stop whatever they’re doing and perform a dance. Because this should happen at any time, the Any State node will be used. The Any State node can interrupt any transition in a State Machine, and will call whatever animations associated with it.
8. Right-click the Any State node, select Make Transition, and connect it to the Dance_01 node.
9. Select the new transition, and in the inspector, click the + button in the conditions section, then select Dance_01 from the list.
10. Right-click the Dance_01 node, select Make Transition, and connect it to the Exit node.
11. Repeat this process for Dance_02 and Dance_03.
12. Playtest the game and press Q, W, and E.
Whenever you press Q, W, or E on the keyboard, the characters will immediately transition to the associated dance, complete it, and then go back to idling!
8. Explore: Dance Party!
Let’s keep this dance party going! The DanceParty script attached to the characters is actually configured for three more animation sequences, so you can add a personal touch to the Animator Controller.
- Find or create three new dance animation sequences for the dance party. If you aren’t sure where to look, remember that there are plenty of resources on the Unity Asset Store.
- Import the animations into Unity, and configure them as needed.
- Add the Animation Clips to the Animator Controller.
- Create three new trigger parameters: Dance_04, Dance_05, and Dance_06. These parameters correspond to the R, T, and Y keys.
- Create transitions to your new Animation Clips and remember to Transition to the Exit node so you can return to the idle animations.