
Introduction to Optimization in Unity
Tutorial
Beginner
+10XP
15m
(222)
Unity Technologies
Unity’s optimization tools allow you to diagnose common performance problems and refine a project’s design, code, and related assets to maximize efficiency. An optimized project will run smoother and more responsively on your target platforms and devices.
This tutorial will help you better understand optimization tools and techniques available in Unity and provides suggested uses for each tool. To learn how to use each tool, please refer to the following tutorials: Working with the Profiler Window, Working with the Stats Window, Working with the Frame Debugger, and Optimization Approaches for Project Assets.
Languages available:
1. Introduction to Optimization with Unity
Verified in 2019.4
Verified in 2019.3 - https://learn.unity.com/tutorial/introduction-to-optimization-with-unity-2019-3
Unity’s optimization tools allow you to diagnose common performance problems and refine a project’s design, code, and related assets to maximize efficiency. An optimized project will run smoother and more responsively on your target platforms and devices.
This workflow will help you better understand optimization tools and techniques available in Unity and provides suggested uses for each tool. To learn how to use each tool or concept, please refer to the following workflow tutorials: Working with the Profiler Window, Working with the Stats Window, Working with the Frame Debugger, Introduction to Sprite Atlas, Fixing Performance Problems, and Optimization Approaches for Project Assets.
2. Unity Optimization Tools
Profiler Window
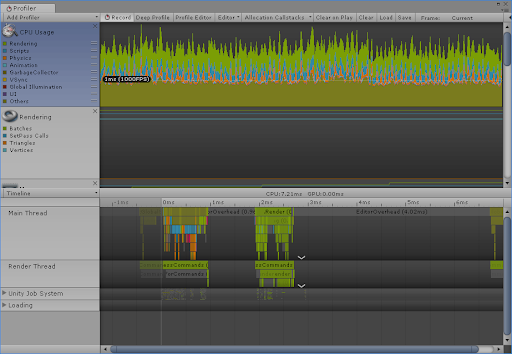
To access the Profiler Window, hold Ctrl (Command on Mac OS) and press 7, or from the Unity Editor Window dropdown, select Analysis > Profiler. (Figure 01)
The Unity Profiler lets you monitor your project’s performance in real-time and shows you the resource demand of your project. It’s the most effective tool for spotting performance bottlenecks and allows you to see how long it takes to complete certain tasks, how much memory is in use, and the frame rate at which your project is running. To access the Profiler from the Unity Editor, select Analysis > Profiler (Figure 01). To learn more about the Profiler, see Working with the Profiler Window.
Stats Window
Stats are enabled in the upper right corner of the Game view in the Unity Editor. (Figure 02)
The Stats Window shows real-time rendering statistics, which is incredibly useful for optimizing performance. The statistics will vary depending on the build target you’ve defined and are organized into two categories: Audio and Graphics. To learn more about the Stats Window, see Working with the Stats Window.
Frame Debugger
To access the Frame Debugger, select Analysis > Frame Debugger. (Figure 03)
The Frame Debugger allows you to freeze playback for a running game on a particular frame and view the individual draw calls used to render that frame. The Debugger also lets you go through frames one-by-one so you can see in greater detail how the scene is constructed. This will help you figure out if particular scenes are causing frame rate issues. To learn more about the Frame Debugger, see Working with the Frame Debugger.
3. Optimization Techniques
Batching
Batching involves the grouping of similar processing tasks. When you have shopping to do, you don’t go to the store and back for each individual item. Instead, you make a list of items, go to the store, and buy everything in one trip. Batching works in a similar way. A Sprite Atlas is a collection of Sprites or 2D UI elements bundled together and processed in one batch on the GPU, rather than individually. This helps optimization by creating far less work to render the same graphics. There are potentially hundreds of graphic elements being rendered in each frame, making batching one of the fundamentals of optimization. To learn more about Sprite Atlases, see Introduction to Sprite Atlas.
Memory Handling
On the more technical side of optimization is memory handling. Memory handling is automatic as far as the developer is concerned, but there are ways to help or hinder memory management. Memory has two organizational structures: the stack and the heap. The stack, named because it functions similar to a stack (of lunch trays, for example) with one open end, is limited to temporarily stored and smaller variables, but is much faster to access. Aside from global variables, it’s good practice to declare a variable only when it’s necessary, in the function where it’s used. Memory is allocated from the stack when you declare a variable using its type, such as int mySpeed;. Memory from the stack is automatically freed as soon as there are no more references to it.
The heap, also known as the managed heap, is used for variables that are larger or stored longer, and is slower to access. Memory is allocated from the heap when the new keyword is used to create an object — for example List<string> partyGuests = new List<string>();. The memory occupied by a variable in the heap needs to be one continuous chunk (contiguous). If there’s insufficient contiguous memory for the declared variable, unneeded heap memory is freed. If available memory is still insufficient, the heap is expanded.
Heap memory that’s no longer needed to store variable data is known as garbage. Freeing of this unneeded memory is called garbage collection. Garbage collection generally happens as needed, but can also be manually triggered. Depending on factors like the amount of memory to be freed, garbage collection can cause a hiccup in performance. Manually triggering garbage collection is generally used to free up memory when any lag introduced will be either unnoticed or have minimal impact. To learn more about memory, see Fixing Performance Problems
Object Pooling
Another effective way to optimize garbage collection is to pool and reuse GameObjects rather than creating and destroying new ones. This applies to anything that is frequently created and destroyed — in a game, this would include bullets, muzzle flashes, and blocks of procedurally generated destructible terrain. An example in a non-gaming scenario would be elements of an interface that is dynamically populated and refreshed. Anything that’s used more than a few times, and can be destroyed, should be pooled. Like garbage collection, the process of allocating memory and instantiating an object is slow. Constantly instantiating and/or destroying objects, especially a large number in a very short span of time, will quickly introduce performance issues.
Rather than directly instantiating a pooled object, one is requested from the pool’s object stack. If no free inactive object exists, such as at the start of a game, or if all objects in the pool are in use, a new object is created, assigned to the pool, and passed to the requestor. If an inactive object is available, it’s reactivated and passed to the requestor. When a pooled object is no longer needed, it’s returned to the pool and deactivated, to be reused later. When reusing a pooled object, be sure to reset it, or else it will appear in the same state — and same place — as when it was deactivated. To learn more about Object Pooling, see Introduction to Object Pooling
Asset optimization
The less work Unity has to do to load, access, and unload assets, the more smoothly and responsively your project will run. To learn more about optimizing assets, see Optimization Approaches for Project Assets.
Caching
Caching involves the temporary storage of data so it may be accessed more quickly for reuse. To revisit the shopping metaphor, let’s say you’re at the store and forgot to put several items on your list. Rather than call home to be reminded of each item, you call once and write the items down (cache), so the information is there when you need it. Cache anything you’ll need to access frequently. Rather than use GetComponent in your Update loop, declare a data member of that component’s type and call GetComponent once in Start or Awake to assign it to the data member. In Update, reference the data member.
The proper use of Update, LateUpdate, and FixedUpdate
Avoid putting all of a MonoBehavior’s logic in the Update() loop. This is a potential problem for a few reasons:
- Readability. It’s good practice to break your logic out into clearly named functions and call those functions as needed. This abstraction makes it easier to track the flow of logic, rearrange steps as needed, and find and debug problem areas in your code. Another benefit is that you can stub out your game’s logic flow and experiment with the actual implementation.
- Consistency. Update doesn’t run at a steady interval, but instead is framerate-dependent. This inconsistency introduces issues with physics simulation, which is best placed in FixedUpdate(). FixedUpdate effectively runs at a fixed interval.
- If your code depends on actions taken by other MonoBehaviors’ Update() loops, it’s best placed in LateUpdate(). LateUpdate runs after all MonoBehaviors’ Update functions have run in a frame. An example use of LateUpdate would be to correct the movement of a camera that’s tracking the player to ensure it stays within bounds of the game world.
- The Update loop runs completely every frame, so demanding code can introduce lag. Code that doesn’t need to run every frame should be encased in a conditional block. For example, if a player is being knocked back after taking damage, we don’t need to check Controller input since they’re not able to move on their own this frame.
Coroutines
Code that doesn’t need to, or can’t, run completely in a single frame should be placed in a coroutine. A coroutine is a code block with return type IEnumerator that runs alongside a MonoBehavior’s main Update(), FixedUpdate(), and LateUpdate() loops. Since a coroutine runs independently of these loops, it can take as long as necessary without slowing or stopping the action. One use of a coroutine is to generate platforms offscreen for an infinite runner. These need to be generated before they’re necessary, without stopping the game to make new platforms, and a coroutine is the perfect solution. One point of caution with coroutines: don’t forget to yield! The coroutine must yield control after completing its work, and after each step in a loop, or else execution is delayed.
Code that is to run at a fixed interval of more than a frame should be placed into its own function and called (once, in Start) using InvokeRepeating(). An example use of InvokeRepeating would be in a wave shooter game, where the wave controller checks every 2 seconds to see if all of the enemies are dead, or to have an email program automatically retrieve new messages from the server at a fixed interval.
4. Unoptimized code
Below is a simple unoptimized script for player movement. (Figure 04)
Though it’s technically functional, the above code would benefit from optimization in a few ways:
- We’re unnecessarily creating a new Vector3 each frame. We no longer need to store the value of the input axes after we set the Rigidbody’s velocity, so we can safely reuse a Vector3, overwriting its values at the start of each Update cycle.
- We’re getting the reference to the Rigidbody component of our GameObject each frame. Since this doesn’t change, we can just create a Rigidbody data member, use GetComponent once to store the reference to the Rigidbody component, and refer to that for quicker access.
- Our movement speed is hardcoded to a value of 10, and it isn’t clearly stated in the code what 10 represents. When first starting on a project, it’s common for there to be many variables that need adjusting from their initial values. Assigning those values to obviously named public variables allows a developer to adjust them in the Inspector as needed while Play mode is active. This interactive iteration is a way to optimize the time and effort needed to find good values. When a good value is found, that variable can be made private (or you can hide a public variable with [HideInInspector] before initialization) and initialized to that value to declutter the Inspector. Remember that changes made to a MonoBehavior’s variables while Play mode is active are reverted by default upon exiting Play mode.
It can be difficult to see the benefits of optimization in a project consisting of a single script such as our exercise, but this workflow will put you on a good path to better understanding optimization. As you build a project, don’t get caught up in optimizing everything from the start, as it will interfere with you making a functional, testable project — unnecessary optimization wastes time and can even introduce bugs. Rather, incorporate optimization techniques into your workflow from the beginning and once your project is fully functional, monitor performance in the Profiler window and test builds on your target hardware, optimizing only as needed.