Introduction to real-time 3D experience design
Tutorial
Beginner
+10XP
20 mins
5393
Unity Technologies

In this tutorial, you’ll explore the basics of real-time 3D experience design. You’ll:
- Recap the different phases of production
- Review the core design process for creating a digital experience
- Consider common approaches to real-time 3D experience creation
Languages available:
1. Overview
Real-time 3D engines such as Unity are tools used to create digital experiences, from first-person shooter games to XR experiences at the cutting edge of augmented reality. These experiences don’t emerge fully formed: they’re the result of comprehensive design and development processes. This tutorial will introduce you to those processes, so that you can use them in your own projects.
2. Experience design and the real-time production cycle
Before you explore the design process, let’s take a moment to consider the role of design in the real-time production cycle.

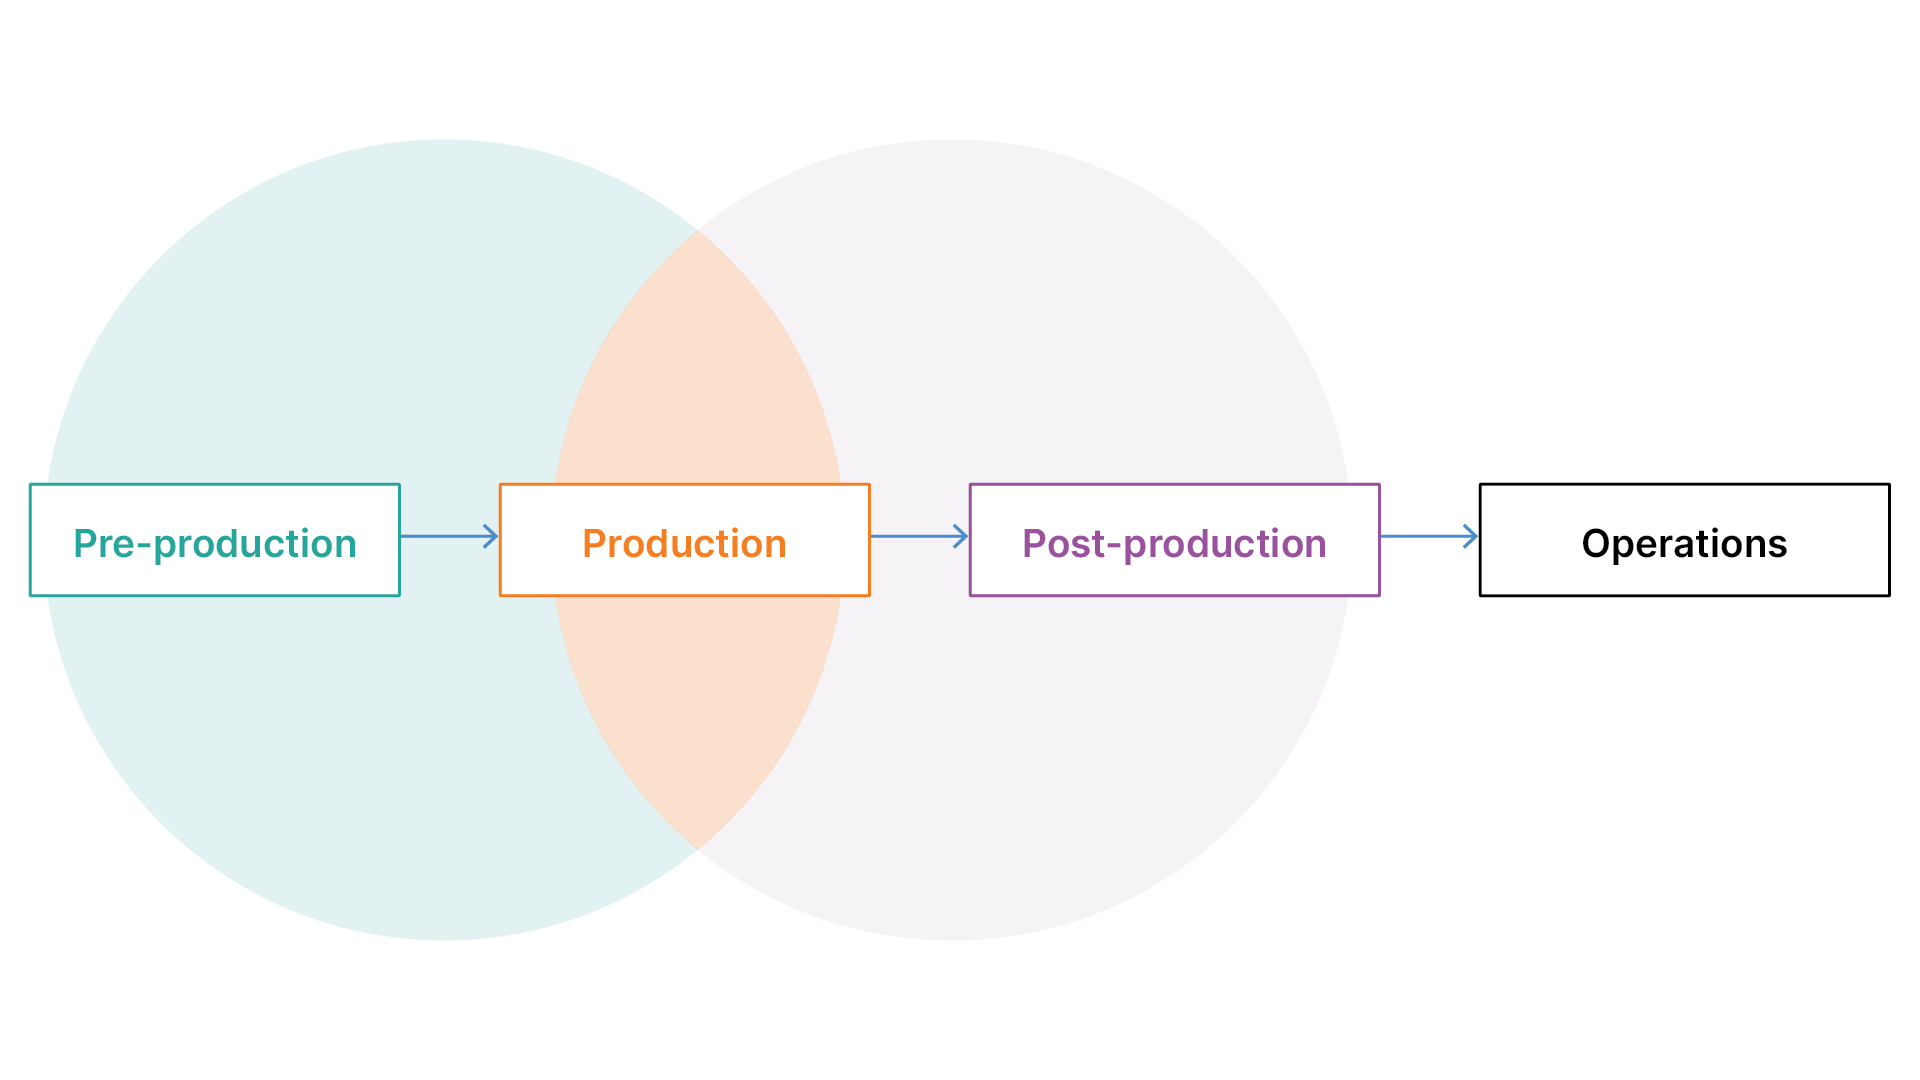
Design primarily sits in the blended first three phases of the real-time production cycle: pre-production, production and post-production. However, design has significant impact throughout the whole cycle. For example, findings during the operations cycle phase may result in ongoing design work for continuous improvement.
Many professional projects involve large teams that include product managers, designers, developers, and testing specialists from different disciplines. Even if “Designer” is not part of your official role, it’s still valuable for you to have a clear understanding of the design process. In fact, understanding design will even be helpful in the projects you’ll be guided through in your Learning Pathways!
Watch the following video to hear more about how design affects the entire real-time production cycle.
3. The design process: ideation and research
The core process of designing a digital experience is similar to designing all sorts of other things. Let’s review that process with a focus on real-time 3D experience creation, starting with ideation and research:
Stage 1: Identify a problem or define an idea
Design for real-time 3D normally starts with a high-level problem statement or idea. This idea might be goal-focused; for example, “I want to make it easier for my architect client to visualize their design in 3D, which is not well-addressed by the solutions they’re currently trying.” Or, it might be a very high-level idea; for example, “We want to create a multiplayer tactical RPG.”
Whatever the case, this initial statement should be the basis of the Game Design Document for the project. This can take many different forms, and acts as the single source of truth to guide design and development.
Stage 2: User and market research
The next stage is to take some time to research the target users and what’s currently available to meet their needs. All design activities start with consideration of the target users’ needs; the design and development process is a realization of one particular way to meet those needs.
It is important to do some competitive research, to find out if there are already other offerings available to address your problem or something similar. This may help you to:
- Identify relevant constraints that might inform the scope of the project, technological or otherwise.
- Develop a better understanding of the unique value proposition of your proposed project, compared to the other ones available.
At this stage, it is also important to consider inclusive design, which is a design methodology for considering the needs of those who are under-represented or marginalized in a particular space. This includes people with disabilities and those who come from historically excluded or under-represented cultures and backgrounds.
Stage 3: Create user personas and define use cases
User research is codified into specific user personas. Personas are fictional profiles of archetypical target users, drawing on the insights identified in your user research. These personas clearly define user needs, and are used throughout the design process to keep the team focused on the users. Part of this work may also involve identifying different use cases, where the needs of the target personas will be different.
4. The design process: clarified brief and initial prototypes
Next, let’s review how that research is used to refine the designs and create a strong foundation for development.
Stage 4: Refine the brief and clarify goals
This stage is the last preparatory stage before full design work begins. It’s an opportunity to refine the brief based on the identified user needs, and to clarify your goals with these in mind. This process will help you keep a tight focus for your design work.
Stage 5: Preliminary designs
Next, preliminary designs are created to address the brief. This is an exploratory and iterative design phase, in which the team:
- Creates example designs
- Evaluates them with the wider team against the defined user needs and the game design document
- Refines the designs or moves in a new direction, and then repeats the cycle
Depending on the experience and the team involved, design work might be split into multiple workstreams. For example, if a team was designing a new phone rather than a real-time experience, they might split into separate teams for the hardware and the operating experience that could work concurrently.
This design stage could include:
- Creating visual representations of the experience, from simple sketches to complex schematics
- Mapping out the user experience flow or branching logic using a physical or digital whiteboard
- Creating user interface (UI) wireframes
- Producing concept art and other visual design sketches
Stage 6: Prototyping
Next, the designs are used to create one or more basic prototypes of the experience. Depending on the project and the design methodology used by the creator or team, this stage may overlap with the creation of the preliminary designs.
As with the preliminary designs, the prototype(s) are evaluated against the defined user needs and game design requirements; this continues throughout the design and development process. At this stage, external user feedback may be sought from target users, or the feedback may remain internal.
5. The design process: iterative design and development
Finally, the chosen prototypes are used as a proof of concept for full design and development.
Stage 7: Iterative design and development
When the prototype(s) are signed-off by the project decision-makers, an iterative cycle begins:
- Design
- Build
- Test
- Evaluate
- Refine the design
This stage can be organized in a variety of different ways, depending on the project scope and chosen design methodology. Evaluation is ongoing throughout this stage, with regular testing to ensure that the experience addresses the defined user needs.
In addition, the experience will usually undergo extensive internal and external testing and user feedback cycles before being ready for launch.
6. Common real-time experience design and development approaches
The high-level process outlined in the previous steps will differ slightly in practice, depending on the requirements of the project and the team. These differences are described as a design and development approach. For example, a solo hobbyist developer is likely to approach the design and development process in a different way from a large AAA game development team. While these approaches differ, the underlying principles of the design and development process remain the same.
Let’s review some common approaches used in real-time experience design.
Waterfall approach
The waterfall approach is commonly used in traditional software development; it’s less common for creating games, but is sometimes used in non-game real-time experience creation. In this approach, after pre-production is complete, design and development is completed in defined and discrete linear stages. When one stage is complete and signed-off, the next is begun, like a waterfall flowing downward.
This approach to design and development makes it difficult to change things once they are created, due to the dependencies between the different stages. Because of this limitation, the agile and hybrid approaches described below are usually preferred.
Agile approaches
Agile design and development, on the other hand, is an iterative approach. It involves working in cross-functional teams on particular features to incrementally plan, build, and refine the experience.
This is a much more flexible methodology, providing design and development teams with greater flexibility and enabling them to adapt to new discoveries and changing requirements. This approach is often considered to favor agility (as the name suggests) over precision, though this is not the full story: it all depends on how the team implements the approach and what their defined priorities are.
Hybrid approaches
A hybrid approach, using elements of both agile and waterfall, might involve having relatively linear preparation during project pre-production, but then iteratively building and testing in cycles focused on particular features.
Project management and design approaches
For more information on the project management aspect of these methodologies, and tools you can use to help you implement them, review Introduction to project management and teamwork.
7. Next steps
In this tutorial, you’ve taken time to review the high level design process used to create real-time experiences and identified a custom approach based on a specific situation.
The next time you start a new project, whether it’s a Learning Pathway submission or a personal project that has sparked your attention, go back to the process you identified. Consider how well it fits the constraints of the new situation, and adjust it if necessary. Then use your personal approach to guide and give structure to your design and development as you work on the project.
We can’t wait to see what you create!