Profile CPU performance in Android builds with Android Studio
Tutorial
advanced
+0XP
60 mins
24
Unity Technologies

While the Unity Profiler is the best choice for initial, coarse-grained performance profiling, developers on mobile projects may require greater granularity than the Unity Profiler can provide. In this tutorial, you will learn how to profile using Android Studio’s CPU profiling tools in order to track down CPU performance issues at runtime.
Languages available:
1. Overview
While the Unity Profiler is the best choice for initial, coarse-grained performance profiling, developers on mobile projects may require greater granularity than the Unity Profiler can provide. For example, user code being executed in MonoBehaviour.Update callbacks is not instrumented and therefore will not be marked up. Users can therefore not easily determine bottlenecks in C# code using the Unity Profiler.
Bottlenecks are different in all Unity projects, and profiling is the key to determining and fixing performance issues. If you’re seeing performance issues in your Android application that is built with Unity, follow this tutorial and try Android Studio for yourself.
Android Studio’s CPU profiling tools are very useful for tracking down CPU performance issues at runtime. The two main CPU profiling recording methods explored in this tutorial are System Trace Recording and Callstack Sample Recording. These two methods are complementary to one another and serve different purposes.
System Trace Recording displays instrumentation data to the user, similarly to the Unity Profiler. It can additionally be used to better understand thread execution per CPU core.
Callstack Sample Recording displays sampling data to the user. This recording method shows detailed call stacks that have been sampled across threads during execution.
Please refer to Android Studio’s documentation on The Android Profiler for more details. For a summary of profiling-related topics, such as instrumentation and sampling, see Wikipedia’s article on Profiling.
2. Before you begin
This tutorial assumes that you already have a completed mobile project in Unity that you are ready to profile. In addition, this tutorial assumes that you are working with the following software and hardware:
- Windows or macOS
- Unity 2020.3
- Android Studio Bumblebee | 2021.1.1
- Android device with Android 8 (API 26) or newer with 64-bit architecture
To begin profiling in Android Studio:
1. If needed, download and install Android Studio. You can use Android Studio’s documentation on how to Install Android Studio for help with this.
2. Open your Unity project and ensure that it’s in a state that is ready to be published and profiled.
3. Prepare an Android build of your project
Several settings must be set correctly in your Unity project in order to successfully profile an Android build in Android Studio.
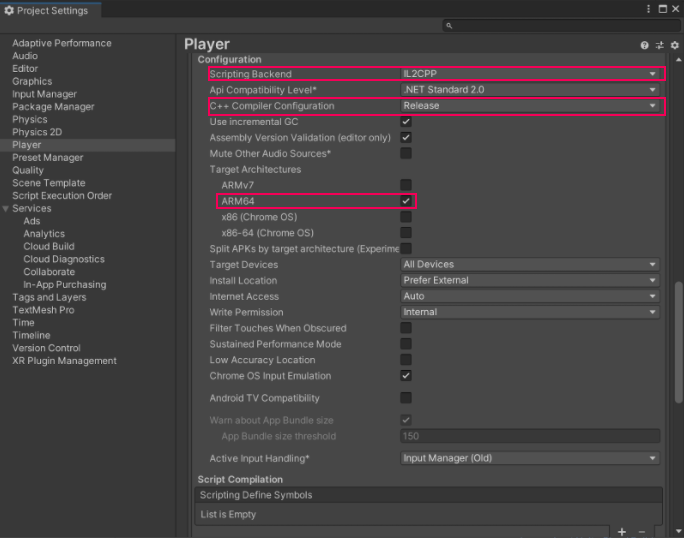
Reviewing your Player Settings will ensure that your build uses the IL2CPP scripting backend. Builds that use IL2CPP can be profiled in Android Studio.
1. Open the Project Settings window by navigating to Edit > Project Settings.
2. Open the Scripting Backend dropdown and select IL2CPP.
3. Open the C++ Compiler Configuration dropdown and select Release.
4. Under Target Architectures, enable ARM64. (ARMv7 can also be used by Android Studio, but it is less reliable when used with Android devices that have ARMv7 architecture).
4. Build Settings
Reviewing Build Settings will ensure that your build is connectable and profileable in Android Studio with as little overhead as possible. To format your settings:
1. Select File > Build Settings to open the Build Settings window.
2. Under Platform, select Android and select Switch Platform at the lower-right of the window.
3. Under Android Settings, disable Export Project.
4. Enable Create symbols.zip.
5. Enable Development Build.
4. Disable Autoconnect Profiler.
5. Disable Deep Profiling Support.
6. Disable Script Debugging.
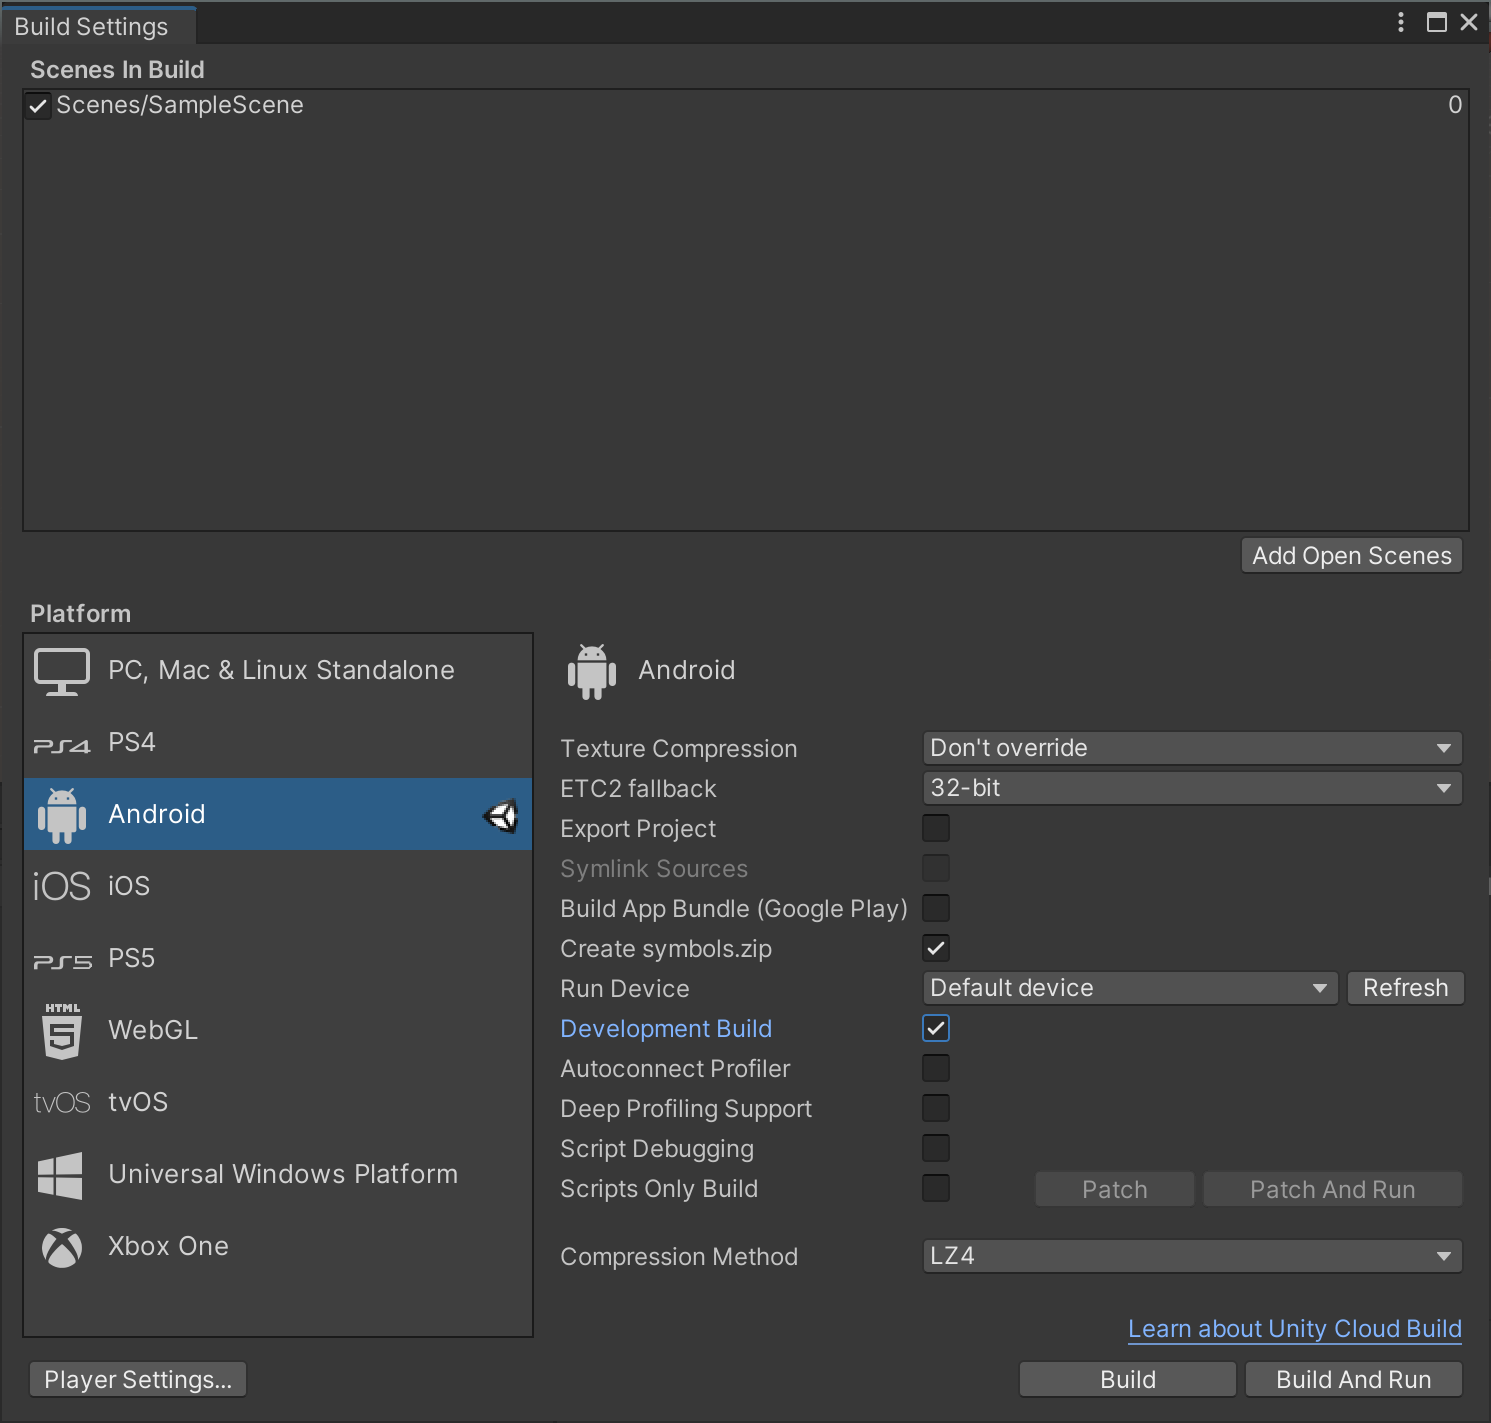
With Build Settings properly configured, select Build. Once completed, you will have an Android Package file (APK) and a symbols.zip archive on disk.
5. Set up the Android Studio project
A Unity Player built with Development Build enabled will result in the debuggable flag being enabled in the AndroidManifest.xml. This AndroidManifest.xml is then used during the Unity build process for Android. When this debuggable flag is enabled for an APK, Android Studio’s profiling tools can be used to profile the application at runtime. To learn more about Android debugging capabilities, consult Android’s Debug your app documentation.
Android Studio allows users to profile pre-built debuggable APKs without having to export an Android Studio project from Unity. This feature is very useful, as it does not disrupt the Unity project’s build process.
To create an Android Studio project from your APK:
1. Navigate to where you saved the build files from the previous step.
2. Unzip the symbols.zip that was created alongside the Android APK.
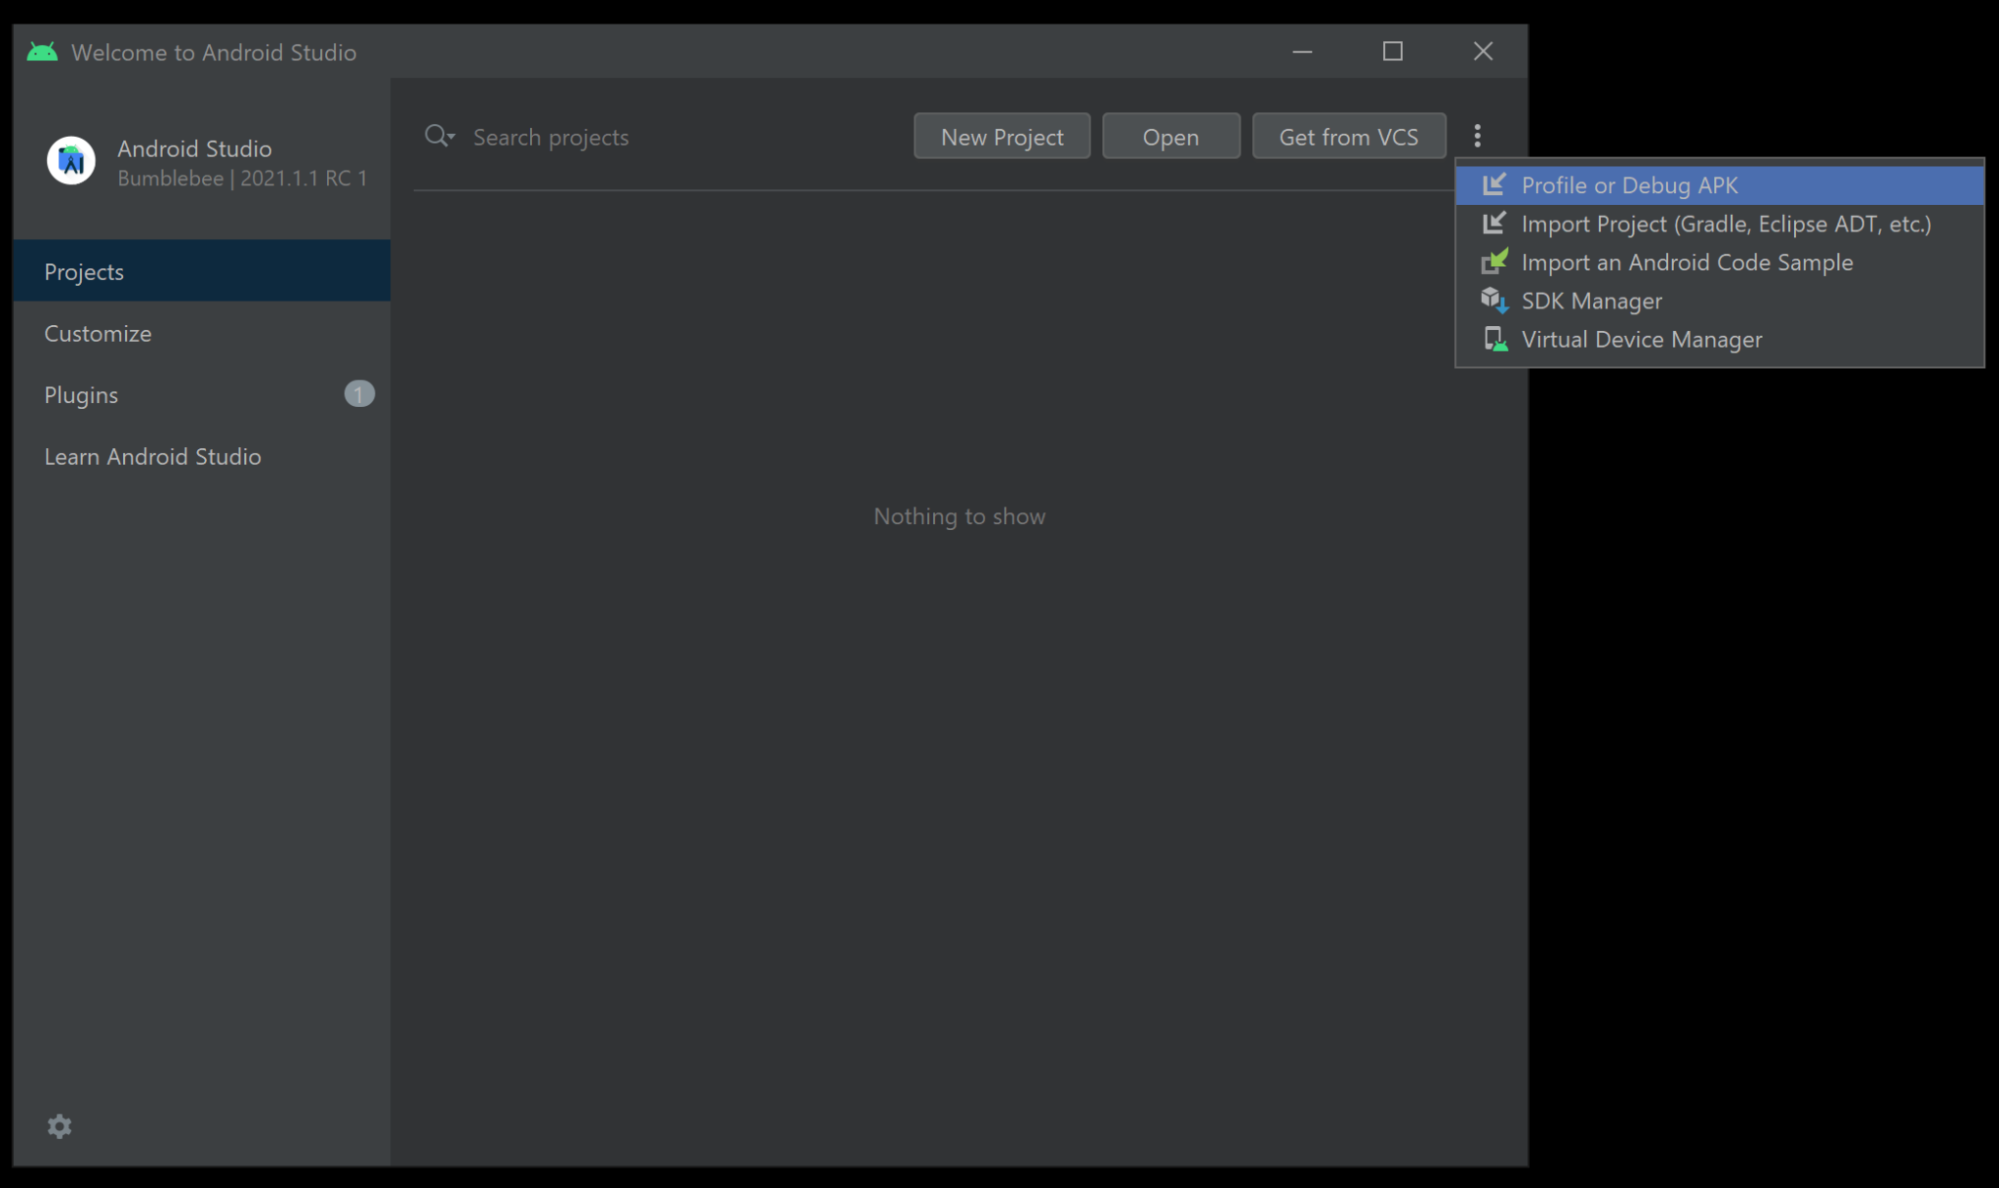
3. Open Android Studio. When presented with the project launcher, select the More menu (⋮) and then select Profile or Debug APK.
4. Select your APK.
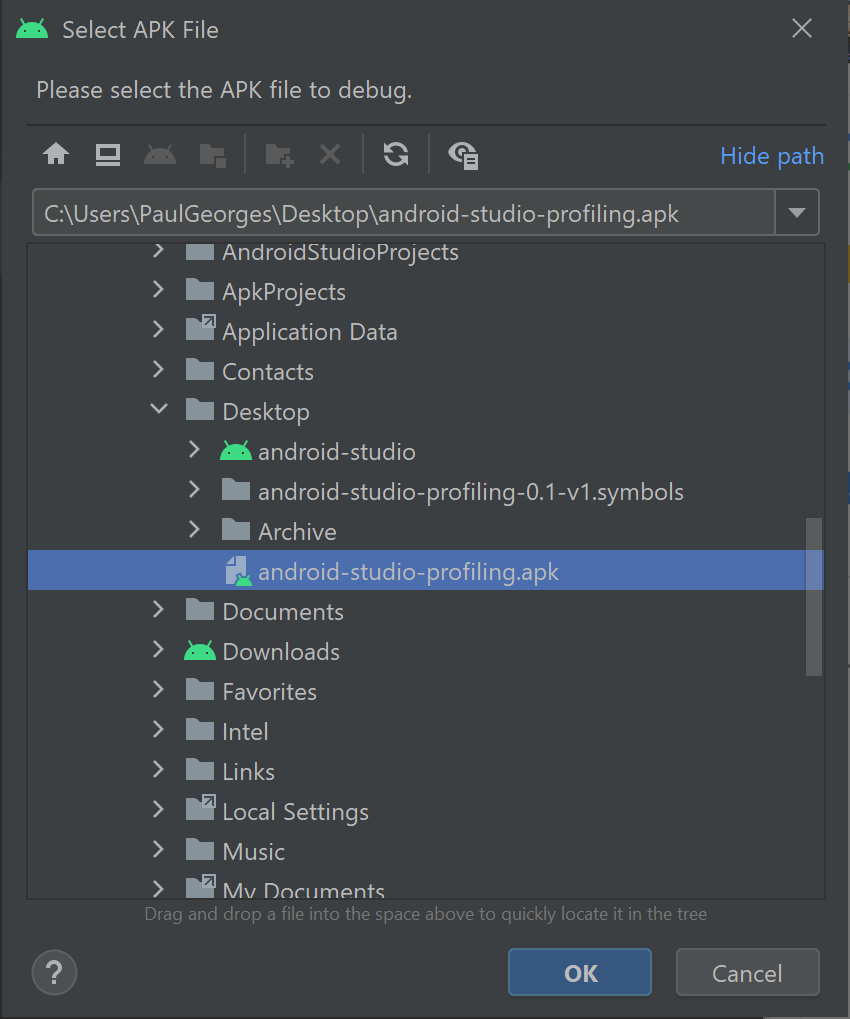
You will be presented with the following screen:
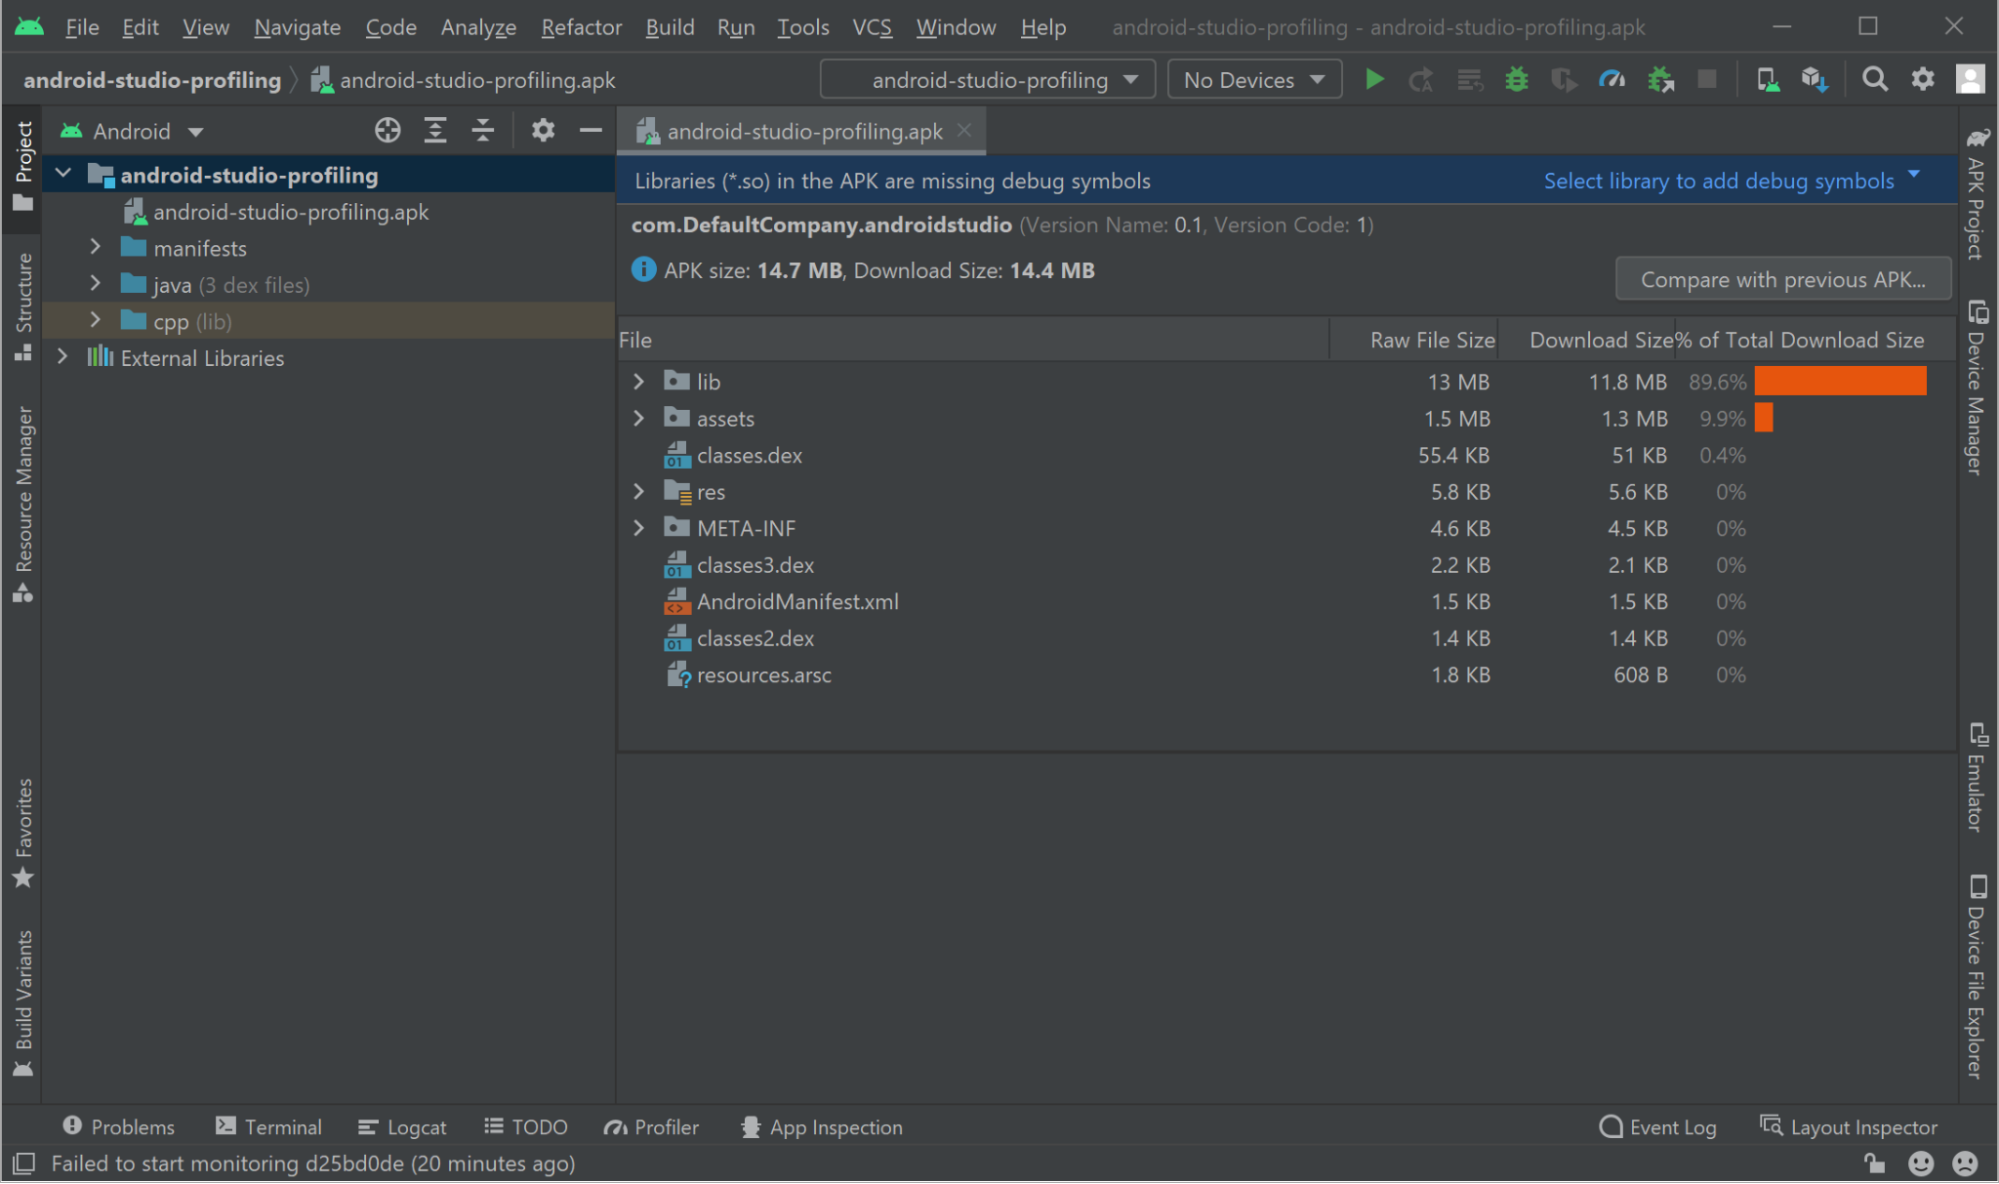
5. Add symbols for libil2cpp.so. Select Select library to add debug symbols and select libil2cpp.so.
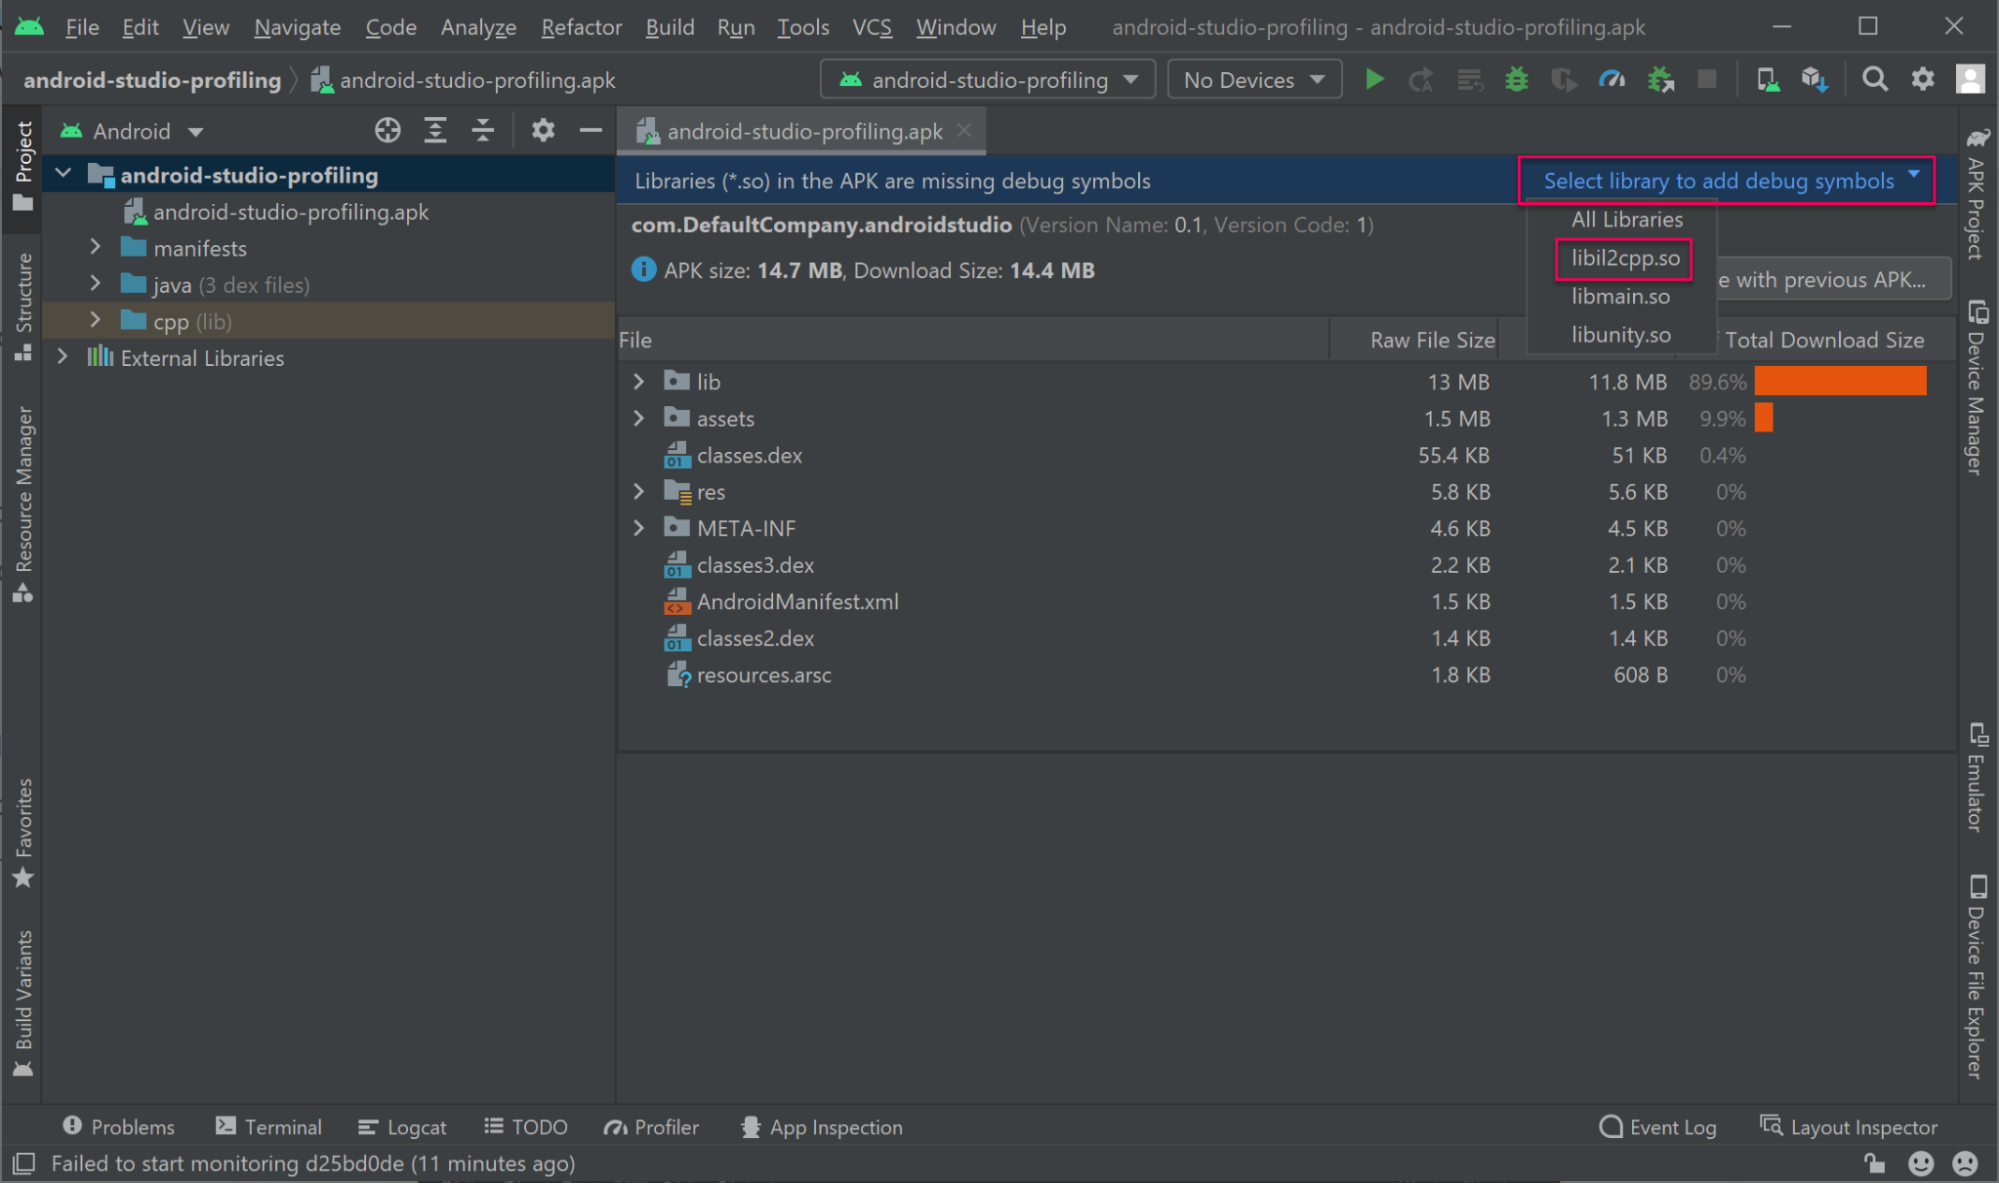
6. Select Add.
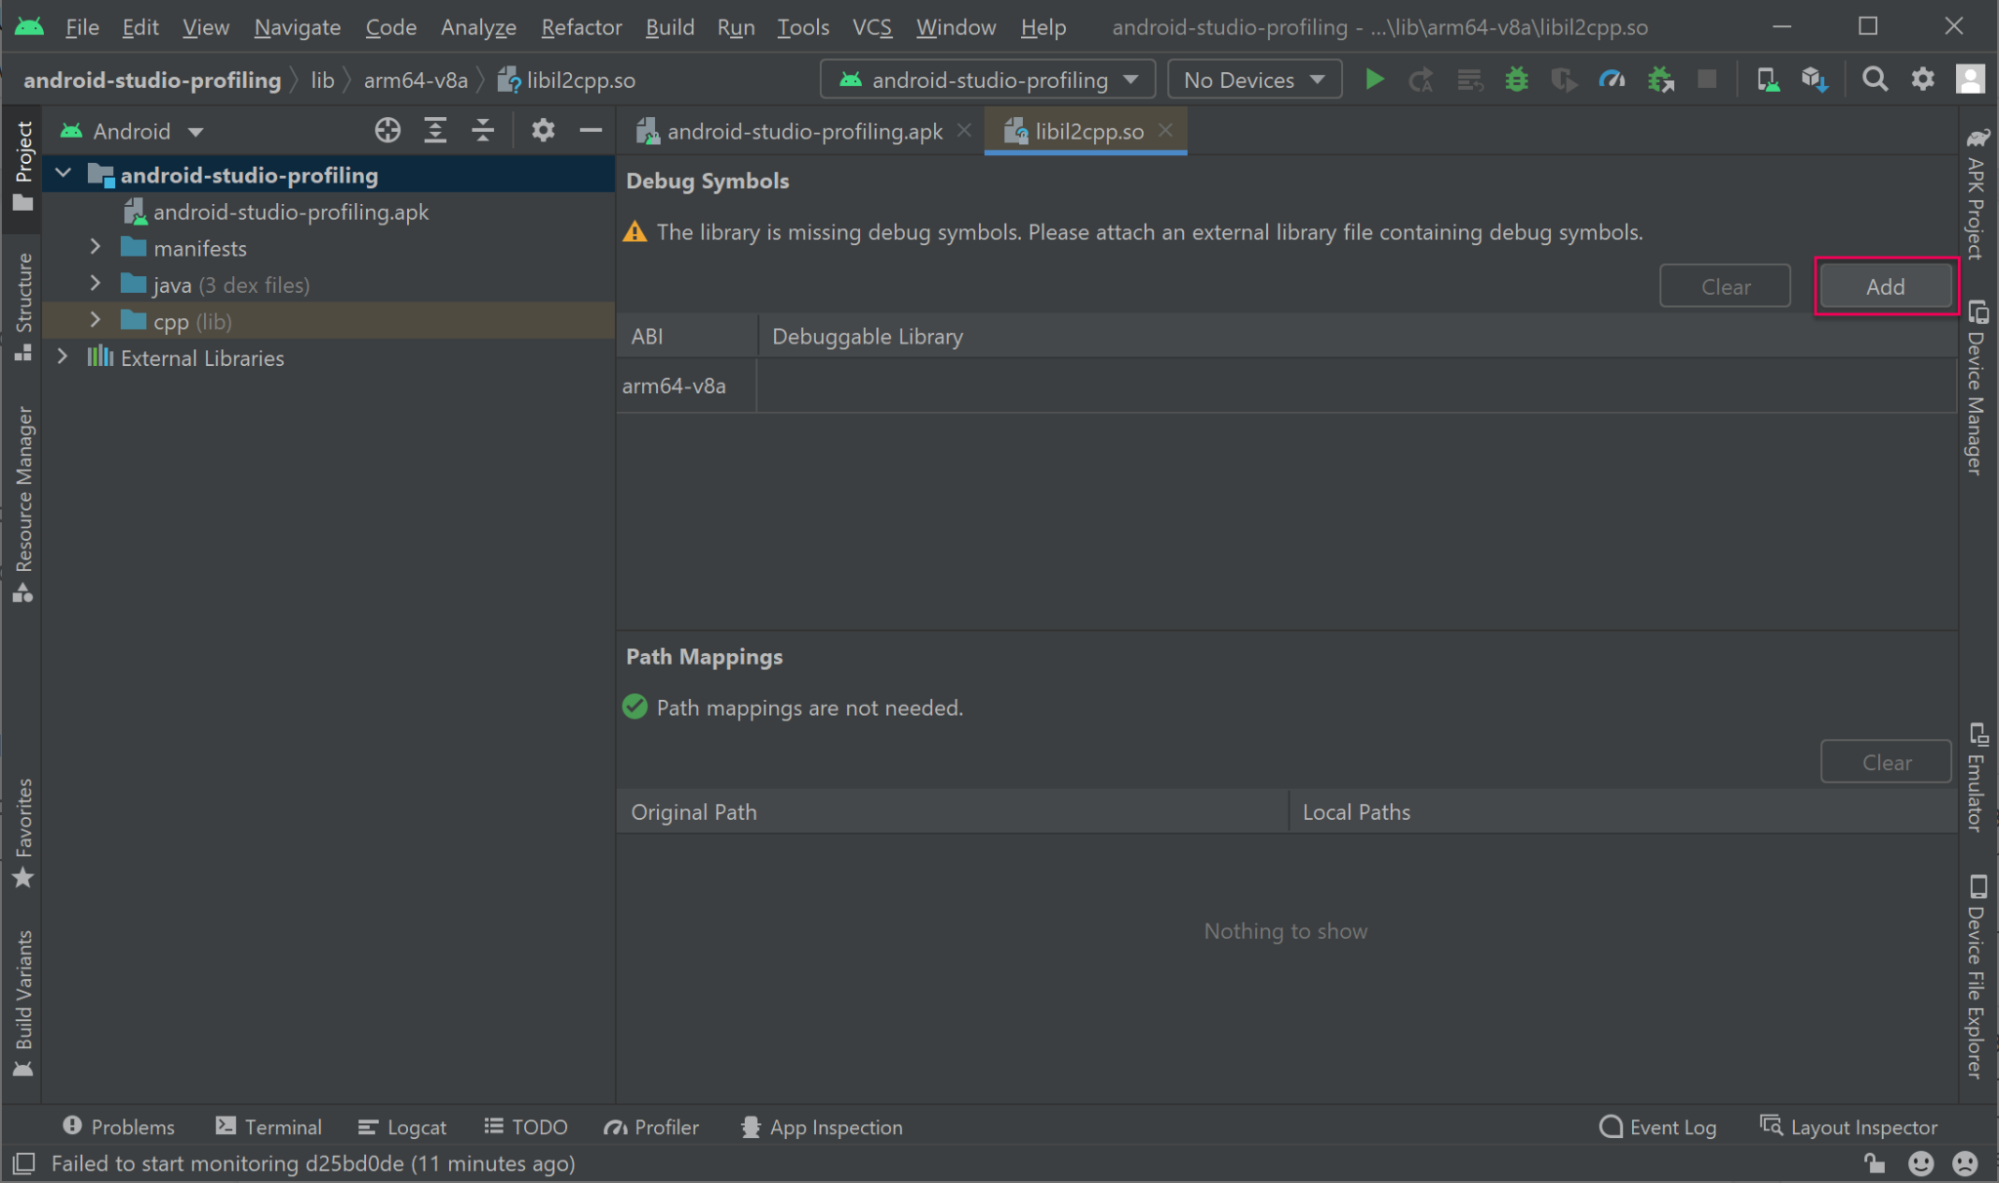
7. Select libil2cpp.dbg.so from the folder where you extracted the symbols.zip archive.
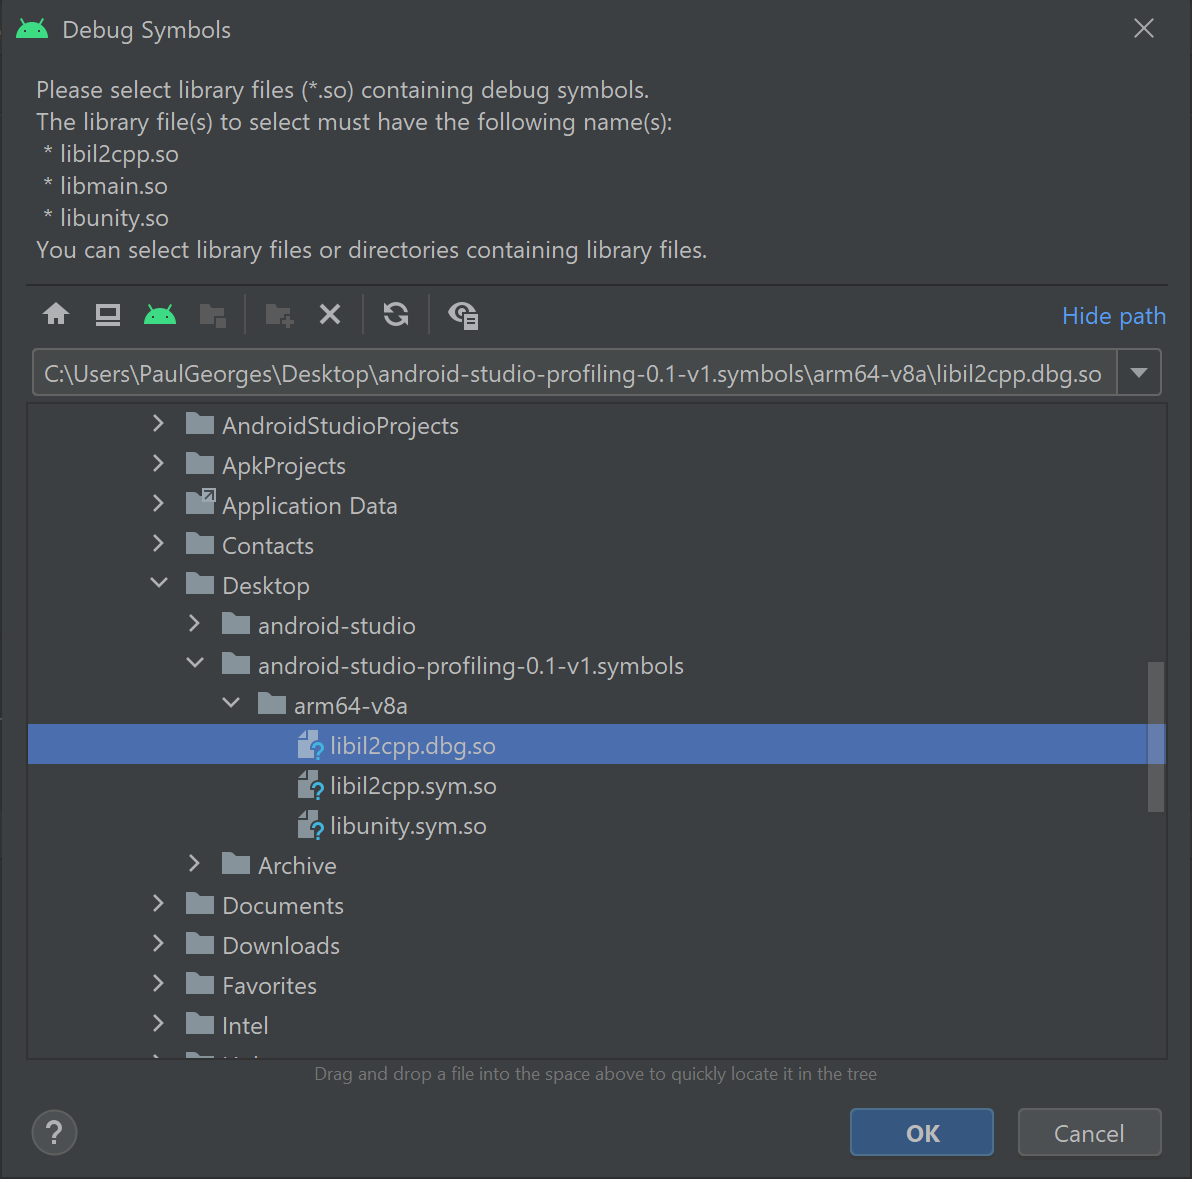
If symbols have been resolved correctly, you will be presented with the following screen:
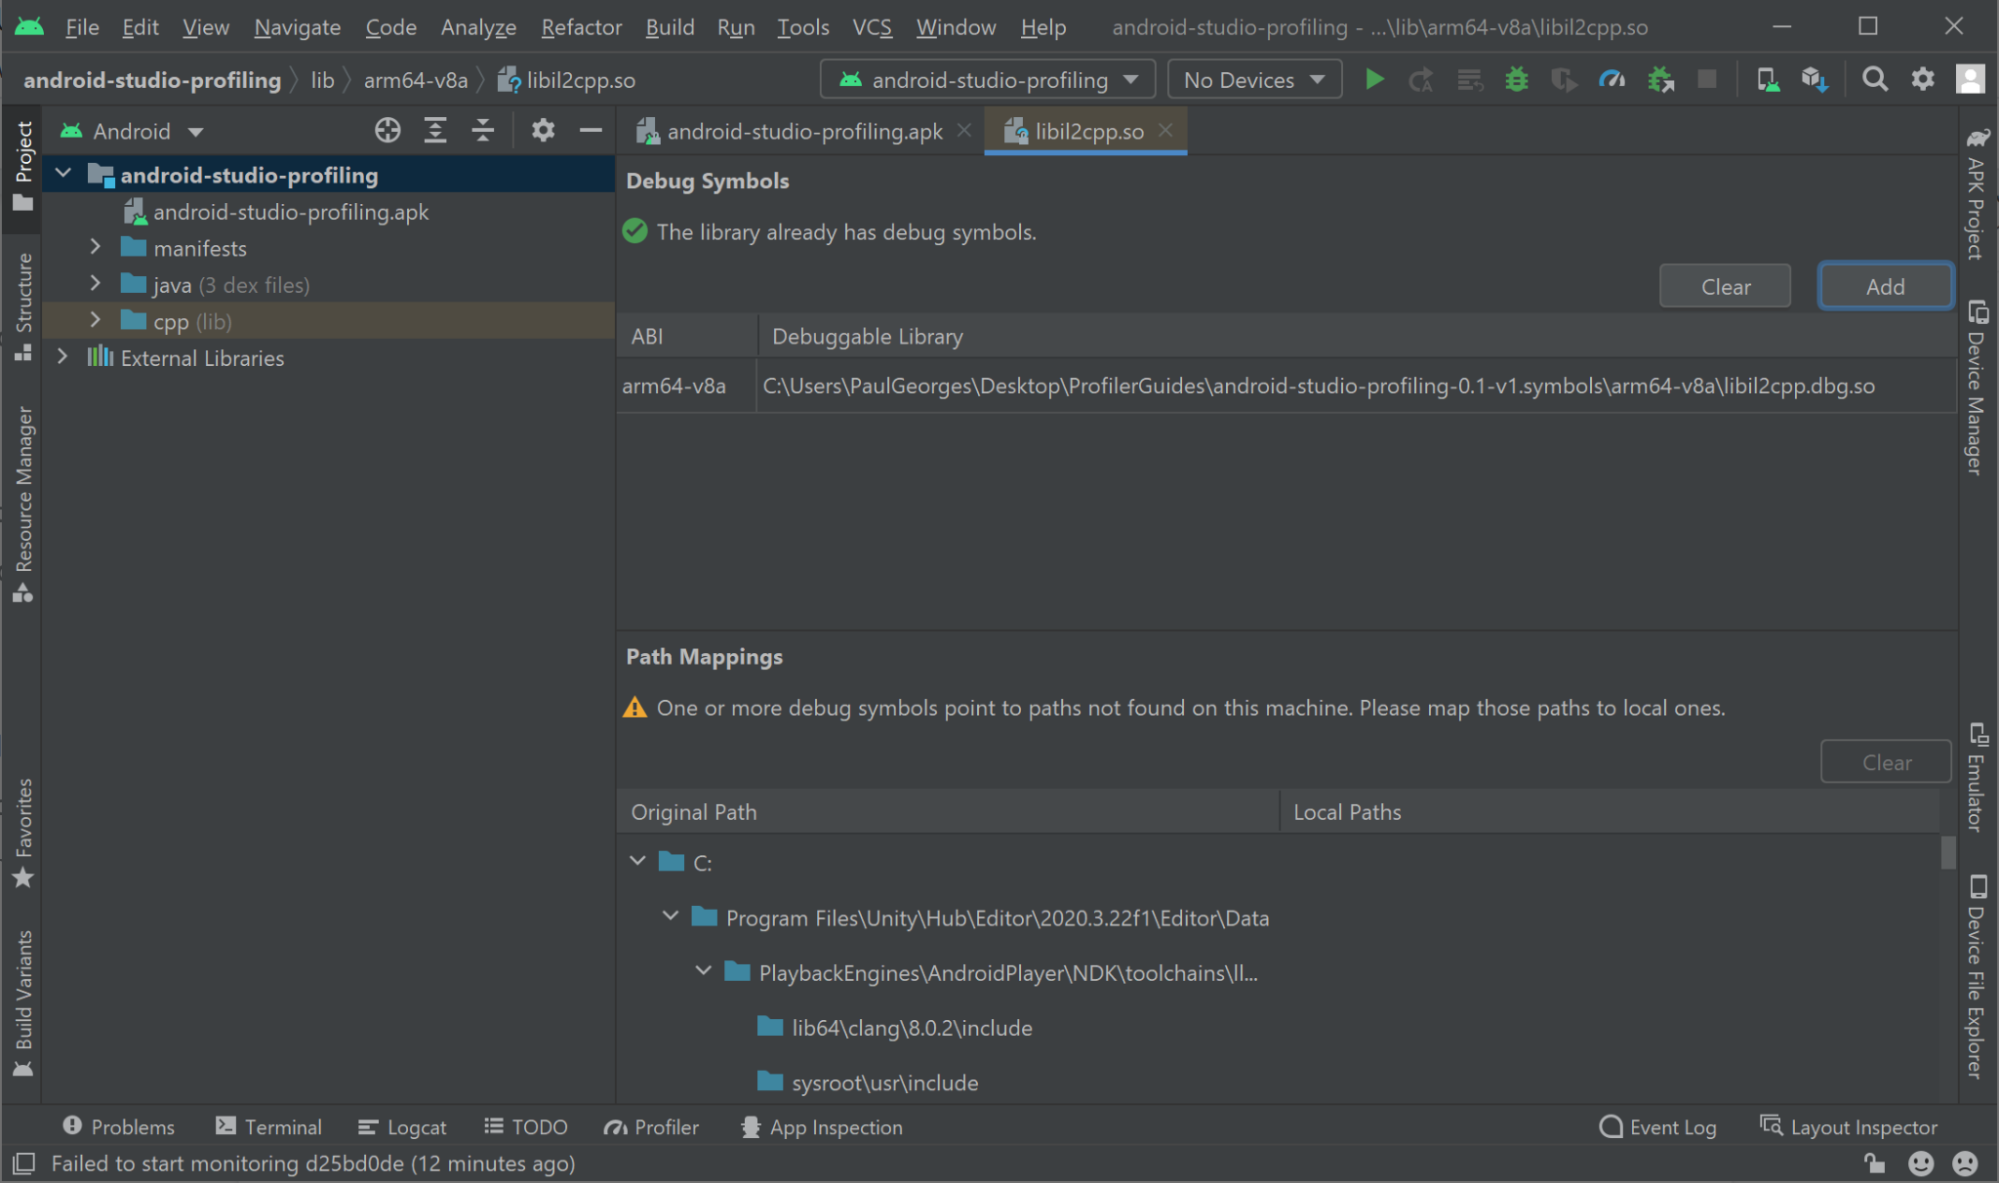
Note: If you see an error stating that the SDK Platform was not installed, select the popup that appears and reads “Install missing platform and fix project”. Once updated, move on to the next step.
At this point you are ready to profile CPU usage using Android Studio. Please refer to Android Studio’s documentation on how to Profile pre-built APKs for additional details.
6. Connecting the profiler
Android Studio allows you to attach its profiler to a running debuggable application. Android Studio also allows the profiler to automatically attach to an application launched via the Profile button.
Note: Before connecting the Android Studio profiler, ensure that no other processes are making use of Android Debug Bridge (adb). To learn more about adb, consult the Android Debug Bridge (adb) documentation.
Attaching to a running debuggable application
To attach to a running debuggable application:
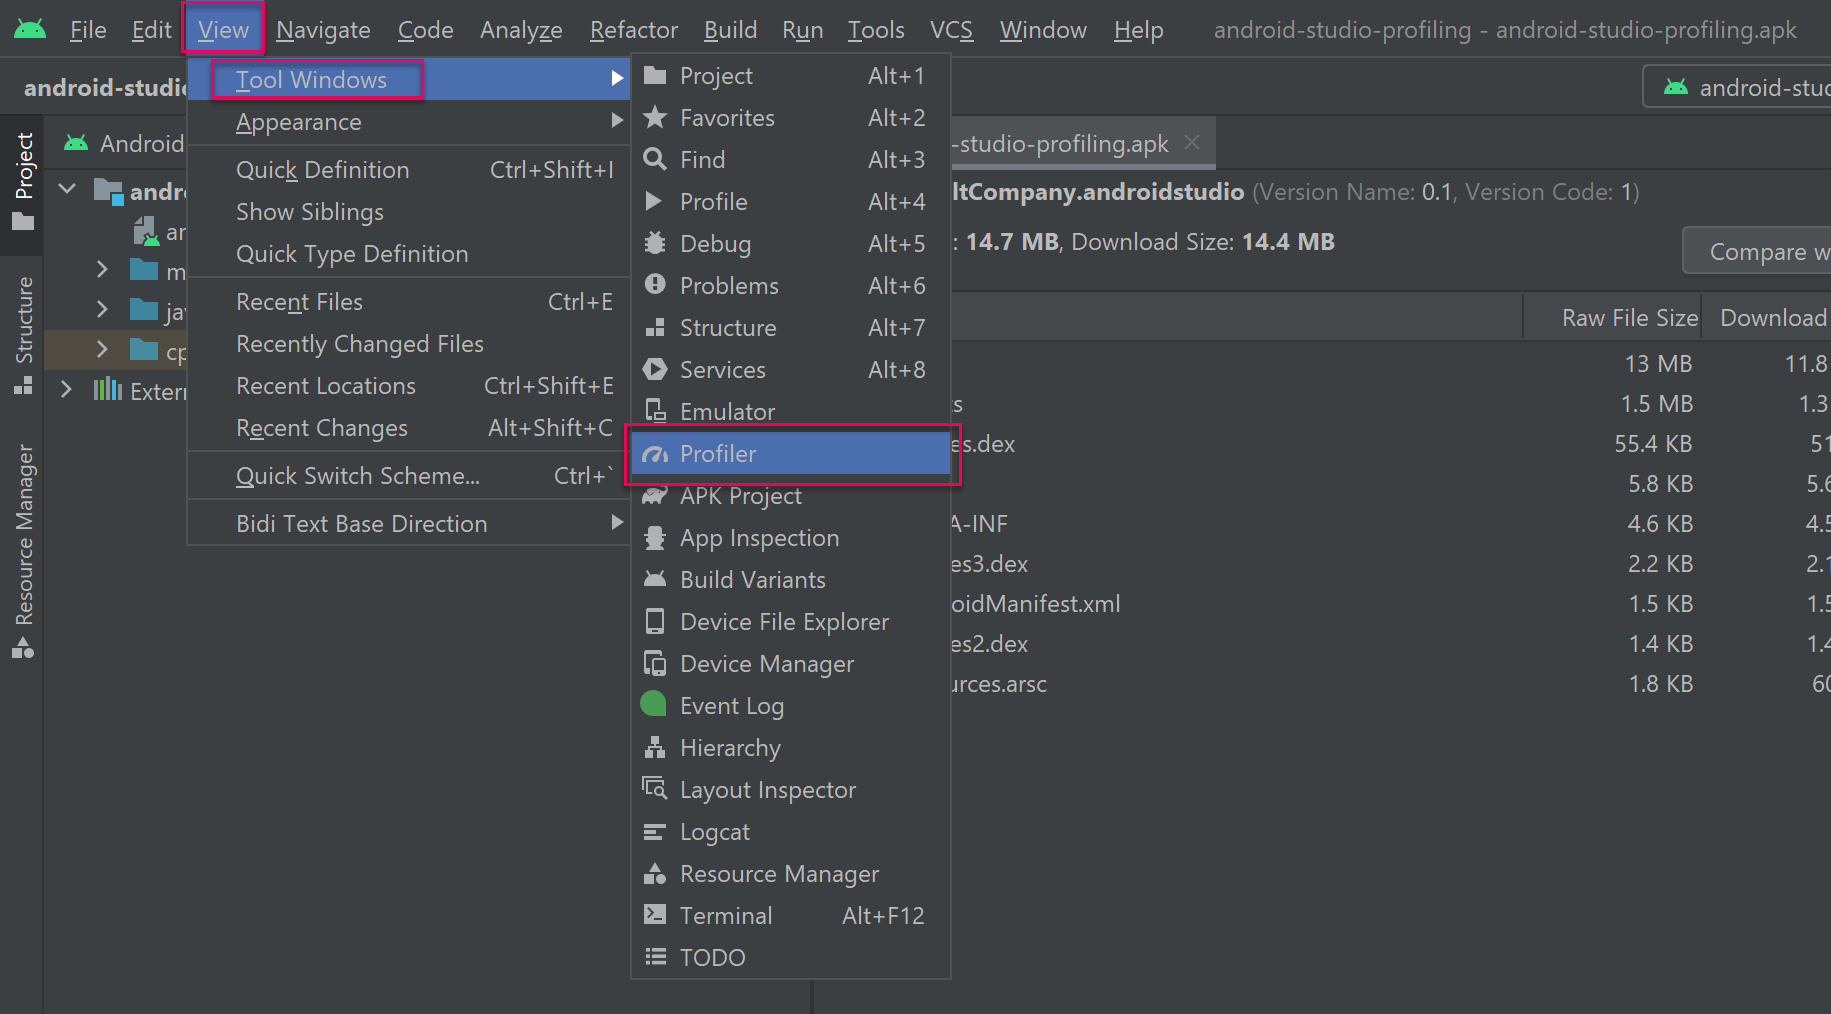
1. Select View > Tool Windows > Profiler to open Android Studio’s profiler window.
2. Connect your device to your computer and then run the application on your device.
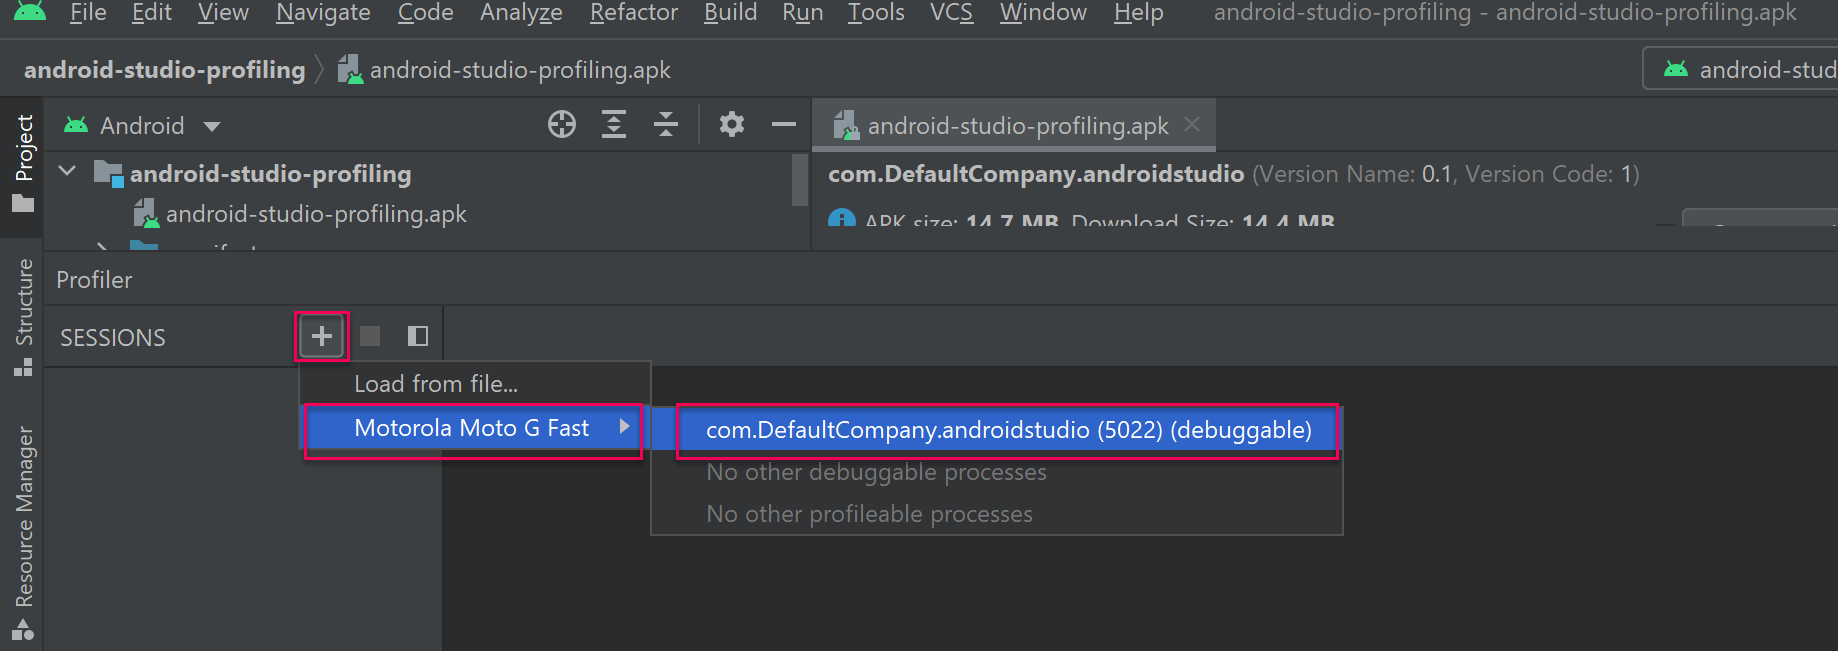
3. Ensure your device is unlocked. Select Add (+) on the left sidebar in Android Studio, select your connected device, followed by the bundle identifier of your running application.
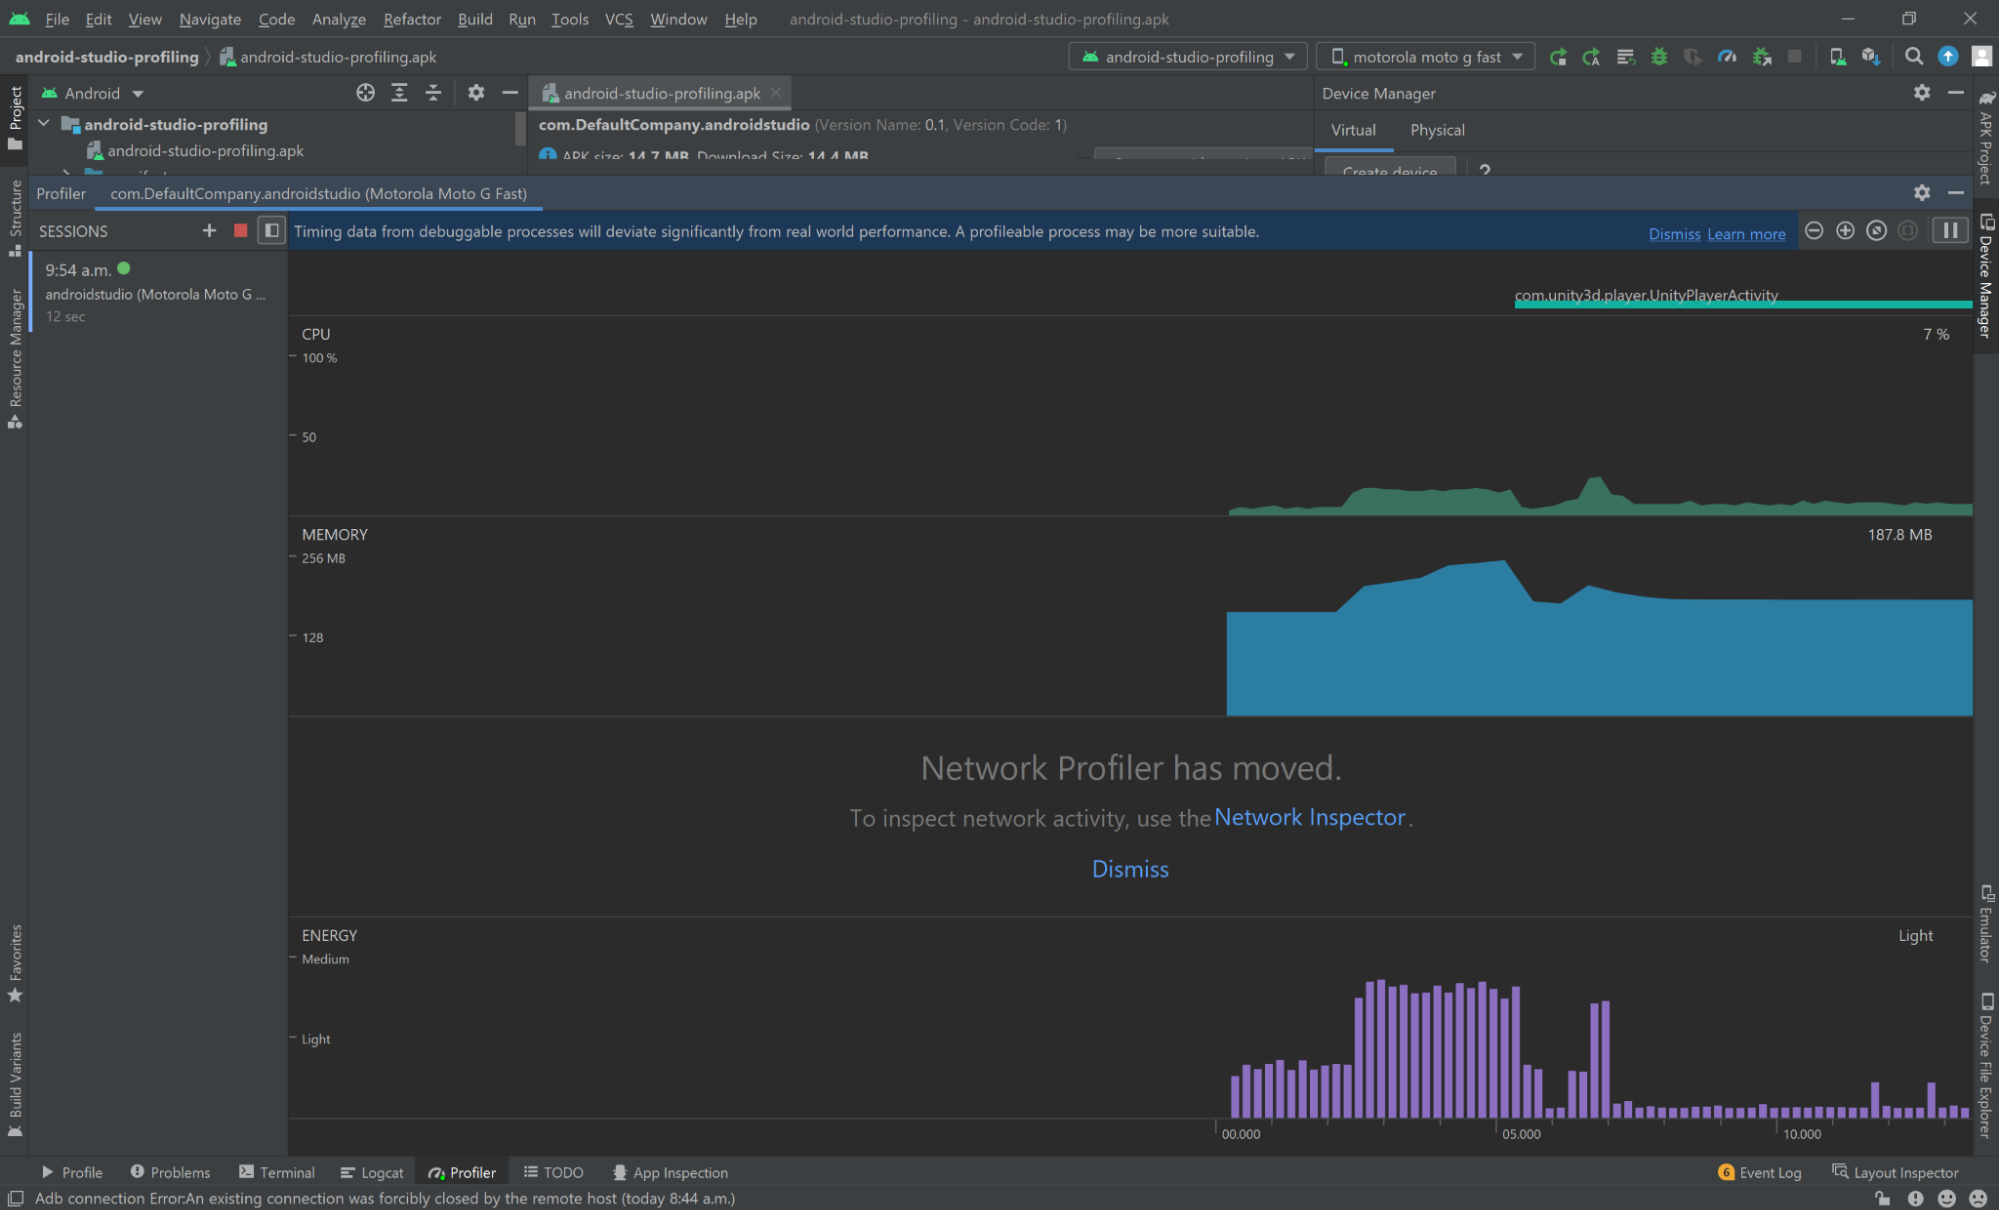
If you are properly connected to your running application, Android Studio will display the different profiling modules available to you and a graph representing an overview of data being streamed to Android Studio in realtime.
Profiling using the Profile button
Android Studio’s Profile button in the toolbar will install and launch your APK on a connected device. Android Studio will then automatically connect the profiler to the launched application. If your prebuilt APK has already been installed on the connected device, installation will be skipped.
To begin the profiling process, select Profile.
7. Capturing data
Android Studio offers two recording methods that are very helpful to determine CPU performance bottlenecks in Unity Android builds:
- Callstack Sample Recording: Uses sampling to capture call stacks being executed by your application’s java and native threads. This mode is especially useful when used to determine the cause of unoptimized user code that is not fully instrumented.
System Trace Recording: Uses instrumentation to capture the time spent in code that has been instrumented. When running a development build, Android Studio will show all the same markers that are visible in the Unity Profiler. Additionally, a system trace recording can also show which threads were run on a given CPU core at a given time. To learn more, consult Android Studio's Overview of system tracing.
To begin CPU profiling:
1. Select the CPU profiling module displaying the realtime CPU activity graph. You will then be presented with several recording methods.
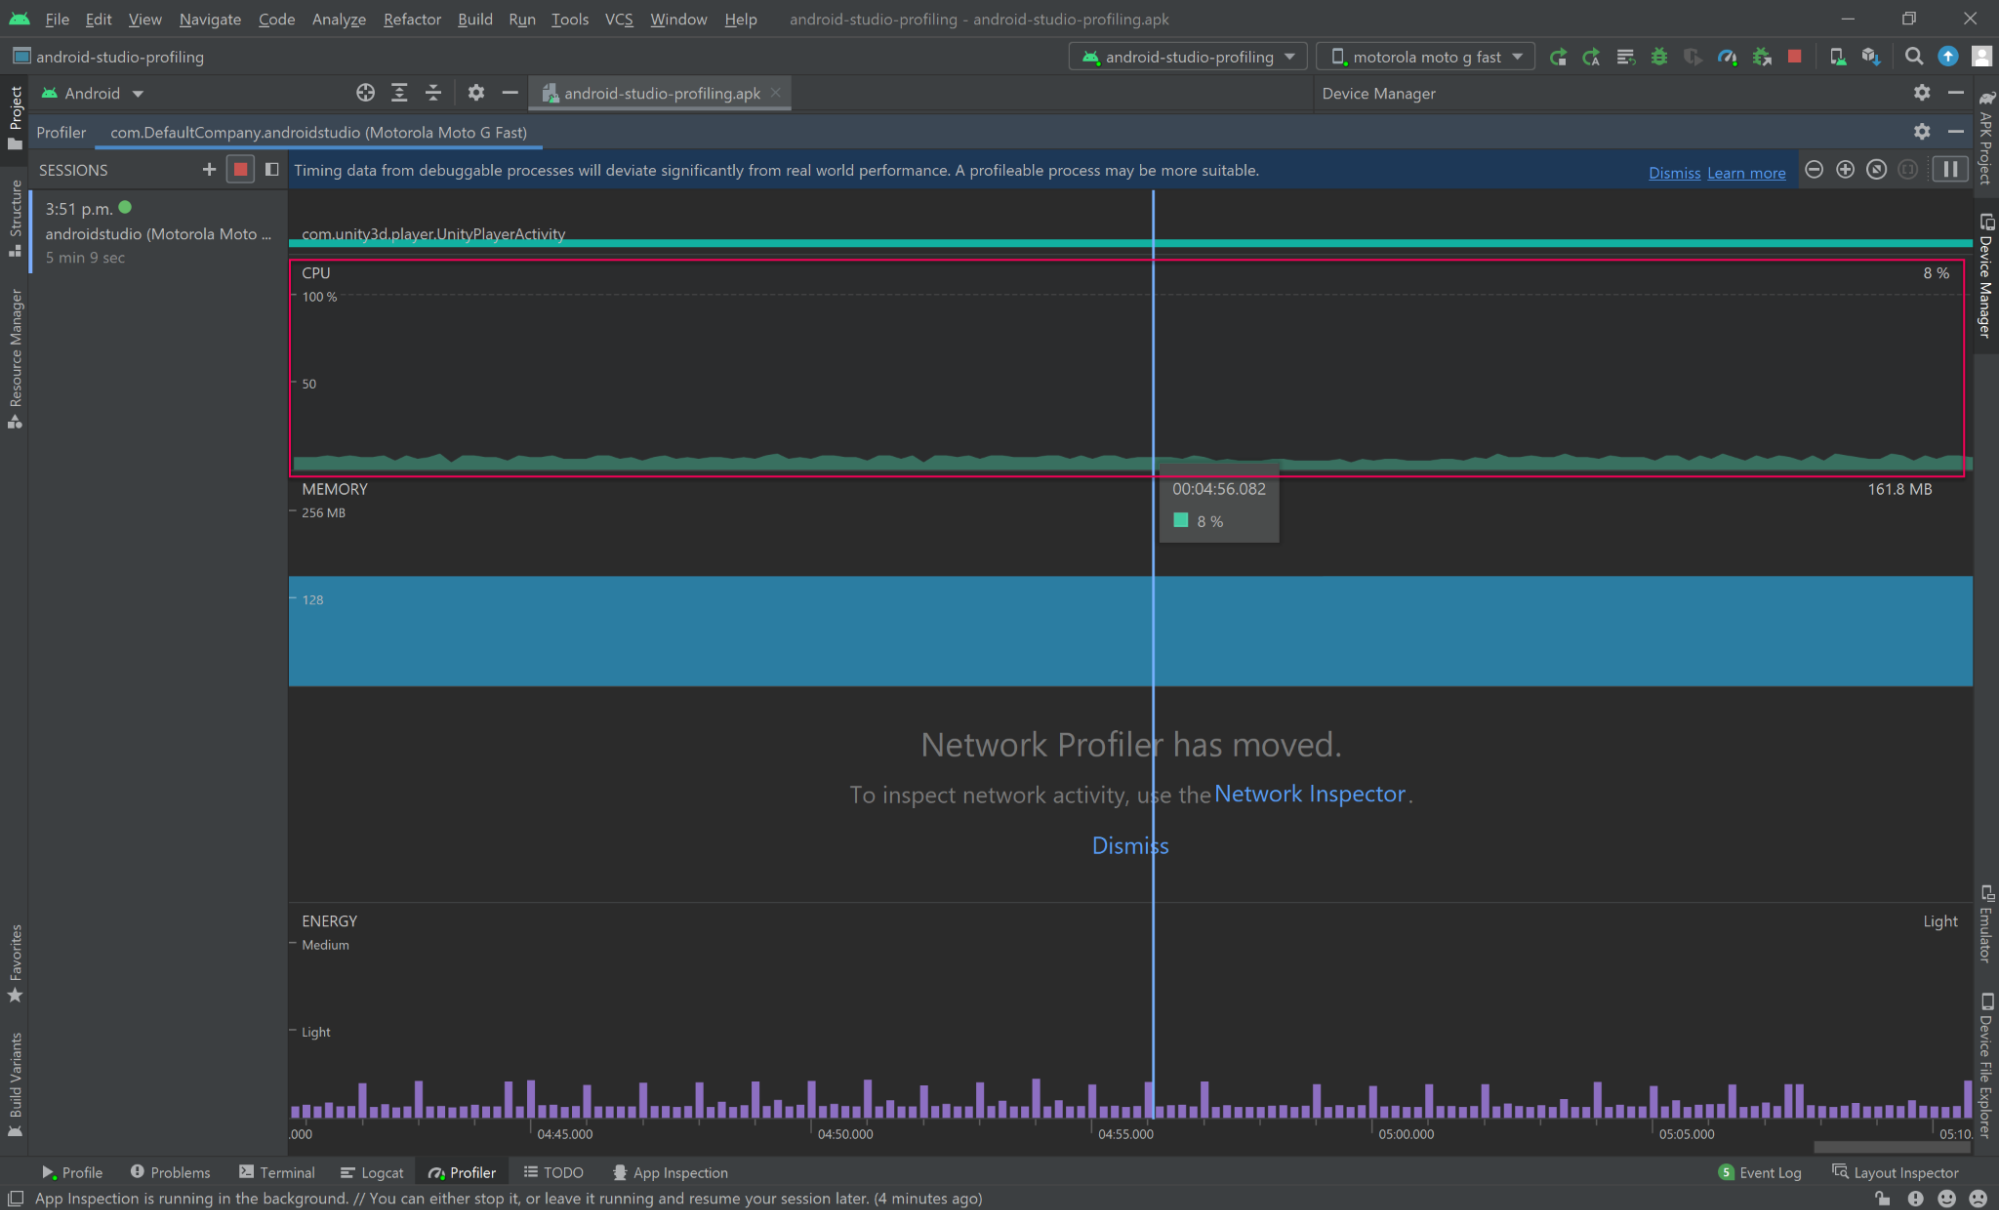
2. Select Callstack Sample Recording or System Trace Recording depending on the type of data you wish to analyze.
3. Select Record. When recording is in process, the CPU chart will begin to highlight the area being recorded.
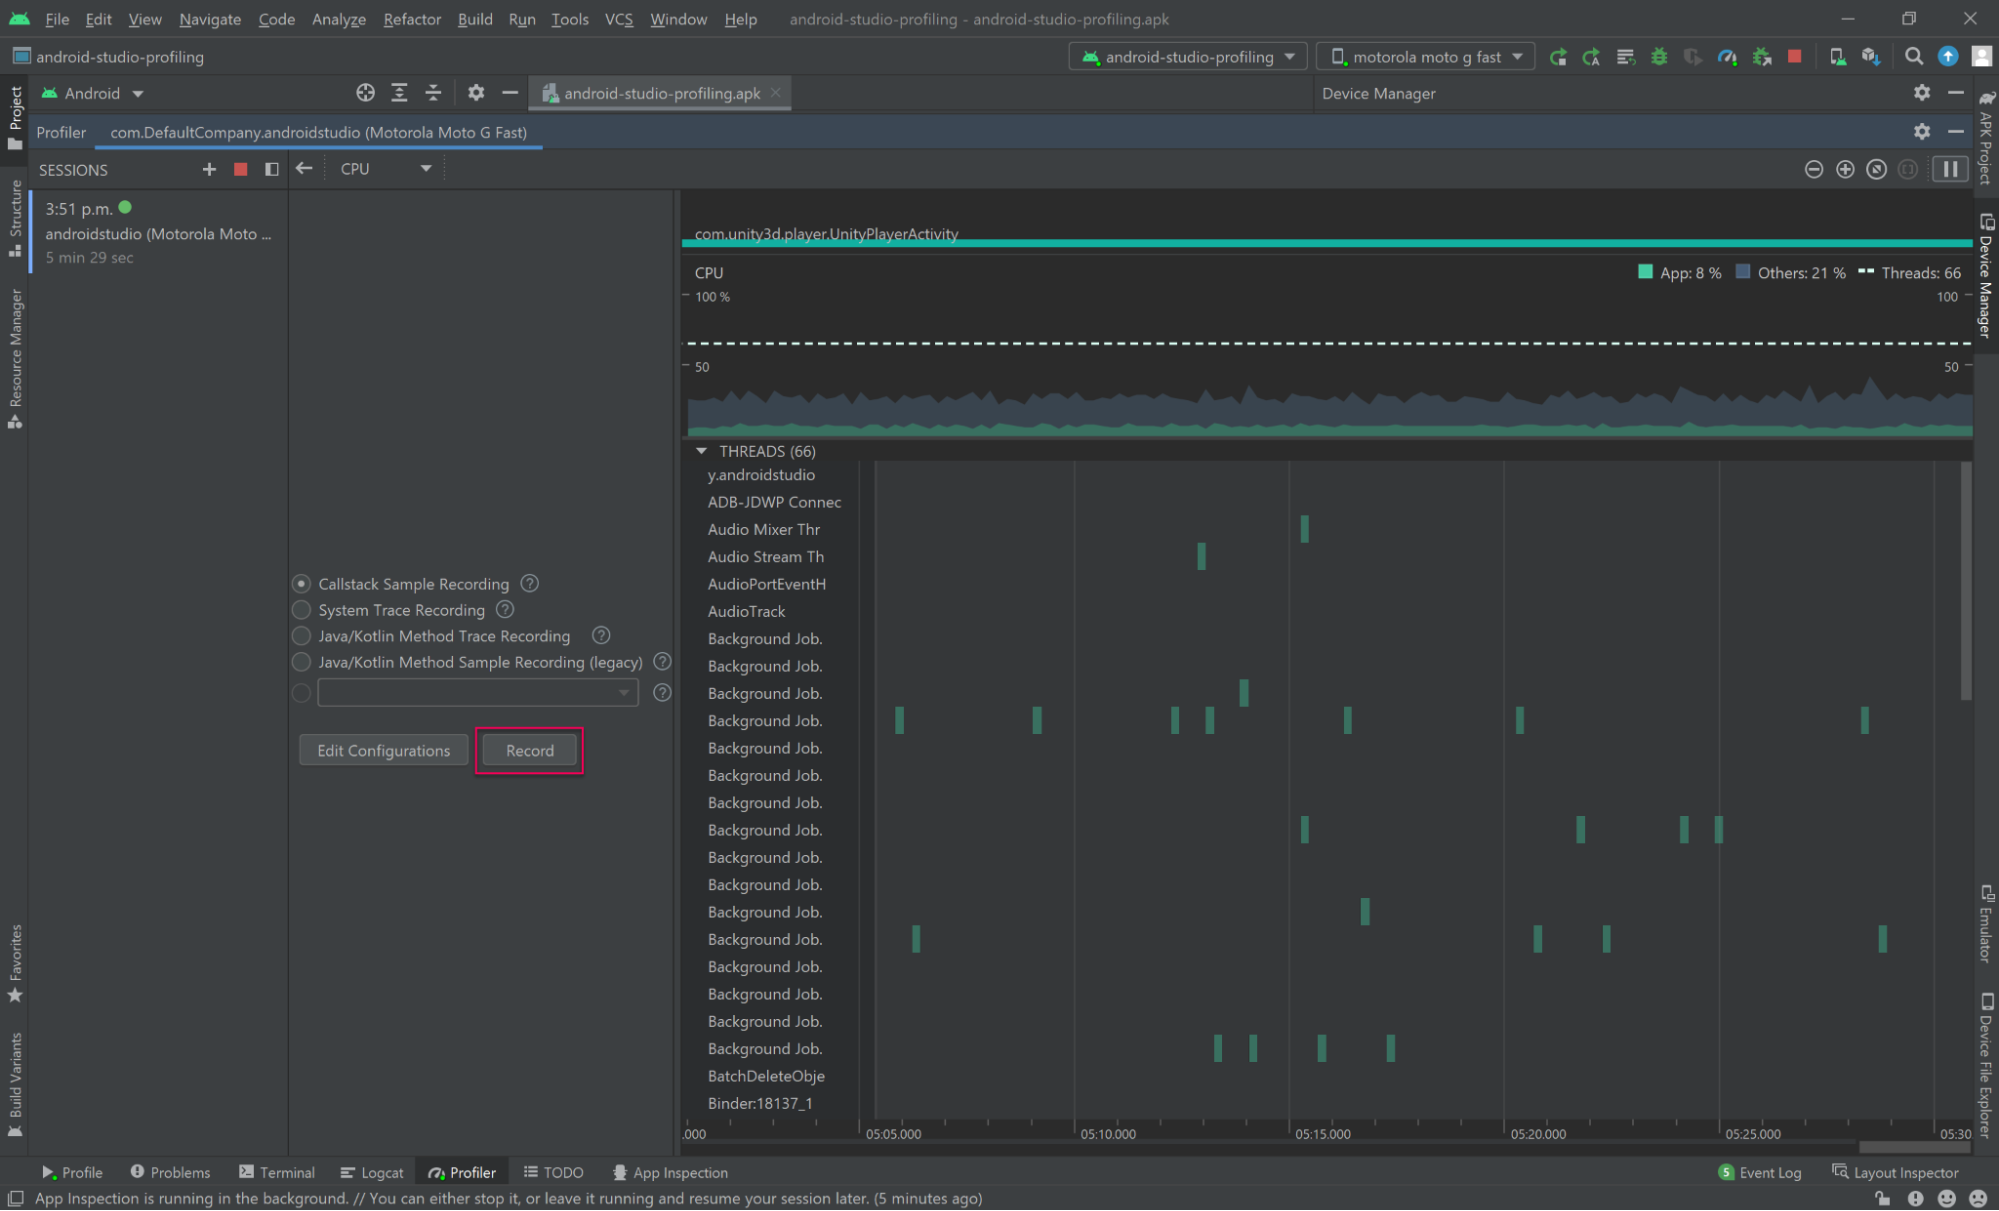
4. When sufficient data has been collected, select Stop.
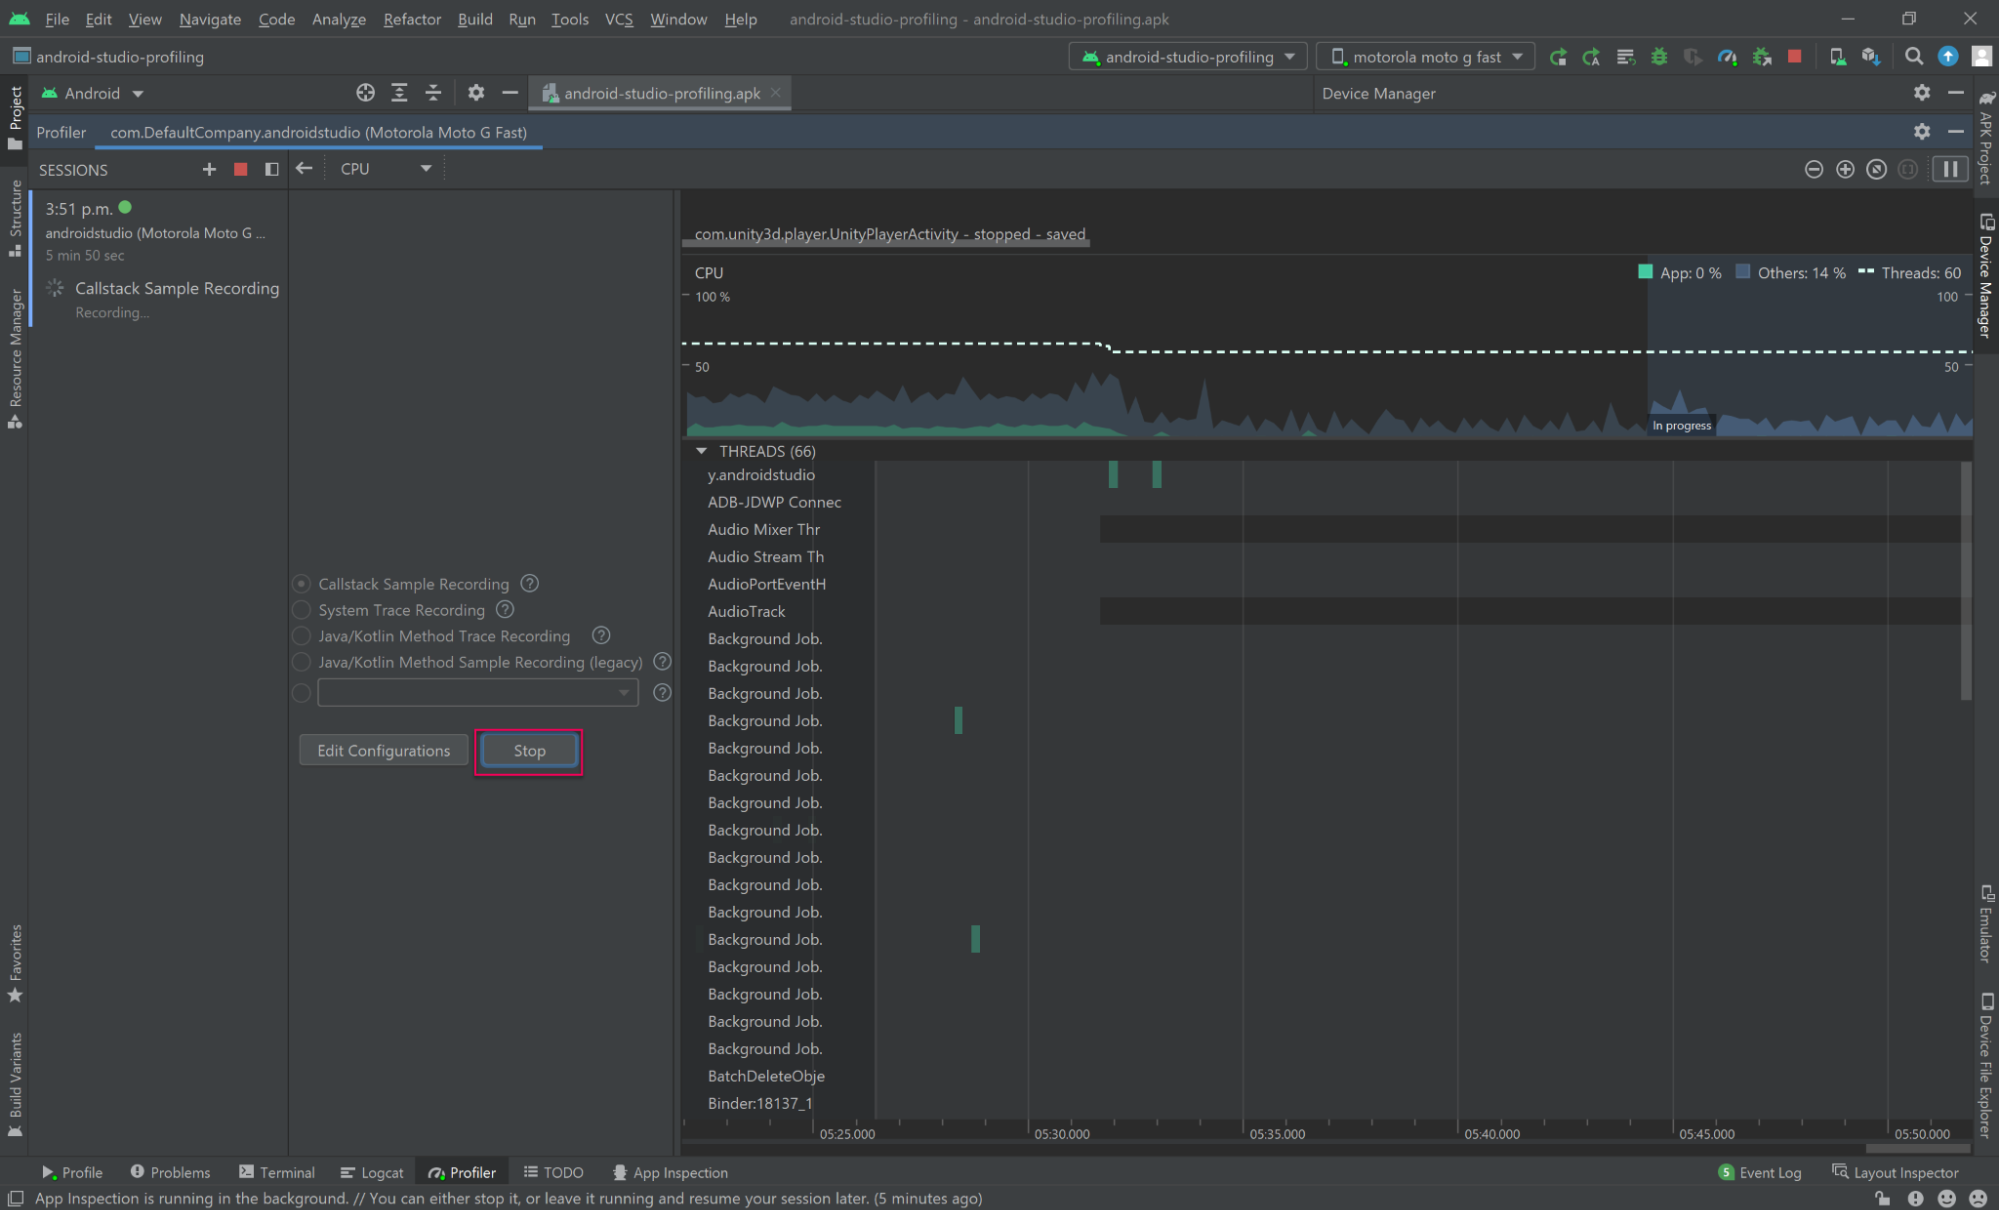
Note: When selecting Stop, Android Studio may seem to be idling as it is parsing your recording. The time spent parsing the recording is linearly proportional to the amount of data that was captured.
When a Callstack Sample Recording ends, you will be presented with this screen:
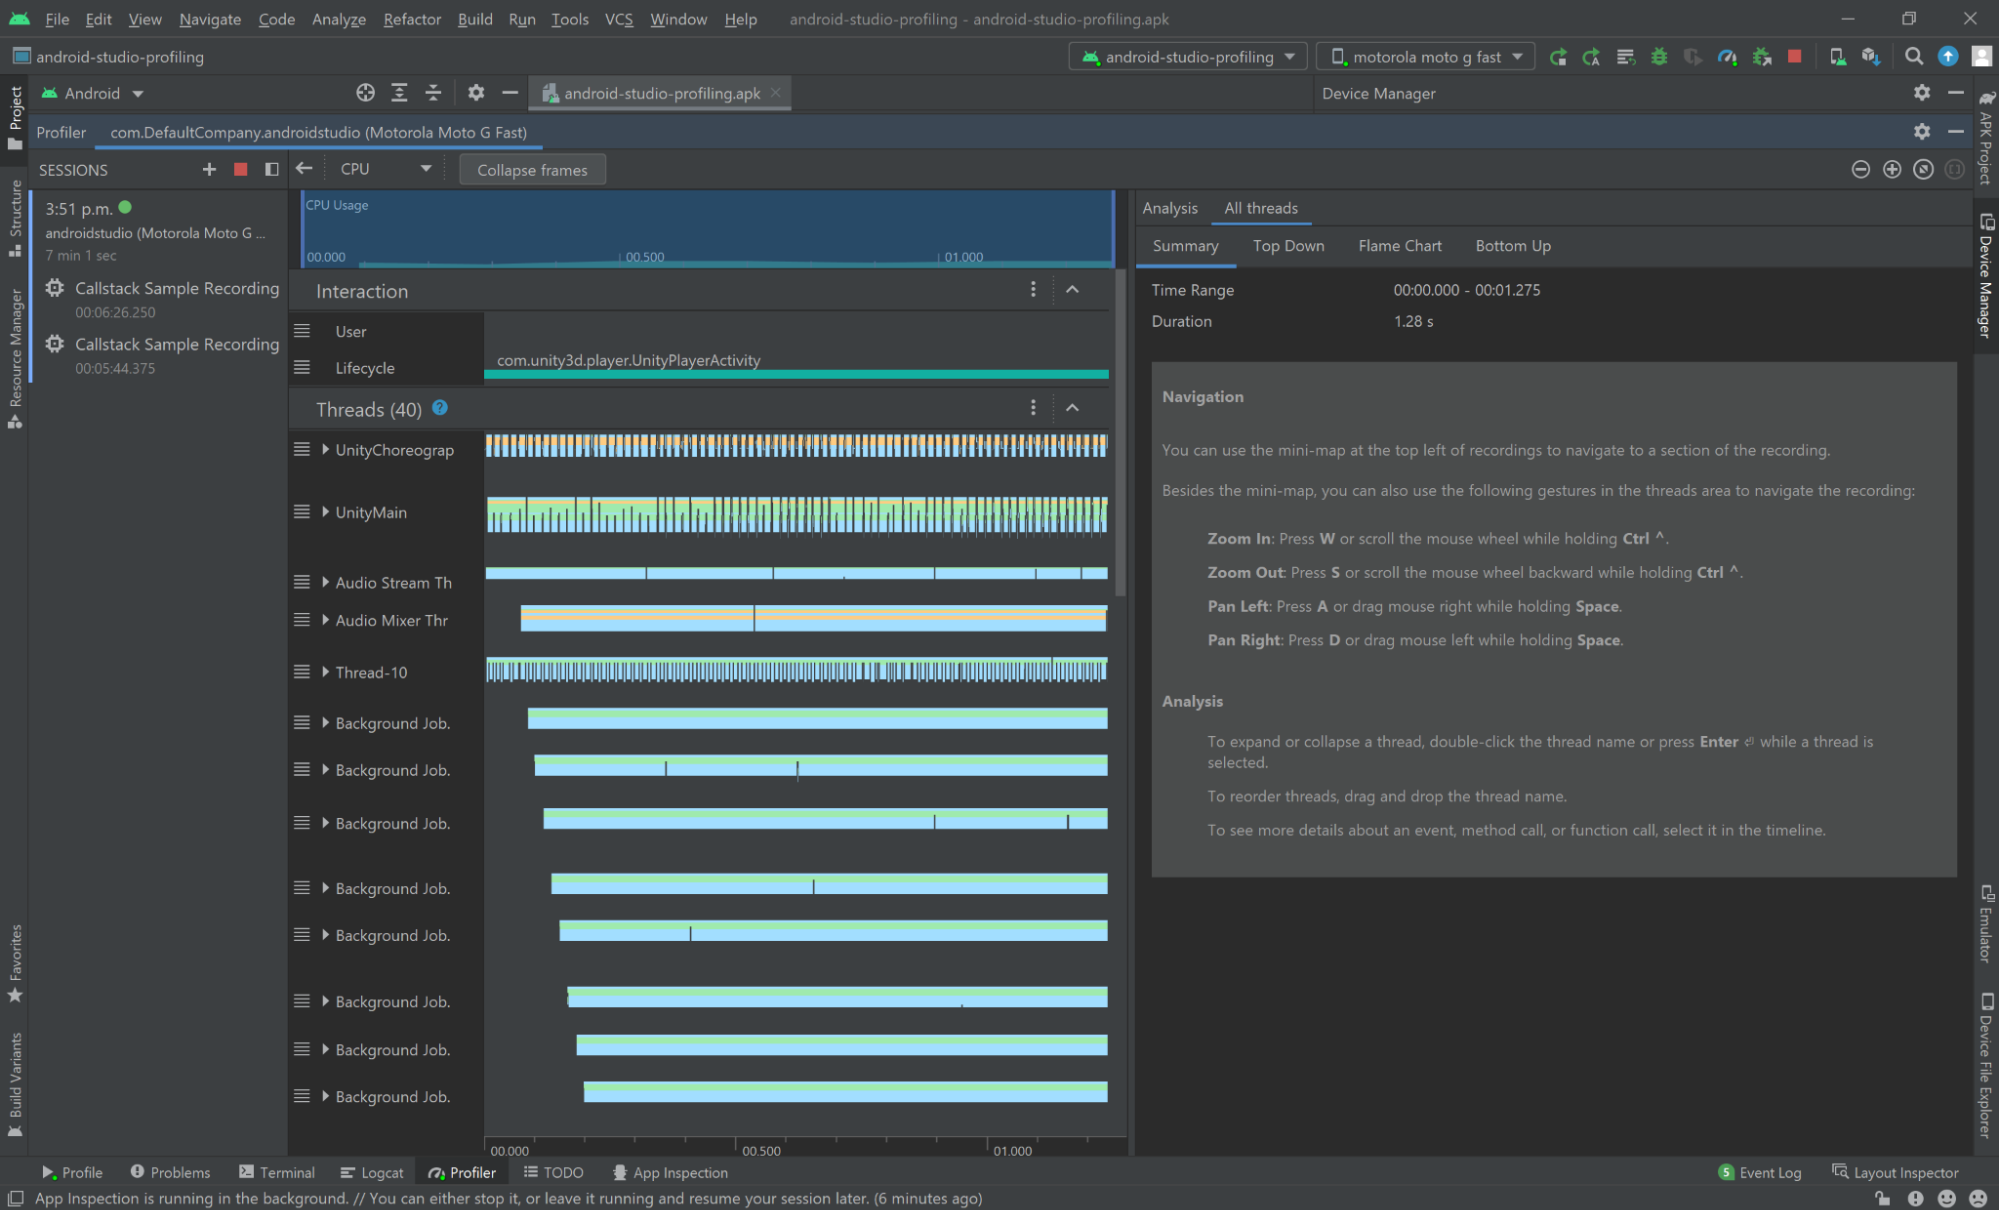
When a System Trace Recording ends, you will be presented with this screen:
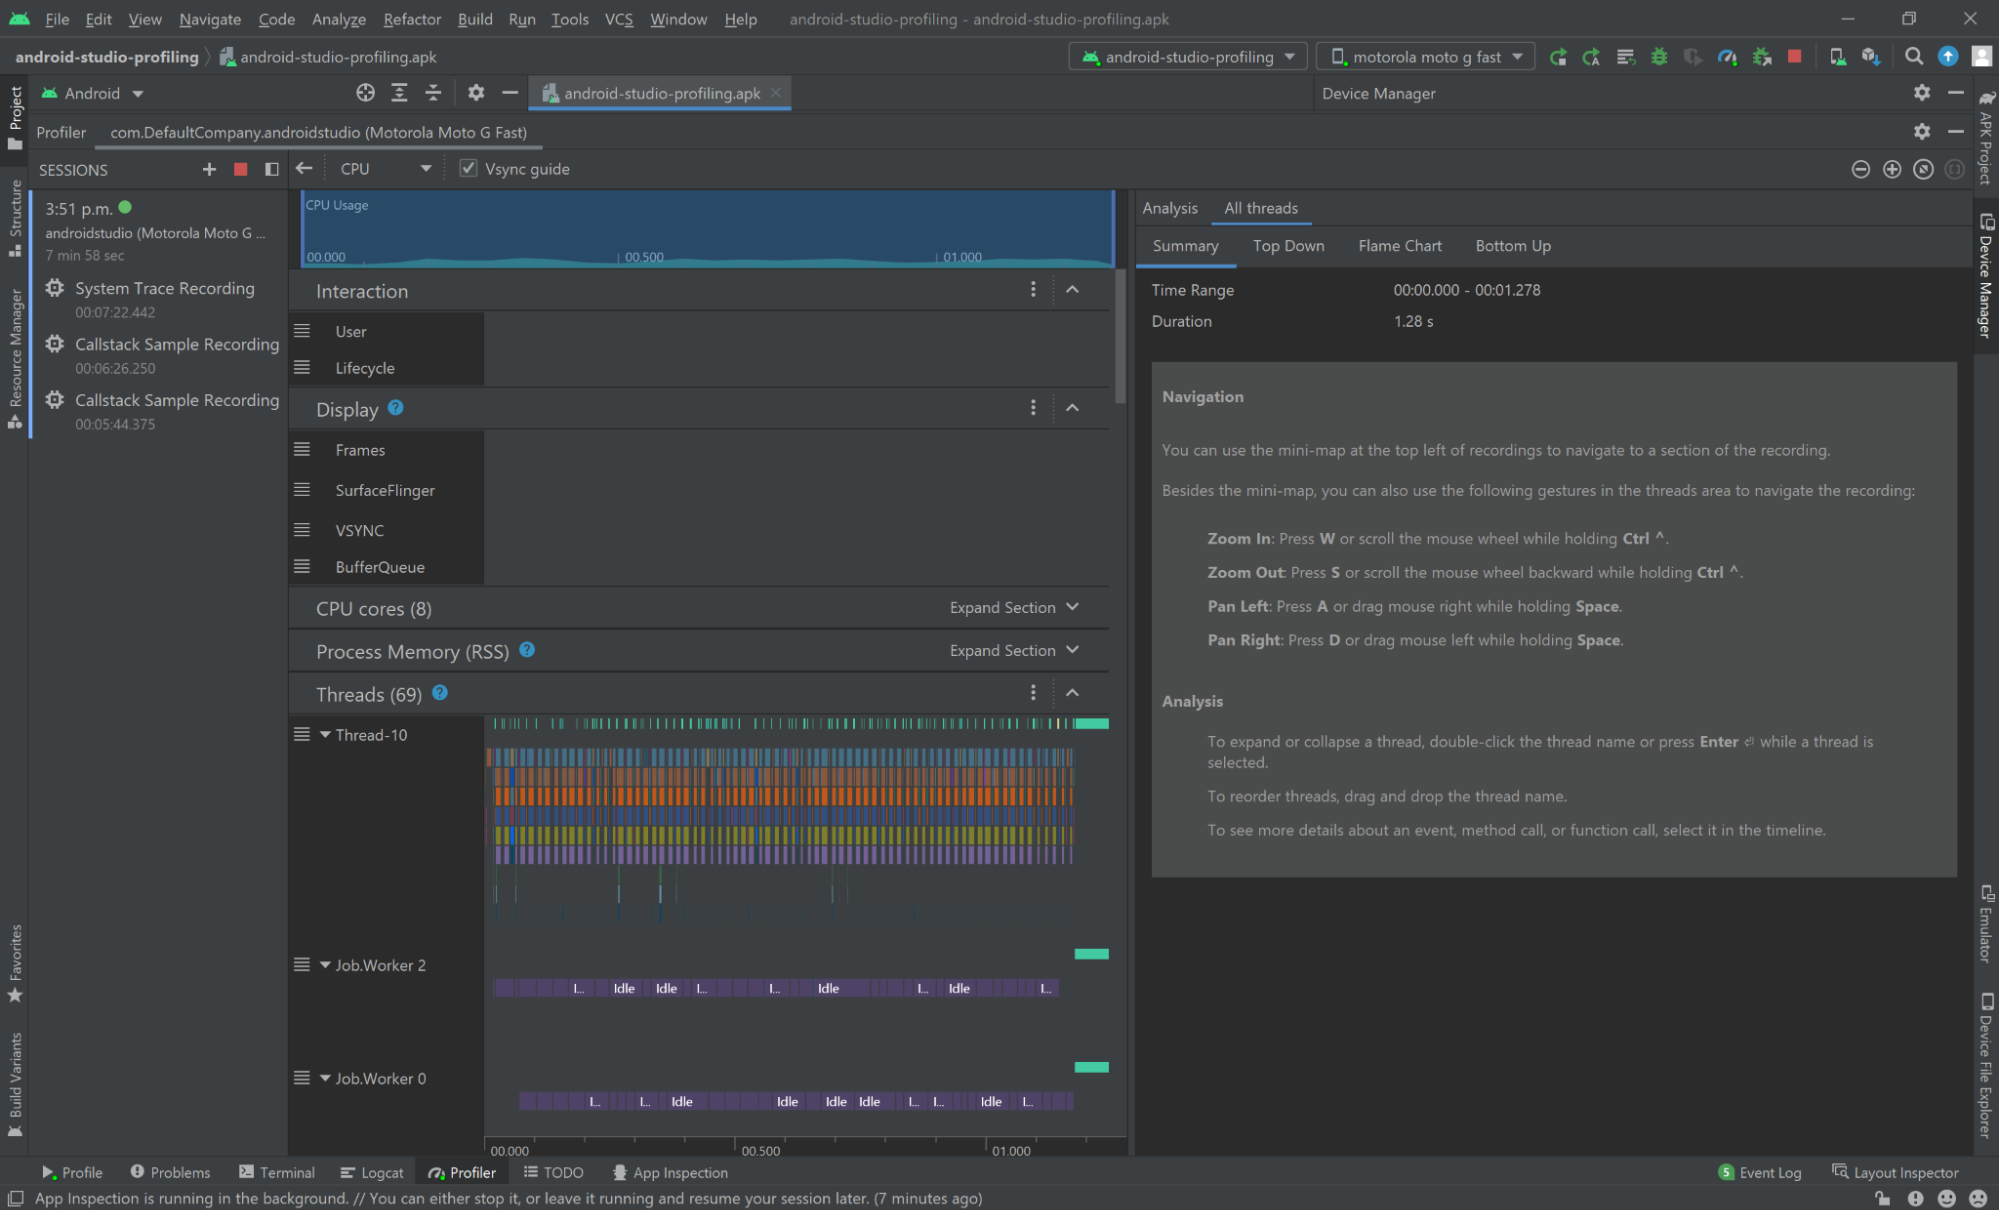
Refer to the Android Studio’s documentation on Record traces for more details around Android Studio’s tracing capabilities and a detailed explanation of Android Studio’s profiler UI.
Inspecting data
Android Studio’s documentation on Inspect traces has an in-depth explanation of the different views that can be used to inspect traces captured with the Android Studio’s CPU profiler.
8. Conclusion
In this tutorial you have learned how to prepare an Android build in Unity that can be used to record CPU usage data using Android Studio’s CPU profiler module. The two CPU recording modes covered, Callstack Sample Recording and System Trace Recording, allow you to capture different types of data that can help you find performance bottlenecks in your application.